Working with MDP Requests by Repeating Attribute Categories
WSO2 Identity Server supports working with Multiple Decision Profile (MDP) requests that are created by repeating attribute categories.
Let’s take a look at a sample scenario where you need to create a multiple decision request by repeating attribute categories .
Consider a sample scenario where a web application needs to verify the
actions that a user named Sam is allowed to perform
on a resource named index.jsp . Assume that the
following are the possible actions that are available:
-
view-welcome
-
view-status
-
view-summary
-
modify-welcome
Generally, the Policy Enforcement Point (PEP) would have to issue four different requests to the Policy Decision Point (PDP) to get the relevant decisions(i.e., one for each action). Here we are going to create a multiple decision request by combining the four requests into a single request, and then repeat the action category four times, so that each instance has the attribute value as a possible action.Upon receiving the request, the PDP isolates each of the repeated subject categories and considers them, in conjunction with the only resource category, one at a time and thus infers four different access control questions. The response from the PDP contains four individual decisions.
Reusing the attribute values in several access control questions, as above, efficiently minimizes the information transmitted across the network.
Prerequisites
- Download and run WSO2 Identity Server. For detailed instrction on how to install WSO2 Identity Server, see Installing the Product.
- Go to the Chrome Web Store and add the Postman app.
Procedure
Upload and publish the following sample policies to the XACML PDP in WSO2 Identity Server as enabled policies:
Follow the steps below to publish a sample policy to the PDP in WSO2 Identity Server:
- Access the WSO2 IS Management Console via
https://localhost:9443/carbon/, and sign in using
admin/adminas credentials. - Click the Main tab on the Management Console, go to Entitlement -> PAP and then click Policy Administration . The Policy Administration screen appears.
- Click Add New Entitlement Policy. This displays the available policy creation methods.
- Click Write Policy in XML. This allows you to write a XACML policy based on your requirement using the XML editor.
-
Add the sample policy and click Save Policy. This adds the sample policy to the Available Entitlement Policies list.
-
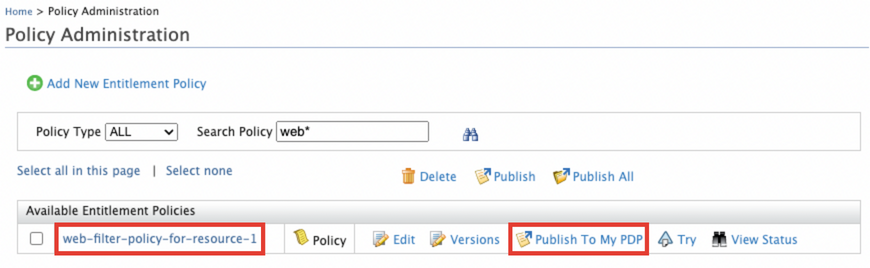
Click Publish to My PDP applicable to the sample policy that you added. This takes you to the Publish Policy screen.
- Click Publish. This displays a confirmation message asking whether you want to continue publishing to PDP.
- Click Yes. This publishes the policy to the PDP.
After you publish all the sample policies from the given location, you can send a sample request and see how the policies evaluate the request.
Testing the authorization flow
Send the following sample MDP request using the PEP TryIt tool in WSO2 Identity Server:
Tip
You can either use the PEP TryIt tool to invoke the PDP, or invoke the
getDecision method of the PDP API using SOAP UI.
<Request xmlns="urn:oasis:names:tc:xacml:3.0:core:schema:wd-17" CombinedDecision="false" ReturnPolicyIdList="false">
<Attributes Category="urn:oasis:names:tc:xacml:3.0:attribute-category:resource">
<Attribute AttributeId="urn:oasis:names:tc:xacml:1.0:resource:resource-id" IncludeInResult="false">
<AttributeValue DataType="http://www.w3.org/2001/XMLSchema#string">index.jsp</AttributeValue>
</Attribute>
</Attributes>
<Attributes Category="urn:oasis:names:tc:xacml:1.0:subject-category:access-subject">
<Attribute AttributeId="urn:oasis:names:tc:xacml:1.0:subject:subject-id" IncludeInResult="false">
<AttributeValue DataType="http://www.w3.org/2001/XMLSchema#string">Sam</AttributeValue>
</Attribute>
</Attributes>
<Attributes Category="urn:oasis:names:tc:xacml:3.0:attribute-category:action">
<Attribute AttributeId="urn:oasis:names:tc:xacml:1.0:action:action-id" IncludeInResult="true">
<AttributeValue DataType="http://www.w3.org/2001/XMLSchema#string">view-welcome</AttributeValue>
</Attribute>
</Attributes>
<Attributes Category="urn:oasis:names:tc:xacml:3.0:attribute-category:action">
<Attribute AttributeId="urn:oasis:names:tc:xacml:1.0:action:action-id" IncludeInResult="true">
<AttributeValue DataType="http://www.w3.org/2001/XMLSchema#string">view-summary</AttributeValue>
</Attribute>
</Attributes>
<Attributes Category="urn:oasis:names:tc:xacml:3.0:attribute-category:action">
<Attribute AttributeId="urn:oasis:names:tc:xacml:1.0:action:action-id" IncludeInResult="true">
<AttributeValue DataType="http://www.w3.org/2001/XMLSchema#string">view-status</AttributeValue>
</Attribute>
</Attributes>
<Attributes Category="urn:oasis:names:tc:xacml:3.0:attribute-category:action">
<Attribute AttributeId="urn:oasis:names:tc:xacml:1.0:action:action-id" IncludeInResult="true">
<AttributeValue DataType="http://www.w3.org/2001/XMLSchema#string">modify-welcome</AttributeValue>
</Attribute>
</Attributes>
<Attributes Category="urn:oasis:names:tc:xacml:3.0:attribute-category:action">
<Attribute AttributeId="urn:oasis:names:tc:xacml:1.0:action:action-id" IncludeInResult="true">
<AttributeValue DataType="http://www.w3.org/2001/XMLSchema#string">modify-summary</AttributeValue>
</Attribute>
</Attributes>
</Request>
Analyzing the response
You will see a response similar to the following:
<Response>
<Result>
<Decision>Permit</Decision>
<Status>
<StatusCode Value="urn:oasis:names:tc:xacml:1.0:status:ok"/>
</Status>
<Attributes Category="urn:oasis:names:tc:xacml:3.0:attribute-category:action">
<Attribute AttributeId="urn:oasis:names:tc:xacml:1.0:action:action-id" IncludeInResult="true">
<AttributeValue DataType="http://www.w3.org/2001/XMLSchema#string">view-welcome</AttributeValue>
</Attribute>
</Attributes>
</Result>
<Result>
<Decision>Deny</Decision>
<Status>
<StatusCode Value="urn:oasis:names:tc:xacml:1.0:status:ok"/>
</Status>
<Attributes Category="urn:oasis:names:tc:xacml:3.0:attribute-category:action">
<Attribute AttributeId="urn:oasis:names:tc:xacml:1.0:action:action-id" IncludeInResult="true">
<AttributeValue DataType="http://www.w3.org/2001/XMLSchema#string">modify-summary</AttributeValue>
</Attribute>
</Attributes>
</Result>
<Result>
<Decision>Permit</Decision>
<Status>
<StatusCode Value="urn:oasis:names:tc:xacml:1.0:status:ok"/>
</Status>
<Attributes Category="urn:oasis:names:tc:xacml:3.0:attribute-category:action">
<Attribute AttributeId="urn:oasis:names:tc:xacml:1.0:action:action-id" IncludeInResult="true">
<AttributeValue DataType="http://www.w3.org/2001/XMLSchema#string">view-summary</AttributeValue>
</Attribute>
</Attributes>
</Result>
<Result>
<Decision>Permit</Decision>
<Status>
<StatusCode Value="urn:oasis:names:tc:xacml:1.0:status:ok"/>
</Status>
<Attributes Category="urn:oasis:names:tc:xacml:3.0:attribute-category:action">
<Attribute AttributeId="urn:oasis:names:tc:xacml:1.0:action:action-id" IncludeInResult="true">
<AttributeValue DataType="http://www.w3.org/2001/XMLSchema#string">view-status</AttributeValue>
</Attribute>
</Attributes>
</Result>
<Result>
<Decision>Deny</Decision>
<Status>
<StatusCode Value="urn:oasis:names:tc:xacml:1.0:status:ok"/>
</Status>
<Attributes Category="urn:oasis:names:tc:xacml:3.0:attribute-category:action">
<Attribute AttributeId="urn:oasis:names:tc:xacml:1.0:action:action-id" IncludeInResult="true">
<AttributeValue DataType="http://www.w3.org/2001/XMLSchema#string">modify-welcome</AttributeValue>
</Attribute>
</Attributes>
</Result>
</Response>
You will see multiple decisions in the XACML response, and can distinguish each decision using the attribute value that is returned.
Top