Enable Single Sign-On for a SAML Web Application
This page guides you through configuring single sign-on authentication between two SAML web applications. This is demonstrated using two sample applications called Pickup Dispatch and Pickup Manager.
Scenario
Pickup is a cab company that has two SAML web applications called pickup-dispatch and pickup-manager. Both applications use WSO2 Identity Server (IS) as the identity provider. When SSO is configured for both these applications, an employee is only required to provide their credentials to the first application and the user will be automatically logged in to the second application.
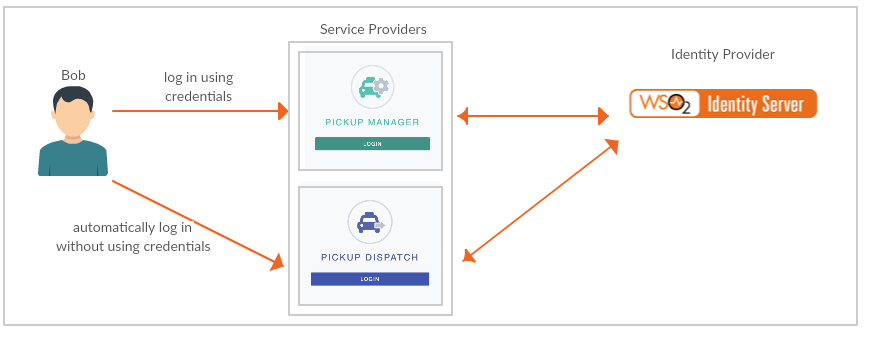
Follow the steps below to deploy two sample applications and see how this works.
Register the service providers
You need to register the two sample applications as service providers in WSO2 Identity Server.
Pickup Dipatch
-
Log in to the Management Console (
https://<IS_HOST>:<PORT>/carbon) using admin/admin credentials. -
Navigate to Main > Identity > Service Providers and click Add.
-
Enter
saml2-web-app-pickup-dispatchin the Service Provider Name text box, and click Register. -
In the Inbound Authentication Configuration section, click Configure under the SAML2 Web SSO Configuration section.
-
Now set the configuration as follows:
- Issuer:
saml2-web-app-pickup-dispatch.com - Assertion Consumer URL:
http://localhost.com:8080/saml2-web-app-pickup-dispatch.com/home.jsp
Click Yes, in the message that appears.
- Issuer:
-
Select the following checkboxes:
- Enable Response Signing
- Enable Single Logout
- Enable Attribute Profile
- Include Attributes in the Response Always
- Enable Signature Validation in Authentication Requests and Logout Requests
Tip
For more information on the advanced configurations, see Advanced SAML Configurations.
-
-
Click Register to save the changes.
Pickup Manager
-
Access the WSO2 Identity Server Management Console (
https://<IS_HOST>:<PORT>/carbon). -
Navigate to Main > Identity > Service Providers and click Add.
-
Enter
saml2-web-app-pickup-managerin the Service Provider Name text box, and click Register. -
In the Inbound Authentication Configuration section, click Configure under the SAML2 Web SSO Configuration section.
-
Now, set the configuration as follows:
-
Issuer :
saml2-web-app-pickup-manager.com -
Assertion Consumer URL :
http://localhost.com:8080/saml2-web-app-pickup-manager.com/home.jspClick Yes, in the message that appears.
-
-
Select the following check-boxes:
- Enable Response Signing
- Enable Single Logout
- Enable Attribute Profile
- Include Attributes in the Response Always
- Enable Signature Validation in Authentication Requests and Logout Requests
Tip
For more information on the advanced configurations refer, Advanced SAML Configurations.
-
-
Click Register to save the changes.
(Optional) Configure claims
Additionally, you can also configure claims for the service providers.
-
On the Main menu of the management console, click Service Providers>List, and Edit the "pickup-dispatch" service provider.
-
Expand the Claim Configuration section in the service provider form.
-
You can select the claims that must be sent to the service provider. Select Use Local Claim Dialect and click Add Claim URI.
-
Add the following claims as Requested Claims.
- http://wso2.org/claims/fullname
- http://wso2.org/claims/emailaddress
-
Select
http://wso2.org/claims/fullnameas the Subject claim URI and click Update to save the service provider configurations.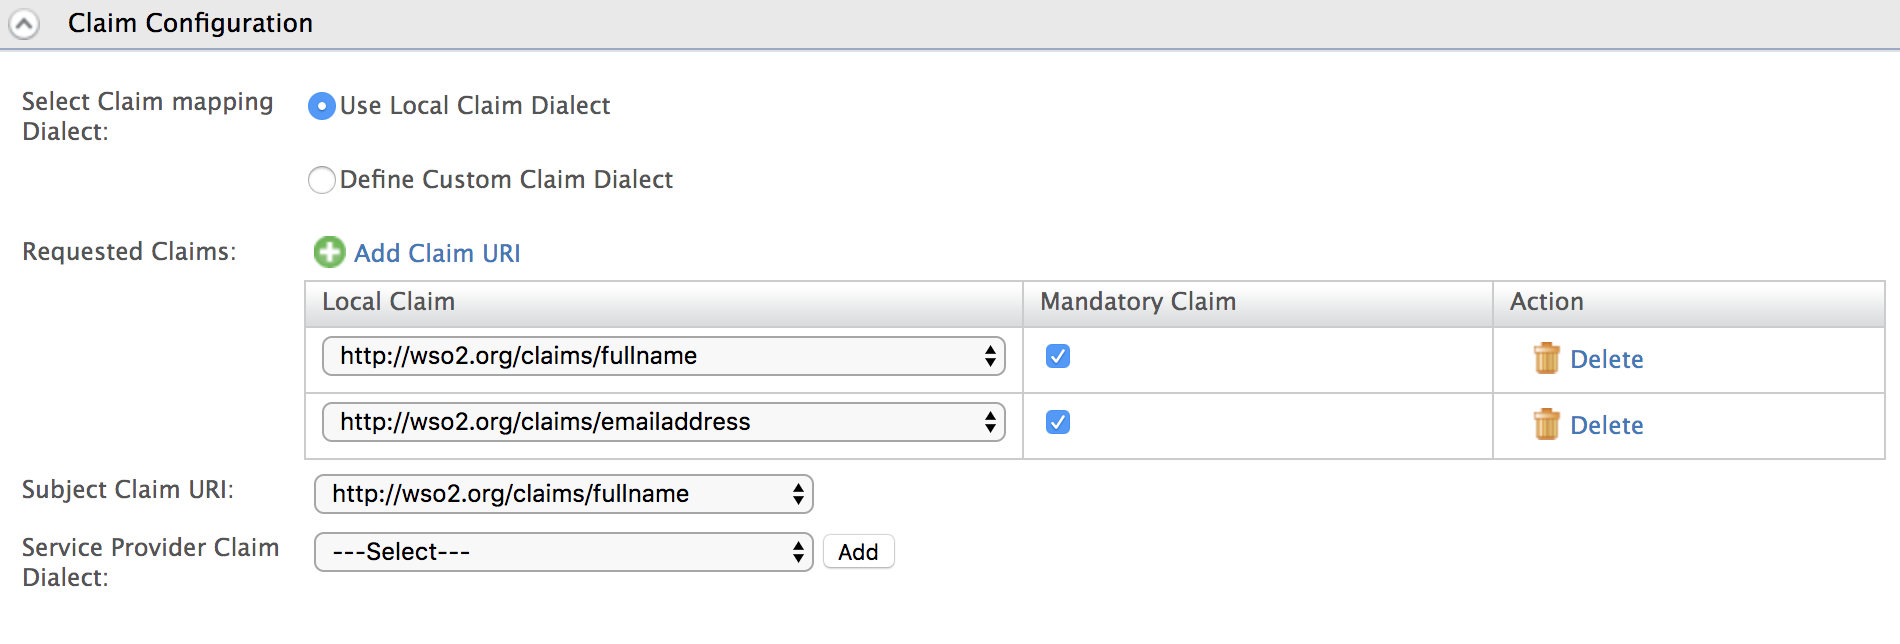
-
Now, logout of the Pickup Dispatch and Pickup Manager applications.
-
Access
http://wso2is.local:8080/saml2-web-app-pickup-dispatch.comon your browser and click Login. -
Note that the user is now prompted for consent to share the Email Address claim value with the sample application.
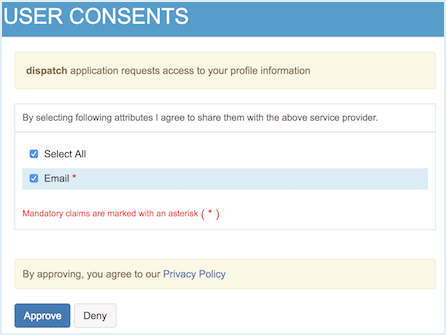
Now you have successfully configured additional claims for your service provider.
Deploy the samples
-
Download Apache Tomcat 8.x from here and install. Tomcat server installation location will be referred as
<TOMCAT_HOME>later in this guide.Info
It is recommended that you use a hostname that is not
localhostto avoid browser errors. Modify the/etc/hostsentry in your machine to reflect this. Note thatwso2is.localis used in this documentation as an example, but you must modify this when configuring the authenticators or connectors with this sample application. -
Download the following samples:
-
Copy the downloaded
saml2-web-app-pickup-dispatch.com.warandsaml2-web-app-pickup-manager.com.warfiles into the<TOMCAT_HOME>/apache-tomcat-<version>/webappsfolder. -
Start the Tomcat server.
You are now ready to try out SAML SSO with the Pickup Dispatch and Pickup Manager sample web applications.
Configure CORS
SAML2 POST Binding requires CORS configurations to be set up.
Before configuring the service provider, add the following configurations to the deployment.toml file found in <IS_HOME>/repository/conf/. Adding this configuration allows HTTP POST requests.
``` toml
[cors]
allow_generic_http_requests = true
allow_any_origin = false
allowed_origins = [
    "http://localhost:8080"
]
allow_subdomains = false
supported_methods = [
    "GET",
    "POST",
    "HEAD",
    "OPTIONS"
]
support_any_header = true
supported_headers = []
exposed_headers = []
supports_credentials = true
max_age = 3600
tag_requests = false
```
Try it
-
Navigate to
http://wso2is.local:8080/saml2-web-app-pickup-dispatch.comon your browser and click Login.
-
You will be redirected to the login page of WSO2 IS. Log in using your WSO2 IS credentials (admin/admin). Provide the required consent. You will be redirected to the Pickup Dispatch application home page.
-
Now, if you navigate to
http://wso2is.local:8080/saml2-web-app-pickup-manager.comand click Login, you can see that the user has been automatically logged in to this application without being prompted for user credentials.
You have successfully configured SAML single sign-on for two web applications using WSO2 IS as the identity provider.
Related topics