Configuring Claims for an Identity Provider
When you add an identity provider to the Identity Server, the claims of the Identity Server are different from those of the identity provider you connect.
Therefore claim mapping is done so that the Identity Server can identify the user attributes in the response sent from the identity provider.
For example, Facebook IdP will return authenticated user email as email, and the identity server will map it to the http://wso2.org/claims/emailaddress using the IdP claim mapping.
See the Identity Server Architecture topic for more information on how claim mapping fits into the identity provider scenario.
In the Claim Configuration form, there are two sub-forms as follows:
-
Basic claim configuration: This involves a straightforward mapping of the claim that is used on the identity provider side with the local claims of the Identity Server.
-
Advanced claim configuration: This involves more advanced mapping, where the mapped claims can have specific default values.
Configuring basic claims
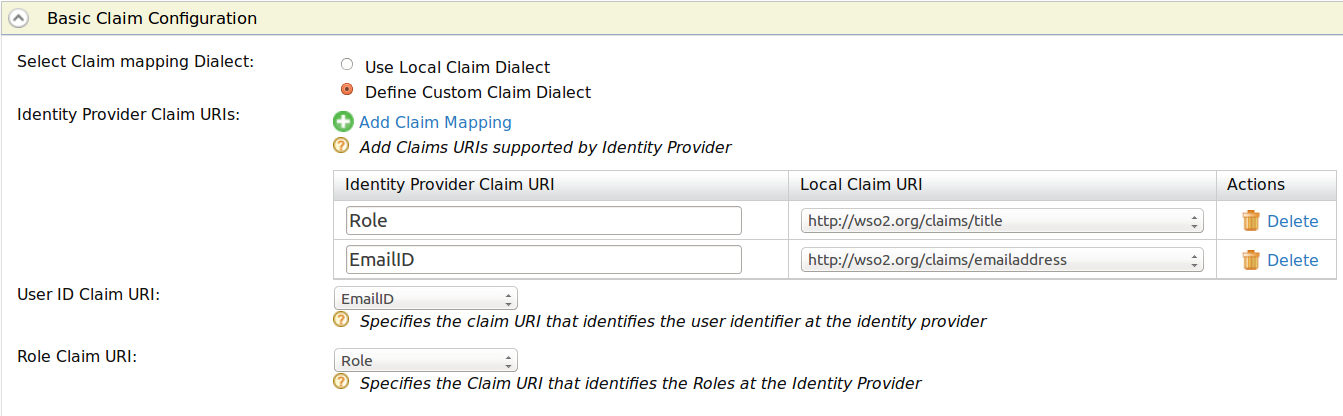
Select the claim mapping dialect by Choosing to use a local claim dialect (i.e., a claim dialect local to the Identity Server). Define your custom claim dialect (i.e., a claim dialect in the identity provider that must be mapped to the Identity Server).
Basic claim configurations can be done by using local claims and defining custom claims on WSO2 Identity Server.
To use local claim dialects:
- On WSO2 Identity Server Management Console, go to Main > Identity > Identity Providers section.
- Click List, select the identity provider you want to edit, and click on the corresponding Edit link.
- Expand the Claim Configurations > Basic Claim Configurations section
- Select Use Local Claim Dialect, and select the claim that includes a list of all the claims defined in the Identity Server from the User ID Claim URI dropdown.

To define custom claim dialects:
Before you begin
To define a custom claim dialect, the configuration given below is required in the
<IS_HOME>/repository/conf/deployment.toml file of your WSO2 Identity Server. Otherwise the protocol-specific claim
dialect such as the OIDC dialect is always used.
[authentication.endpoint]
enable_custom_claim_mappings = true- On WSO2 Identity Server Management Console, go to Main > Identity > Identity Providers section.
- Click List, select the identity provider you want to edit, and click on the corresponding Edit link.
- Expand the Claim Configurations > Basic Claim Configurations section.
- Select Define Custom Claim Dialect and click Add Claim Mapping button under Identity Provider Claim URIs. Clicking this button again enables you to perform more claim mapping.
-
Map the value of the corresponding claim in the identity provider to the claim in the Identity Server.

Property Description Sample Value Identity Provider Claim URI Claim identifier used in the Identity Provider side emailIDLocal Claim URI Claim identifier used in the WSO2 Identity Server http://wso2.org/claims/emailaddress -
Select the User ID Claim URI from the dropdown that includes the list of identity provider claims you defined. This is used to uniquely identify the user in the response sent by the identity provider and identify the user in provisioning requests.
-
Select the Role ID Claim URI from the dropdown that includes the list of identity provider claims you defined. This is used to uniquely identify the user's role in the response sent by the identity provider and the role in provisioning requests.
Custom claim dialects for OIDC identity providers
After configuring custom claim dialects for OIDC identity providers, add the following configuration to the deployment.toml file in the <IS_HOME>/repository/conf directory to enable custom claim mappings.
[authentication.endpoint]
enable_custom_claim_mappings = true
Configuring advanced claims
The advanced claim configurations are made based on the basic claim configurations done in the above steps.
When to use Advanced Claims?
This section encompasses two scenarios where provisioning happens. For both these scenarios, advanced claims are beneficial.
Scenario 1
Entities associated with the scenario:
- Google Apps as the Identity Provider. This IdP is connected with a Google provisioning connector to provision the user.
- Administrator
The scenario:
- The administrator adds a user to the management console.
- The new user is provisioned to Google Apps (as it is the IdP).
When configuring claims for the above scenario, you have to keep the following facts in mind: - The user may have multiple local claims. - Google Apps may require only some of these claims to be provisioned.
In this scenario, the administrators can use Provisioning Claim Filter to filter out the claims that need to be provisioned.
Scenario 2
Entities associated with the scenario:
- SalesForce as the Service Provider. The SP has JIT provisioning configured.
- Facebook as the Identity Provider.
The scenario:
What happens here is that the authentication request is sent from Salesforce to the Identity Server, which sends it along to Facebook for authentication. Once authentication is done, the response is sent back to the Identity Server when JIT provisioning happens. So basically, JIT provisioning occurs in the middle of an authentication flow.
If the same user store is configured in the Google Apps identity provider configuration and JIT provisioning is enabled, the user is also provisioned there. Once again, the Provisioning Claim Filter is vital to map only the required claims for the specific identity provider.
In both these scenarios, only some specific user attributes must be configured for provisioning as the claims are different for both Facebook and Google Apps and must be mapped to the claims in the Identity Server.
Provisioning modes
Provisioning can happen in the following two modes:
-
Blocking mode: The authentication flow will be blocked until the provisioning finishes.
-
Non-blocking mode: Provisioning happens in a different thread.
This provisioning mode can be specified when configuring the service provider.
To configure advanced claim configurations:
- On WSO2 Identity Server Management Console, go to Main > Identity > Identity Providers section.
- Click List, select the identity provider you want to edit, and click on the corresponding Edit link.
-
Expand the Claim Configurations > Advanced Claim Configurations section.
-
To configure advanced claims, if you have chosen Use Local Claim Dialect as the basic claim configuration method:
- From the Provisioning Claim Filter dropdown, select the claim that needs to be provisioned, and click Add Claim.
-
Enter the Default Value of the claim in the corresponding field.

For example, the Claim URI can be
http://wso2.org/claims/organization, and the corresponding Default Value can bedocsorg, which is the organization that all the users belong to.
-
To configure advanced claims if you have chosen Define Custom Claim Dialect as the basic claim configuration method:
-
Select the Identity Provider Claim URI you defined from the dropdown list, and click Add Claim.
-
Enter a Default Value for your claim. This value is the default value used when provisioning this claim.

-
Note
You can use the Add Claim link to add many claims.
-
Map a new OIDC claim to an unused OIDC claim
If your IdP is using OIDC claims and your newly added OIDC claims are not available in WSO2 OIDC claim dialect, you need to map those new OIDC claims to an existing unused OIDC claim in WSO2 Identity Server.
To map a newly added OIDC claim to an unused OIDC claim:
-
On the management console, go to **Claims > List**and select
http://wso2.org/oidc/claimfrom the list. -
A list of claims related to
http://wso2.org/oidc/claimwill appear. Select a claim you do not use from the list and map it to the newly added claim.
See the following topics for samples of claim mapping for an identity provider.
- Logging in to your application via Identity Server using Facebook Credentials
- Logging in to Salesforce with Facebook
- Outbound Provisioning with Salesforce