Configure WS-Federation Single Sign-On
This page guides you through enabling single sign-on (SSO) for a WS-Federation based application using WSO2 Identity Server.
Info
WSO2 Identity Server's passive security token service (Passive STS) is used as the WS-Federation implementation.
The Passive STS is capable of issuing SAML 1.1 and 2.0 security tokens.
To request a SAML 2.0 security token, the Request Security Token (RST) should be sent to the passive STS endpoint
with the TokenType SAMLV2.0 when sending the token request. If there is no RST specified, WSO2 Identity Server
will issue a SAML 1.1 token by default.
Scenario
Pickup is a cab company that has two web applications that use WS-Federation. Both applications use WSO2 IS as the identity provider. When SSO is configured for both these applications, an employee is only required to provide their credentials to the first application and the user will be automatically logged in to the second application.
This tutorial demonstrates configuring WS-Federation for one application and retrieving a SAML token that can be used for single sign-on.
Before you begin
Install Apache Tomcat 8.x.
This tutorial demonstrates configuring WS-Federation for one application and retrieving a SAML token that can be used for single sign-on.
Set up
-
Navigate to
<IS_HOME>/binand start the server by executing one of the following commands.``` java tab="Linux/macOS" sh wso2server.sh
``` java tab="Windows" wso2server.bat run -
Log in to the management console using admin/admin credentials and create a new user called "Alex" with login permission.
Info
'admin' is the default administrative user in WSO2 Identity Server.
-
Click List under Users and Roles and edit Alex's user profile. Enter an email address for Alex.
Download the sample
To be able to deploy a WSO2 Identity Server sample, you need to download it onto your machine first.
Follow the instructions below to download a sample from GitHub.
- Navigate to WSO2 Identity Server Samples.
- Download the
PassiveSTSSampleApp.warfile from the latest release assets.
Deploying the PassiveSTSSampleApp webapp
Deploy this sample web app on a web container.
- Copy the .war file into the
webappsfolder. For example,<TOMCAT_HOME>/apache-tomcat-<version>/webapps. - Start the Tomcat server.
Configure sample properties
Open the <TOMCAT_HOME>/apache-tomcat-<version>/webapps/PassiveSTSSampleApp/WEB-INF/web.xml file and configure the following.
-
Specify
idpUrlas the URL of Identity Server's Passive STS. The following is an example.<init-param> <param-name>idpUrl</param-name> <param-value>https://localhost:9443/passivests</param-value> </init-param> -
Specify the
replyURLas the URL of the web app. The following specifiesPassiveSTSSampleAppas the web app.<init-param> <param-name>replyUrl</param-name> <param-value>http://localhost:8080/PassiveSTSSampleApp/index.jsp</param-value> </init-param> -
Specify the
realm. This should be a unique identifier for the web app as seen in the example below.<init-param> <param-name>realm</param-name> <param-value>PassiveSTSSampleApp</param-value> </init-param> -
For tenant user logins, specify the
tenantDomain.<init-param> <param-name>requestParams</param-name> <param-value>tenantDomain=tenant4.com</param-value> </init-param> -
Restart the tomcat server.
To check the sample application,
navigate to http://<TOMCAT_HOST>:<TOMCAT_PORT>/PassiveSTSSampleApp/home.jsp on your browser.
For example, http://localhost:8080/PassiveSTSSampleApp/home.jsp .
Configuring the service provider
The next step is to configure the service provider.
-
Return to the WSO2 IS management console.
-
Navigate to Main>Identity>Service Providers and click Add.
-
Enter PassiveSTSSampleApp in the Service Provider Name text box, and click Register.
-
In the Inbound Authentication Configuration section, set following configurations under the WS-Federation (Passive) Configuration section.
-
Passive STS Realm :
PassiveSTSSampleApp -
Passive STS WReply URL :
http://localhost:8080/PassiveSTSSampleApp/index.jsp -
Passive STS WReply Logout URL :
http://localhost:8080/PassiveSTSSampleApp/index.jsp
Click Yes, in the message that appears.
-
-
Expand the Claim Configuration section and click Add Requested Claim to add the following claims.
- http://wso2.org/claims/username
- http://wso2.org/claims/emailaddress
-
Select
http://wso2.org/claims/emailaddressas the Subject Claim URI.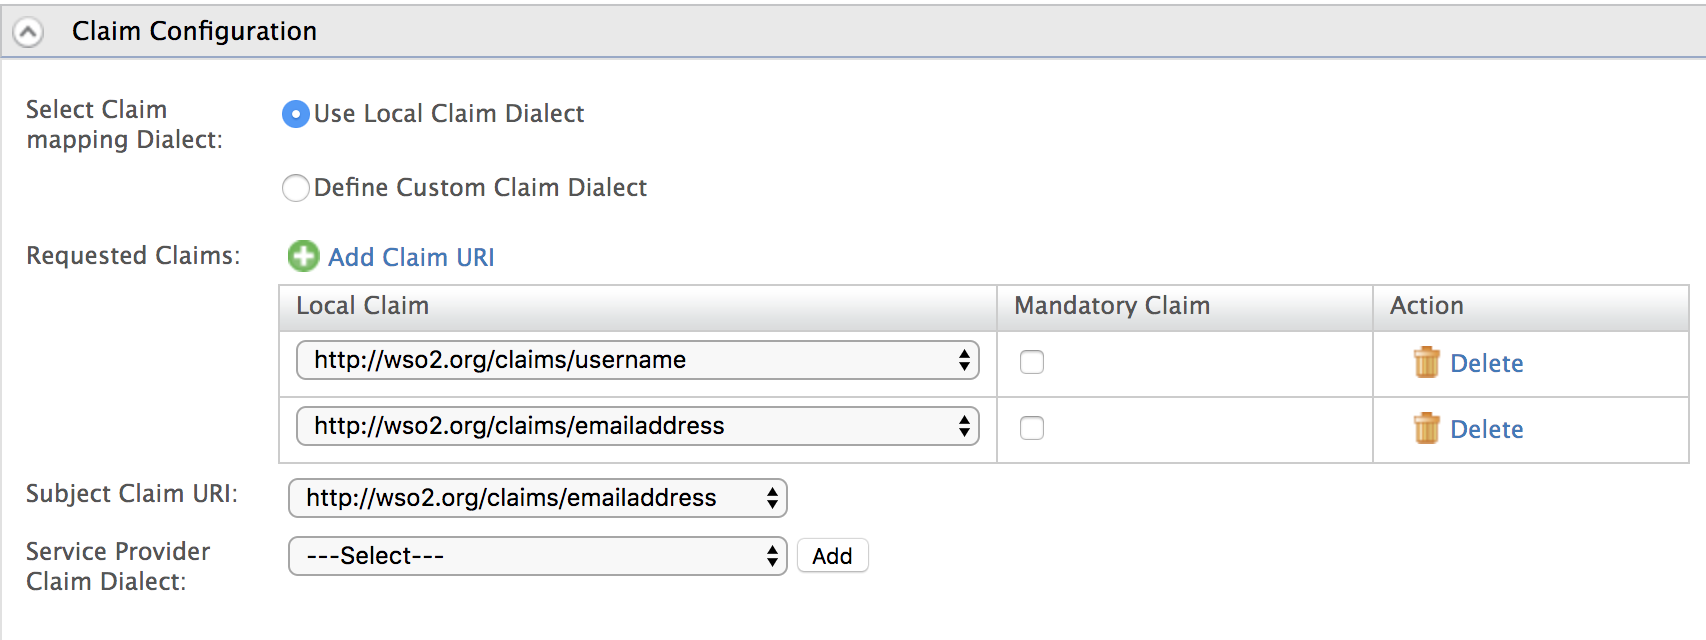
-
Click Update to save the changes.
Now you are sent back to the Service Providers page.
Try it out
Info
When redirecting your users to WSO2 IS Passive STS endpoint, the following (optional) parameters are sent in the request from the sample application.
- wa=wsignin1.0: specifies whether WSO2 IS should issue a token for the relying party (this is the default action).
- wa=wsignout1.0: specifies whether WSO2 IS should log the user out.
- wreply={replyUrl}: specifies where the response should be sent to.
It is recommended to use a Network tracer such as a SAML tracer to analyze the HTTP request and responses in this scenario. With a tracer, you will be able to view the parameters mentioned above and also see the SAML token that is issued from WSO2 IS.
-
Navigate to one of the following links on your browser and click Login.
- To get a SAML 1.1 token: http://localhost:8080/PassiveSTSSampleApp/index.jsp
- To get a SAML 2.0 token: http://localhost:8080/PassiveSTSSampleApp?samlv=2-0
-
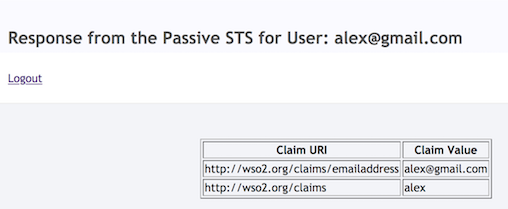
Log in using Alex's credentials. You will be redirected to the WSO2 IS Passive STS Service and then redirected back to the configured
replyUrl. -
On the screen, you will see the passive STS response with the requested claims. Click Logout to logout from the application.
Related topics