Add app-native authentication
In traditional applications, login is usually fulfilled by a web browser. This means that the users who attempt to log in to these applications are redirected to a web browser for authentication. This is not ideal if your goal is to provide the user with a seamless login experience or if you have a business need to keep users within the application's environment.
App-Native Authentication takes an API-based approach to let developers implement a secure login experience directly within the application along with features such as Multi-Factor Authentication (MFA), adaptive authentication, and support for federated logins. This means users will have a seamless login experience from right within the application without the need for redirection.
Limitations of App-Native Authentication
-
At the time of login, app-native authentication,
- does not prompt the user to provide missing mandatory attributes.
- does not prompt the user for consent to share attributes with the application.
- does not support prompts in adaptive authentication flows.
- does not facilitate enrolling authenticators (e.g. TOTP authenticator).
- only supports silent JIT provisioning.
-
App-native authentication does not support all authentication options. If you configure an unsupported authentication option, the login flow does not start.
How it works
The following diagram illustrates the high-level steps involved with app-native authentication.
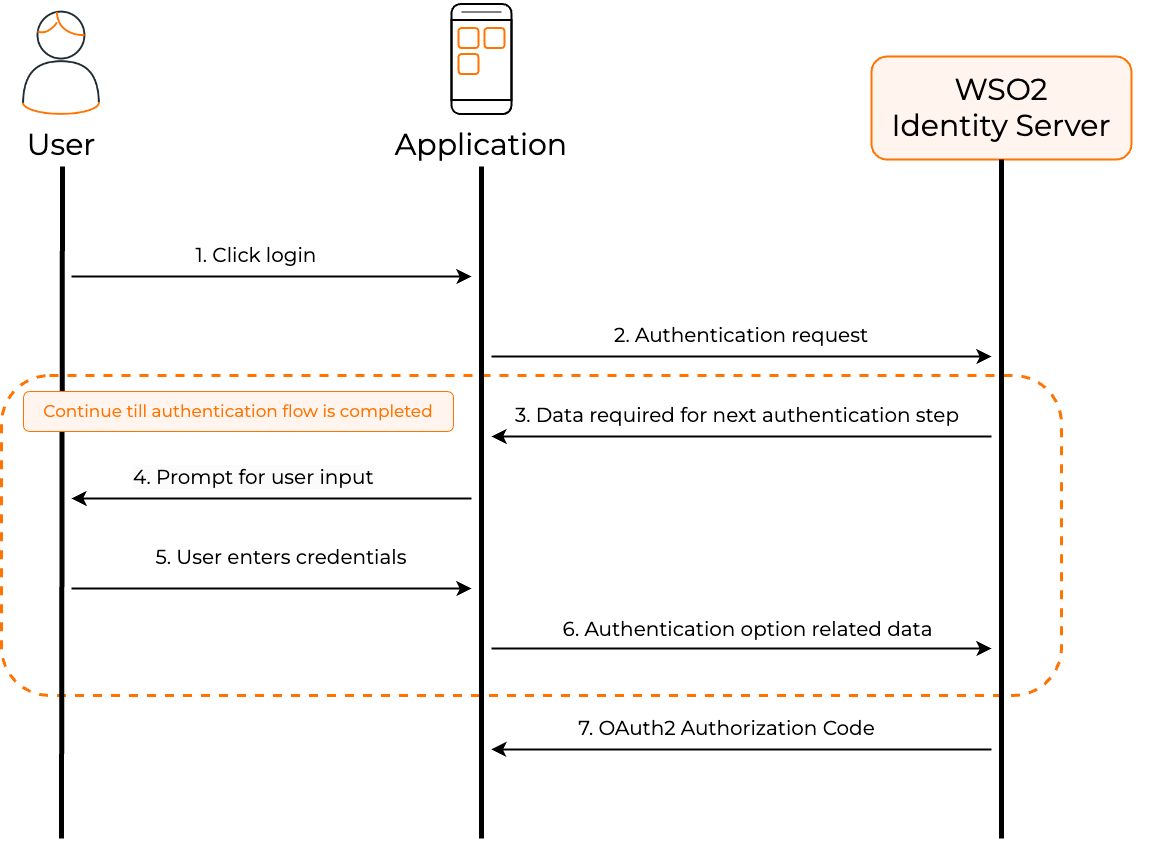
- User initiates a login request at the application's login page.
-
The application initiates an app-native authentication request with the server. The initial request made by the application is similar to an OAuth 2.0 authorization code request but with the
response_modeset todirectas shown below.curl --location 'https://localhost:9443/oauth2/authorize/' --header 'Accept: application/json' --header 'Content-Type: application/x-www-form-urlencoded' --data-urlencode 'client_id=<client_id>' --data-urlencode 'response_type=<response_type>' --data-urlencode 'redirect_uri=<redircet_url>' --data-urlencode 'state=<state>' --data-urlencode 'scope=<space separated scopes>' --data-urlencode 'response_mode=direct'curl --location 'https://localhost:9443/oauth2/authorize/' --header 'Accept: application/json' --header 'Content-Type: application/x-www-form-urlencoded' --data-urlencode 'client_id=VTs12Ie26wb8HebnWercWZiAhMMa' --data-urlencode 'response_type=code' --data-urlencode 'redirect_uri=https://example-app.com/redirect' --data-urlencode 'state=logpg' --data-urlencode 'scope=openid internal_login' --data-urlencode 'response_mode=direct' -
The server responds with instructions for the next step of the authentication.
- The application displays the available authentication options to the user and prompts the user to enter the credentials.
- User interacts with the application and enters the credentials for a selected authentication option.
-
The application gathers the credentials and sends an authentication request back to the server using the Authentication API.
Info
Steps 3-6 repeat for all authentication steps configured for the application.
What is the Authentication API?
- The Authentication API is an interactive, stateful API that facilitates a multi-step authentication flow. See its OpenAPI definition for more details.
- While app-native authentication is initiated at the
/authorizeendpoint, the authentication API fulfills the actual authentication for each step by interacting with the/authnendpoint.
-
After the authentication is complete, the application receives an OAuth2 authorization code in the response.
Learn more
While this section provides a brief overview, it is highly recommended to read through app-native authentication to understand the concept in detail.
Try it out
Follow the steps below to try out App-Native Authentication with WSO2 Identity Server.
Attention
App-native authentication should be limited exclusively to an organization's internal applications. AVOID using it with third-party applications to mitigate the risk of credential exposure.
Prerequisites
-
To get started, you need to register an application with WSO2 Identity Server.
-
You need to have a user account in WSO2 Identity Server. If you don't already have one, create a user account in WSO2 Identity Server.
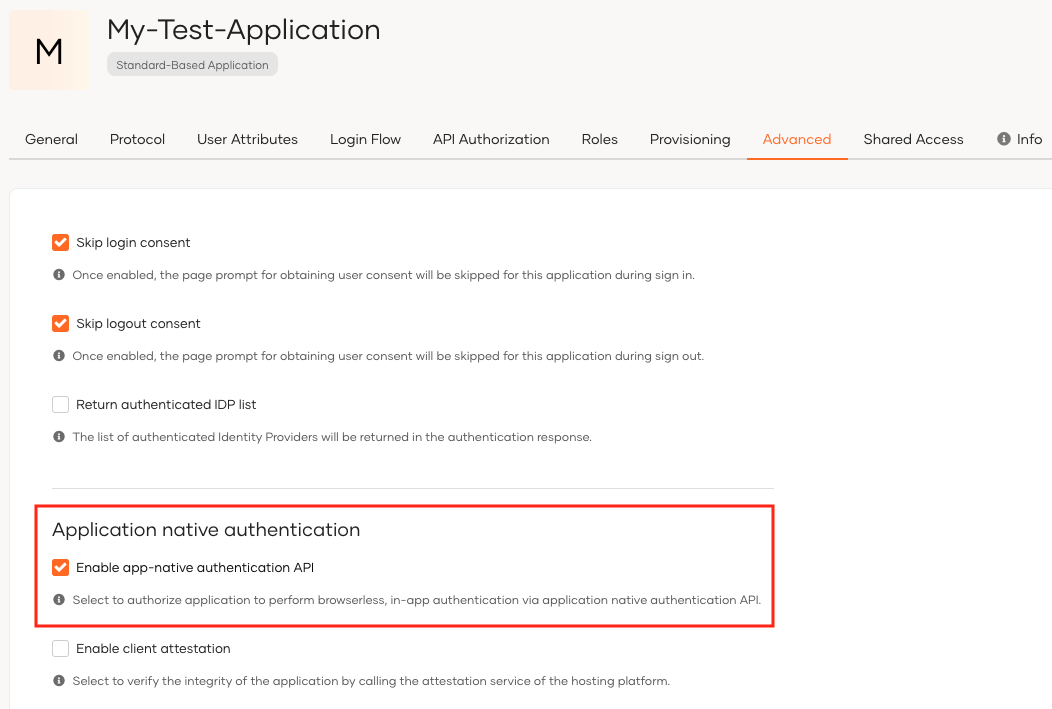
Enable App-Native Authentication
Follow the steps below to enable app-native authentication for your application.
-
On WSO2 Identity Server Console, go to Applications.
-
Go to the Protocol tab and select Code from Allowed grant types.
-
Click Update to save the changes.
-
Go to the Advanced tab of your application and select Enable app-native authentication API.
-
Click Update to save the changes.
-
Go to the Login flow tab and configure a login flow with the supported authentication options.
Finding supported authentication options in the login flow
Supported authentication options are tagged with
#APIAuth.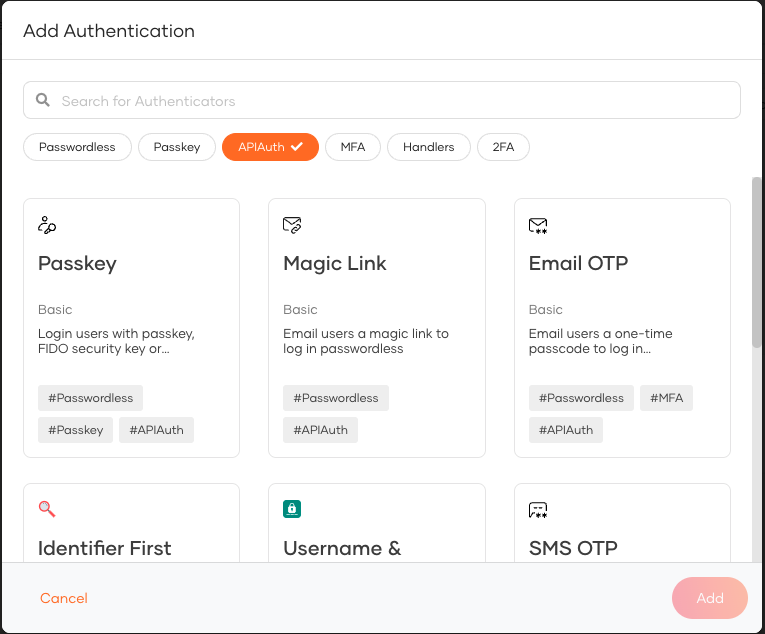
-
Click Update to save the changes.
Try out App-Native Authentication
Try out App-Native Authentication using Postman.
![]()
Note
Learn more about the API calls in App-native authentication.
Next steps
You have successfully enabled app-native authentication for your application. You can now try out the app-native authentication flow with your application. To give you better support, we have provided SDKs for different technologies.
Android
For an Android application, use the Android Mobile UI SDK to integrate app-native authentication. To get started, refer to the Android Mobile UI SDK documentation.
Other technologies
We are working on providing SDKs for other technologies. Stay tuned for updates.
What's next?
-
Secure app-native authentication flows guides you on how to secure app-native authentication flows.
-
Handle advanced login scenarios guides you on how to handle federated authentication, multi-option login steps and SSO for app-native authentication.