Authenticating AI Agents
This guide walks you through how to authenticate AI agents into your applications secured by WSO2 Identity Server. It covers two key authentication scenarios:
Each scenario leverages standard or emerging OAuth 2.0-based protocols to ensure secure and scalable access delegation.
AI agent acting on its own
In this scenario, the AI agent operates autonomously without user involvement, supporting background processes, monitoring tasks, and independently running automation workflows.
Agent friendly authentication mechanism
- AI agents often require machine-to-machine communication.
- This flow does not use redirects.
- The agent leverages authentication APIs to securely obtain tokens for autonomous access.
When acting on its own, the AI agent uses its Agent ID and Agent Secret to authenticate with the authorization server and obtain an access token.
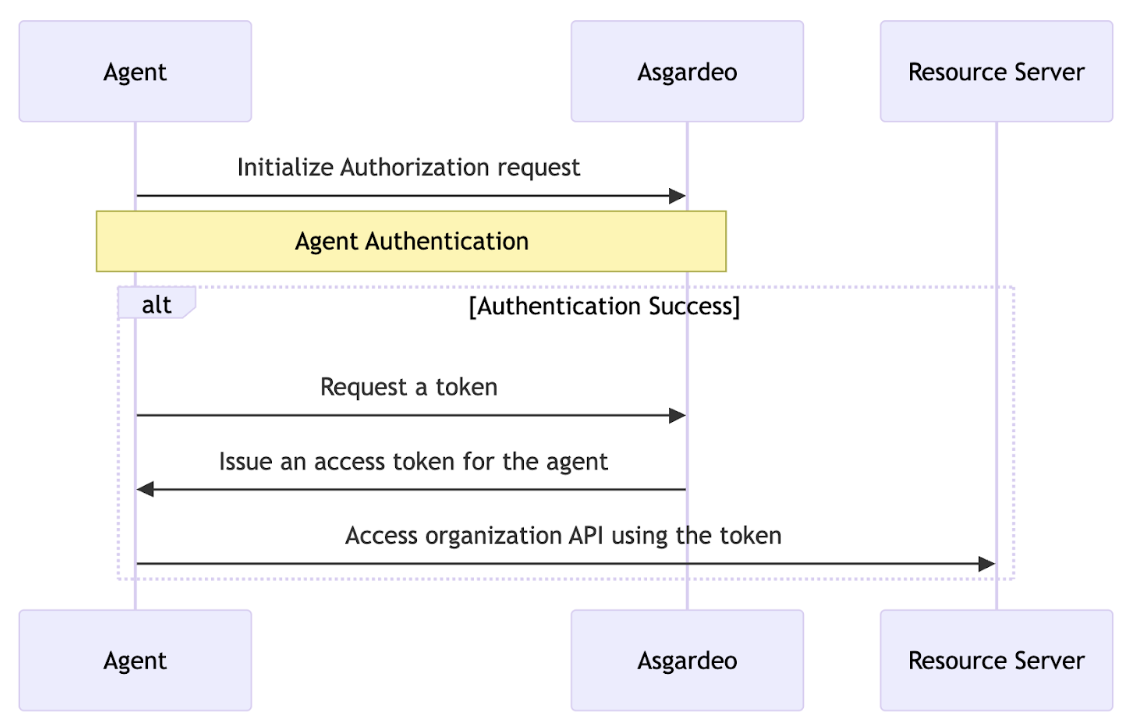
- The AI agent begins the authentication flow by initiating an authorize request.
curl --location 'https://localhost:9443/t/{root_organization_handle}/oauth2/authorize' \
--header 'Accept: application/json' \
--header 'Content-Type: application/x-www-form-urlencoded' \
--data-urlencode 'client_id=vMH8K3zdIhlSiIDmmvnebNOI_bIa' \
--data-urlencode 'response_type=code' \
--data-urlencode 'redirect_uri=https://example.com/callback' \
--data-urlencode 'scope=read_bookings write_bookings' \
--data-urlencode 'response_mode=direct' \
--data-urlencode 'resource=booking_api'
The agent receives the following response that contains key components like the flowId parameter that uniquely identifies the login flow and the authenticators array that contains the authentication options available for the first step.
{
  "flowId": "3bd1f207-e5b5-4b45-8a91-13b0acfb2151",
  "flowStatus": "INCOMPLETE",
  "flowType": "AUTHENTICATION",
  "nextStep": {
    "stepType": "AUTHENTICATOR_PROMPT",
    "authenticators": [
      {
        "authenticatorId": "QmFzaWNBdXRoZW50aWNhdG9yOkxPQ0FM",
        "authenticator": "Username & Password",
        "idp": "LOCAL",
        "metadata": {
          "i18nKey": "authenticator.basic",
          "promptType": "USER_PROMPT",
          "params": [
            {
              "param": "username",
              "type": "STRING",
              "isConfidential": false,
              "order": 1,
              "i18nKey": "param.username"
            }
          ]
        },
        "requiredParams": [
          "username",
          "password"
        ]
      }
    ],
    "acceptErrorParams": false,
    "messages": [
      {
        "type": "ERROR",
        "messageId": "msg_invalid_un_pw",
        "message": "Invalid username or password.",
        "i18nKey": "message.msg_invalid_un_pw",
        "context": [
          {
            "key": "remainingAttempts",
            "value": "2"
          }
        ]
      }
    ]
  },
  "links": [
    {
      "name": "authentication",
      "href": "/api/authenticate/v1",
      "method": "POST"
    }
  ]
}
- The agent makes a POST request to the
/authnendpoint using the Authentication API. The payload of this request includes the flowId and the selectedAuthenticator object which contains credentials for the user-selected authentication option.
curl --location 'https://localhost:9443/t/{root_organization_handle}/oauth2/authn' \
--header 'Content-Type: application/json' \
--data '{
"flowId": "3bd1f207-e5b5-4b45-8a91-13b0acfb2151",
"selectedAuthenticator": {
    "authenticatorId": "QmFzaWNBdXRoZW50aWNhdG9yOkxPQ0FM",
    "params": {
        "username": "<agent_id>",
        "password": "<agent_secret>"

    }
}
}'
If the request is successful, the agent will receive a response with the following format.
{
   "code": "6ff8b7e1-01fc-39b9-b56d-a1f5826e6d2a",
   "state": "logpg",
   "session_state": "43b1ffc92c8d349942e99bd0270fca05f934ad6f612b27f40a5fa60b96bd0iD4RK8Etr4XruxnYMEvcKQ"
}
- As the final step, the agent sends a token request with the received authorization code to the authorization server’s token endpoint, using its own credentials (Agent ID and Secret). The server verifies these credentials, and upon successful authentication, issues an access token. The agent then includes this access token in its requests to securely access protected resources.
curl --location 'https://localhost:9443/t/{root_organization_handle}/oauth2/token' \
--header 'Content-Type: application/x-www-form-urlencoded' \
--data-urlencode 'grant_type=authorization_code' \
--data-urlencode 'client_id=vMH8K3zdIhlSiIDmmvnebNOI_bIa' \
--data-urlencode 'code=3a23a94a-3c50-3b56-92fa-f583cb63c617' \
--data-urlencode 'code_verifier=FehTNaOvDMhpP9wgdGb_AWR5Gu5KwTmF978KMRKbtgM' \
--data-urlencode 'redirect_uri=https://example.com/callback' \
--data-urlencode 'resource=booking_api'
AI agent acting on behalf of a user
When an AI agent needs to act on behalf of a user—such as initiating a transaction, making a booking, or retrieving user-specific data—it must do so with explicit user consent. This is typically required for user-facing assistants, copilots, or delegated decision-making agents.
This scenario follows an enhanced authorization code flow, adopting the OAuth Extension for AI Agents IETF draft, which introduces a structured and dynamic delegation model.
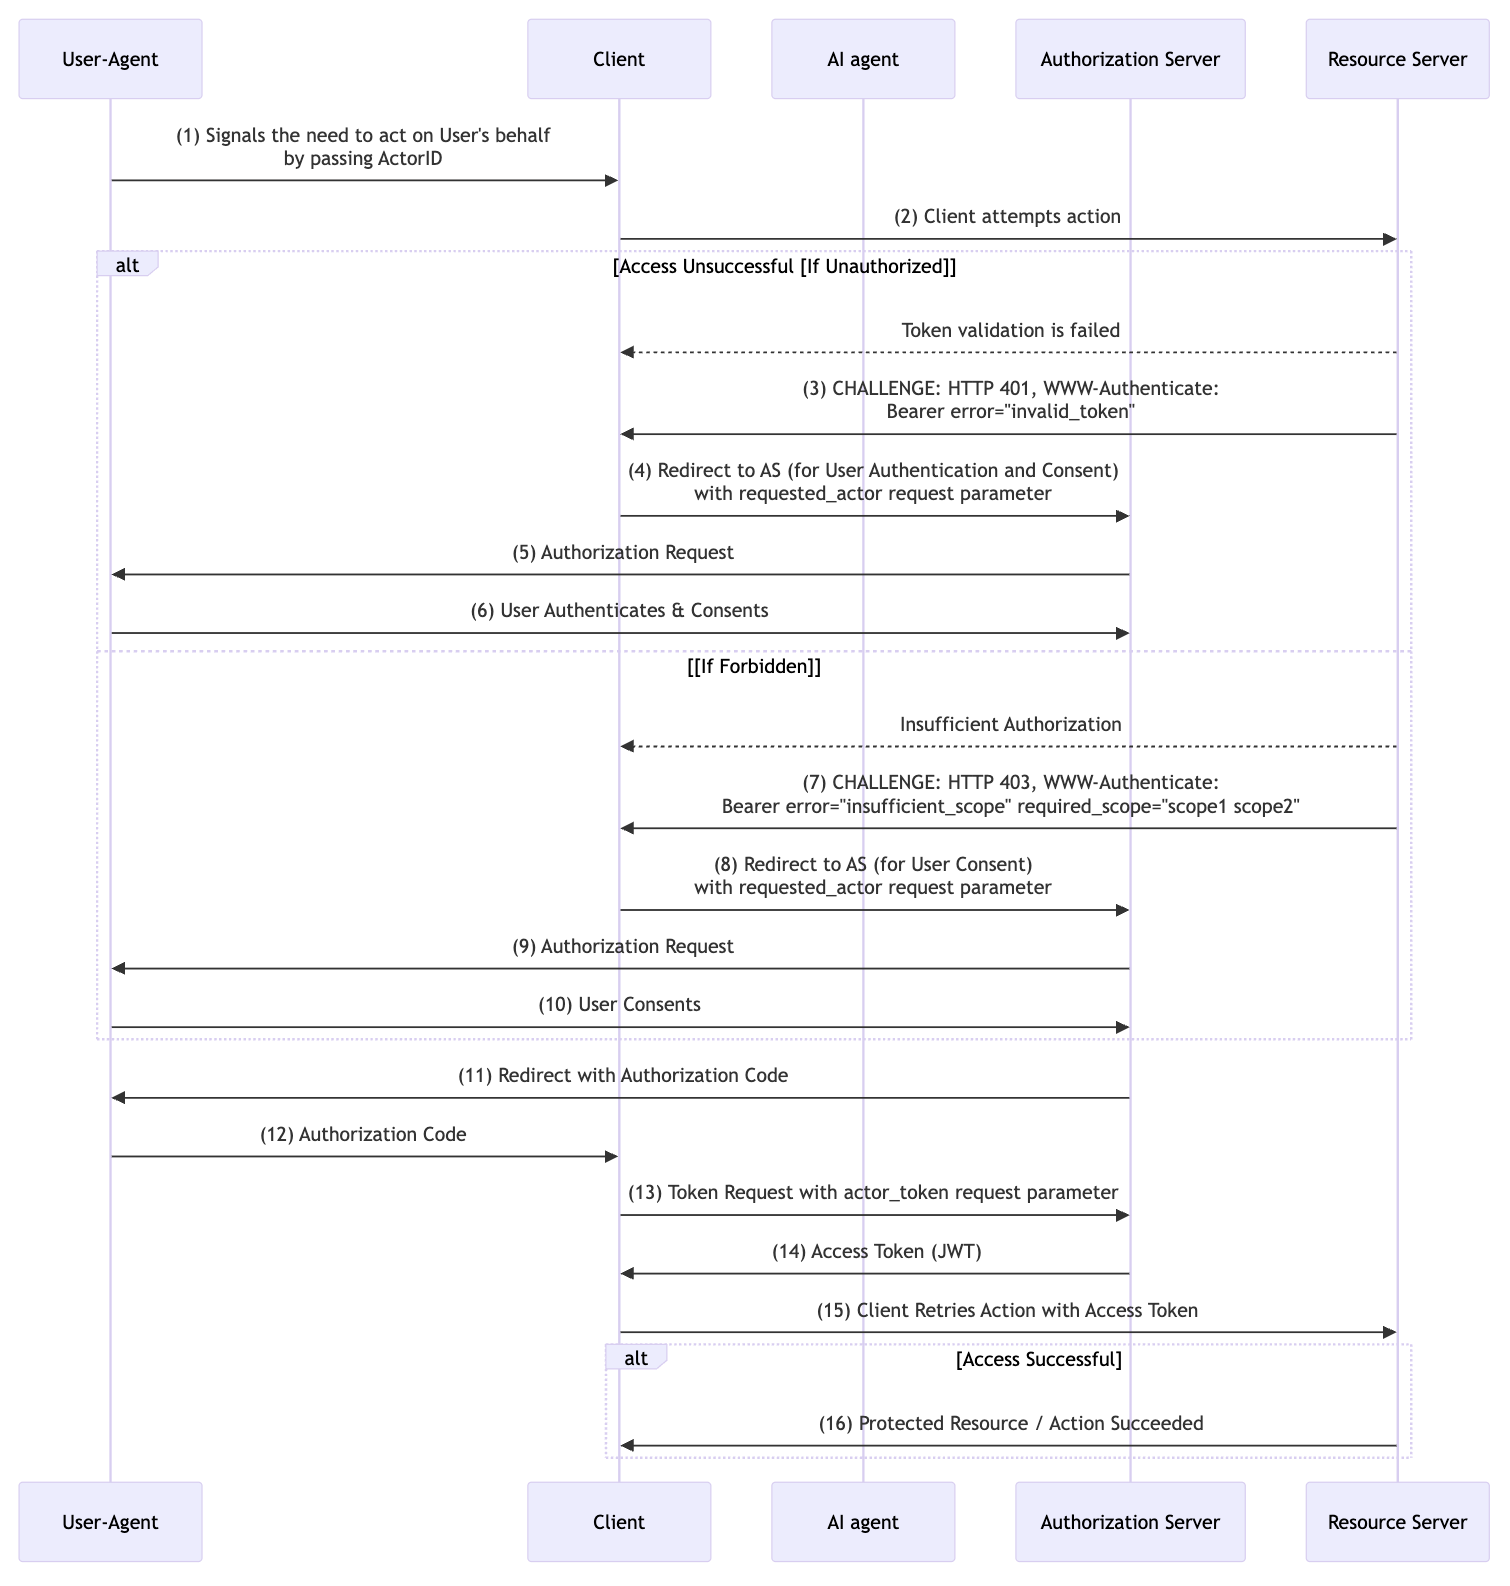
As shown in the above sequence diagram, the flow proceeds as follows.
-
Delegation Initiation The user initiates a delegation request—via a user interface or API—specifying that a particular AI agent (
Actor ID) is permitted to act on their behalf. -
Initial Unauthorized Attempt The agent attempts to access a protected resource but receives a
401 Unauthorizedresponse, as it lacks the necessary credentials to act on behalf of the user. -
Authentication and Consent Redirection The client redirects the user to the Authorization Server (AS), including the
requested_actorparameter (which identifies the AI agent) along with standard OAuth parameters such as the client ID, redirect URI, and requested scopes. -
User Authentication and Consent The user logs in to the Authorization Server and is presented with a consent screen that clearly indicates the scopes being requested and the identity of the AI agent attempting to act on their behalf. If the user approves, the delegation is successfully established.
-
Additional Consent (If Required) If the AI agent later attempts an action requiring scopes not previously granted, the resource server may return a
403 Forbiddenwith a list of missing scopes. The client can then initiate a follow-up consent flow to obtain user approval for these additional scopes. -
Authorization Code Exchange After consent, the client receives an authorization code. It then exchanges this code at the token endpoint, attaching the AI agent’s own
actor_token(acquired separately using its credentials) in theAuthorizationheader. -
Token Issuance The Authorization Server verifies both the user’s authorization code and the agent’s actor token, and issues a delegated JWT access token that encapsulates the user-agent relationship.
-
Authorized Request Retry The client retries the original request using the new access token, which now represents both the user and the authorized agent.
-
Successful Access The request succeeds. The AI agent is now authorized to act on the user’s behalf and access the required resources.
Using CIBA for on-behalf-of delegation
For background agents that operate without direct user interaction, the CIBA grant can be combined with OBO tokens to enable delegation. Instead of redirecting the user to a browser for consent, the agent initiates a backchannel authentication request with its actor_token, and the user approves the delegation asynchronously on a separate device via email, SMS, or an external notification channel.
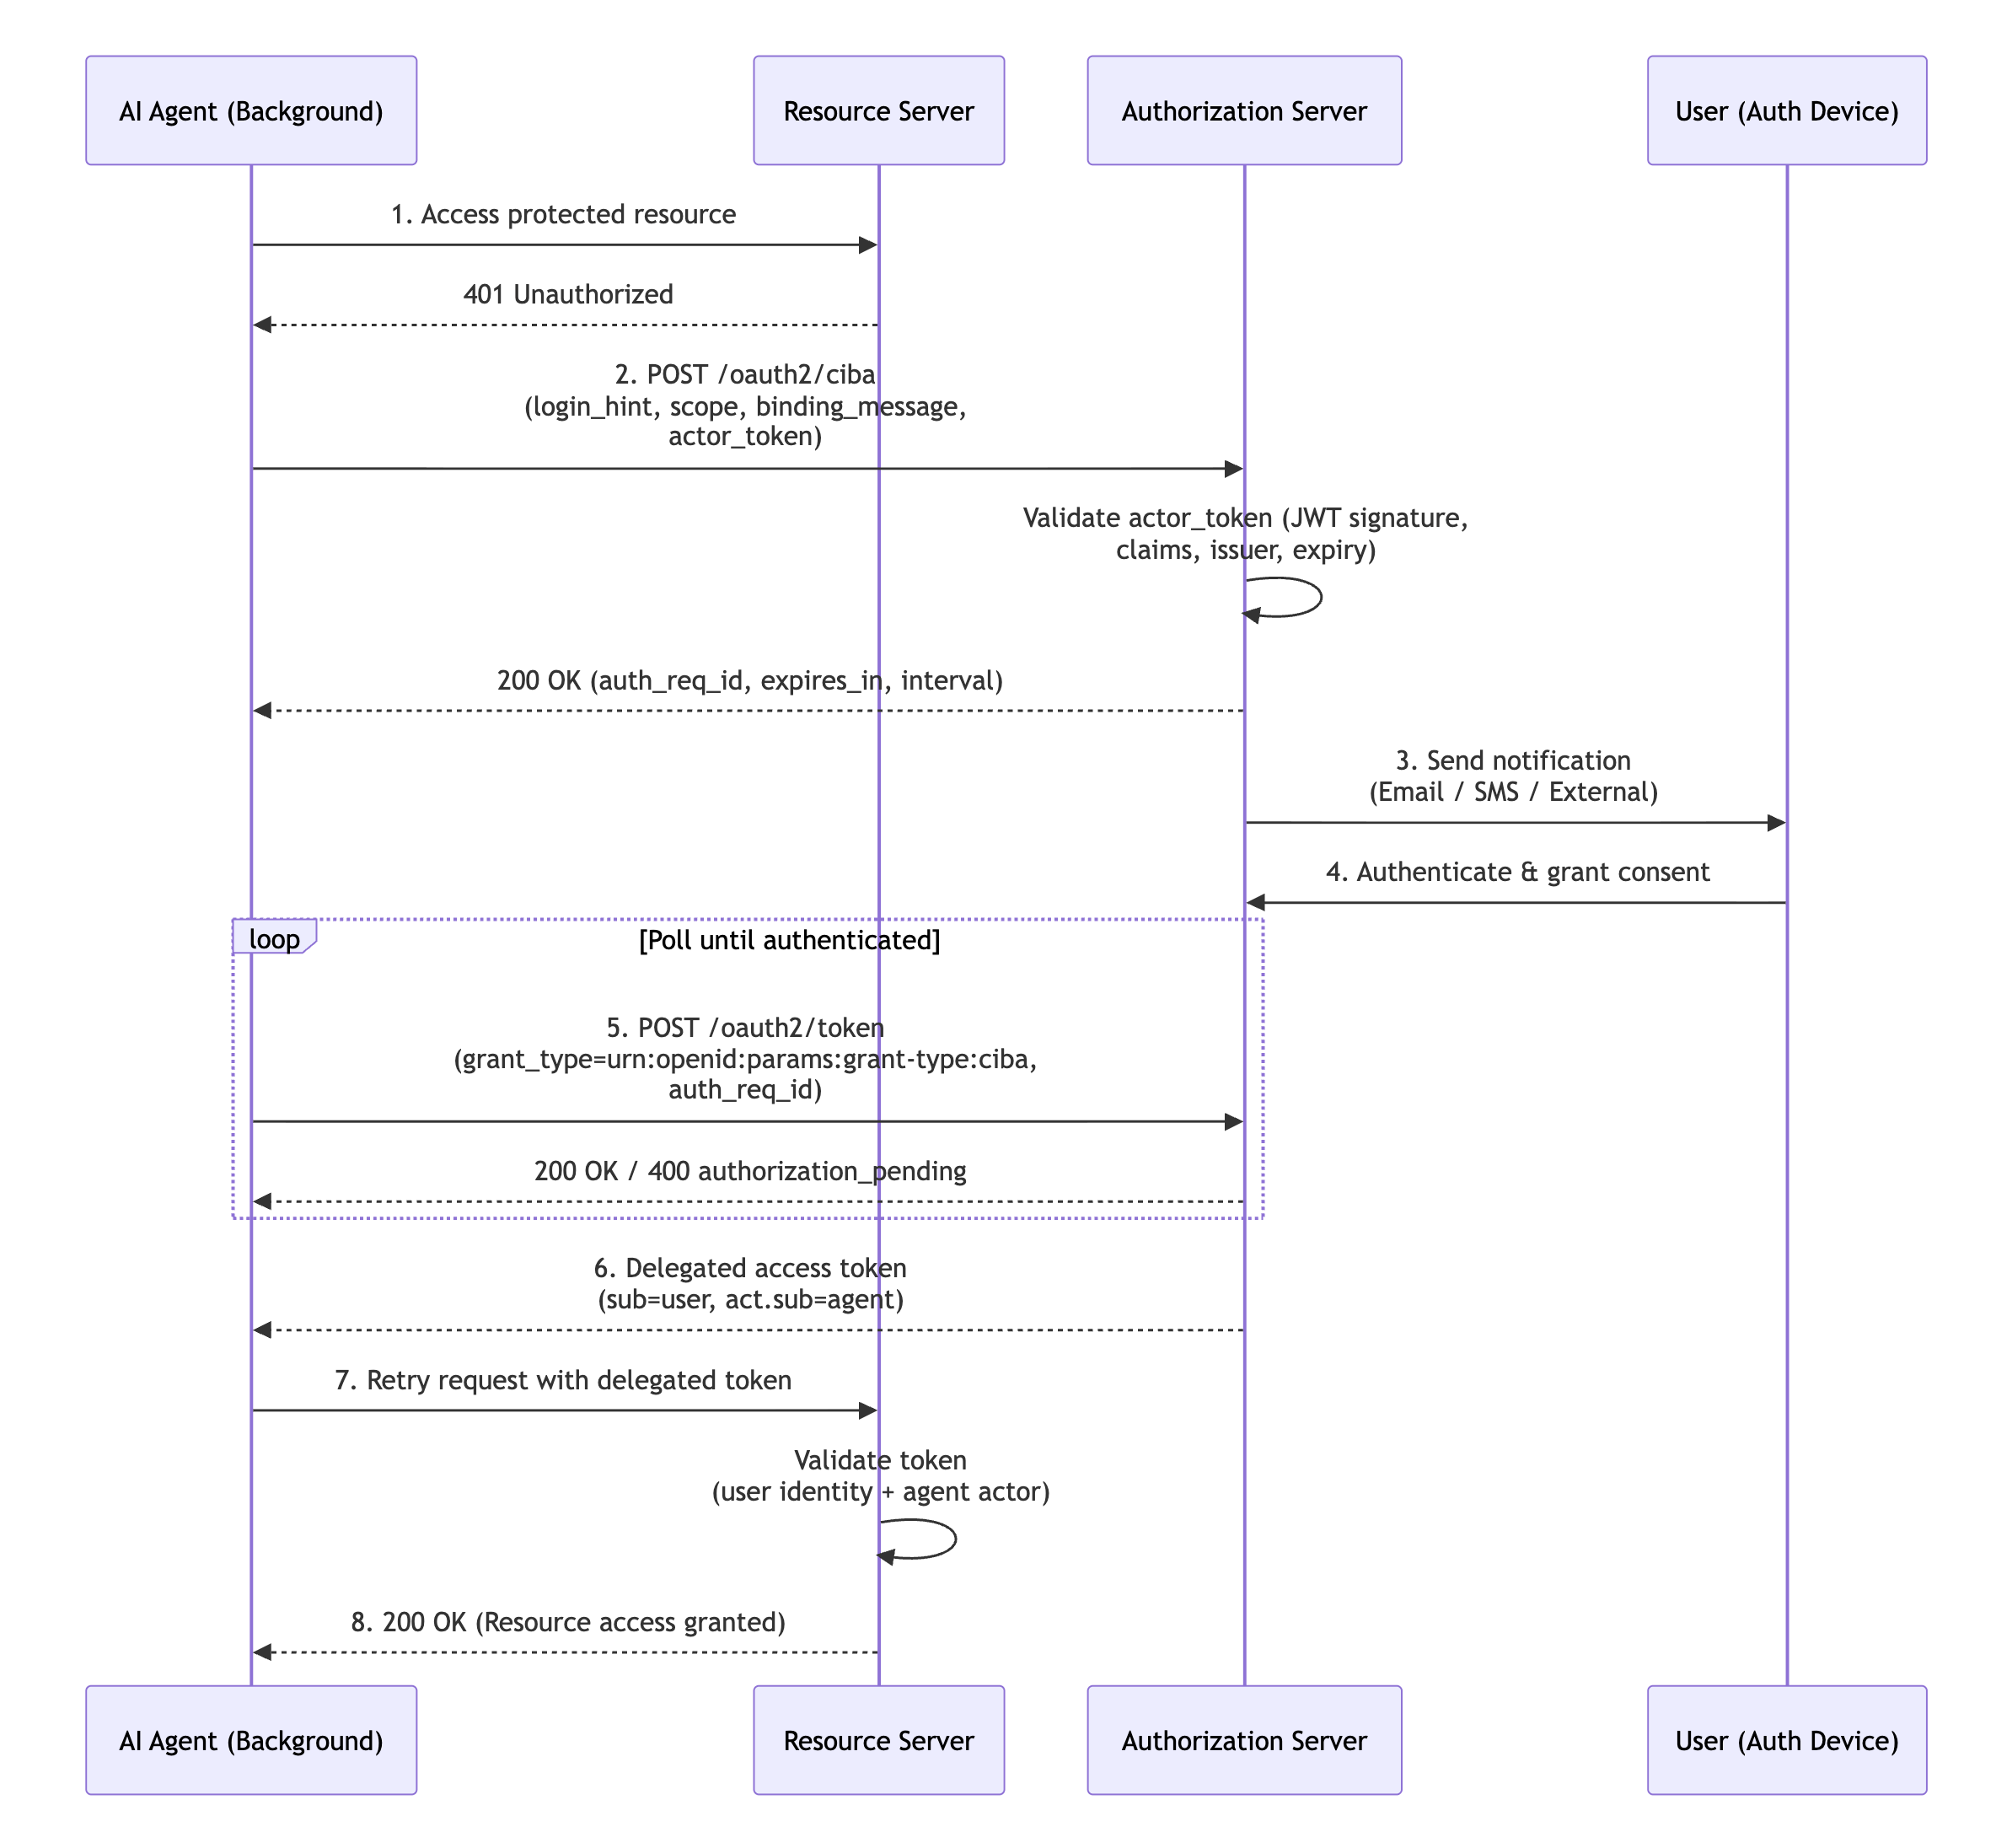
The flow proceeds as follows:
-
Backchannel Authentication with Actor Token The agent sends a backchannel authentication request to the
/oauth2/cibaendpoint, including itsactor_tokenalongside standard CIBA parameters.curl -v -k -X POST https://localhost:9443/t/{root_organization_handle}/oauth2/ciba \ --header "Authorization: Basic <Base64Encoded(CLIENT_ID:CLIENT_SECRET)>" \ --header "Content-Type:application/x-www-form-urlencoded" \ --data-urlencode "scope=openid profile" \ --data-urlencode "login_hint=<username>" \ --data-urlencode "binding_message=Agent requesting access on your behalf" \ --data-urlencode "actor_token=<AGENT_ACTOR_TOKEN>"The
actor_tokenis a JWT representing the AI agent’s identity, obtained through the agent’s own authentication flow. -
User Notification and Authentication WSO2 Identity Server validates the actor token and sends a notification to the user through the configured channel (email, SMS, or external). The user authenticates and provides consent on the separate device.
-
Token Polling The agent polls the token endpoint using the
auth_req_idreceived in the CIBA response:curl -v -k -X POST https://localhost:9443/t/{root_organization_handle}/oauth2/token \ --header "Authorization: Basic <Base64Encoded(CLIENT_ID:CLIENT_SECRET)>" \ --header "Content-Type:application/x-www-form-urlencoded" \ --data-urlencode "grant_type=urn:openid:params:grant-type:ciba" \ --data-urlencode "auth_req_id=<AUTH_REQ_ID>" -
Delegated Token Issuance Once the user authenticates, the authorization server issues a delegated access token containing an
actclaim that identifies the agent:This token allows the agent to access protected resources on behalf of the user, while resource servers can verify both the user’s identity and the agent acting on their behalf.
Note
To use OBO tokens with CIBA, agent identities must be enabled in WSO2 Identity Server, and the application must have the CIBA grant type enabled. Learn more about registering background agents.