Add X login
You can add X login to your applications using WSO2 Identity Server and enable users to log in with their X accounts.
Register WSO2 Identity Server on X
-
Log in to the X Developer Portal using your X credentials.
-
Navigate to Projects & Apps, click Add project and provide details of your project.
-
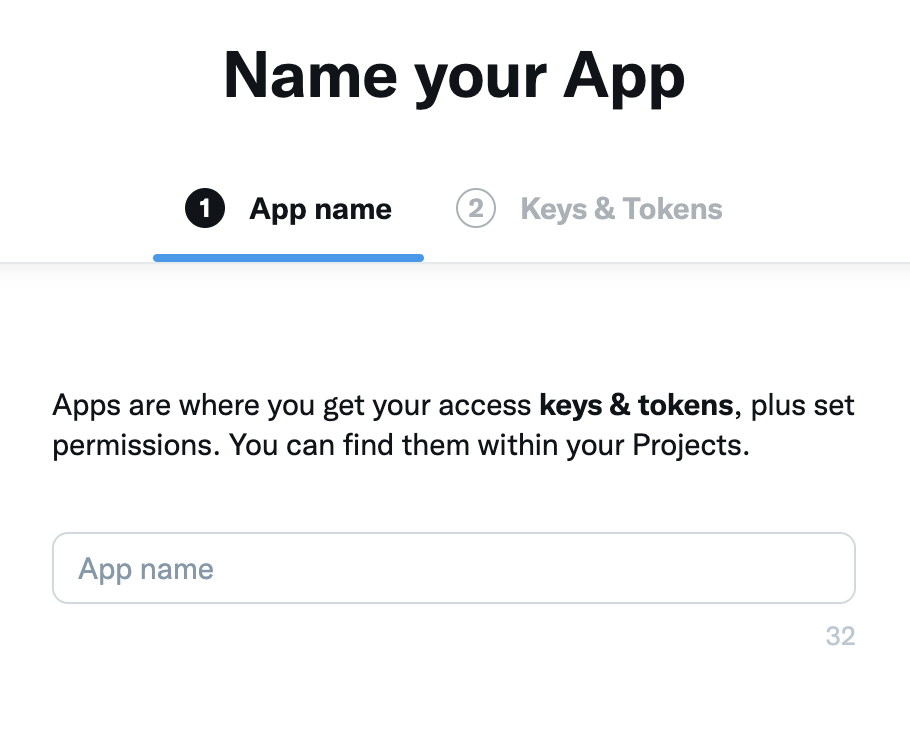
Either during project creation, or by navigating to your created project in Projects & Apps, click Add App.
-
Provide an App name.
-
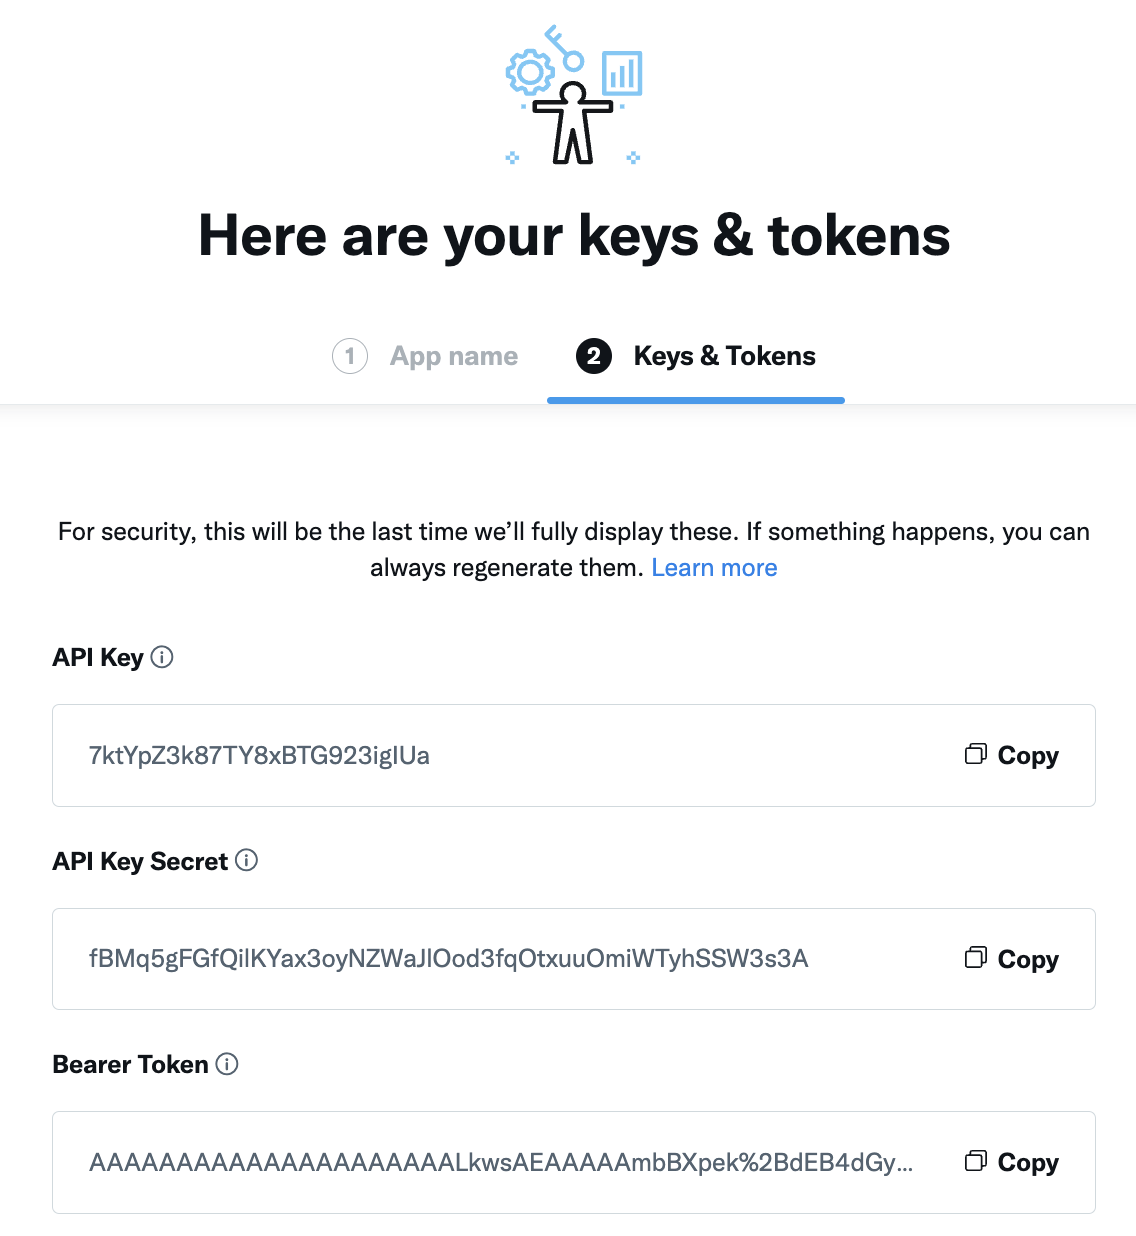
Take note of the API Key and API Key Secret of the application.
-
-
Click App Settings at the bottom of the page.
-
Click Set up under User Authentication Settings and do the following.
-
Under Type of App select Web App, Automated App or Bot.
-
Fill in the user authentication details with the following values.
- Callback URI / Redirect URL -
{{ product_url_format }}/commonauth - Website URL -
http://localhost.com:8080/pickup-dispatch/home.jsp
- Callback URI / Redirect URL -
-
Click Save.
Note
The App Client ID and App client secret presented at this moment is not required for this guide.
Register the X IdP
Now, let's register the Microsoft IdP in WSO2 Identity Server.
-
On the WSO2 Identity Server Console, go to Connections.
-
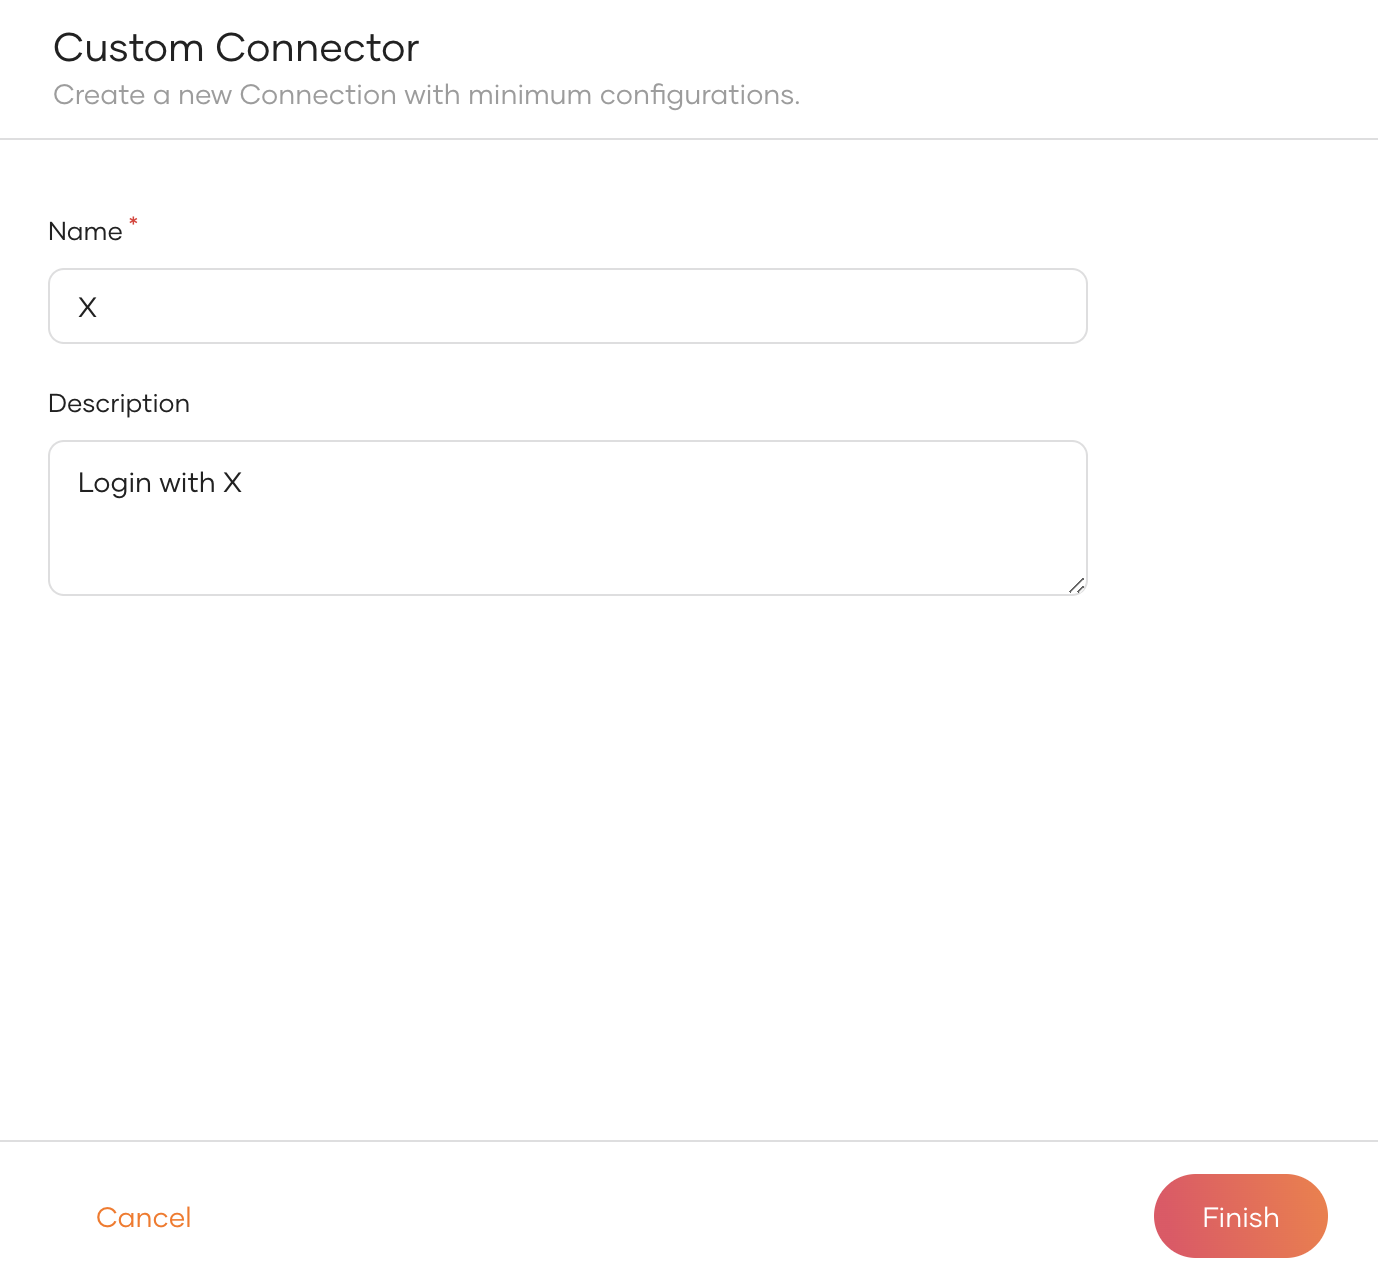
Click Create Connection and select Custom Connector.
-
Provide a name and a description for the connector and click Finish.
-
On the created custom connector, go to the Settings tab.
-
Click New Authenticator, select Twitter and click Next.
-
Enter the following details and click Finish.
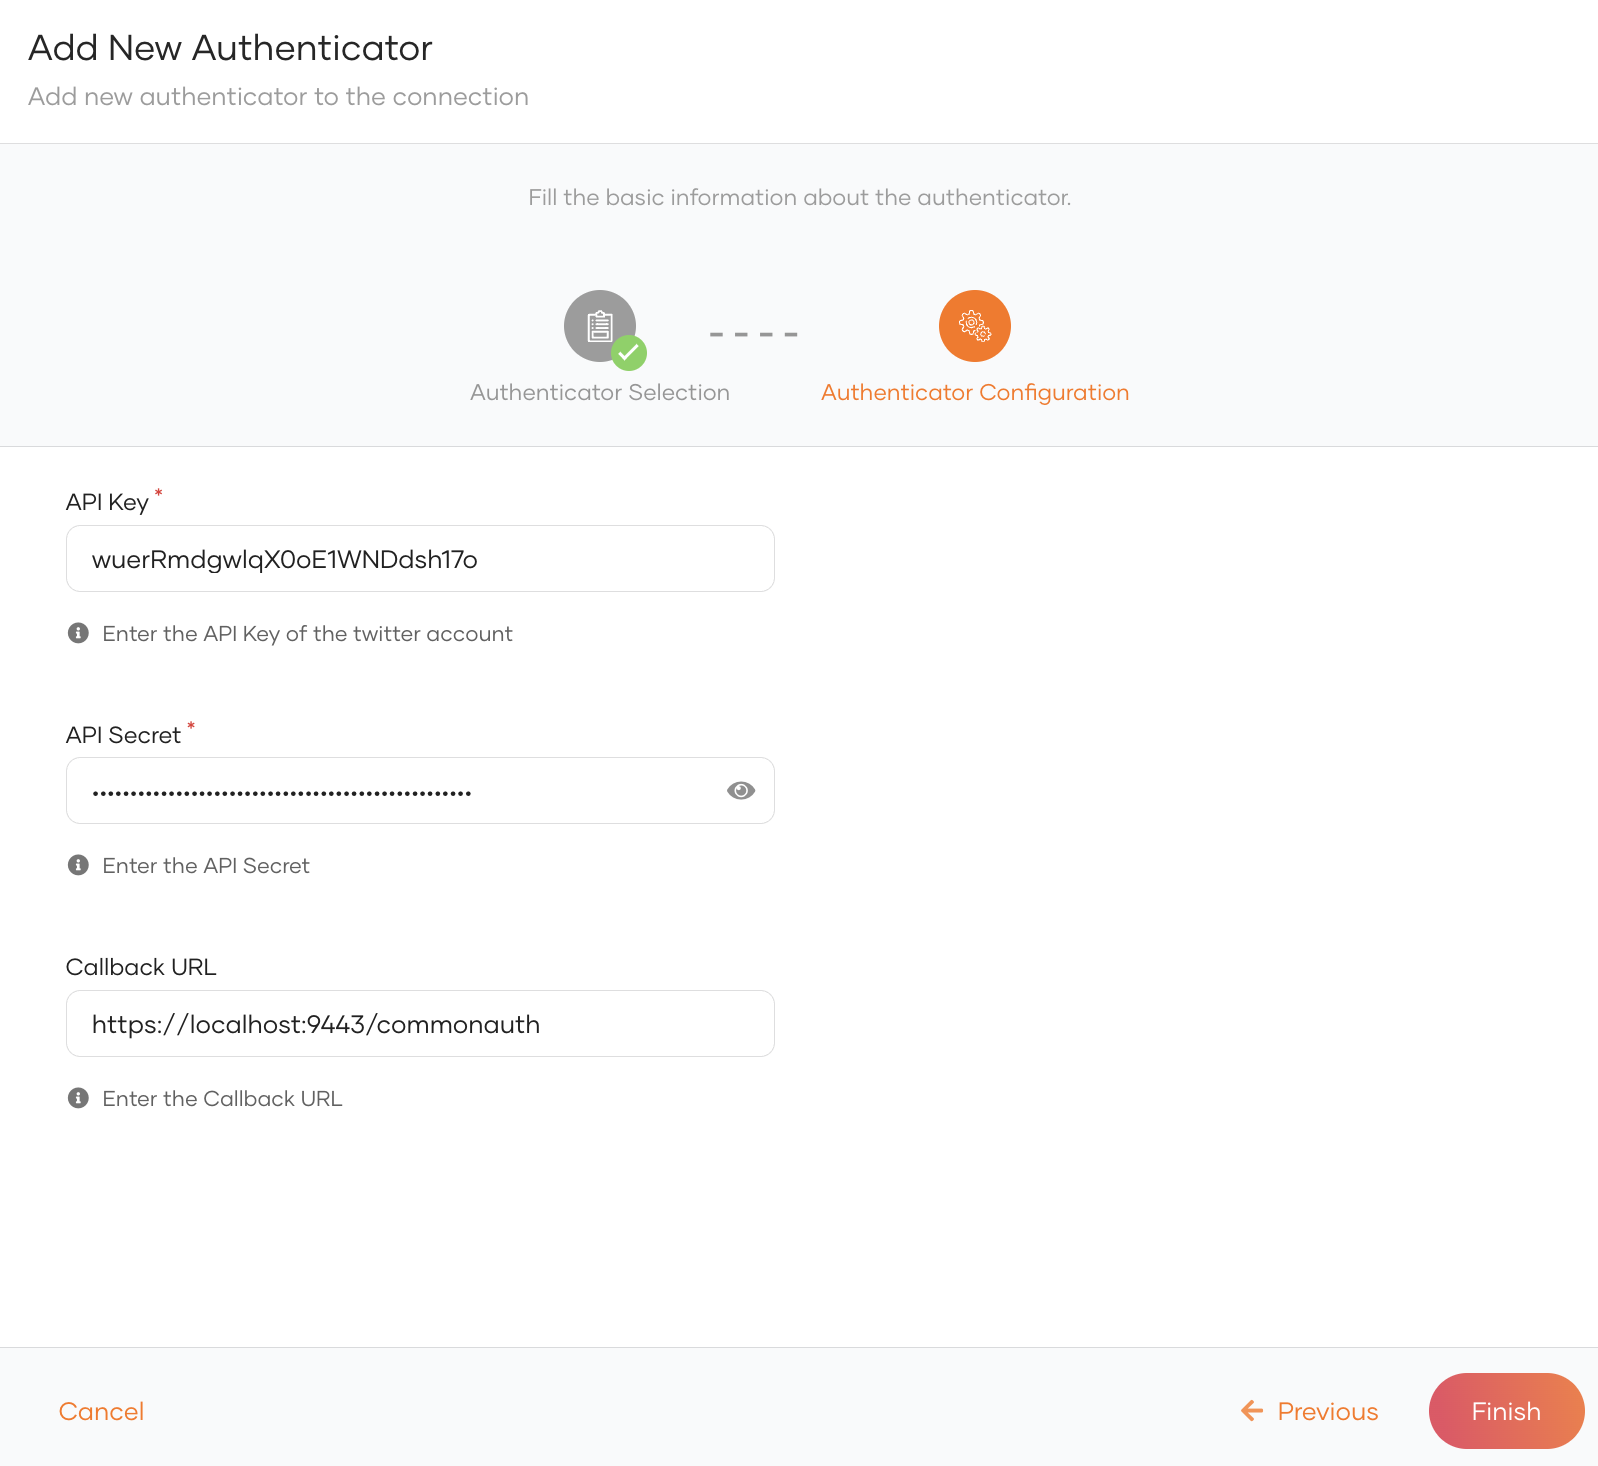
Parameter Description API Key The API keygenerated when registering WSO2 Identity Server in X.
e.g.wuerRmdgwlqX0oE1WNDdsh17oAPI Secret The API Key Secretgenerated when registering WSO2 Identity Server in X.
e.g.771tqnkpcbRyTBSCRQvVud1x8j1uQlCDpNZo3hRG0s4cEtsFkyCallback URL The Callback URL you entered when registering WSO2 Identity Server in X. This is the URL to which the browser should be redirected after the authentication is successful.
e.g.{{ product_url_format }}/commonauth
JIT user provisioning
When a user logs in with an external identity provider using the same email address registered in a local account, JIT-provisioning overrides the attributes of the local account with the attributes received from the external identity provider.
WSO2 Identity Server, by default, disables Just-In-Time (JIT) user provisioning for your external identity provider.
To enable JIT-provisioning,
-
On the WSO2 Identity Server Console, click Connections and select the relevant connection.
-
Go to the Just-in-Time Provisioning tab of the selected connection.
-
Check/Uncheck the Just-in-Time (JIT) User Provisioning checkbox to enable/disable it.
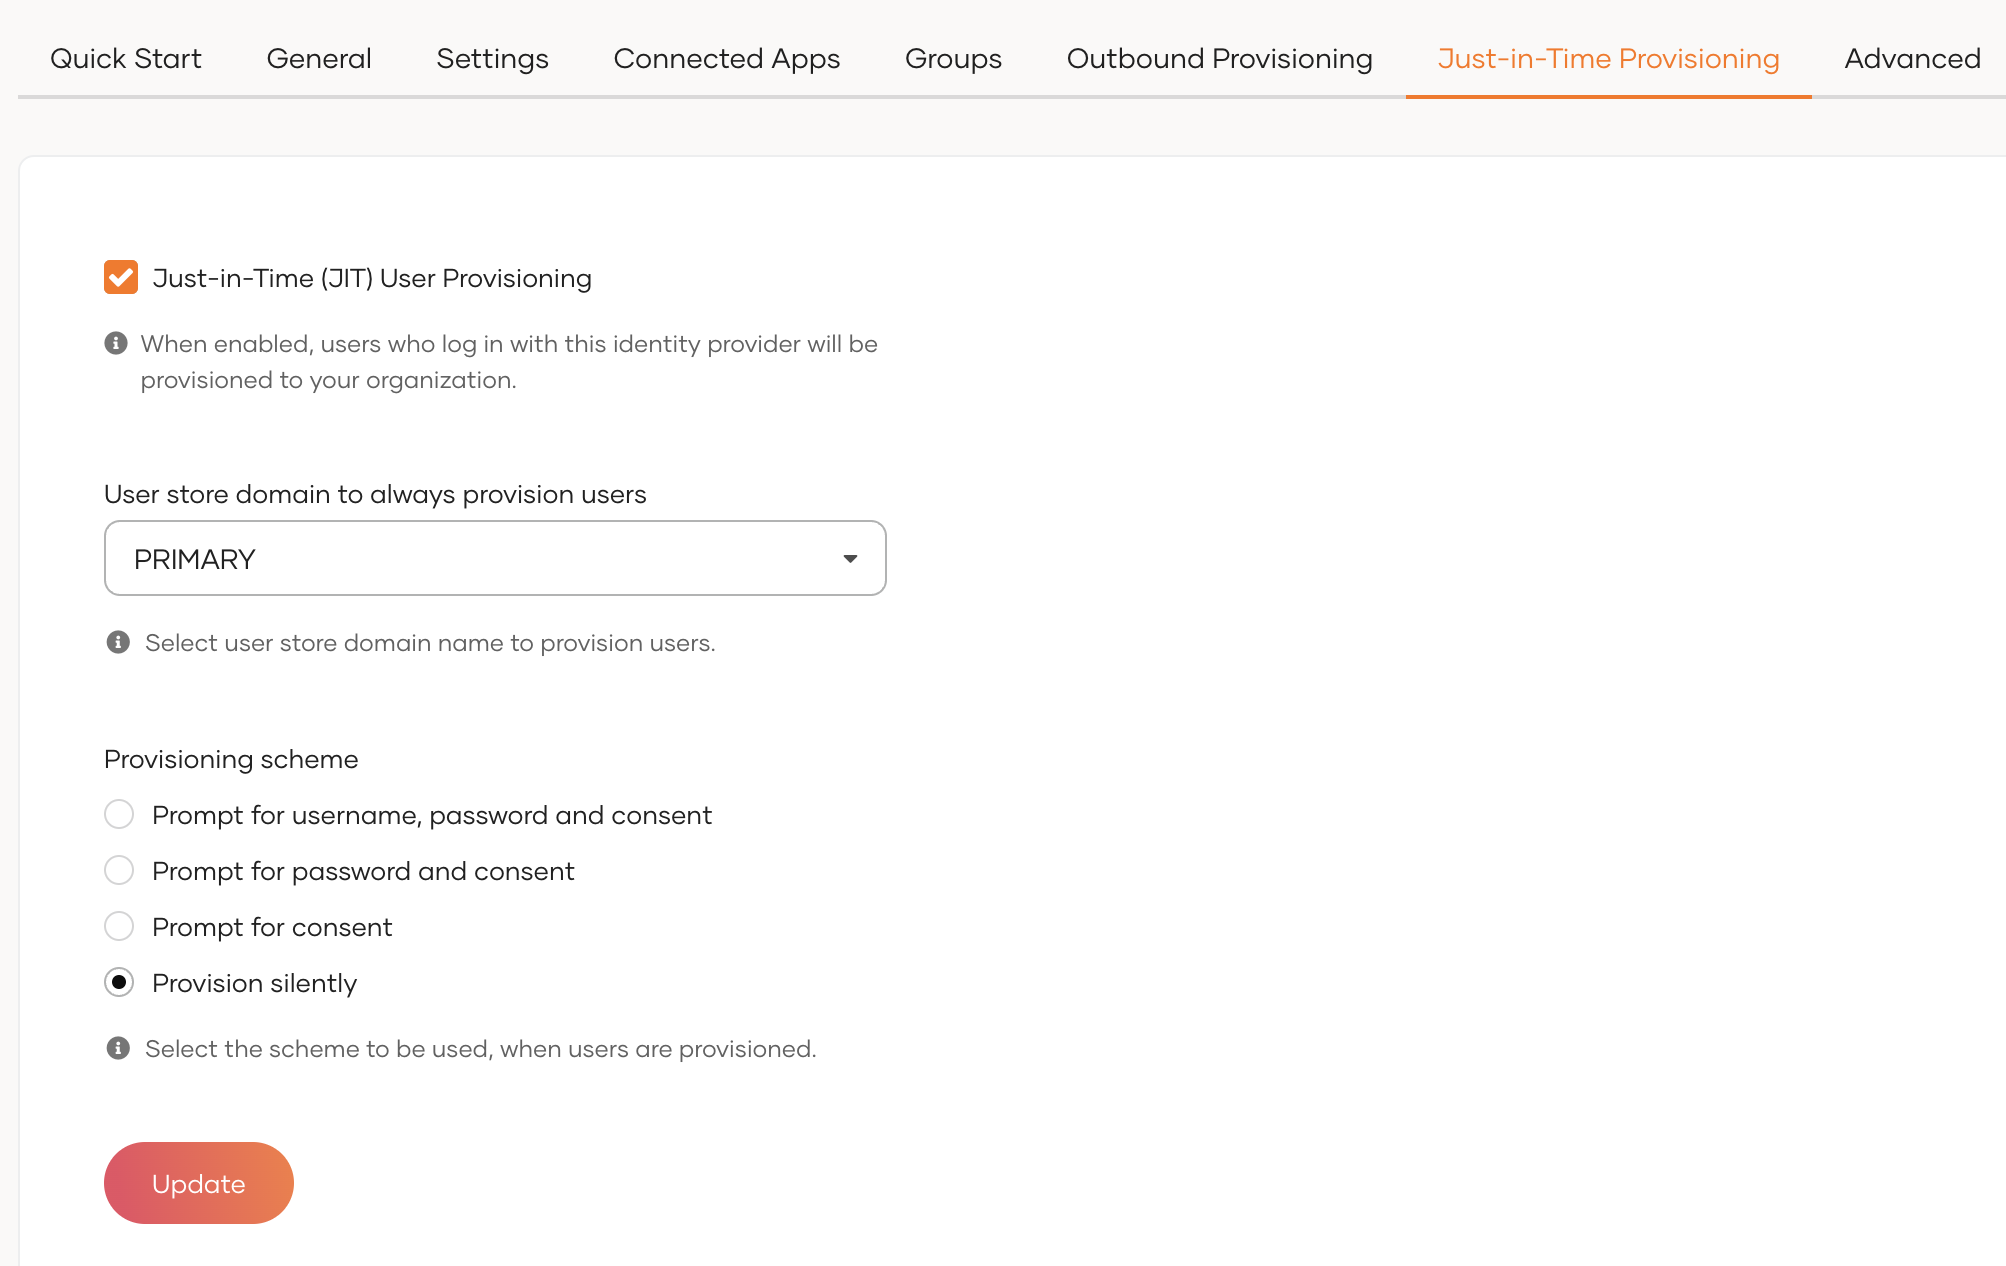
-
Click Update to save the changes.
Note
-
Learn more about JIT provisioning configurations in configure JIT user provisioning.
-
You can use the identity provider APIs to customize the attribute syncing behavior between the external identity provider and WSO2 Identity Server.
Enable X login
Before you begin
You need to register an application with WSO2 Identity Server. You can register your own application or use one of the sample applications provided.
- On the WSO2 Identity Server Console, go to Applications.
-
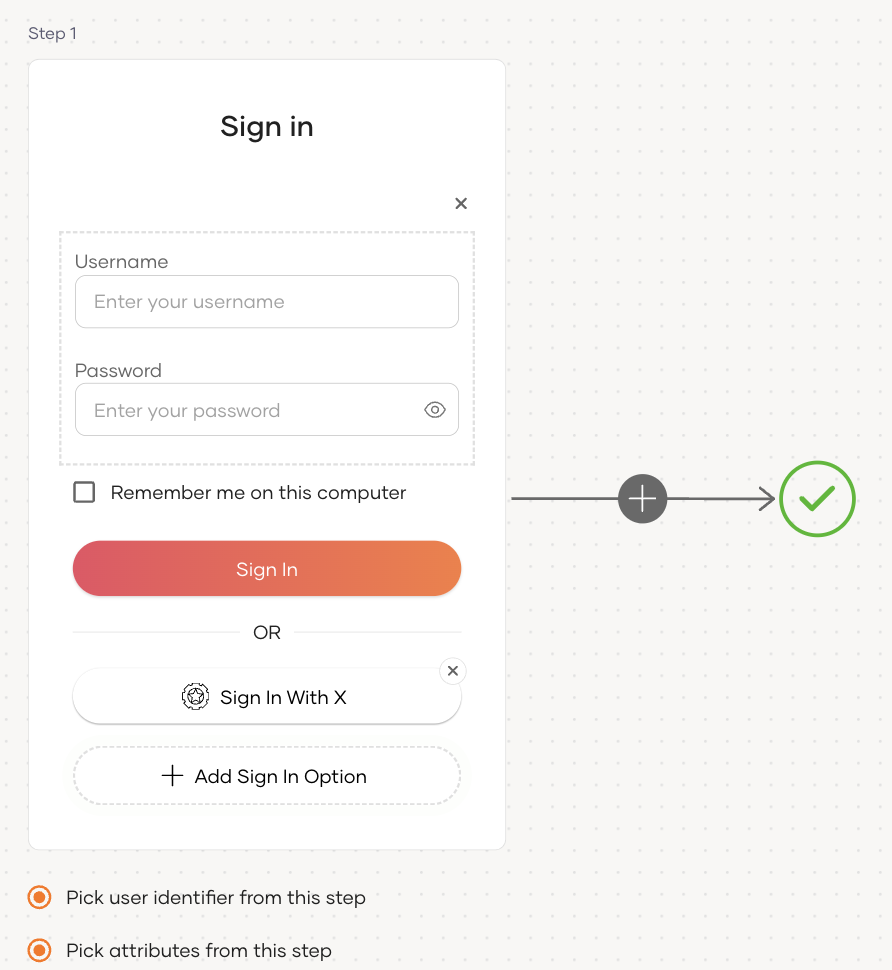
Select your application, go to the Login Flow tab and add X login from your preferred editor:
-
Click Add Sign In Option to add a new authenticator to the first step.
-
Select the Twitter connection.
-
Click Confirm to add login with X to the sign-in flow.
Recommendations
It is recommended to add your social and enterprise connections to the first authentication step as they are used for identifying the user.
-
-
Click Update to save your changes.
Try it out
Follow the steps given below.
-
Access the application URL.
-
Click Login to open the WSO2 Identity Server login page.
-
On the WSO2 Identity Server login page, Sign in with X.
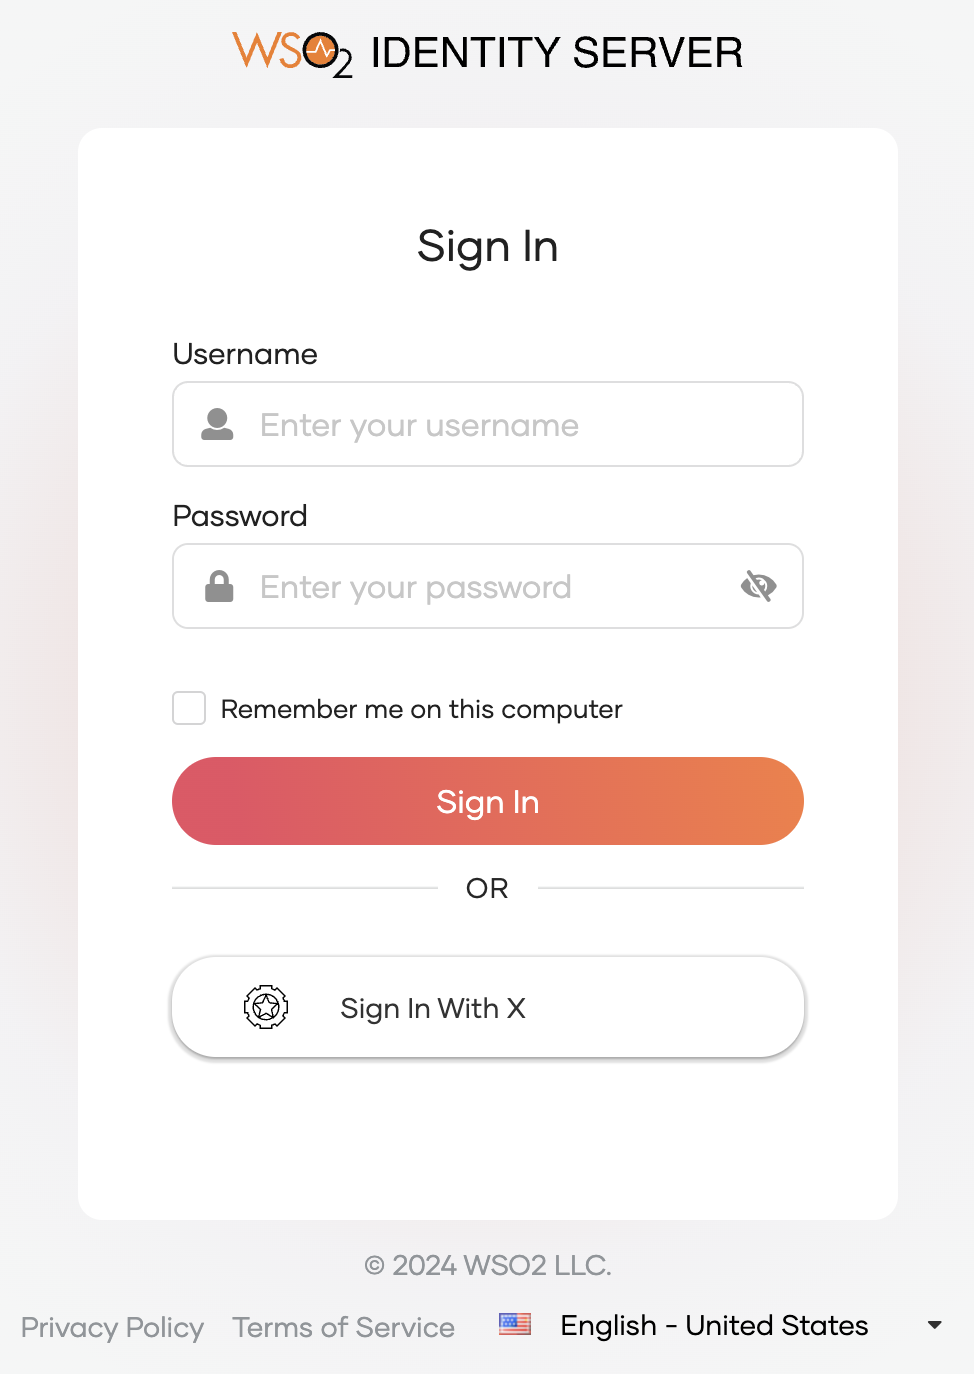
-
Log in to X with an existing user account.
Note
When a user successfully logs in with X for the first time, a user account is created in the WSO2 Identity Server Console with the X username. This new user account will be managed by X.
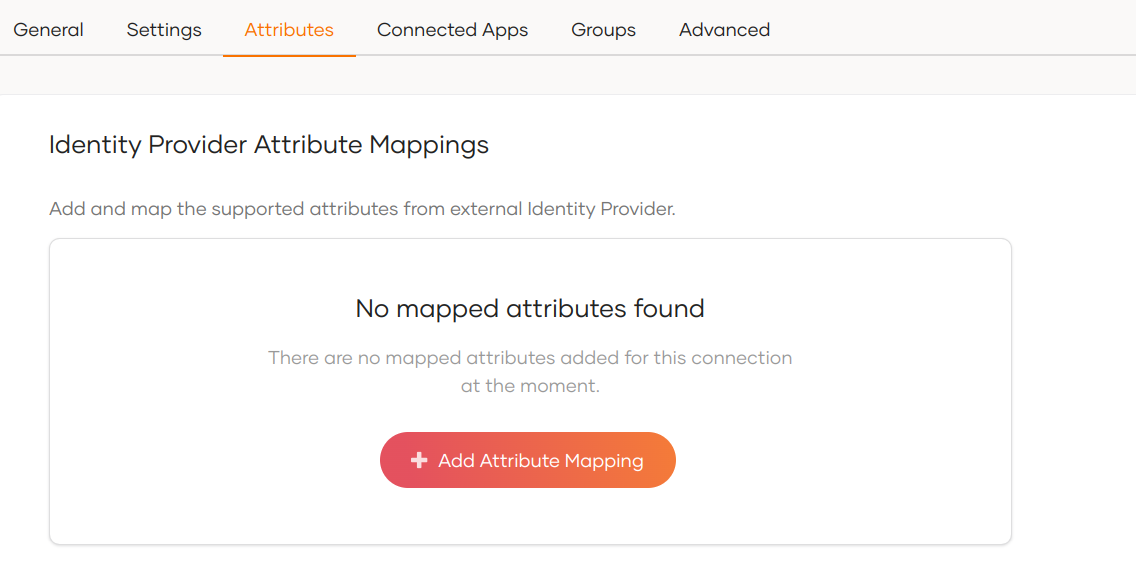
Configure user attributes
Configuring attributes for an Identity Provider (IdP) involves mapping the attributes available in the external IdP to local attributes. This is done so that WSO2 Identity Server can identify the user attributes in the response sent from the external IdP.
To do so,
-
On the WSO2 Identity Server Console, click Connections.
-
Select the relevant IdP connection from the list and click Set up.
-
Go to the Attributes tab and under Identity Provider Attribute Mappings, click Add Attribute Mapping.
-
Enter the external attribute, select the corresponding local attribute to which it maps and click Add Attribute Mapping.
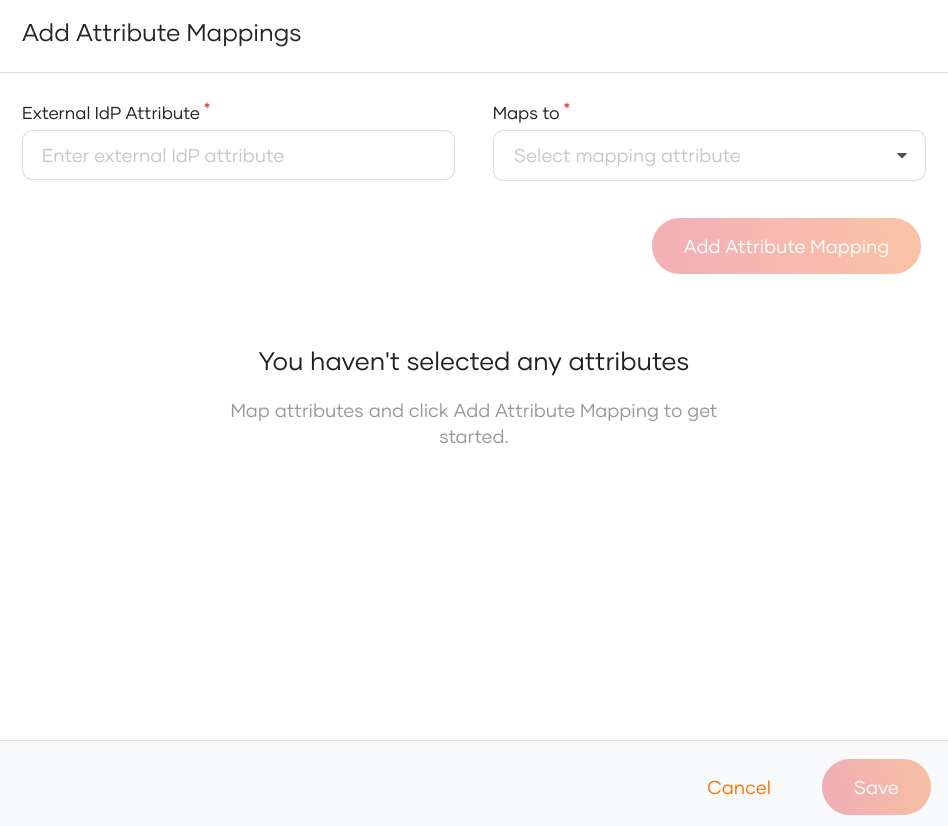
-
Click Save to save the entries.
-
Under Subject, select a Subject Attribute that will be used to uniquely identify the user.
-
Under Provisioning Attributes Selection, select the required attributes that needs to be sent in the response to provision the user in WSO2 Identity Server.
-
Click Update to save the changes.
Configure connection
To learn more about other configurations available for the connection, refer to the add federated login documentation.