Connect WSO2 Identity Server as an OIDC attribute provider for verifiable credentials (VC) with MATTR
Verifiable credentials are a digitalized representation of paper-based credentials and can be stored in a digital wallet. These credentials can be cryptographically verified, making them more tamper-evident (i.e., it provides clear evidence if the credential has been tampered with) and more secure than their physical forms.
It allows the holder to own, control, and manage the credentials and to address several issues in traditional verification systems like paper-based verification, physical inspections, etc.
If you or your organization are already managing user accounts in an OpenID Connect (OIDC) attribute provider (such as WSO2 Identity Server), you can use OIDC login to share user attributes to offer verifiable credentials.
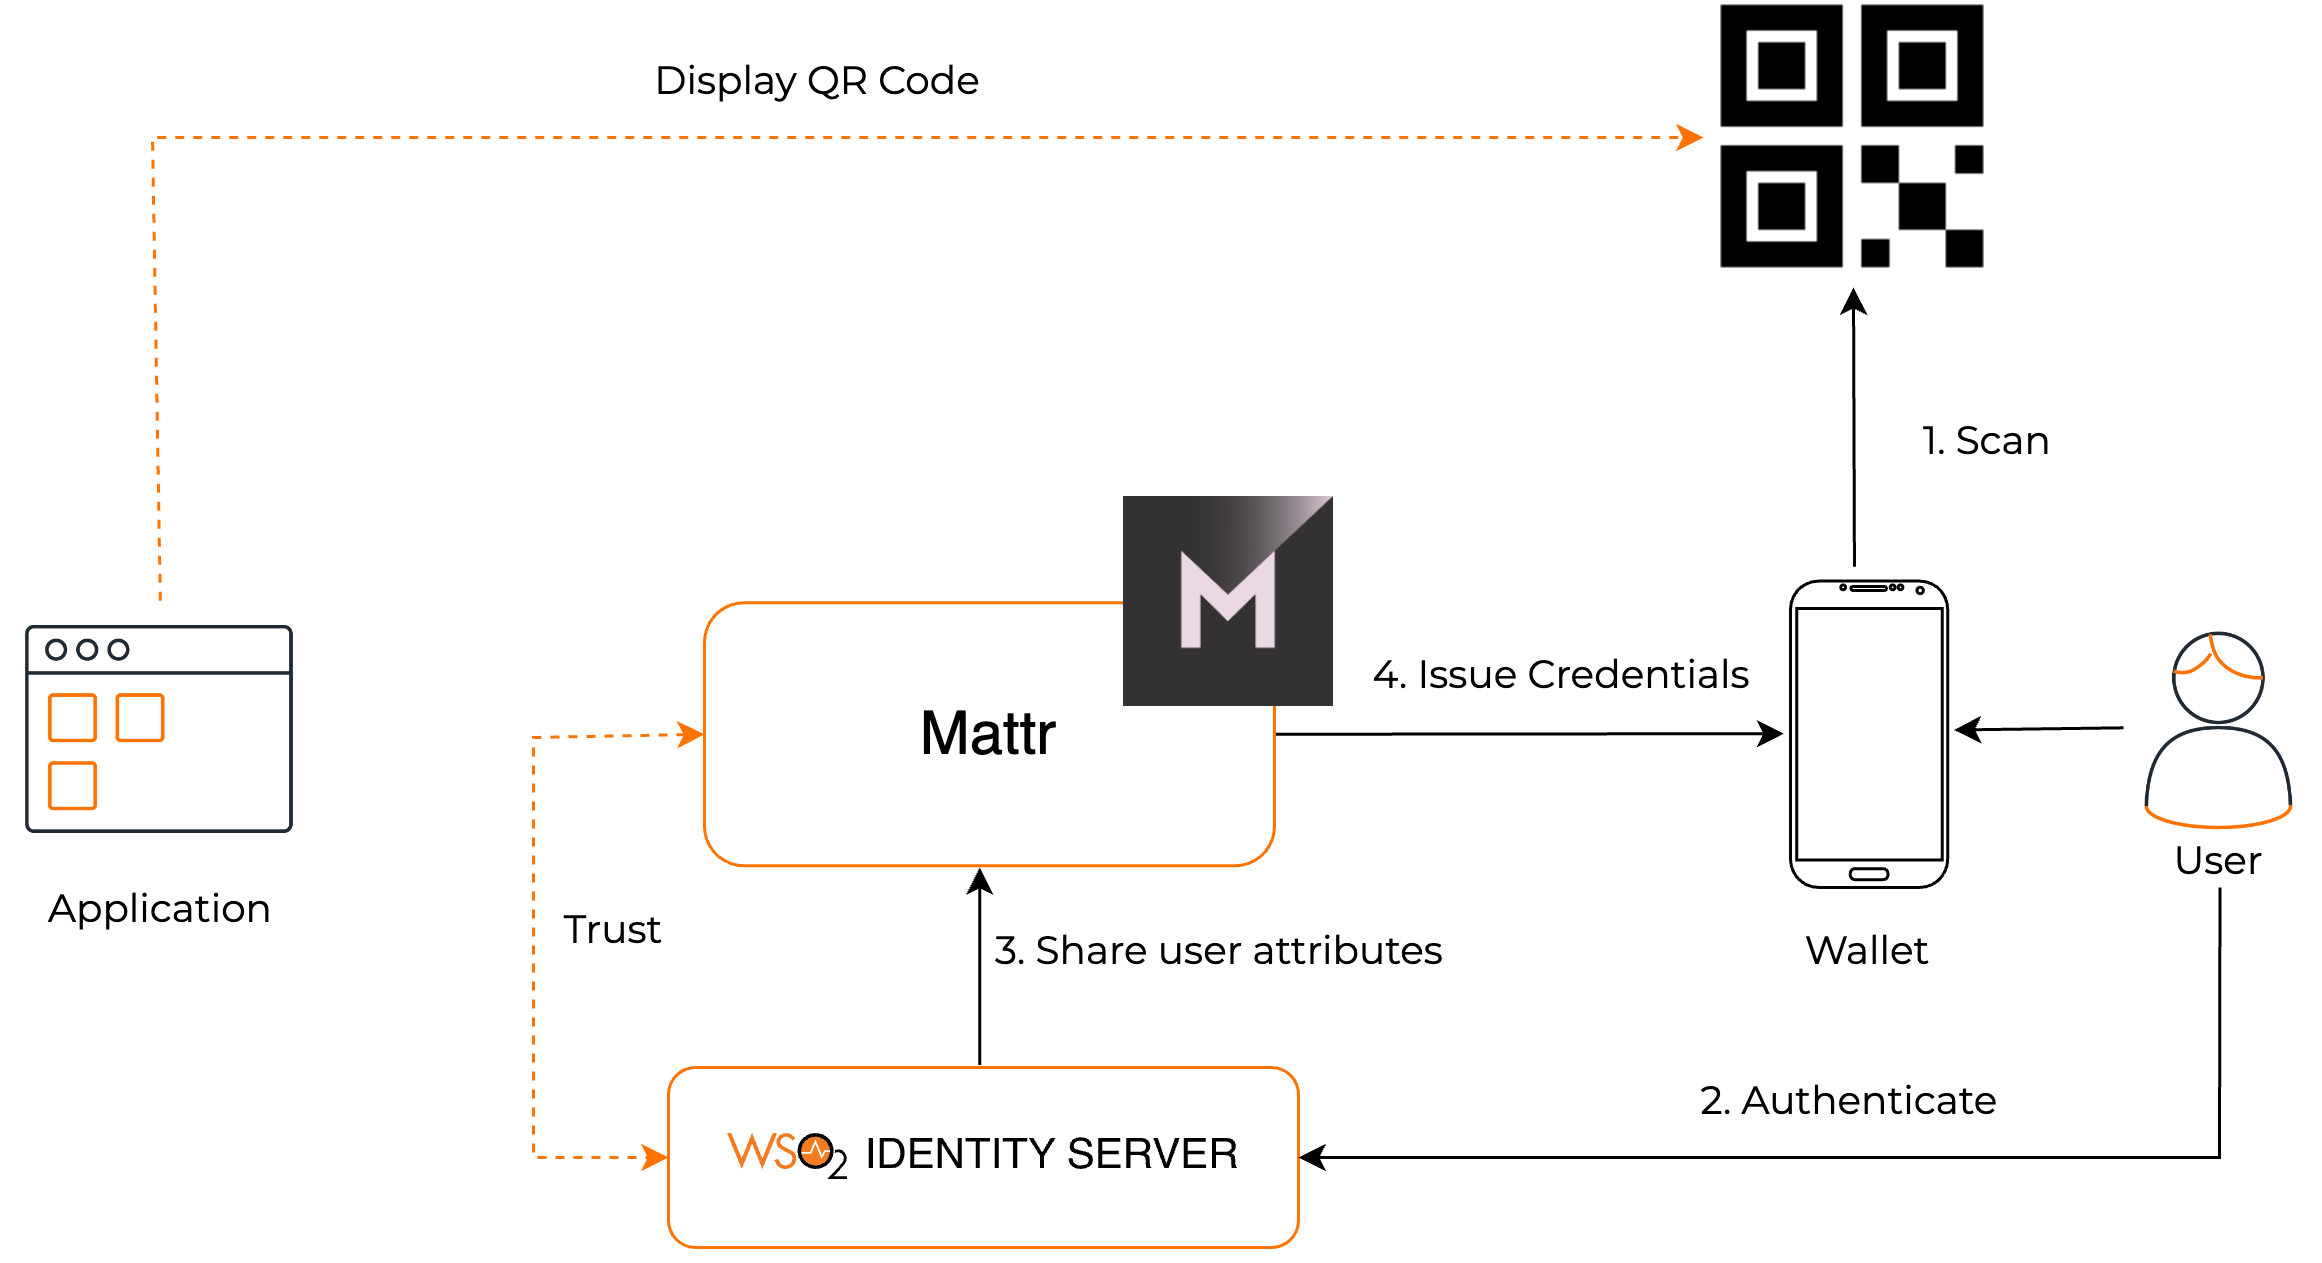
Issuing verifiable credentials

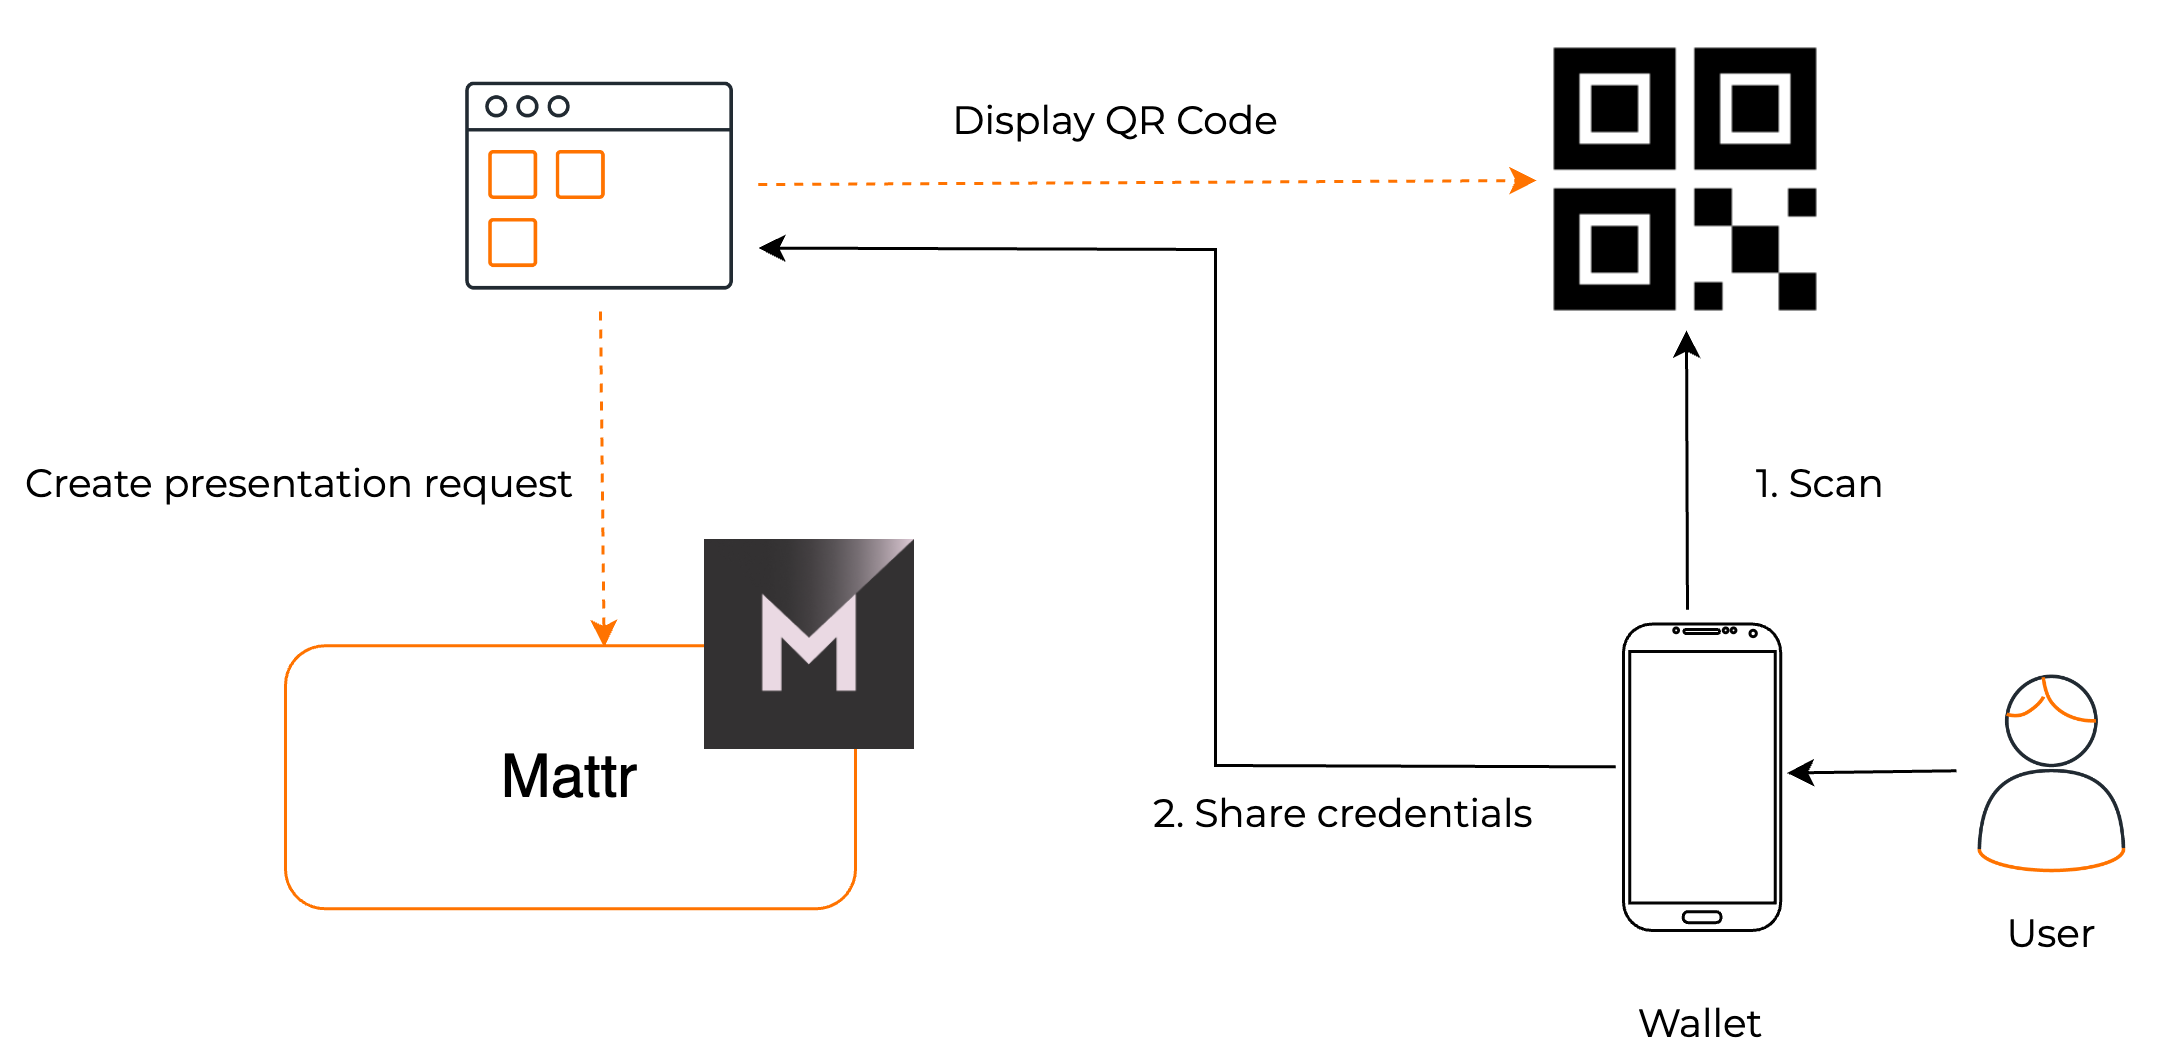
Verifying credentials

This tutorial explains how this is done using MATTR and WSO2 Identity Server, where MATTR acts as a decentralized identity management platform for issuing verifiable credentials, management, and verification, while WSO2 Identity Server acts as the OIDC identity provider. Given below are the high-level steps you will follow:
- Configuring MATTR to connect to WSO2 Identity Server with OpenID Connect.
- Issuing verifiable credentials to the MATTR Wallet.
- Verifying credentials presented by the Wallet holder.
Step 1: Connect MATTR to WSO2 Identity Server with OIDC
Follow the instructions below to begin.
Step 1.1: Register an application in WSO2 Identity Server
To register your application in WSO2 Identity Server:
- Go to the WSO2 Identity Server Console.
-
To create an OIDC application, go to Applications, click +New Application, and select Traditional Web Application.
-
Give a name for the application, select the OpenID Connect protocol, provide an authorized redirect URL, and click Register to complete the registration.
Note
For now, let's give a dummy value as the Authorized redirect URL. You'll update this later when you configure MATTR and create a credential issuer.
-
Take note of the client ID and client secret.
Note
You will need them to configure the MATTR credential issuer later.
-
-
Go to the Info tab and take note of the Token URL.
- Go to the User Attributes tab, select the mandatory user attributes that you need to offer with the verifiable credential (for example, Email, First Name, Last Name, and Date of Birth.), and click Update to save the changes.
Step 1.2: Create a user account in WSO2 Identity Server
If you currently do not have any users in the WSO2 Identity Server, follow the instructions below to create a new user account.
- On the WSO2 Identity Server Console, go to User Management > Users.
- Click + Add User and provide the required details.
Later, this user will log in to WSO2 Identity Server to get verifiable credentials to the MATTR Wallet.
Step 1.3: Configure MATTR and create a credential issuer
Follow the steps given below.
-
Go to
https://mattr.global/, create a MATTR account, and take note of your client ID, client secret, and tenant domain.Note
From now on, let's refer to the MATTR client id as
<MATTR_CLIENT_ID>, its client secret as<MATTR_CLIENT_SECRET>, and its tenant domain as{tenant-subdomain}or<TENENT_DOMAIN>. -
Get an access token for the MATTR tenant by sending the following request:
Note
We are using a cURL command to send the request in this example.
curl -i -X POST "https://auth.mattr.global/oauth/token" \
-H "Content-Type: application/json" \
-d '{
    "client_id": "<MATTR_CLIENT_ID>",
    "client_secret": "<MATTR_CLIENT_SECRET>",
    "audience": "https://vii.mattr.global",
    "grant_type": "client_credentials"
}'
Note
From now on, let's refer to the value of the
access_tokenparameter in the response as<BEARER_TOKEN>. -
Create a MATTR decentralized ID (DID) with a BLS key type, which supports BBS+ signatures.
curl -i -X POST "https://{tenant-subdomain}.vii.mattr.global/core/v1/dids" \
-H "Authorization: Bearer <BEARER_TOKEN>" \
-H "Content-Type: application/json" \
-d '{
    "method": "key",
    "options": {
    "keyType": "bls12381g2"
    }
}'
Note
From now on, let's refer to the value of the DID parameter in the response body as
<DID_ID>. -
Create a MATTR credential issuer using the following cURL command:
curl -i -X POST "https://{tenant-subdomain}.vii.mattr.global/ext/oidc/v1/issuers" \
-H "Authorization: Bearer <BEARER_TOKEN>" \
-H "Content-Type: application/json" \
-d '{
    "credential": {
    "issuerDid": "<DID_ID>",
    "name": "<ISSUER_NAME>",
    "context": [
        "https://schema.org"
    ],
    "type": [
        "VerifiableCredential",
        "<CREDENTIAL_TYPE>"
    ]
    },
    "federatedProvider": {
    "url": "<TOKEN_ENDPOINT_URL>",
    "scope": [
        "openid",
        "profile",
        "email"
    ],
    "clientId": "<OIDC_APP_CLIENT_ID>",
    "clientSecret": "<OIDC_APP_CLIENT_SECRET>"
    },
    "claimMappings": [
    {
        "oidcClaim": "email",
        "jsonLdTerm": "email"
    },
    {
        "oidcClaim": "given_name",
        "jsonLdTerm": "given_name"
    },
    {
        "oidcClaim": "birthdate",
        "jsonLdTerm": "birthdate"
    },
    {
        "oidcClaim": "family_name",
        "jsonLdTerm": "familyName"
    }
    ]
}'
Update the values in the above request as follows:
<ISSUER_NAME>and<CREDENTIAL_TYPE>: Provide meaningful values.<TOKEN_ENDPOINT_URL>: Provide the WSO2 Identity Server token endpoint URL.<OIDC_APP_CLIENT_ID>: Provide the OIDC application ID.<OIDC_APP_CLIENT_SECRET>: Provide the OIDC application secret that you created when configuring the application in WSO2 Identity Server.claimMappings: Configure the claims that you need to offer with the verifiable credential to the wallet holder by adding them in theclaimMappingsparameter in the request payload. See the MATTR-supported credential claim mappings.
Note
In the step that displays the QR code, we'll refer to the
idparameter in the response as{issuer-id}. -
On the WSO2 Identity Server Console, go to the Protocol tab under Applications, select your OIDC application, and do the following updates:
- Use the
callbackUrlparameter underfederatedProviderin the above response body as the authorized redirect URL for the OIDC application. - Enable CORS by adding the MATTR origin into the Allowed origins field, and then click Update.
- Use the
Step 2: Issue verifiable credentials to a MATTR Wallet
Follow the steps given below.
Step 2.1: Display the QR code
Get a QR code that can be scanned to get verifiable credentials from the MATTR Wallet. Given below is an example from https://goqr.me/api/.
https://api.qrserver.com/v1/create-qr-code/?size=400x400&data=openid://discovery?issuer=https://{tenant-subdomain}.vii.mattr.global/ext/oidc/v1/issuers/{issuer-id}
Step 2.2: Get verifiable credentials with MATTR Wallet
Follow the steps given below.
-
Download the MATTR mobile wallet app to your mobile phone.
Note
See this documentation for details.
-
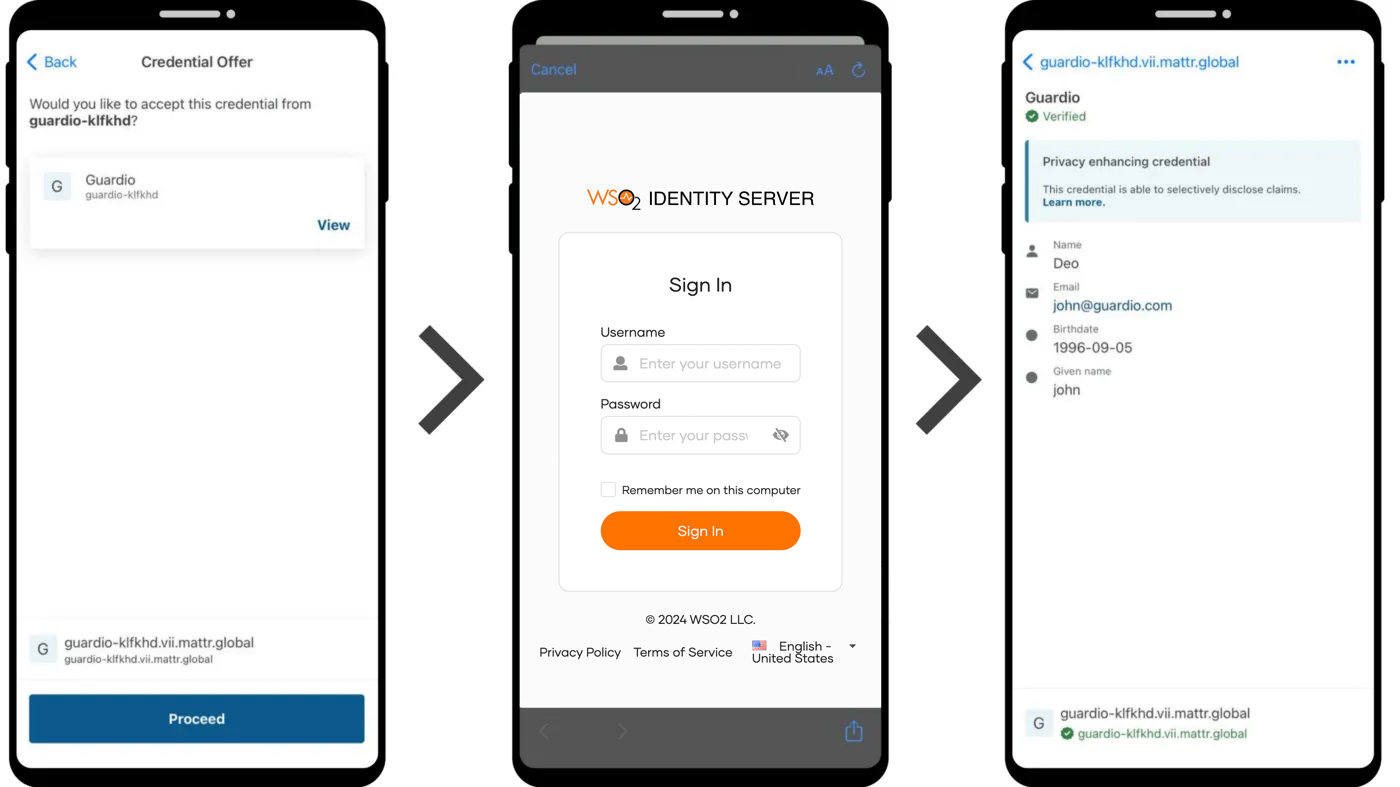
Go to the MATTR mobile wallet app and scan the QR code.
-
Click Proceed and log in to your account in WSO2 Identity Server.

Now, you can view your credentials in your MATTR Wallet.
Step 2.3: Verify credentials
Let's use a sample MATTR application to perform the credential verification. For the steps below, use the previously created MATTR tenant or a new tenant. If you are using a new MATTR tenant, you need a new access token.
Note
The presentation request does not support DID with a BLS key type, which we created earlier. Hence, you may need to create a new DID by removing keyType in the options of the credential issuer creation request body.
-
Create a credential presentation template with MATTR.
Replace the
<TEMPLATE_NAME>with a meaningful value and<CREDENTIAL_TYPE>with the same value used in the issuer-creation step.curl -i -X POST "https://{tenant-subdomain}.vii.mattr.global/core/v1/presentations/templates" \ -H "Authorization: Bearer <BEARER_TOKEN>" \ -H "Content-Type: application/json" \ -d '{ "domain":"<TENENT_DOMAIN>.vii.mattr.global", "name":"<TEMPLATE_NAME>", "query": [{ "type":"QueryByFrame", "credentialQuery":[ { "reason": "Please provide your educational award and surname from your Certificate", "frame":{ "@context":[ "https://www.w3.org/2018/credentials/v1", "https://w3id.org/security/bbs/v1", "https://mattr.global/contexts/vc-extensions/v1", "https://schema.org", "https://w3id.org/vc-revocation-list-2020/v1" ], "type": ["VerifiableCredential", "<CREDENTIAL_TYPE>"], "credentialSubject":{ "@explicit":true, "given_name":{} } }, "trustedIssuer":[ { "issuer":"<DID>", "required":true } ], "required":true } ] }] }' -
Download and configure the MATTR sample application by visiting the GitHub repository below.
https://github.com/mattrglobal/sample-apps/tree/master/verify-callback-expressUpdate the environment variables in the
.envfile according to your setup. Specifically, for theTEMPLATEIDvariable, use the ID value you received from the response to the previous request. -
Run the sample application and start an Ngrok tunnel to your localhost.
Tip
If everything is set up correctly, the running terminal shows you a QR code.
-
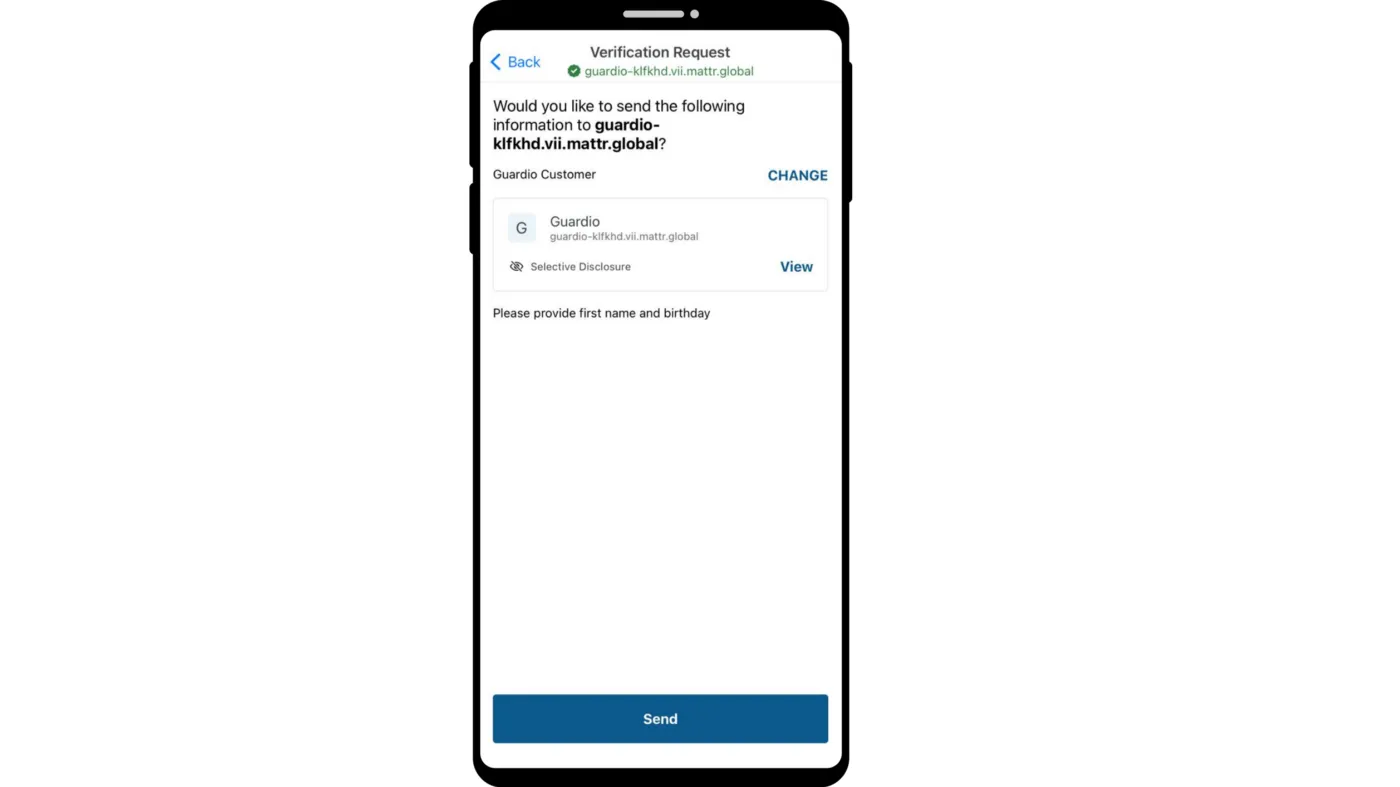
Scan the QR code with the MATTR Wallet and click Send.

Note
Once sent by the wallet holder, the callback endpoint defined in the presentation request receives the verification response and requested credentials. In this case, the sample MATTR application receives the response and prints it to the running terminal.
{
presentationType: 'QueryByFrame',
challengeId: 'GW8FGpP6jhFrl37yQZIM6w',
claims: {
    id: 'did:key:z6MkisTmUeMWzqbwxTad2jrhoAXrLZN1BggiYUNsVBR7FUYW',
    'http://schema.org/birthdate': '1996-09-05'
    'http://schema.org/given_name': 'john'
},
verified: true,
holder: 'did:key:z6MkisTmUeMWzqbwxTad2jrhoAXrLZN1BggiYUNsVBR7FUYW'
}
Now you know how to issue verifiable credentials for wallet holders and how to verify them with MATTR using WSO2 Identity Server. You can continue to harness the full capabilities that WSO2 Identity Server provides by customizing the sign-in flow, enhancing application security, etc.