Extend SCIM 2.0 user schemas
The System for Cross-domain Identity Management (SCIM) is a specification that is designed to manage user identities in cloud-based applications and services in a standardized way to enable interoperability, security, and scalability. It is an emerging open standard which provides RESTful APIs for easier, cheaper, and faster way for creating, provisioning, and maintaining identities. The latest version SCIM 2.0 was released as IETF RFC in September 2015.
Note
SCIM 2.0 is supported by default in WSO2 Identity Server version 5.4.0 onwards. If you are using WSO2 Identity Server 5.4.0 or a later version, see SCIM 2.0 Users REST API, Groups REST API, Server Config REST API, Me REST API, and Roles REST API for instructions on how to use SCIM 2.0 OOTB.
Extend the SCIM 2.0 API
The SCIM 2.0 (System for Cross-Domain Identity Management) specification defines a fixed set of default attributes for the user object. This set is defined to ensure the interoperability and it can cater to most of the industry's identity management requirements. However, in reality, organizations have their own attributes defined for their users which have already been used in their LDAP schemas. Therefore, SCIM is extensible enough to cope with custom attributes and uses the Enterprise User Extension to support extra attributes for the SCIM user object.
WSO2 Identity Server allows users to define their own user schema in addition to the core user schema. These configured schema are then used while creating or validating user objects. This means that custom user attributes can be passed using SCIM for identity management requirements. Follow the steps given below to add a custom attribute.
-
Open the
scim2-schema-extension.configfile located in the<IS_HOME>/repository/conf/folder. -
Define the extension by adding attributes in the following format before the last element of the JSON array in the
scim2-schema-extension.configfile.{ "attributeURI":"urn:ietf:params:scim:schemas:extension:enterprise:2.0:User:customAttribute", "attributeName":"customAttribute", "dataType":"string", "multiValued":"false", "description":"customAttribute", "required":"false", "caseExact":"false", "mutability":"readwrite", "returned":"default", "uniqueness":"none", "subAttributes":"null", "canonicalValues":[], "referenceTypes":[] } -
Add the attribute names of the attributes that you added to the
scim2-schema-extension.configfile assubAttributesof theurn:ietf:params:scim:schemas:extension:enterprise:2.0:Userattribute as seen in the code block below.{ "attributeURI":"urn:ietf:params:scim:schemas:extension:enterprise:2.0:User", "attributeName":"urn:ietf:params:scim:schemas:extension:enterprise:2.0:User", "dataType":"complex", "multiValued":"false", "description":"Enterprise User", "required":"false", "caseExact":"false", "mutability":"readWrite", "returned":"default", "uniqueness":"none", "subAttributes":"employeeNumber costCenter organization division department manager customAttribute", "canonicalValues":[], "referenceTypes":["external"] } -
Save the file and restart WSO2 Identity Server.
Add the custom attribute
-
On the WSO2 Identity Server Console, go to User Attributes & Stores > Attributes.
-
Click Attributes again under the Manage Attributes section.
-
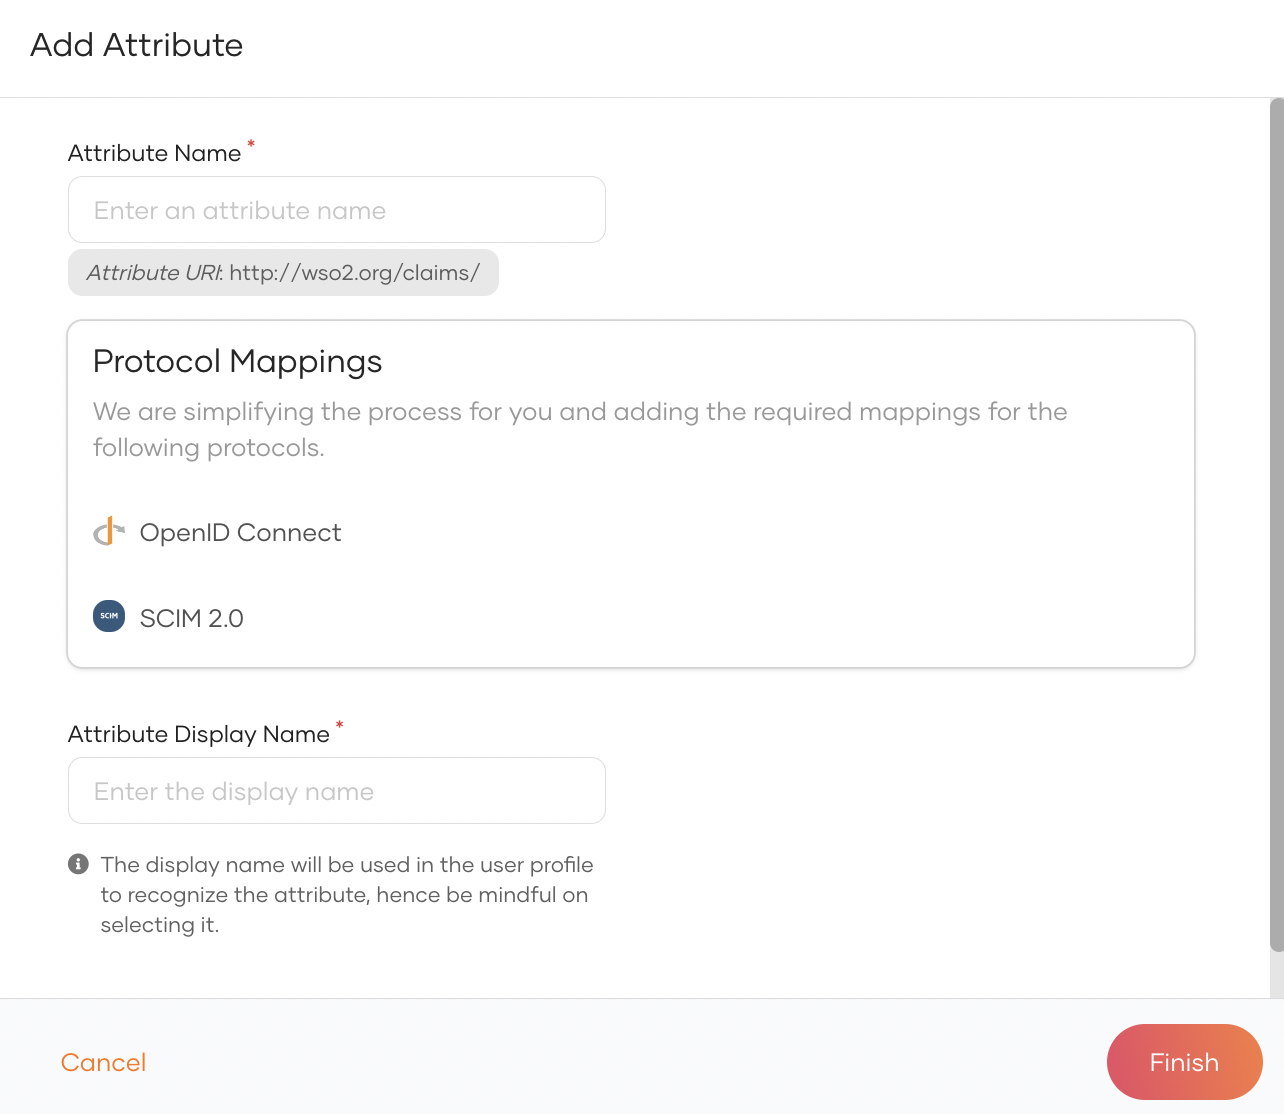
Click New Attribute and enter the following values.
- Attribute Name: customAttribute
- Attribute Display Name: Custom Attribute
Tip
Delete the SCIM 2.0 mapping under Protocol Mappings since this adds a custom schema. An enterprise schema will be added later in this guide.
-
Click Finish.
Note
- The configuration above is valid when using the PRIMARY userstore. If you have a secondary userstore configured, make sure to add another attribute mapping for the particular user store.
Map the custom attribute
-
On the WSO2 Identity Server Console, go to User Attributes & Stores > Attributes.
-
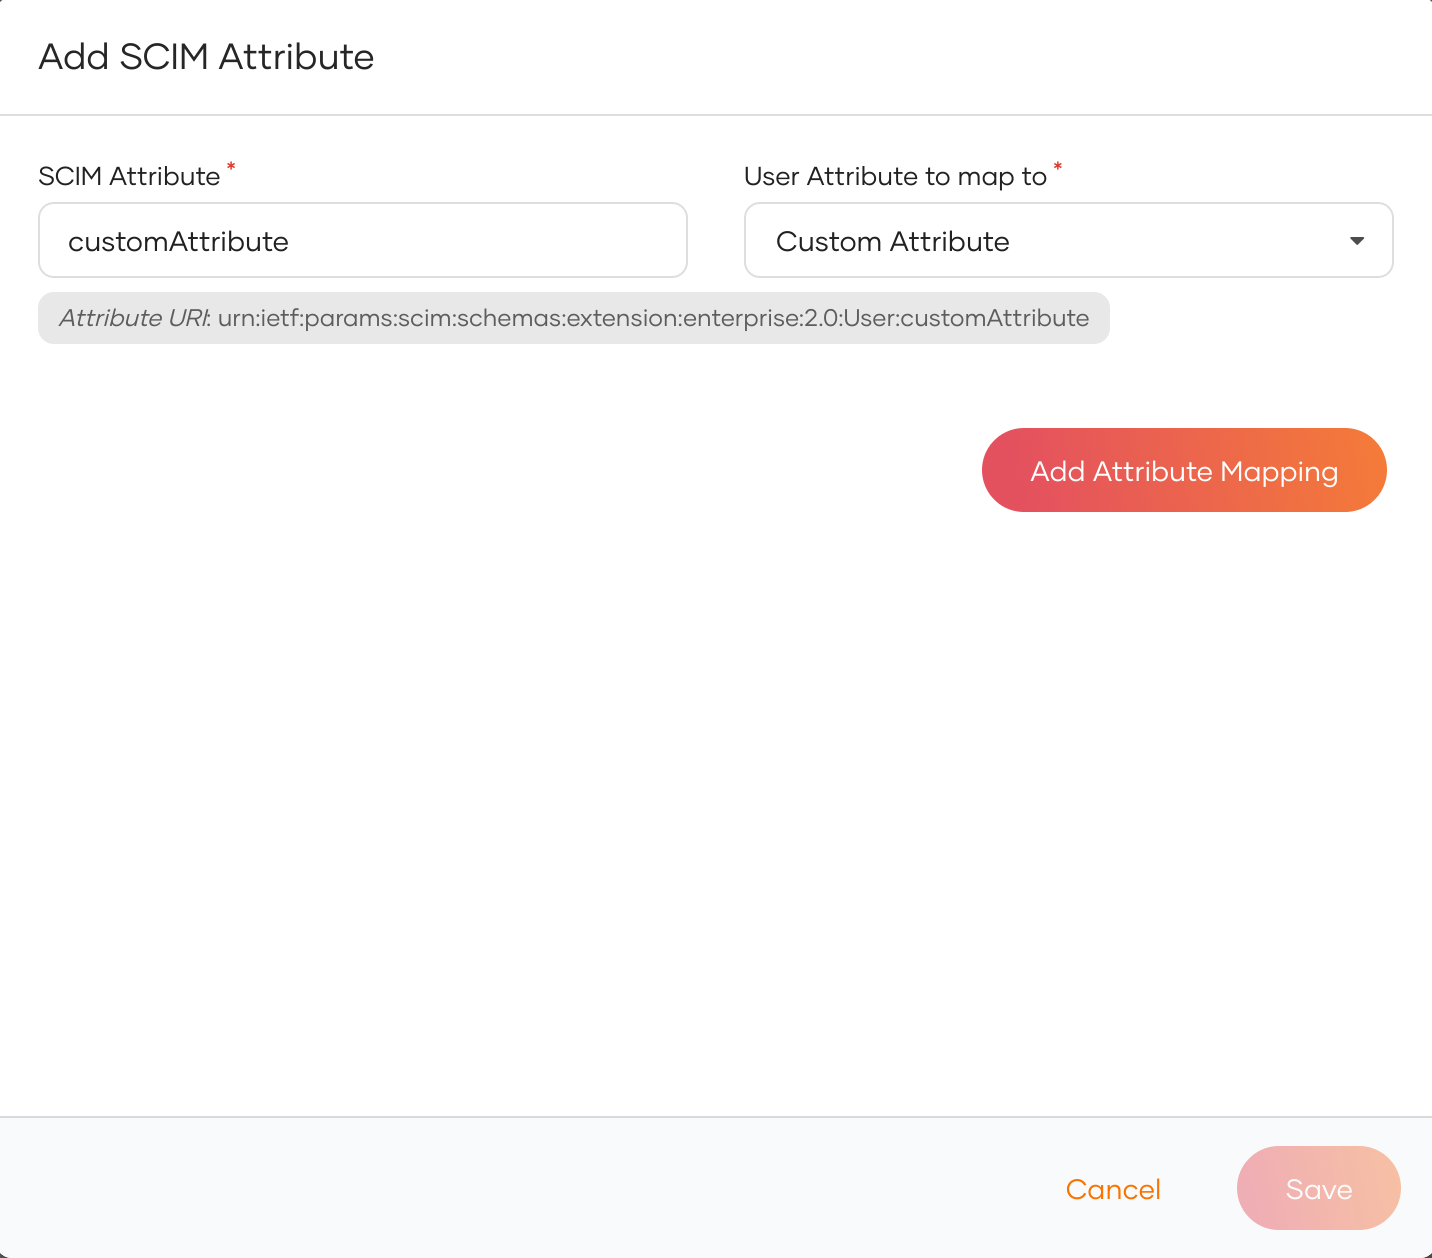
Under Manage Attribute Mappings, click SCIM 2.0.
-
Go to Enterprise Schema tab, click New Attribute and enter the following values.
- SCIM Attribute: customAttribute
- User Attribute to map to: Custom Attribute
-
Click Add Attribute Mapping. Then click Save.
Try it out
-
On the WSO2 Identity Server Console, go to User Management > Users.
-
Click Add User.
-
Provide the required details and create the user.
-
In the user profile, add a value for the Custom Attribute field and click Update.
-
Retrieve the user using SCIM and ensure that the custom attribute value is present.
SCIM request
curl -v -k --user admin:admin https://localhost:9443/scim2/Users
SCIM response
{
    "totalResults":2,
    "startIndex":1,
    "itemsPerPage":2,
    "schemas":["urn:ietf:params:scim:api:messages:2.0:ListResponse"],
    "Resources":[
        {
            "emails":["[email protected]"],
            "meta":{
                "created":"2020-01-21T16:52:11Z",
                "lastModified":"2020-01-21T16:52:11Z"
            },
            "roles":[{"type":"default", "value":"Internal/everyone,admin"}],
            "name":{"givenName":"admin", "familyName":"admin"},
            "id":"54779523-8677-48bc-bce6-1764b7439f64",
            "userName":"admin"
        },
        {
            "emails":[{"type":"home", "value":"testvalue"},"[email protected]"],
            "meta":{
                "created":"2020-01-21T16:56:56Z",
                "lastModified":"2020-01-21T17:02:43Z",
                "resourceType":"User"
            },
            "EnterpriseUser":{"customAttribute":"testvalue"},
            "roles":[{"type":"default", "value":"Internal/everyone"}],
            "name":{"givenName":"Alex", "familyName":"alex"},
            "id":"c91b5f1c-08c7-44d3-89c4-34ea9440dea5",
            "userName":"alex"
        }
    ]
}
You can also try out updating the custom attribute value using the following SCIM command and checking if the value is updated by accessing the user profile on the WSO2 Identity Server console.
Request format
curl -k -X PATCH \
  https://<IS_HOST>:<IS_PORT>/scim2/Users/<USER_ID> \
  -H 'Authorization: Basic <Base64Encoded_username:password>' \
  -H 'Content-Type: application/json' \
  -d '{
   "schemas":[
      "urn:ietf:params:scim:api:messages:2.0:PatchOp"
   ],
   "Operations":[
      {
         "op":"replace",
         "value":{
            "urn:ietf:params:scim:schemas:extension:enterprise:2.0:User": {
                 "customAttribute": "<NEW_VALUE>"
            }
         }
      }
   ]
}'
Sample request
curl -k -X PATCH \
    https://localhost:9443/scim2/Users/be8f8562-7661-44a9-b6f4-d6d94dac914f \
    -H 'Authorization: Basic dmloYW5nYTphZG1pbg==' \
    -H 'Content-Type: application/json' \
    -d '{
    "schemas":[
        "urn:ietf:params:scim:api:messages:2.0:PatchOp"
    ],
    "Operations":[
        {
            "op":"replace",
            "value":{
            "urn:ietf:params:scim:schemas:extension:enterprise:2.0:User": {
                    "customAttribute": "new value"
            }
            }
        }
    ]
}'