Connect WSO2 Identity Server as an OIDC attribute provider for verifiable credentials (VC) with Microsoft Entra Verified ID
Microsoft Entra Verified ID is a verifiable credential issuance and verification service provided by Microsoft Azure. It allows users to generate, present, and verify their digital identities.
Microsoft allows configuring an IDP (such as WSO2 Identity Server) as an OpenID Connect (OIDC) attribute provider for verifiable credentials using their idTokens attestation in which the claims provided through the OIDC id token is used to generate the verifiable credential.
Issuing verifiable credentials

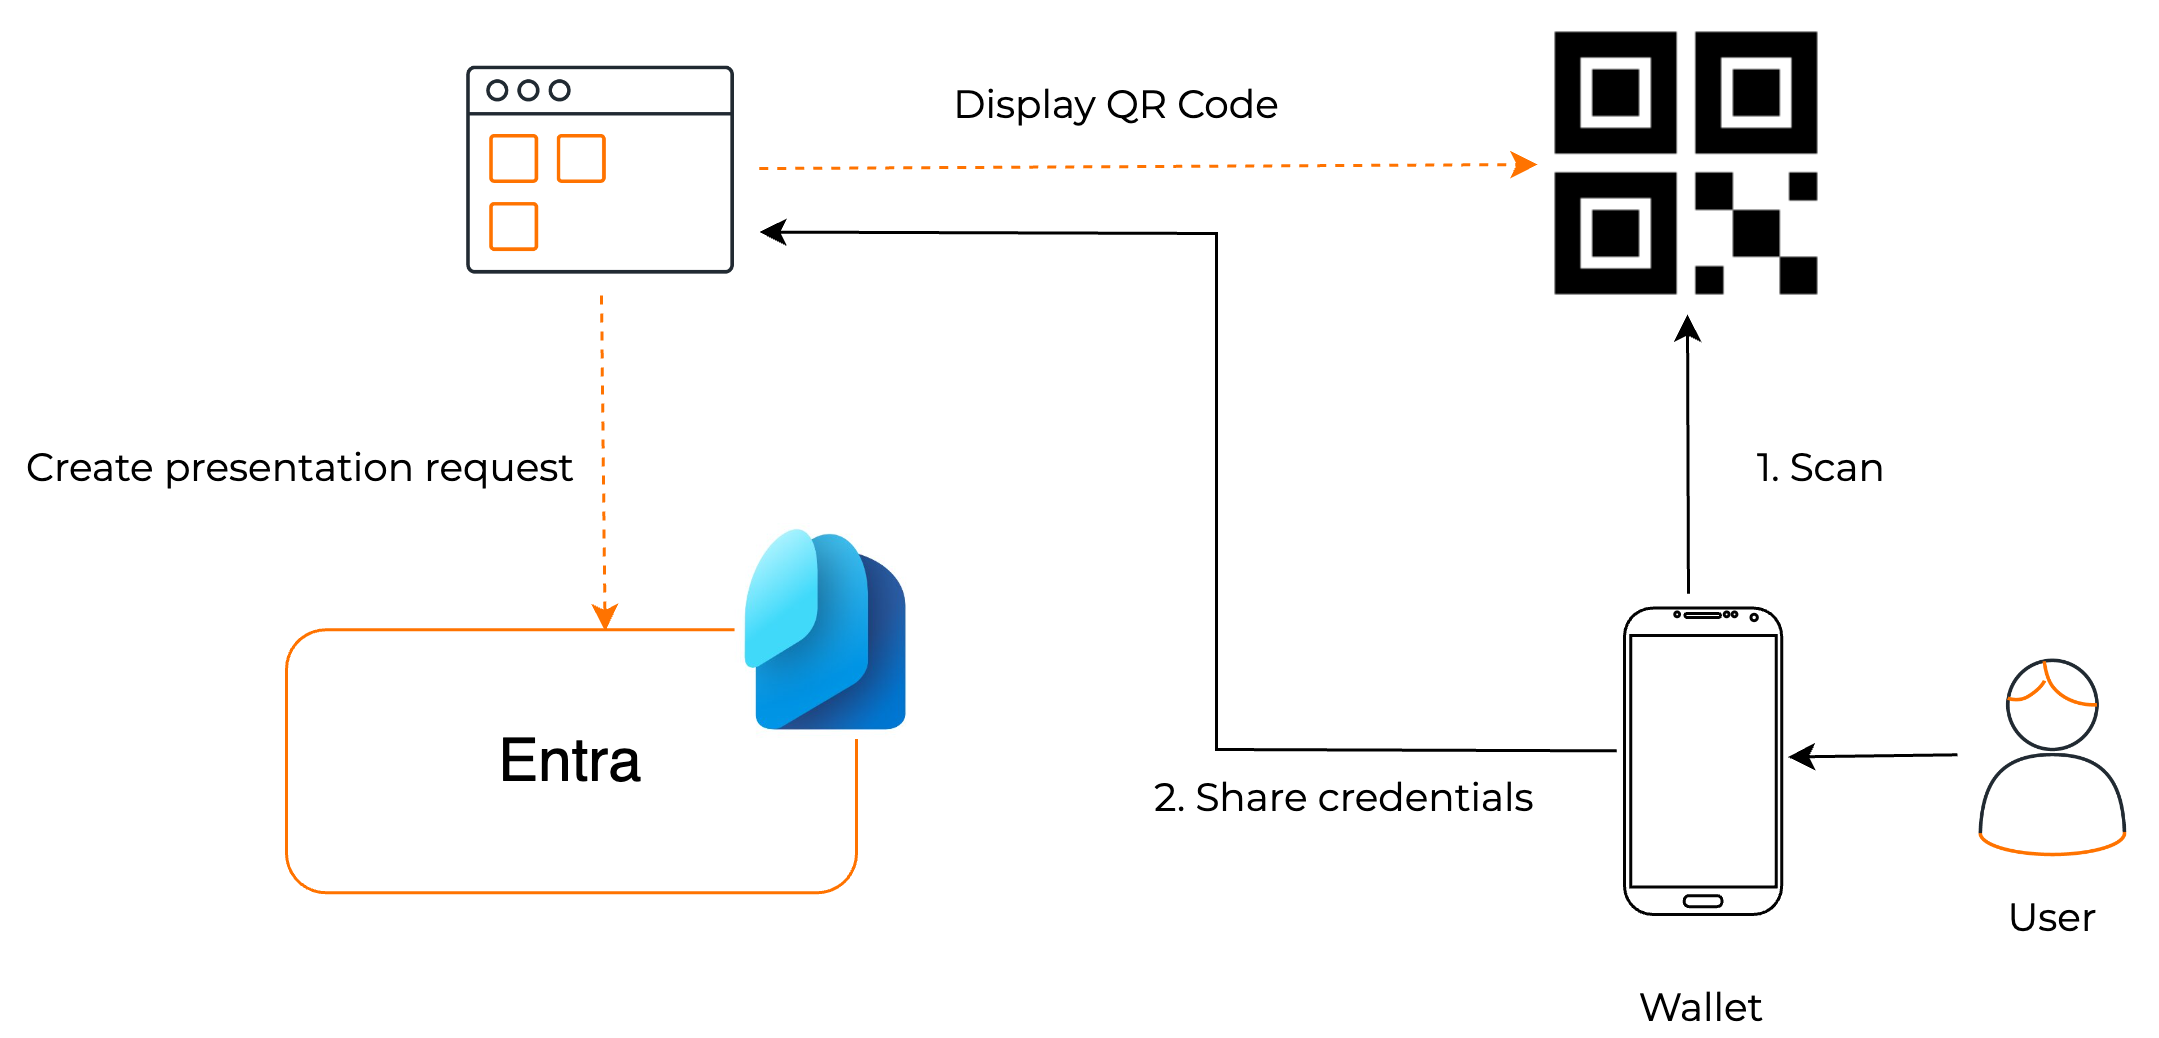
Verifying credentials
This tutorial explains how this is done using WSO2 Identity Server and Microsoft Entra. Given below are the high-level steps you will follow:
- Configure Microsoft Entra Verified ID to issue verifiable credentials.
- Configure WSO2 Identity Server as an OIDC attribute provider.
- Try out the Microsoft Verified ID Node JS sample.
Sample scenario
Consider the sample use case given below.
Krusty Krab is a fast-food restaurant owned and operated by Mr. Krabs. Krusty Krab has an employee management system where employees can log in and perform their employee-related operations, such as payroll handling, expense reimbursement, etc.
Krusty Krab utilizes WSO2 Identity Server as their identity provider. Every Krusty Krab employee has an account in the WSO2 Identity Server.
Recently Mr. Krabs decided to issue employee credentials to their employees using Verifiable Credentials, which the employees can then use to prove their employment at Krusty Krab.
Step 1: Configure Microsoft Azure for verifiable credentials
Before you begin
To proceed with this tutorial, you need to have a tenant with an active Azure subscription. If you haven't claimed an Azure subscription before, you can create an account for free and claim $200 credits.
Before proceeding with this tutorial, check all the prerequisites mentioned in the Azure documentation.
Step 1.1: Create a key vault
First, we need to create an Azure key vault instance to store the public and private keys generated by the Verified ID service.
- Sign in to the Azure portal and from the home page select Create a resource.
- Select Key Vault and click Create.
-
Provide the following information and click Review + Create.
Tip
Leave the rest of the values to their defaults.
Configuration Description Subscription Select your subscription if not already selected. Resource group Select the resource group. You can create a new resource group if you don't already have one. Key vault name Enter a unique name for the key vault. Region Select the region. 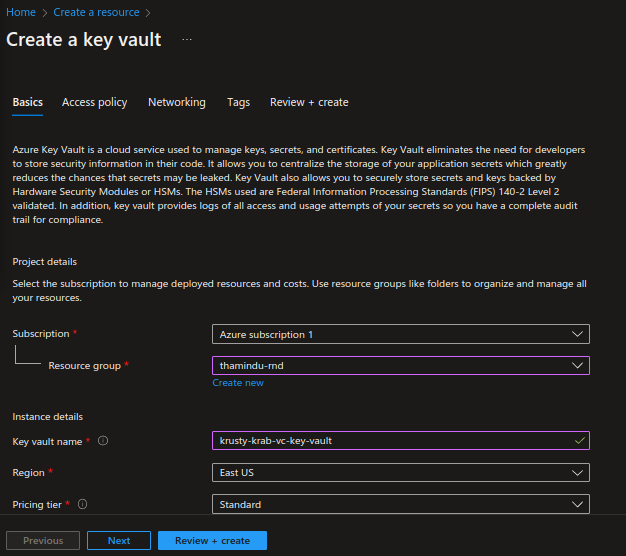
-
Review the details and click Create.
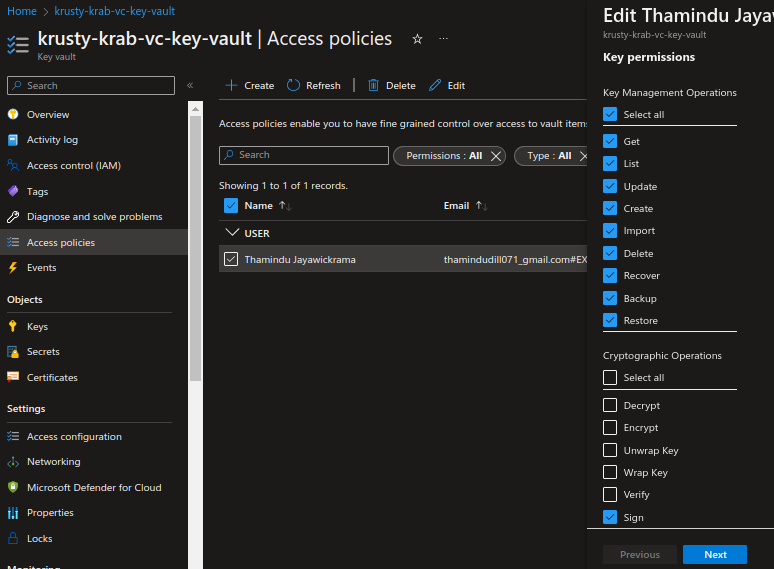
Step 1.2: Set access policies for the key vault
A key vault access policy defines the security principles that can perform operations on the secrets and keys stored in the key vault. You need to define access policies for both the Verified ID Service Administrator account and the Request Service API Principal.
- On the Azure portal, go to the previously created Key Vault instance, and from the left menu, select Access policies.
-
Select the user account that you need to configure access policies for and click Edit from the upper menu.
-
Verify that the following key permissions are enabled.
Tip
Signshould be the only key permission you need to update.- Key Management Operations: Create, Delete
- Cryptographic Operations: Sign
-
Click Next and then save the changes.
Step 1.3: Set up Verified ID
The next step is to create and set up a Verified ID service instance.
-
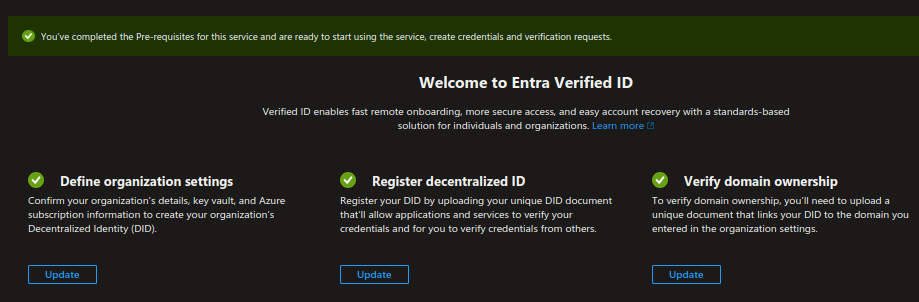
On the Azure portal, search for “verified ID”, select the listed Verified ID tile, and select Setup from the left menu.
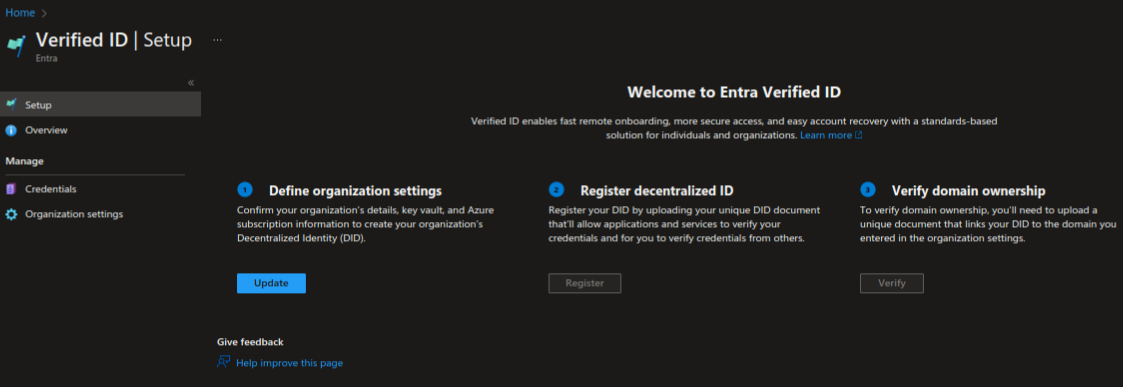
Now, you will see three tiles, as shown in the above image.
-
Click Update under Define organization settings.
Note
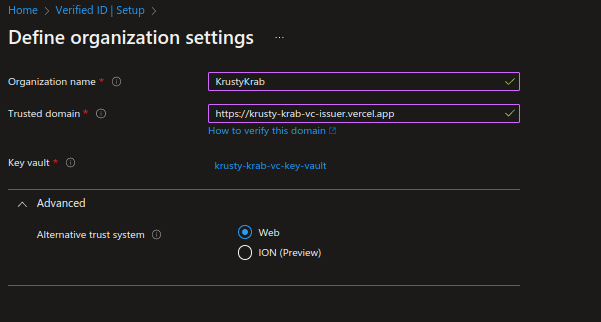
In this step, you're required to provide a domain for your organization. This domain binds your decentralized ID (DID) to something tangible that the users might know about your business. It'll be used for all of your credentials. Digital wallets use this information to validate that your DID is linked to your domain.
For this tutorial, let's deploy a simple web application in vercel. Later, you're required to host some DID well-known files on this site.
-
Enter an organization name and a trusted domain, and then select the key vault you created previously for the key vault.
-
Under Advanced settings, you can select the trust system.
Note
By default, this is selected as Web. As per your preference, you can change this to ION.
-
Save the updates.
Note
When you set up the verified ID, the access policies in the Azure key vault are automatically updated to give the required permissions for service principles of the verified ID.
Step 1.4: Register an application in Azure AD
In this tutorial, let's use a Microsoft verifiable credentials sample web application to configure credential issuance and verification. For the sample application to invoke the Microsoft Entra Verified ID, you need to register an application on the Azure portal and grant API permissions.
-
Sign in to the Azure portal and search for “Azure active directory”.
-
Select App registrations from the left menu and click New registration.
-
Provide a display name for your application and select Accounts in this organizational directory only (Default Directory only - Single tenant) for the supported account types.
-
Click Register to complete the registration.

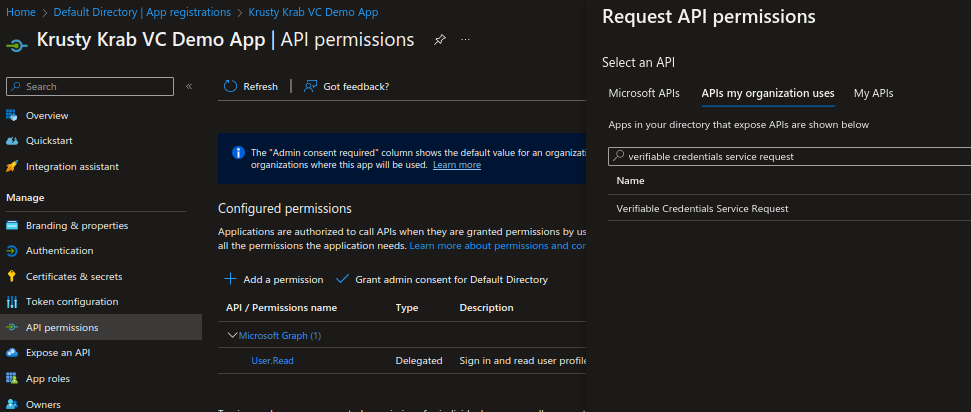
Now, we need to grant permissions to the application to access the “Verifiable Credentials Service Request” service principal.
- Go to the created application on the Azure portal and select API permissions from the left menu.
- Click Add a permission and select APIs my organization uses.
-
Search for “Verifiable Credentials Service Request” and click the listed tile.
-
Choose Application Permission and check VerifiableCredential.Create.All.
-
Click Add permission and then select Grant admin consent for your tenant name.
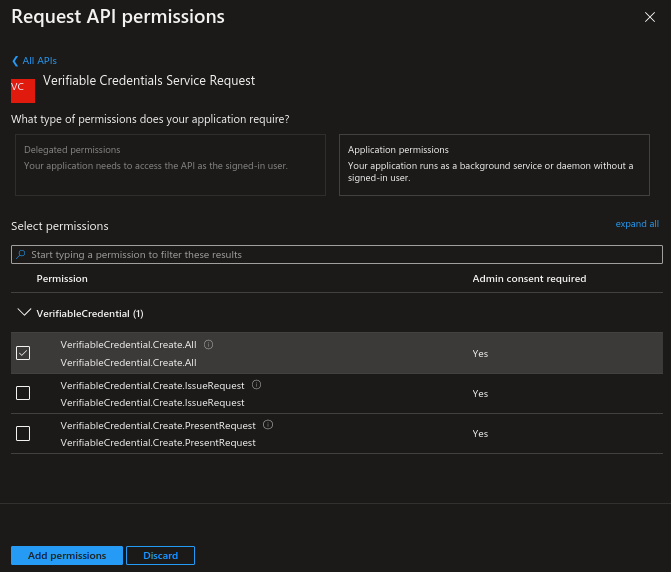
Note
You can choose to grant issuance and presentation permissions separately if you prefer to segregate the scopes into different applications.
Next, we need to create a client secret for the registered application.
- From the left menu, select Certificates & secrets and click New client secret.
-
Give a description and an expiry time for the secret.
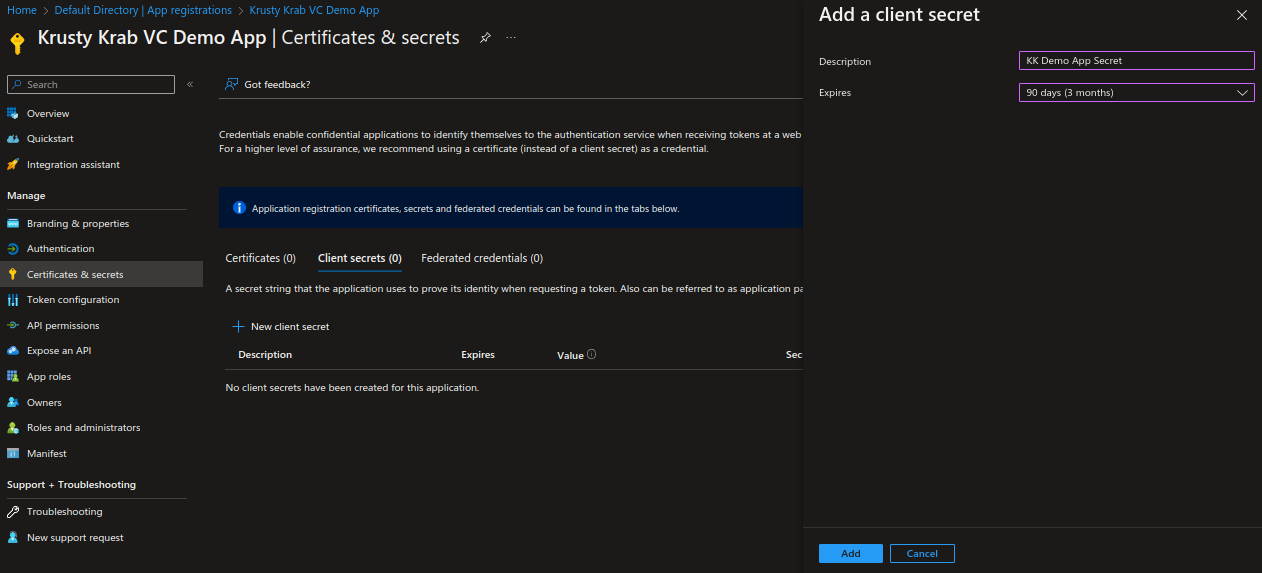
Be sure to keep a record of the secret's value. You'll use this value for a configuration in a later step. The secret value won't be displayed again and isn't retrievable by any other means.
Step 1.5: Register your decentralized ID
Now, you need to complete setting up the Azure Verified ID service. You can skip this step if you have selected did:ion as your trust system.
- Go back to the Verified ID service and select Setup from the left menu.
- Click Register under Register decentralized ID to register your DID document.
-
Copy or download the DID document and host the JSON file in the /.well-known directory on your web server.
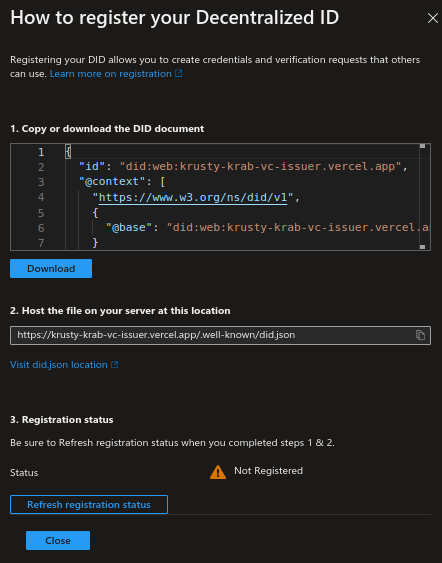
-
After hosting the file, click Refresh registration status.
Tip
If the system can access the hosted file, it is indicated by a green tick on the status.
Step 1.6: Verify domain ownership
Now, you need to verify domain ownership to establish trust between the DID and the domain.
- Click Verify under Verify domain ownership.
-
Copy or download the manifest file and host it under the
/.well-knowndirectory of your web server.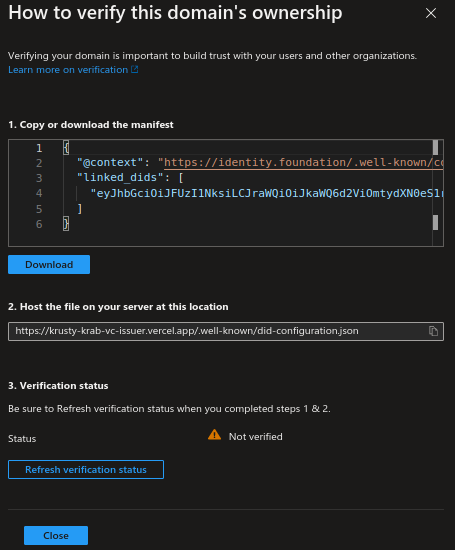
-
After hosting the file, click Refresh verification status.
Tip
If the system can access the hosted file, it is indicated by a green tick on the status.
With that, you have completed setting up the Entra Verified ID instance. Now you should be seeing all the tiles with a green tick, as shown below.
Step 2: Configure WSO2 Identity Server as the OIDC attribute provider
In this step, you will configure the connection between WSO2 Identity Server and the Microsoft Verified ID service. Here, we need to create an application in WSO2 Identity Server with the Mobile template.
-
On the WSO2 Identity Server Console, go to Applications.
-
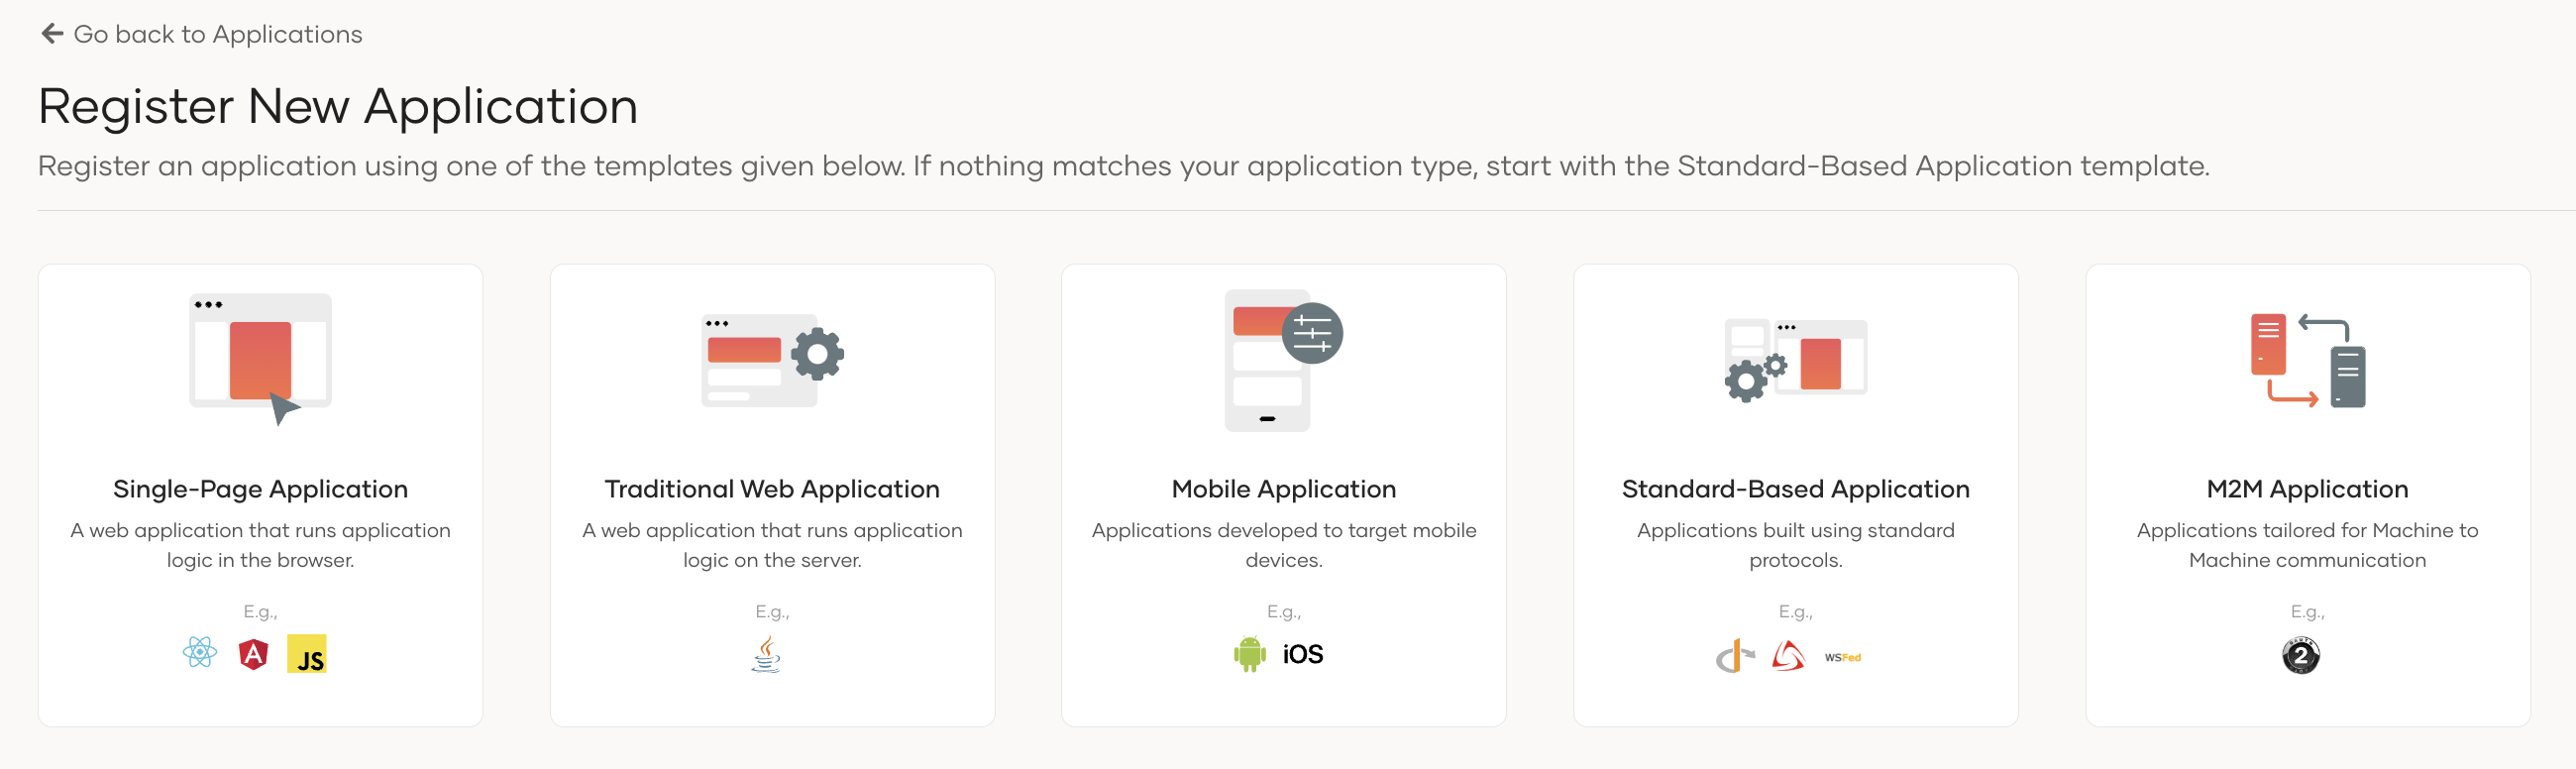
Click New Application and select Mobile Application:
-
Enter the following details:
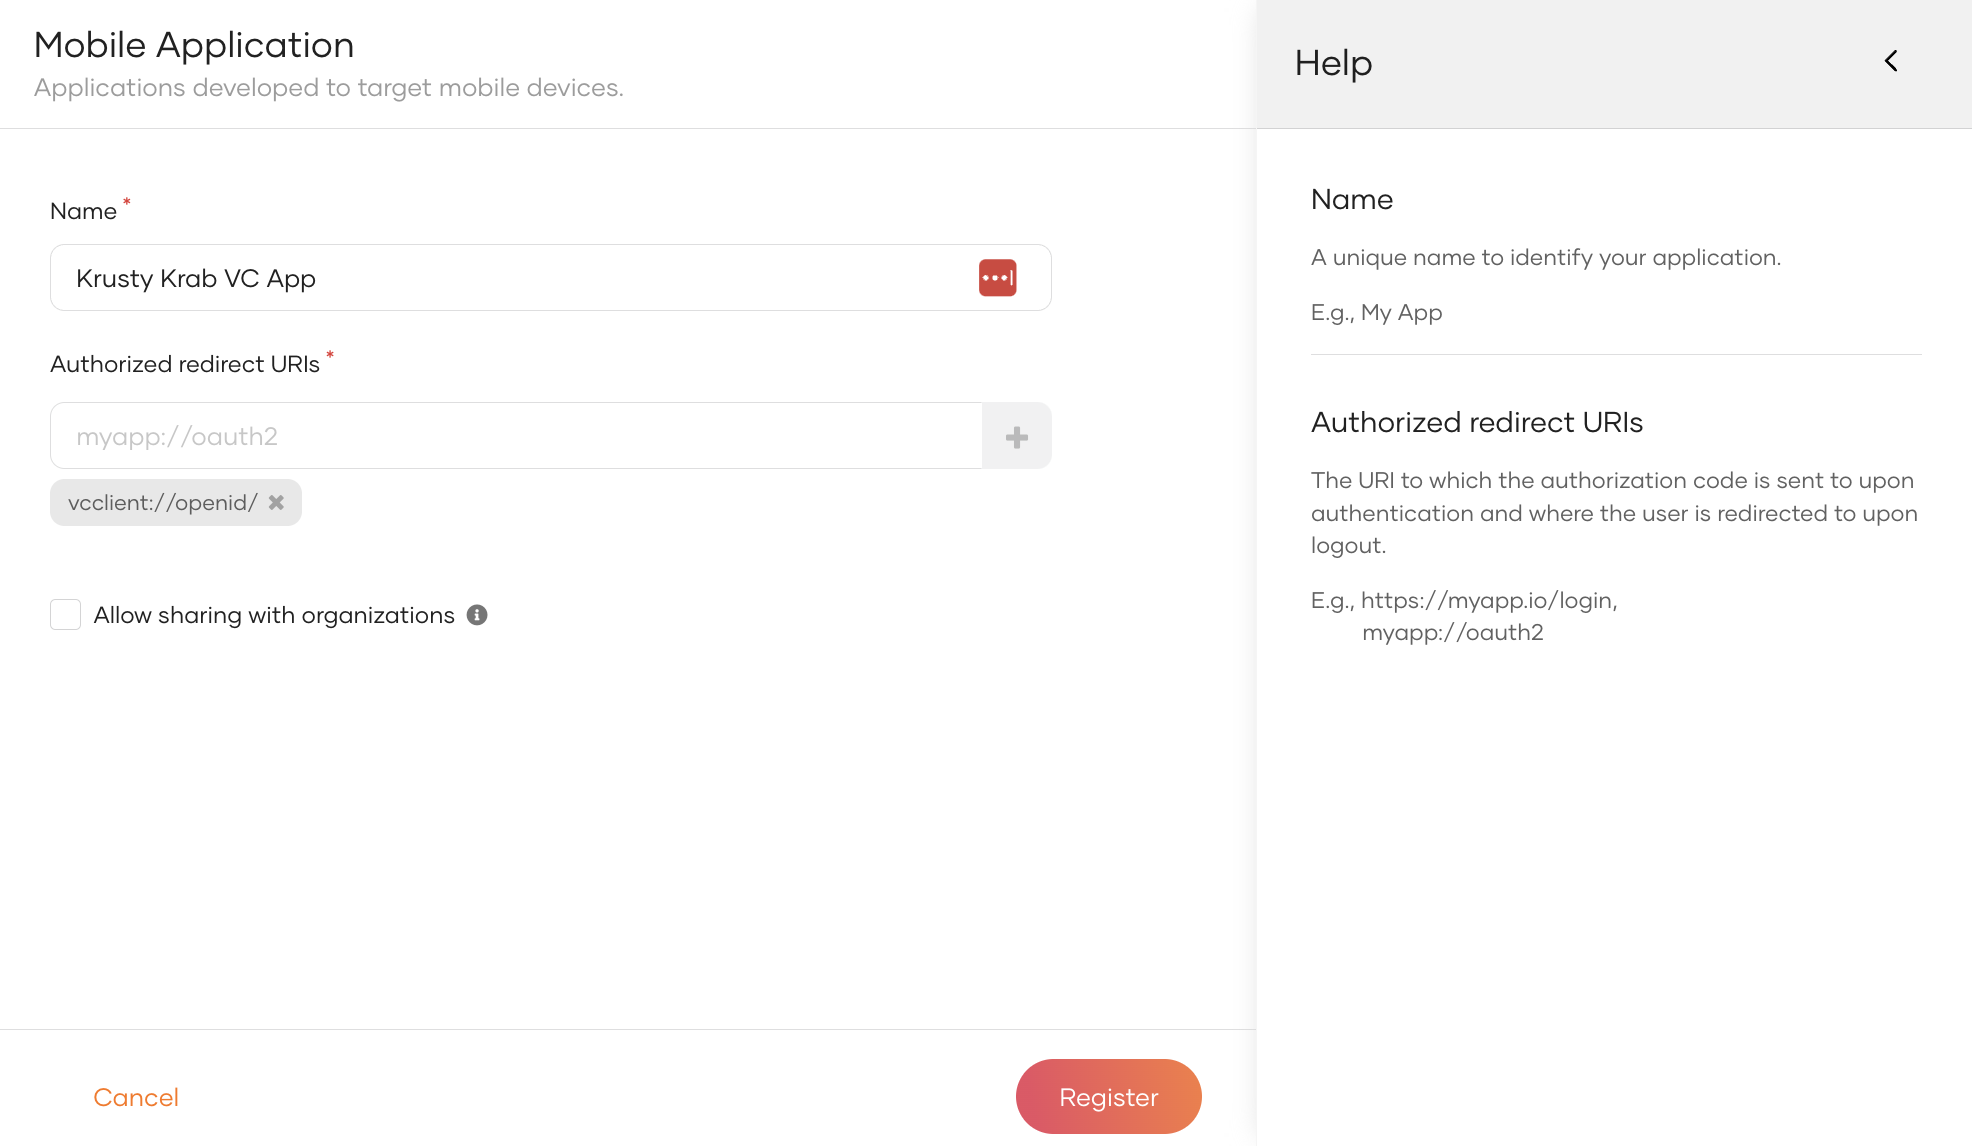
Parameter Description Name A unique name to identify your application. Authorized redirect URLs Enter vcclient://openid/as the authorized redirect URI. Be sure to click the plus sign in front of the redirect uri input field. -
Click Register to complete the registration.
-
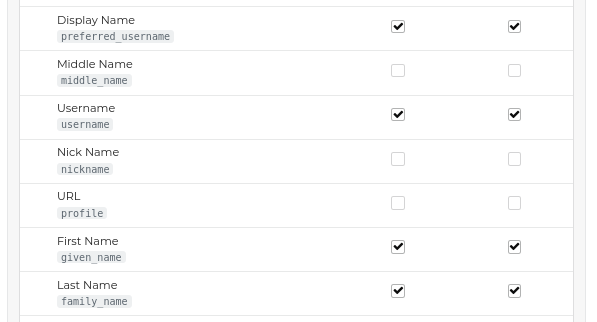
Go to the User Attributes tab, mark the required attributes as Mandatory, and click Update to save the changes.
Tip
Be sure to copy the scopes displayed on the page.
-
Go to the Protocol tab, clear the PKCE checkbox, and click Update to save the changes.
Note
- PKCE is disabled as it is not required for the tutorial.
- The listed configurations in the Guide tab are needed for the next step of the tutorial.
-
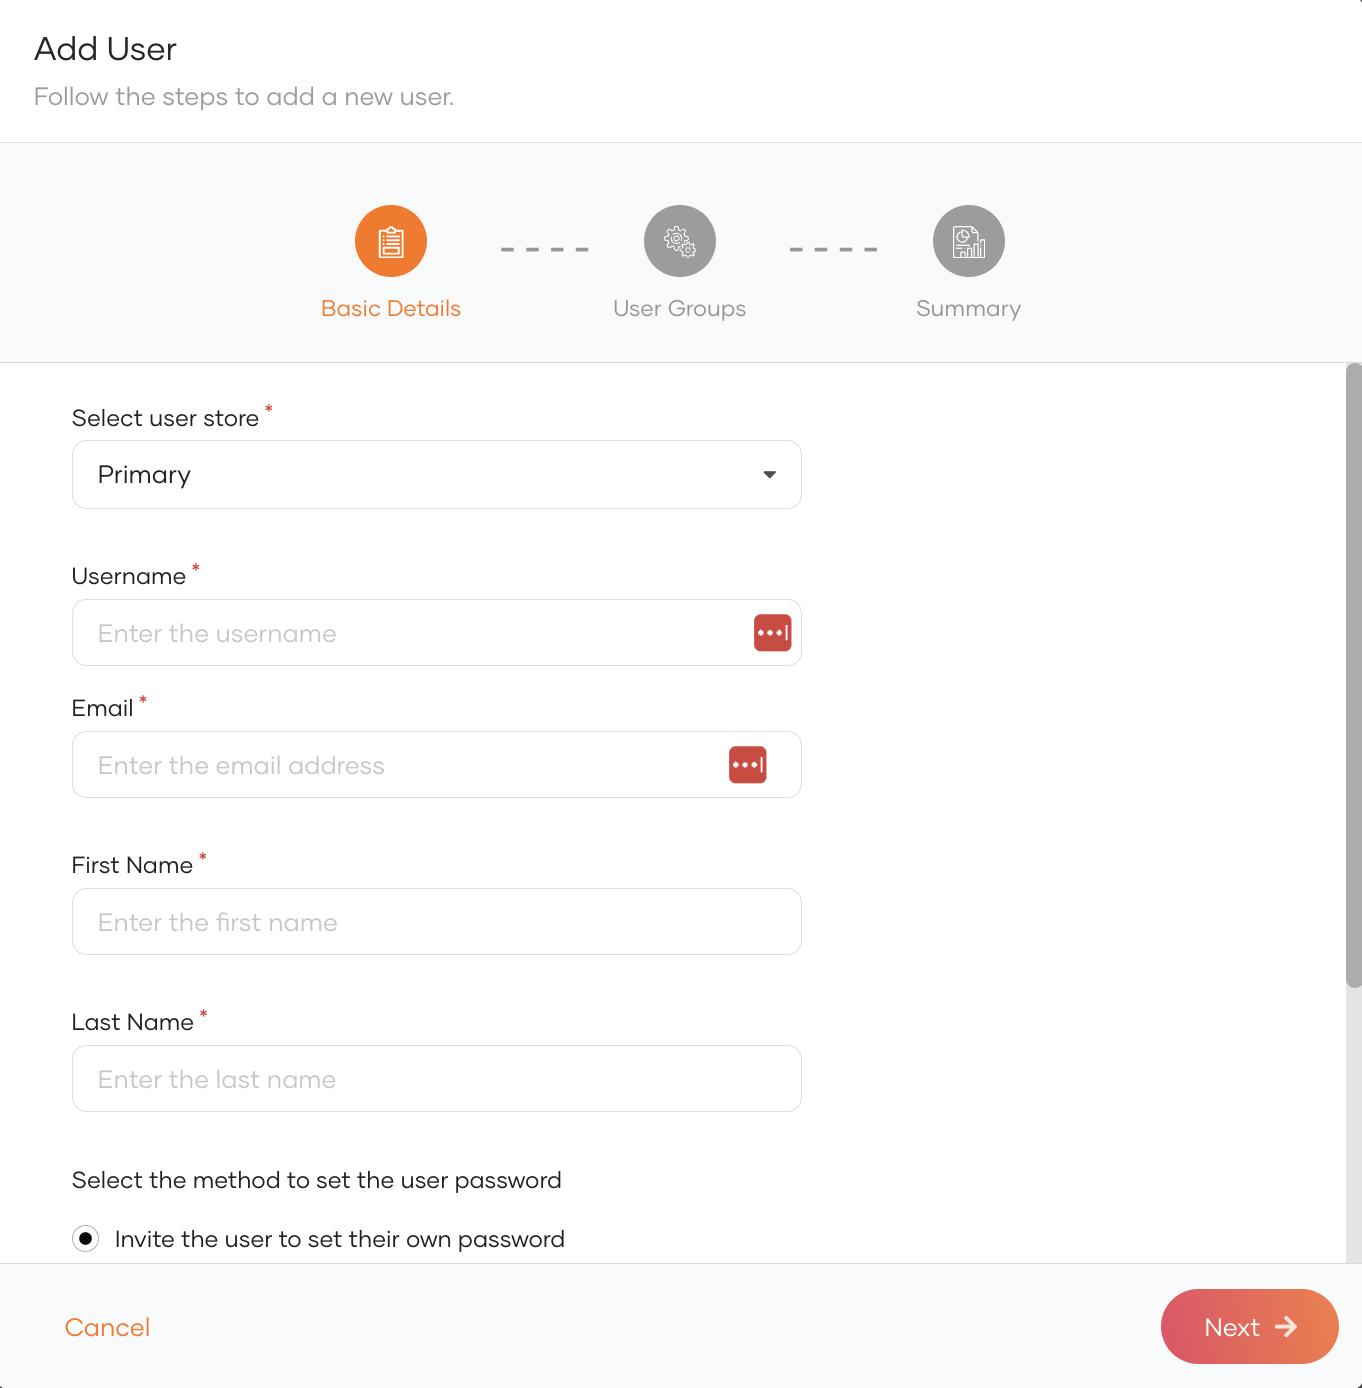
Go to User Management > Users on the WSO2 Identity Server Console and add a new user from there.
Note
This step is required to ensure you can log in to the application. You need a business user registered in the WSO2 Identity Server to be able to perform user login.
Step 3: Create a verifiable credential for the ID token
Now, let's create a credential for the Verified ID service with the id token attestation type.
- On the Azure portal, go to the previously configured Verified ID service, and select Credentials from the left menu.
- Click Add a credential, select Custom credential as the credential type, and click Next.
- On the credential creation page, provide a unique credential name.
-
Adjust the JSON content under the Display definition as per your requirement.
Note
This defines the style of the verifiable credential card stored in the wallet. By default, this only contains texts for the English language. If you want to support multiple locales, add multiple entries as a comma-separated list.
// The sample display definition used for the tutorial. { "locale": "en-US", "card": { "backgroundColor": "#FB8114", "description": "Use your verified credential to prove to anyone that you are an employee of Krusty Krab.", "issuedBy": "Krusty Krab", "textColor": "#000000", "title": "Employee Credential", "logo": { "description": "Krusty Krab Logo", "uri": "https://krusty-krab-vc-issuer.vercel.app/resources/logo-wobg.png" } }, "consent": { "instructions": "Sign in with your WSO2 Identity Server account to get your card.", "title": "Do you want to get your Krusty Krab Verified Credential?" }, "claims": [ { "claim": "vc.credentialSubject.userName", "label": "User name", "type": "String" }, { "claim": "vc.credentialSubject.displayName", "label": "Display name", "type": "String" }, { "claim": "vc.credentialSubject.firstName", "label": "First name", "type": "String" }, { "claim": "vc.credentialSubject.lastName", "label": "Last name", "type": "String" } ] } -
Configure the Rules definition.
Note
This is the most important part, where we add configurations for the connection with WSO2 Identity Server. The rules definition determines what the user should do to get the credential.
Here, the attestation should be an
idTokensattestation, and the rules definition should contain the WSO2 Identity Server application's client ID, openid configuration url, scopes, and claim mappings. See the below table to learn how to retrieve these values on WSO2 Identity Server.Key Description clientId The OAuth 2.0 Client ID received from the created WSO2 Identity Server application. configuration The OpenID Connect identity provider metadata discovery endpoint of the WSO2 Identity Server. redirectUri The URL to which the authorization code is sent upon user authentication. scope The scopes requested from the WSO2 Identity Server application. mapping The output and input claim mappings for VC and WSO2 Identity Server. You'll be able to find the identifier for the inputClaimfrom the User Attributes tab of the created WSO2 Identity Server application.// The sample rules definition used for the tutorial. { "attestations": { "idTokens": [ { "clientId": "<client_id>", "configuration": "https://localhost:9443/oauth2/token/.well-known/openid-configuration", "redirectUri": "vcclient://openid/", "scope": "openid profile", "mapping": [ { "outputClaim": "userName", "required": true, "inputClaim": "$.username", "indexed": false }, { "outputClaim": "displayName", "required": true, "inputClaim": "$.preferred_username", "indexed": false }, { "outputClaim": "firstName", "required": true, "inputClaim": "$.given_name", "indexed": false }, { "outputClaim": "lastName", "required": true, "inputClaim": "$.family_name", "indexed": true } ], "required": false } ] }, "validityInterval": 2592000, "vc": { "type": [ "KrustyKrabCredential" ] } } -
Click Create to save the changes.
-
Go to the created verifiable credential, click Issue credential, and take note of the following information.
Tip
This information is required when configuring the sample application.
- Authority: The decentralized identifier.
- Manifest: URL that the authenticator evaluates before displaying the verifiable credential issuance requirements.
Step 4: Configure the application
You have now completed all the configurations for trying out the verifiable credential flow. In this tutorial, you will be using the Azure verifiable credential Node JS sample application.
-
Clone the GitHub repository or download the sample code by visiting the following URL:
-
Open the
config.jsonfile inside the 1-node-api-idtokenhint folder and provide values for the required configurations as explained below.Configuration Description azTenantId The ID of your tenant. You can get this from the Overview section of Azure Active Directory component. azClientId The client ID of the Azure application. You can get this from the created application in the Azure Active Directory component. azClientSecret The client secret you created for the Azure application. CredentialManifest The manifest URL received from the Verified ID credential. IssuerAuthority The issuer authority of the Verified ID credential. VerifierAuthority The verifier authority of the Verified ID credential. For this tutorial, this value is the same as the issuer authority. -
Leave the rest of the configurations empty and save the file.
-
Open the
presentation_request_config.jsonfile and modify the following values under therequestedCredentialsobject as per your VC configurations:acceptedIssuers: Your VC issuer authorities.type: Your VC type.
Step 5: Try it out
Now, let's run the application and try out the verifiable credential issuance and verification flows.
Step 5.1: Start the application
Follow the step below to start the application.
-
Open a terminal, navigate to the
1-node-api-idtokenhintfolder, and run the following command: -
Set up Ngrok:
Note
The sample application runs on port 8080. You can visit the sample application by opening the
http://localhost:8080URL. However, to try out the VC flow, the website must be available via a public URL. Let's use Ngrok for this tutorial.- Download and install Ngork on your computer.
- Go to the Ngrok directory and open a new terminal.
-
Run the below command to host the sample application with Ngrok.
-
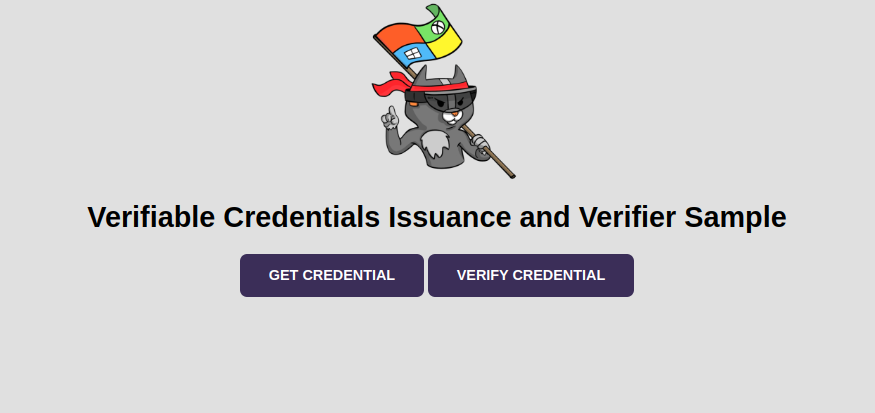
Open the displayed public URL, and you'll see the MS verifiable credential sample application.
Note
Microsoft Verifiable Credentials use the Microsoft Authenticator app as the digital wallet. Hence, prior to trying out the sample, you need to download and install the Microsoft Authenticator app from the Google Play Store or the Apple App Store.
Step 5.2: Get the verifiable credential
To get the KrustyKrab verifiable credential:
-
Click Get Credential on the above sample website.
Note
If everything is configured correctly, the website shows you a QR code.
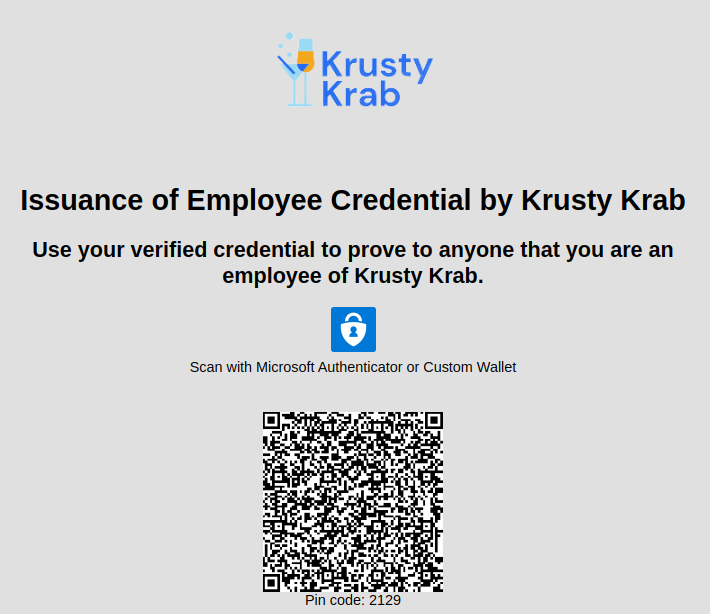
-
Open your Microsoft Authenticator app and go to the Verified IDs tab.
You'll be able to scan the QR code there.
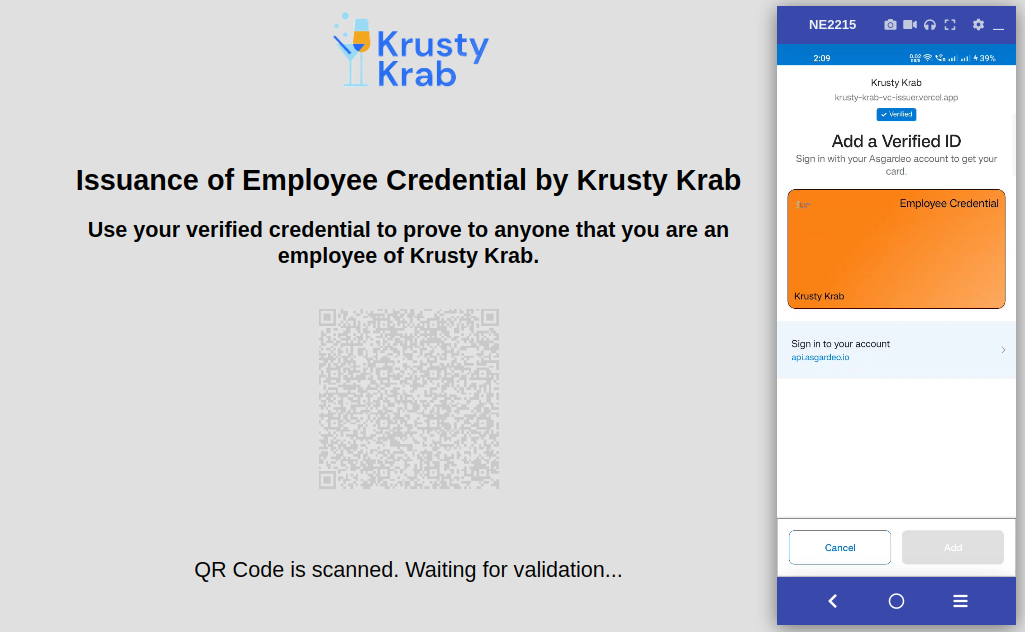
-
Scan the QR and you'll see an option to sign in with WSO2 Identity Server.
-
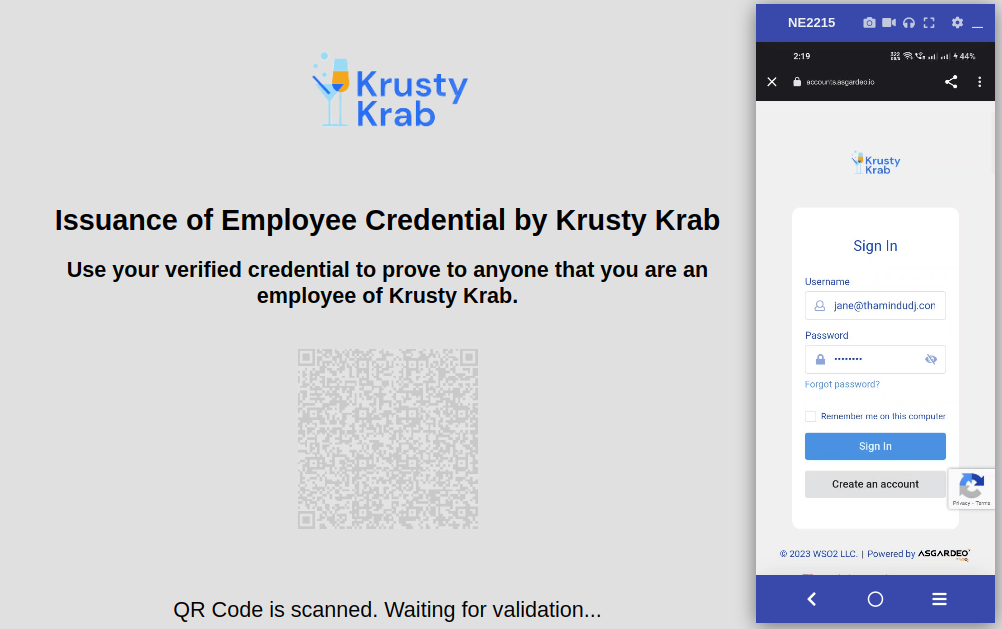
Click Sign In with WSO2 Identity Server, and you are redirected to the login page provided by WSO2 Identity Server.
-
Sign in with the user account you added previously.
After successful authentication, you are redirected to the Microsoft Authenticator app.
-
Click Add to add the KrustyKrab credential to your wallet.
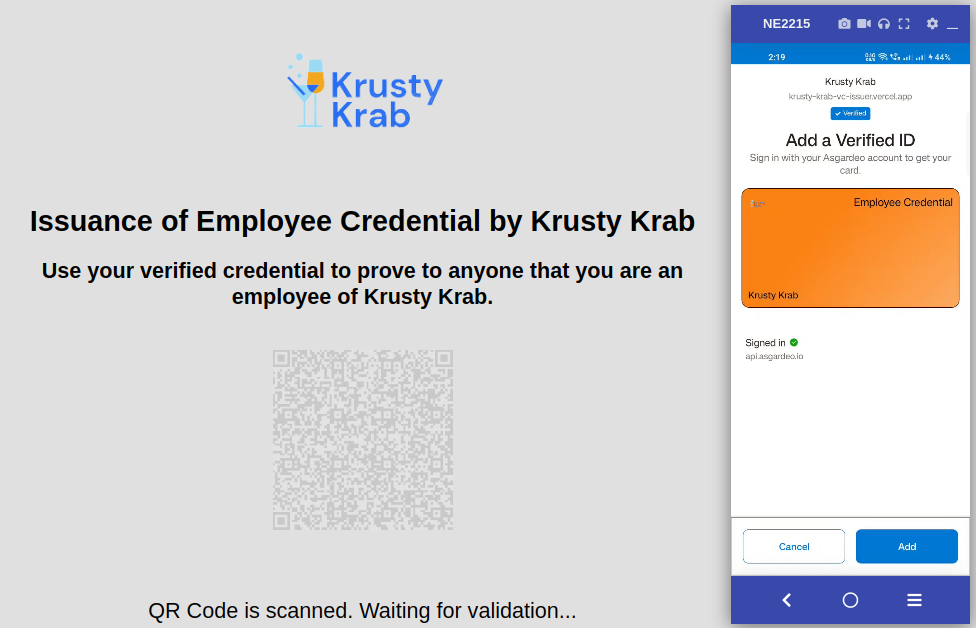
You can view the user details you received from WSO2 Identity Server by clicking the verifiable credential card inside the wallet.
Step 5.3: Verify the credential
Now that you have added the KrustyKrab credential to the wallet, you can use it to verify the Krusty Krab employment.
-
Go back to the home page of the sample website and click Verify Credential.
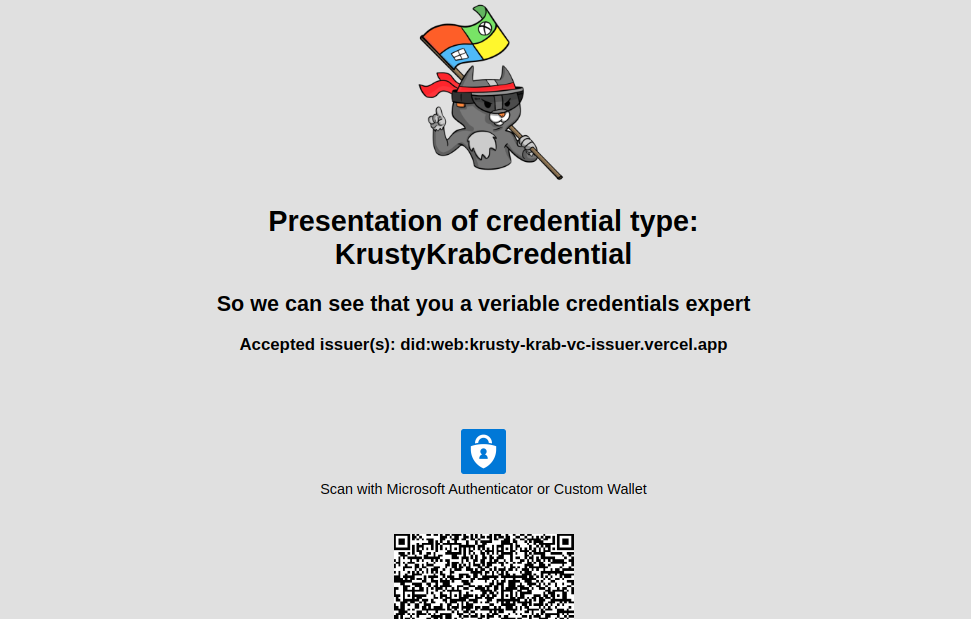
If everything is configured correctly, the website shows you a QR code.
-
Scan the available QR code using the Microsoft Authenticator app, and it will prompt you to share the KrustyKrab credential.
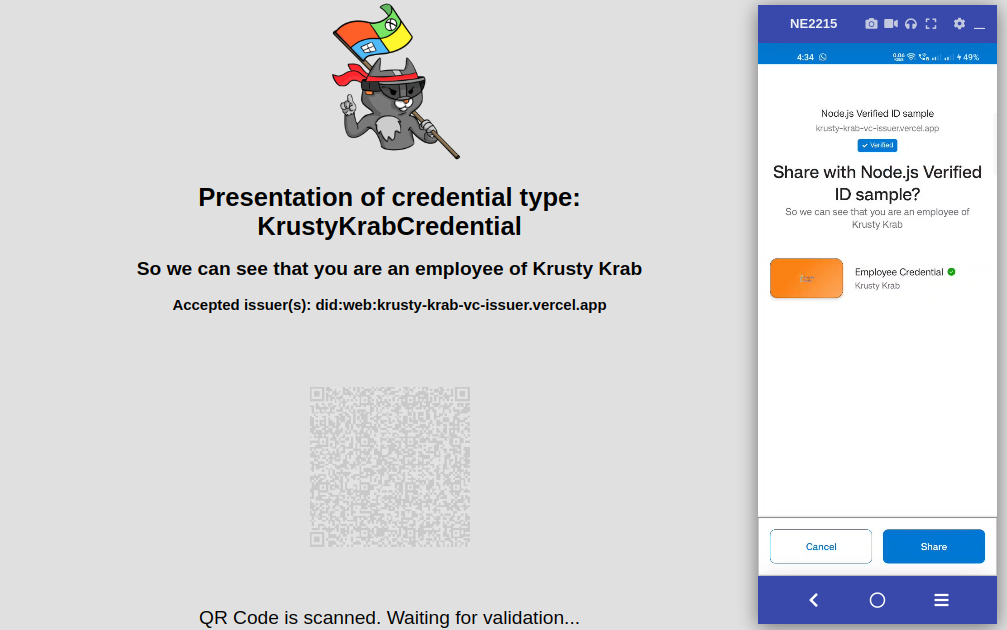
-
Click Share.
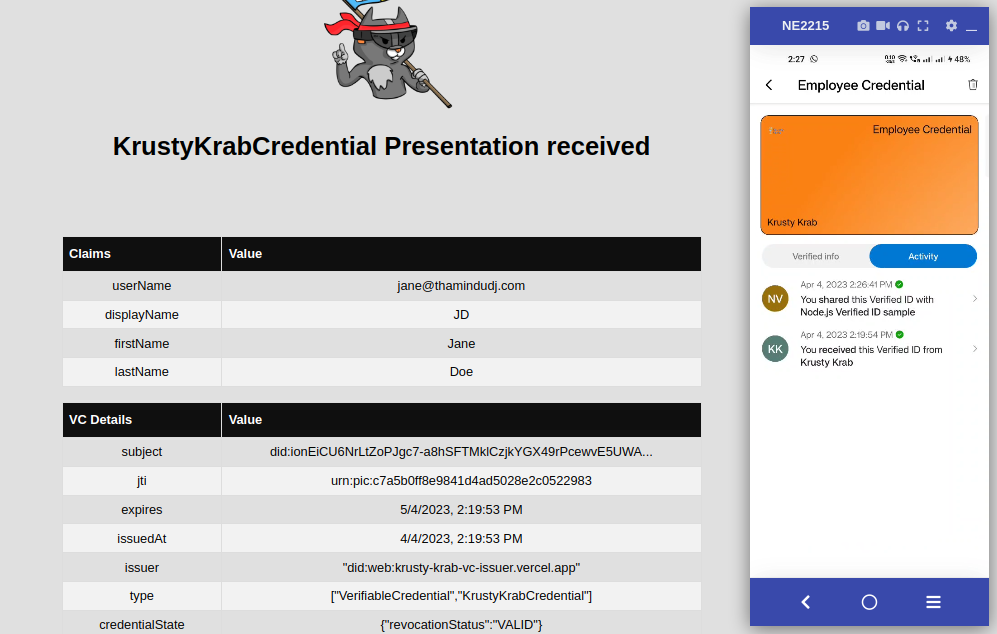
The sample website now receives the user details from the KrustyKrab credential.
Now that you have successfully configured WSO2 Identity Server as an OIDC attribute provider for Microsoft Entra verifiable credentials, you can continue to harness the full capabilities that WSO2 Identity Server provides by customizing the sign-in flow, enhancing application security, etc.