Manage users
This guide walks you through how you can manage user accounts as an administrator.
Onboard users
WSO2 Identity Server provides multiple ways to onboard users to your organization. You can add users individually or in bulk using a CSV file. You can also allow users to self-register.
To learn more about onboarding users, see Onboard users.
Filter users
Administrators can filter users based on their account status from the WSO2 Identity Server Console.
To filter users by account status:
- On the WSO2 Identity Server Console, go to User Management > Users.
-
Click the Account Status dropdown and select the relevant filter criteria:
- Locked: Filters users with locked accounts.
- Disabled: Filters users with deactivated accounts.
- Pending password reset: Filters users for whom the administrator has initiated a forced password reset, but the users haven't yet reset their passwords.
- Pending initial password setup: Filters users an administrator invited to set their own password during initial account creation but who haven't done so yet.
- Pending email verification: Filters users who haven't yet verified their primary email addresses.
-
Pending mobile verification: Filters users who haven't yet verified their primary mobile numbers.

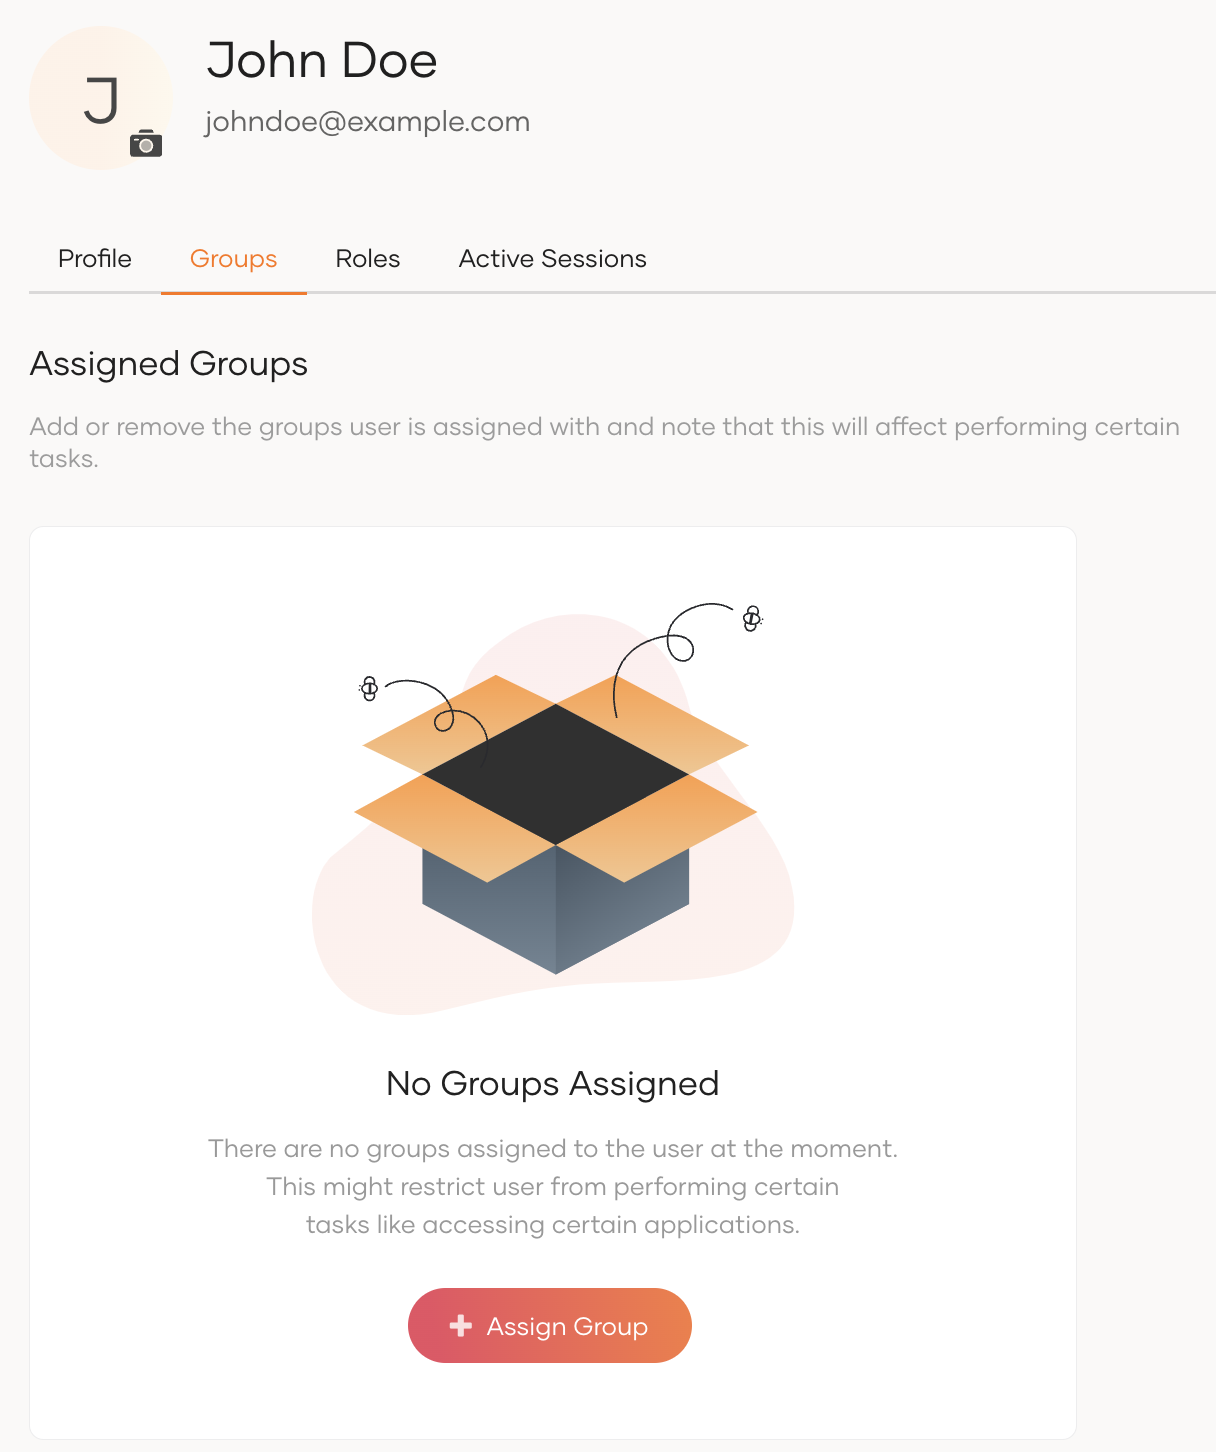
Assign groups
Groups are useful when you wish to assign a certain permission level to multiple users. A user can be a member of multiple groups in the organization. Learn how to manage groups.
To assign users to groups:
- On the WSO2 Identity Server Console, go to User Management > Users.
- Click Edit for the user.
- Go to the Groups tab and click + Assign Group.
-
Select the relevant groups and click Save.
Manage user profiles
A user profile consists of attributes that represent the details of the user such as username, email address, contact information, other custom attributes, etc.
Note
Administrators can configure the list of attributes that should be available in the user profile. See Manage attributes for details.
View profile details
Administrators can view the user profile of any user as follows:
-
On the WSO2 Identity Server Console, go to User Management > Users.
Note
If you have connected a remote user store, and want to filter the users in your remote user store, select your user store from the drop-down menu.
-
Select the user to view the profile.
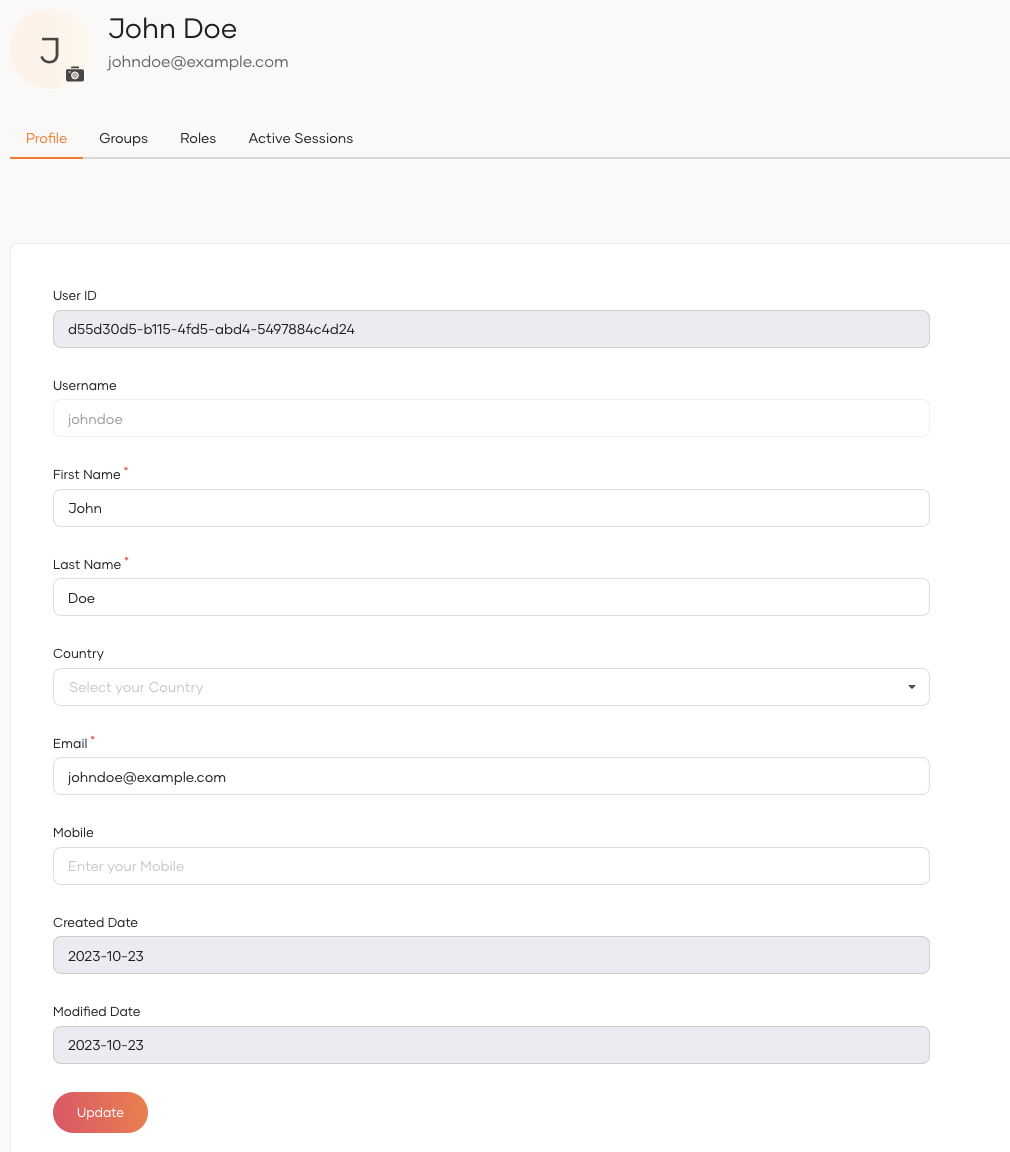
Update the profile
An administrator can update the profile of a user via the WSO2 Identity Server Console.
To update the user profile:
-
On the WSO2 Identity Server Console, go to User Management > Users.
-
Find the user's account and click Edit.
-
Update the information on the user profile.
-
Click Update to save.
Share user with organizations
An administrator can share a user with an organization (or multiple organizations) via the WSO2 Identity Server Console.
To share a user with organizations:
-
On the WSO2 Identity Server Console, go to User Management > Users.
-
Find the user's account in the user list and click Edit.
-
Navigate to the Shared Access tab.
-
Select the appropriate sharing option.
-
Do not share user with any organization - user will not be shared with any organizations.
-
Share user with all organizations - user is shared with all current and future organizations. When the user is shared, administrators can also configure which roles should be assigned to the user in the shared organizations.
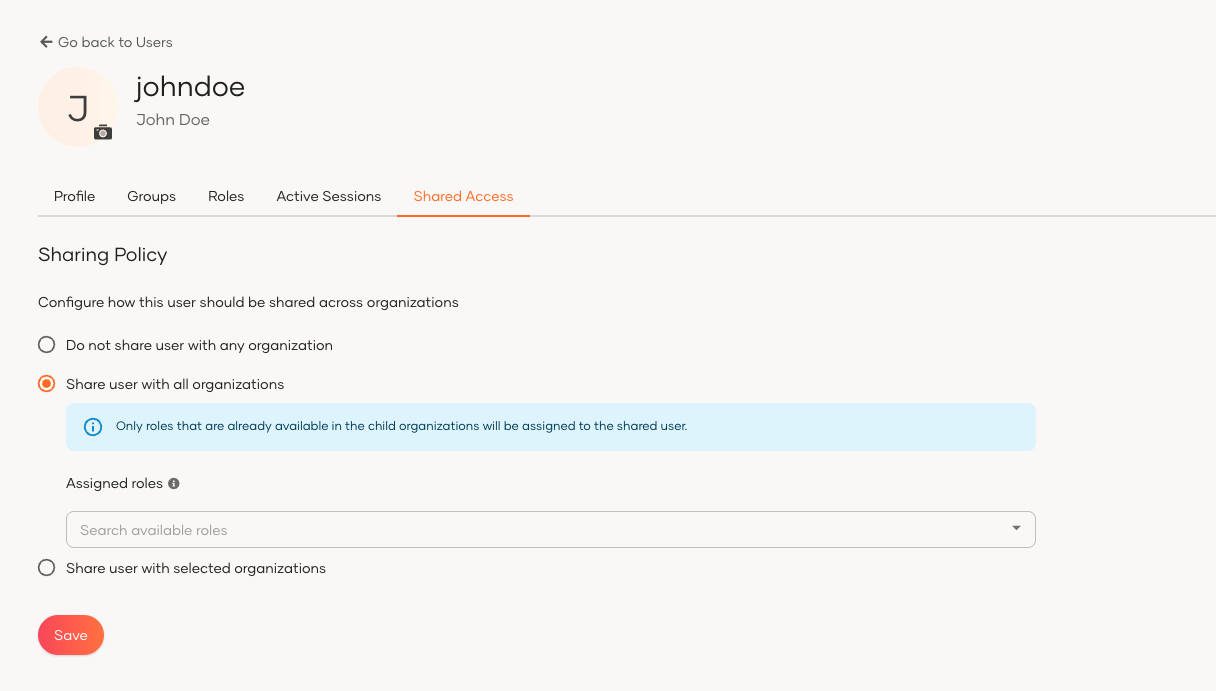
- Share user with selected organizations - user is shared with a specific set of existing organizations, but they are not shared with the future children organizations. Administrators can configure which roles should be assigned to the user in the shared organizations.
-
-
Once selected and configured, click Save.
Resend invitation links and codes
Administrators can resend expired invitation links or verification codes to users. This applies when users need to:
- Complete registration
- Reset passwords through an admin-initiated password reset
- Confirm their account
- Verify their email address
Use the Console
To resend links or codes through the Console:
-
Navigate to the user's profile in User Management > Users.
-
Click the Resend link in the warning message at the top of the user's profile.


Use the API
You can also use the resend-code API to resend links or codes programmatically.
curl -X 'POST' \
'https://localhost:9443/t/{root_organization_handle}/api/identity/user/v1.0/resend-code' \
-H 'accept: application/json' \
-H 'Authorization: Bearer <access_token>' \
-H 'Content-Type: application/json' \
-d '{
    "user": {
        "username": "<username>",
        "realm": "<realm>"
    },
    "properties": [
        {
            "key": "RecoveryScenario",
            "value": "<recovery_scenario>"
        }
    ]
    }'
curl -X 'POST' \
'https://localhost:9443/t/{root_organization_handle}/api/identity/user/v1.0/resend-code' \
-H 'accept: application/json' \
-H 'Authorization: Bearer <access_token>' \
-H 'Content-Type: application/json' \
-d '{
    "user": {
        "username": "jane",
        "realm": "PRIMARY"
    },
    "properties": [
        {
            "key": "RecoveryScenario",
            "value": "ASK_PASSWORD"
        }
    ]
    }'
Recovery scenarios
Specify the recovery scenario in the properties parameter of the API request:
ASK_PASSWORD: User needs to set up their initial password using the setup link.ASK_PASSWORD_VIA_EMAIL_OTP: User needs to complete registration using an email OTP.ASK_PASSWORD_VIA_SMS_OTP: User needs to complete registration using an SMS OTP.ADMIN_FORCED_PASSWORD_RESET_VIA_EMAIL_LINK: User needs to reset password via an admin-forced email link.ADMIN_FORCED_PASSWORD_RESET_VIA_OTP: User needs to reset password via an admin-forced OTP sent through email.EMAIL_VERIFICATION: User needs to verify their email using the setup link.EMAIL_VERIFICATION_OTP: User needs to verify their email using an email OTP.SELF_SIGN_UP: User needs to confirm their account using the email link.
Note
- Provide the username without the user store domain prefix
- Specify the relevant user store domain name in the
realmparameter
Response
Set a user's password
Administrators can set a user's password if the user is unable to set the password via the initial setup email link shared during user creation.
To set the password:
-
Click Set password at the bottom of the user's profile.
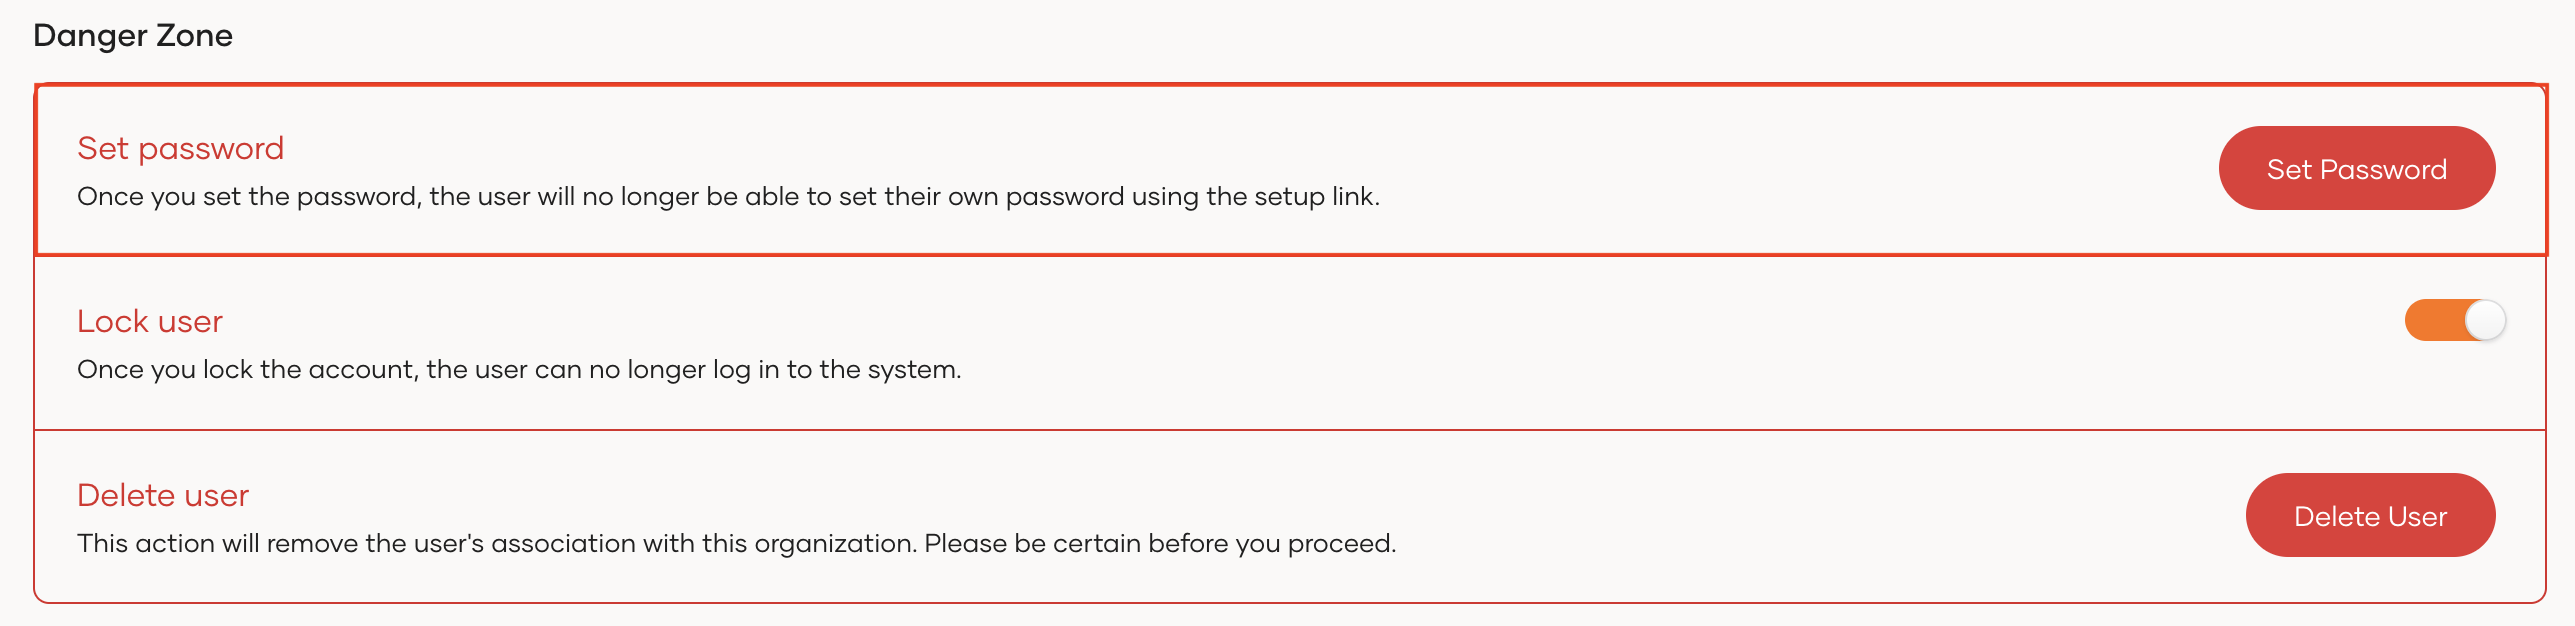
-
Type the new password.
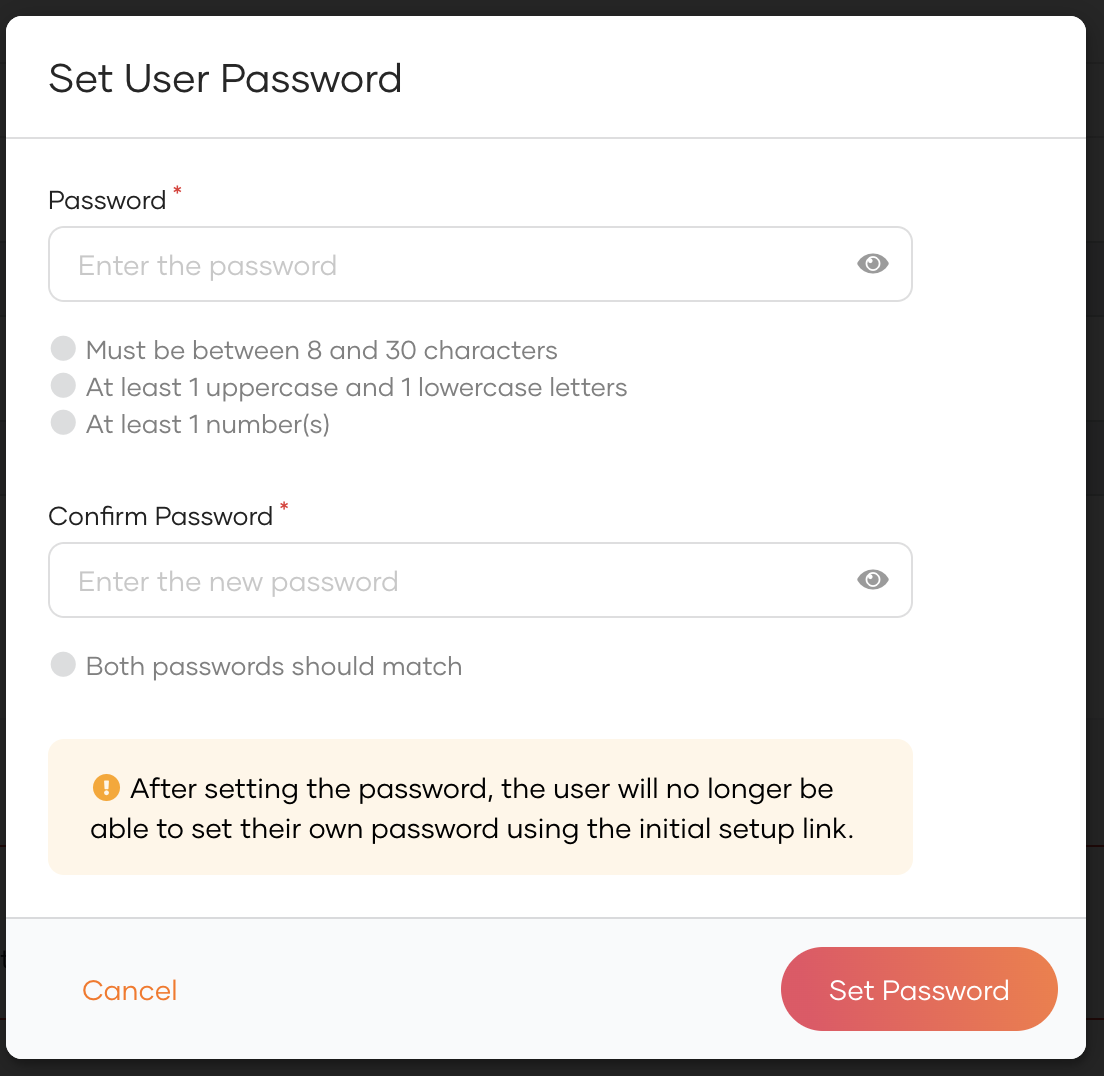
-
Click Set Password.
Note
Once the administrator set the password, the user's account will get unlocked.
Reset the user's password
Administrators can reset a user's password or initiate the password reset process from the WSO2 Identity Server Console.
To reset the password:
-
Click Reset password at the bottom of the user's profile.
-
Select a method to reset the user password:
-
Set a new password for the user: If this option is selected, the owner or an administrator can set a new password for the user.
Note
If the user is in pending admin forced password reset, once the admin resets the password, the account will get unlocked.
-
Invite user to reset the password: If this option is selected, a password reset request can be sent to the user using one of the password recovery methods you have enabled for the organization.
Note
Enable the relevant password recovery methods by navigating to Login & Registration > Password Recovery.
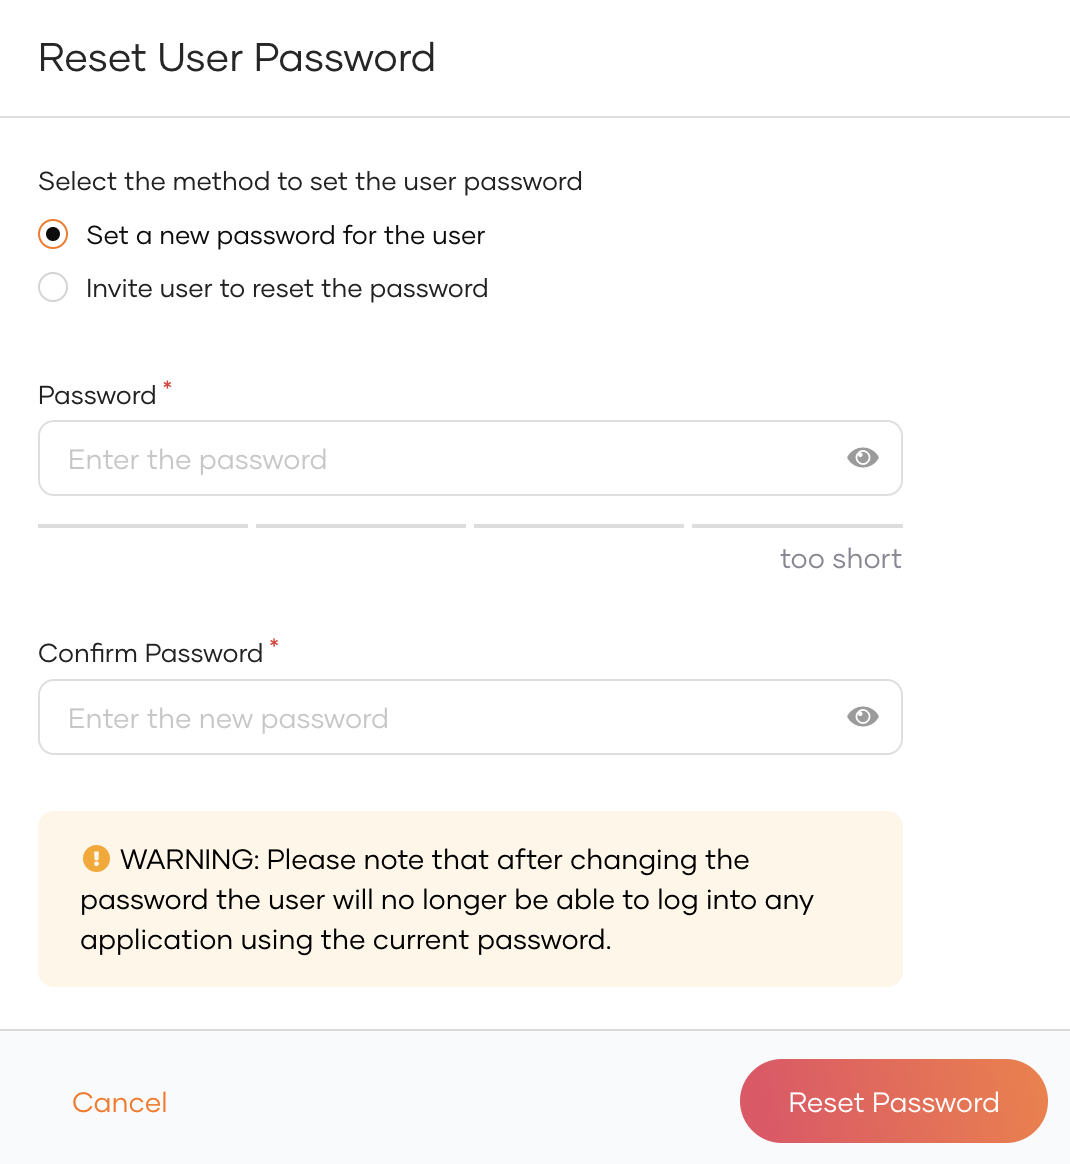
-
-
Click Reset Password.
Using the API
You can also use WSO2 Identity Server's SCIM API to initiate the admin initiated password recovery flow.
-
Get an access token with the
internal_user_mgt_updatescope. -
Use the obtained access token to execute the following cURL.
curl --location --request PATCH 'https://localhost:9443/scim2/Users/<user_id>' \
--header 'Content-Type: application/json' \
--header 'Authorization: Bearer <access_token>' \
--data '{
   "schemas": [
      "urn:ietf:params:scim:api:messages:2.0:PatchOp",
      "urn:ietf:params:scim:schemas:extension:enterprise:2.0:User"
   ],
   "Operations": [
      {
            "op": "add",
            "value": {
               "urn:ietf:params:scim:schemas:extension:enterprise:2.0:User": {
                  "forcePasswordReset": true
               }
            }
      }
   ]
}'
Upon successful execution of the cURL the user will receive an email to reset their password.
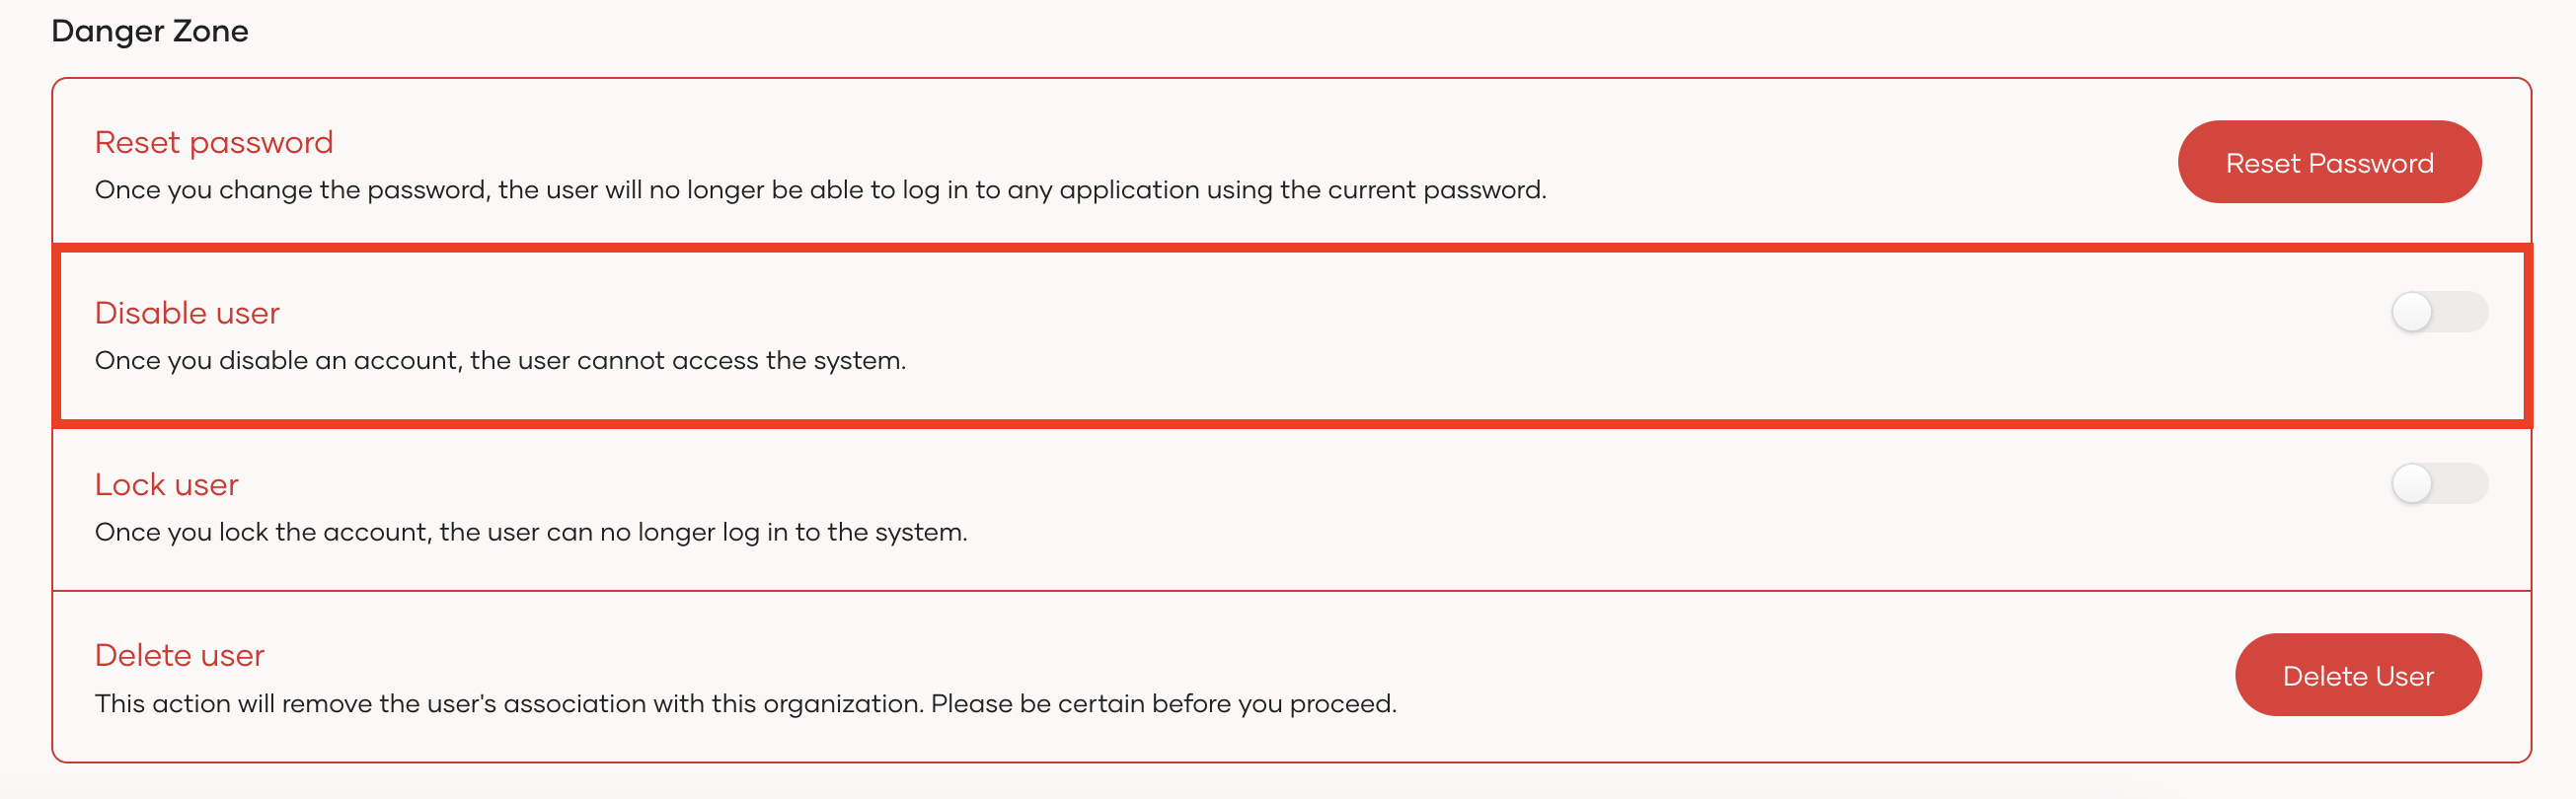
Lock a user account
To temporarily prevent a user from logging into applications or the self-service My Account portal, you can lock the user's account.
To lock a user account:
- On the WSO2 Identity Server Console, go to User Management > Users and select the user.
-
In the Danger Zone, turn the Lock user toggle on to lock the user's profile. Turn it off to unlock it.
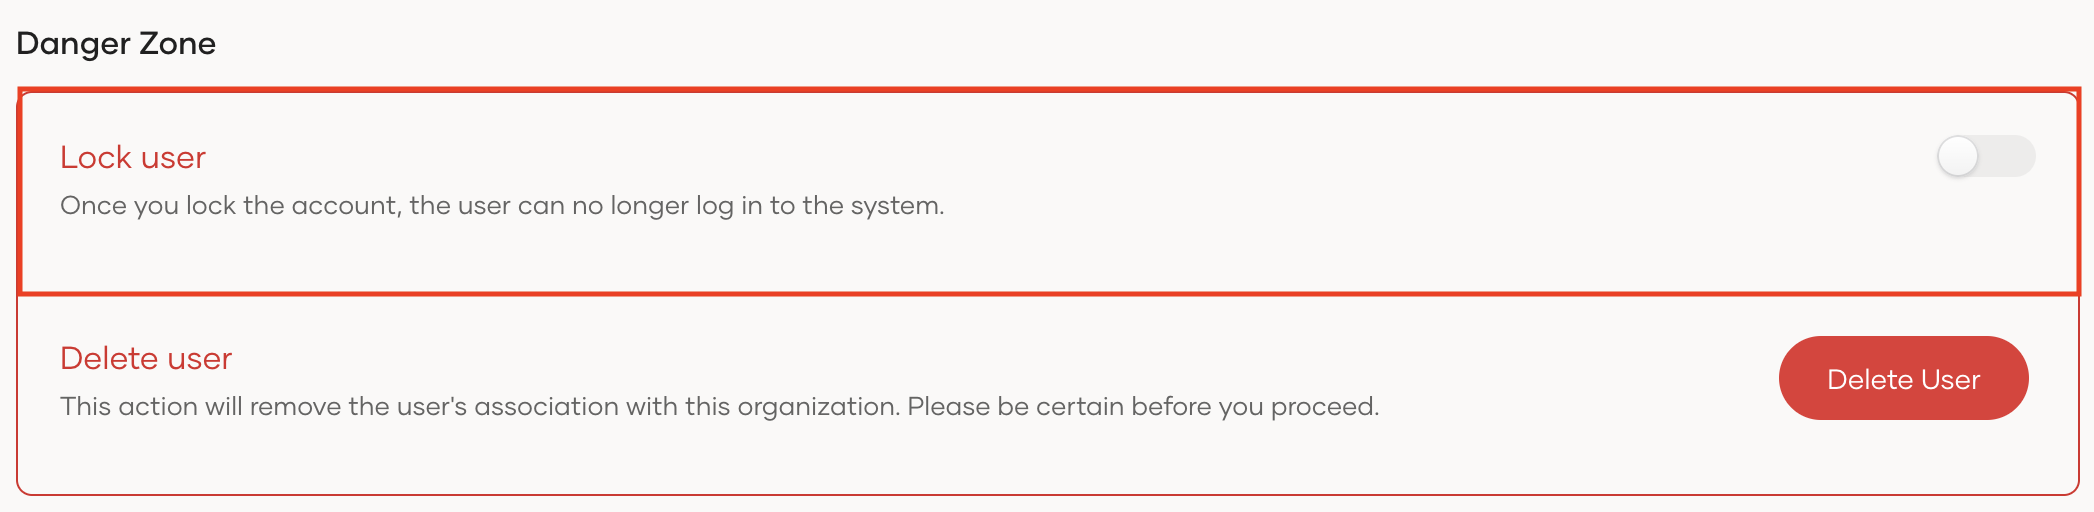
-
Select the checkbox to confirm your action.
- Click Confirm.
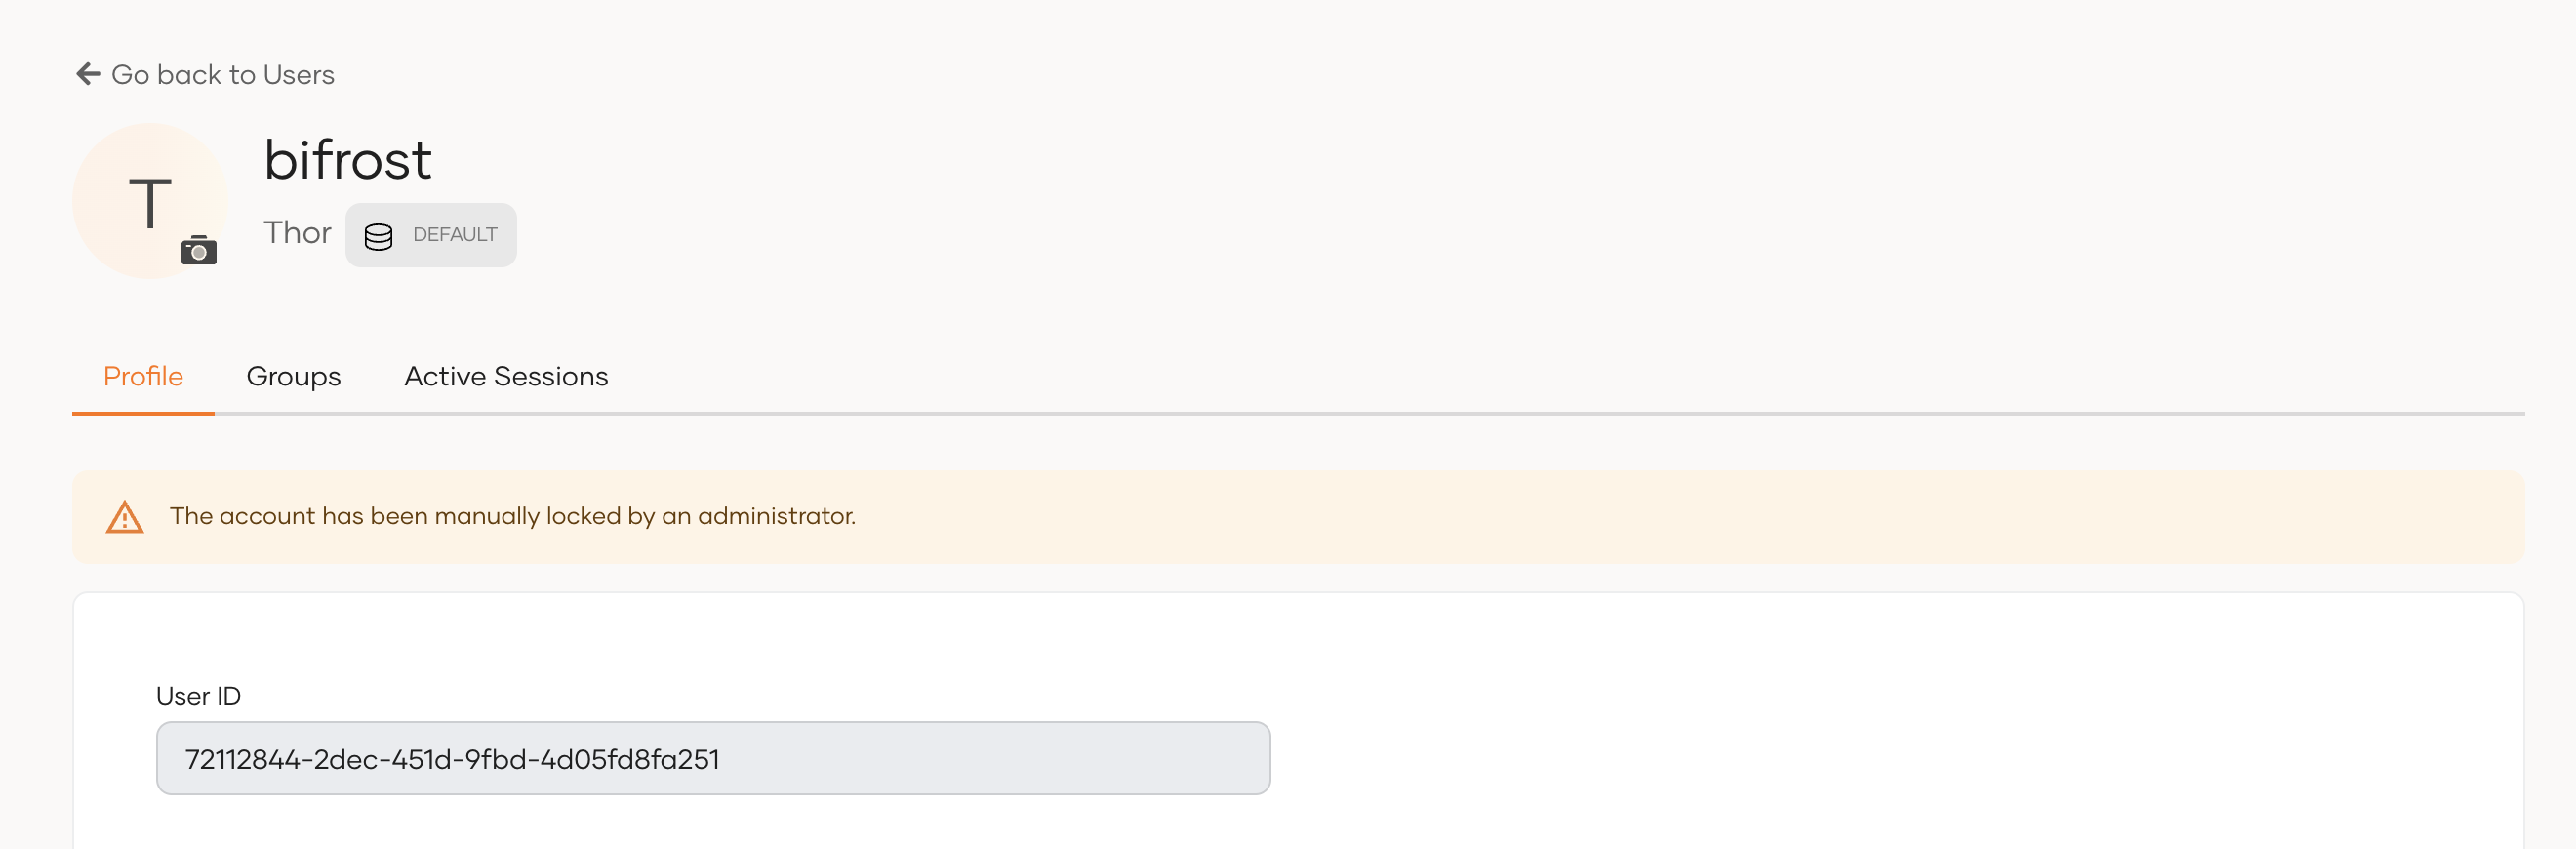
Note
When a user account is locked, the reason for the account lock will be displayed in the user's profile.
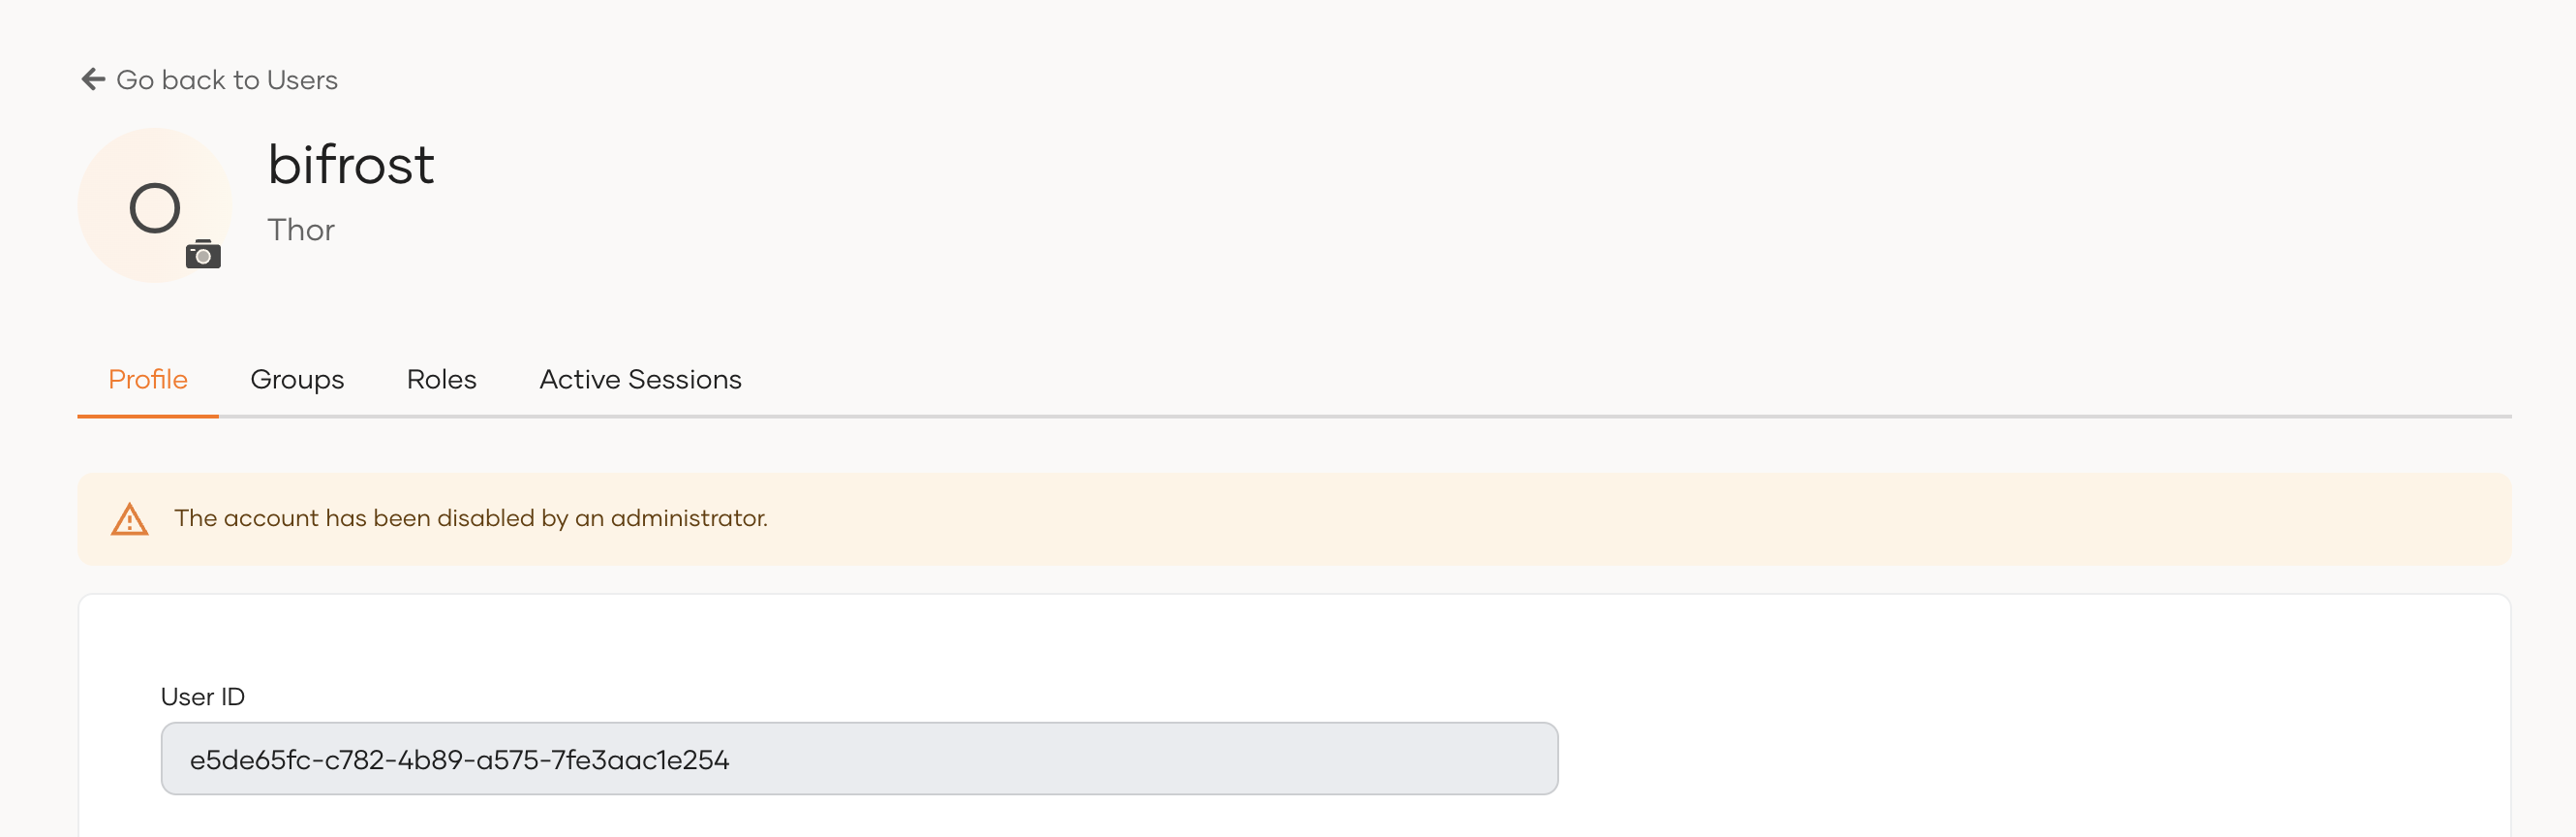
Disable a user account
Disabling a user's account prevents users from logging into applications or to the self-service My Account portal. It is intended to be a long-term and a more permanent measure than locking a user's account. Therefore, if you simply wish to restrict a user's access temporarily, it is recommended to use account locking.
To disable a user account you can use either the Console or the SCIM API.
Enable account disabling
Account disabling is not an option available for a users' accounts by default. If you wish to enable this option for your organization, refer to account disabling.
- On the WSO2 Identity Server Console, go to User Management > Users and select the user.
-
In the Danger Zone, turn the Disable user toggle on to disable the user's profile. Turn it off to enable it.
-
Select the checkbox to confirm your action.
- Click Confirm.
When a user account is disabled, the following message will be displayed in the user's profile.
You can use WSO2 Identity Server's SCIM API to disable user accounts. To do so,
-
Get an access token with the
internal_user_mgt_updatescope. -
Use the obtained access token to execute the following cURL.
Note
Replace
<user_id>with the ID of the user you want to disable, and<access_token>with the access token you obtained in step 1.curl --location --request PATCH 'https://localhost:9443/scim2/Users/<user_id>' \ --header 'Content-Type: application/json' \ --header 'Authorization: Bearer <access_token>' \ --data '{ "schemas": [ "urn:ietf:params:scim:api:messages:2.0:PatchOp", "urn:scim:wso2:schema" ], "Operations": [ { "op": "replace", "value": { "urn:scim:wso2:schema": { "accountDisabled": false } } } ] }'After you successfully execute the cURL, the user profile gets disabled.
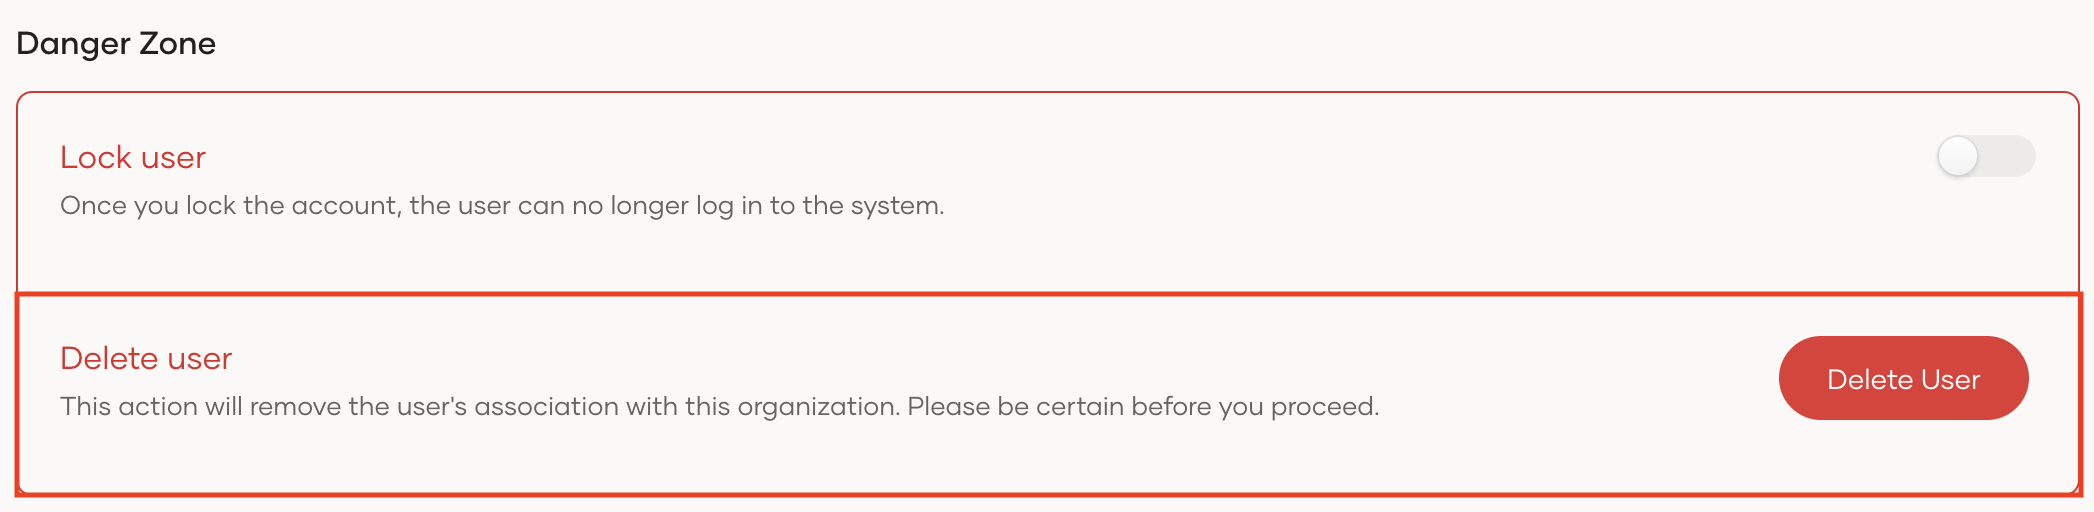
Delete a user
A user account can be deleted by administrators. Once an account is deleted, the action is irreversible.
To delete a user account:
- On the WSO2 Identity Server Console, go to User Management > Users and select the user.
-
Click Delete User at the bottom of the user's profile.
-
Select the checkbox to confirm your action.
- Click Confirm.