SAML artifact binding
This guide explains SAML artifact binding and how to enable it in WSO2 Identity Server.
Overview
SAML artifact binding eliminates the need to exchange sensitive user information through the user's browser during authentication.
When a Service Provider (SP) requests authentication from an Identity Provider (IdP) using SAML artifact binding, the IdP responds with a small artifact that works as a pointer to the actual SAML response. The SP uses this reference and retrieves the full SAML message from the IdP using a SOAP-based back-channel, ensuring secure and reliable delivery.
This approach minimizes the risk of interception or tampering but introduces additional complexity due to the required back-channel communication between the SP and IdP.
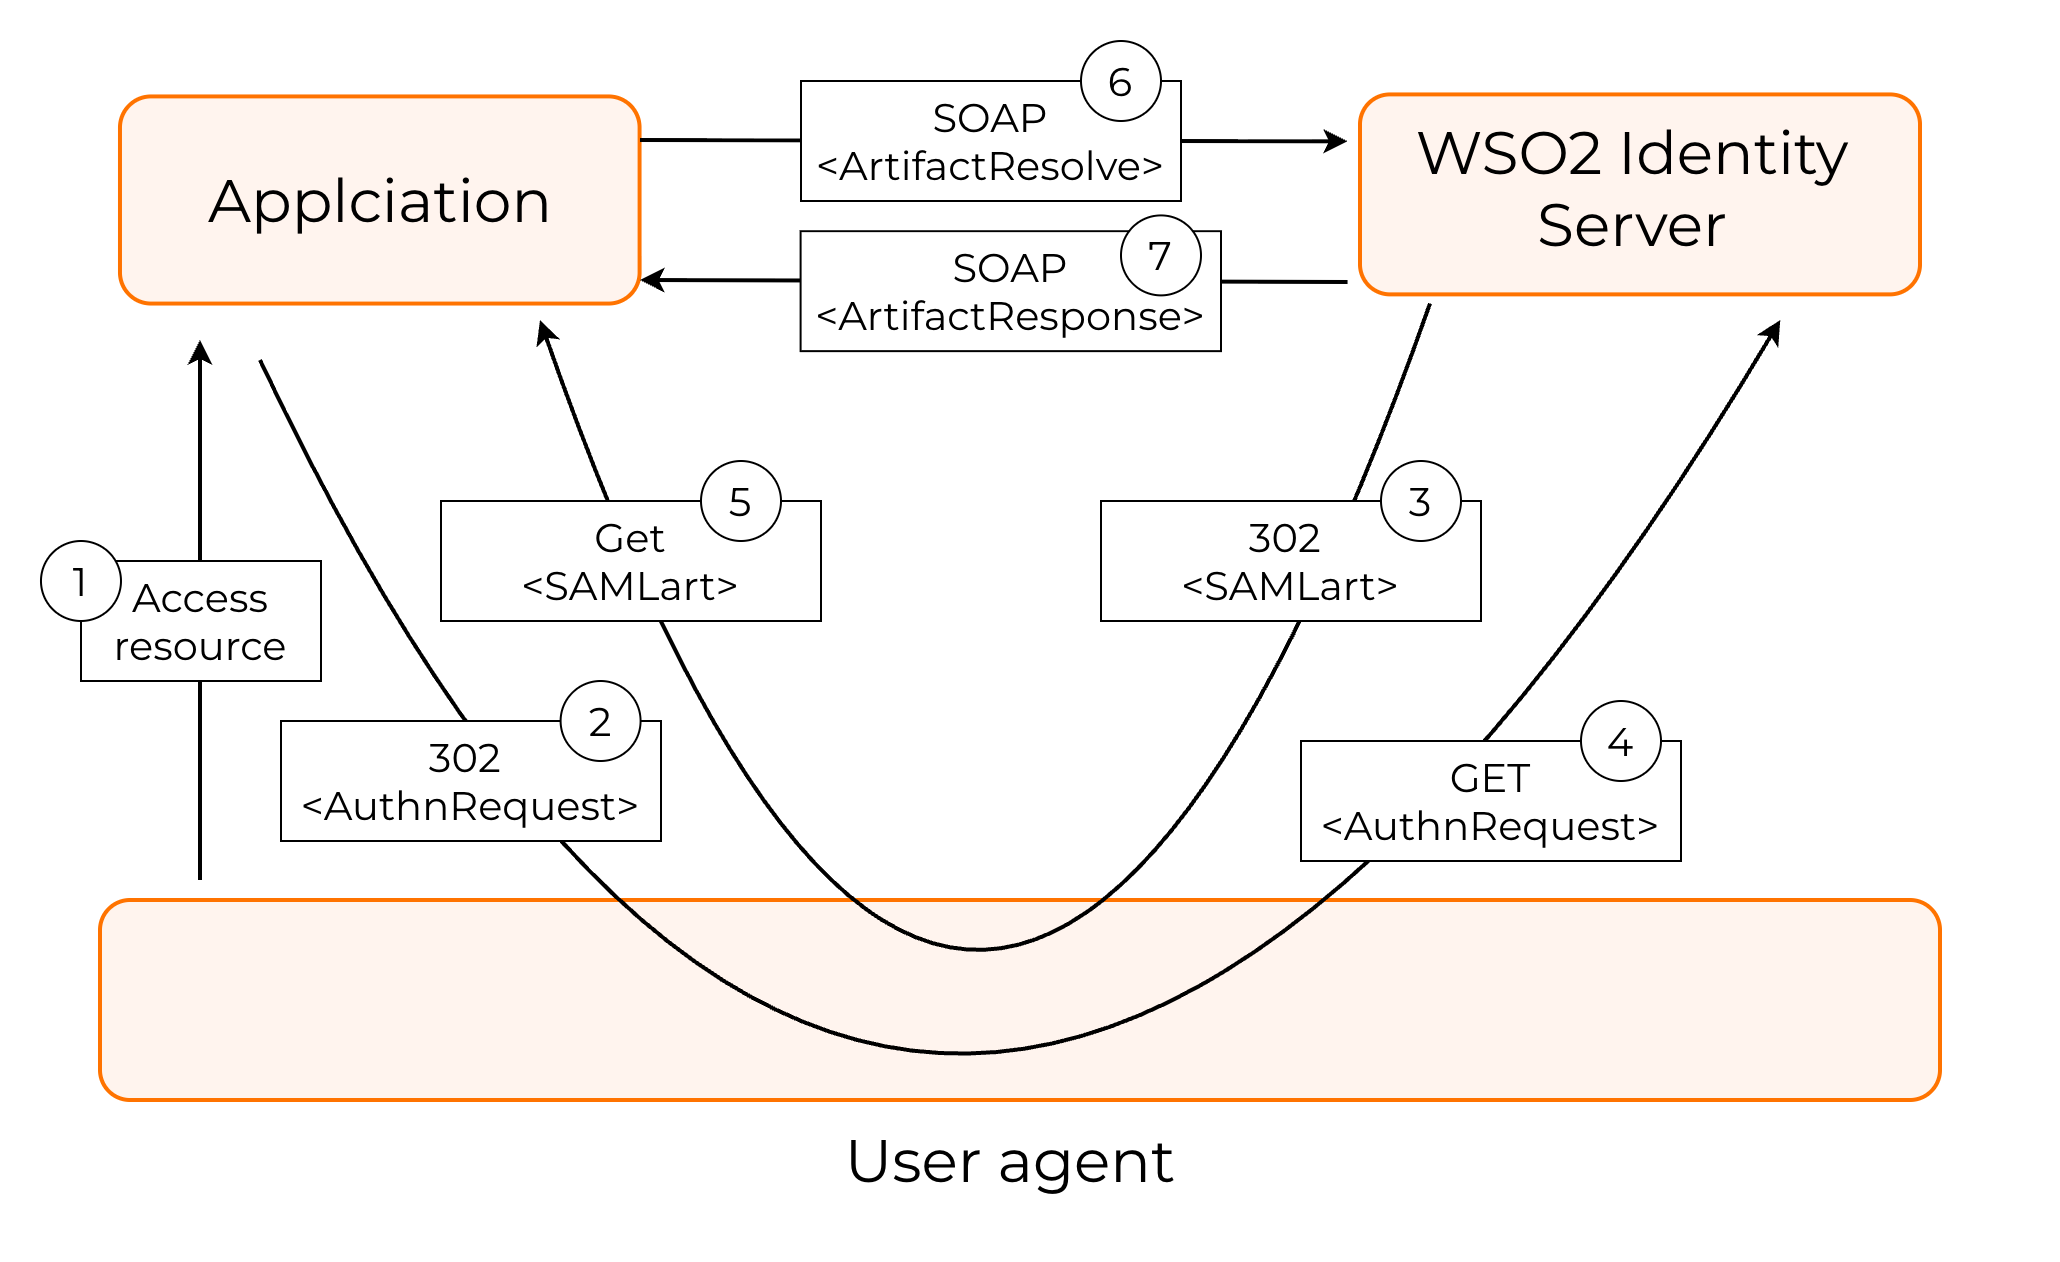
The process goes as follows:
-
User tries to access a protected resource and the application sees that the user needs to log in.
-
The application creates a SAML AuthnRequest and sends a 302 Redirect to the browser which contains the AuthnRequest in the query parameters.
-
The IdP receives the AuthnRequest, authenticates the user and generates a SAML Artifact (a short reference pointer). The IdP sends a 302 Redirect back to the browser containing:
-
The browser follows the redirect and sends:
-
The application extracts the artifact:
-
The SP must now resolve the artifact into a full SAML Response. For this, it sends a back-channel SOAP call to the IdP:
-
The IdP receives the artifact, looks up the stored SAML Response corresponding to that artifact and returns the full signed SAML response
The application verifies the signature, extracts attributes, creates a session, and logs the user in.
Implement artifact binding
WSO2 Identity Server supports SAML artifact binding as specified in the SAML 2.0 Binding specification specification. The following guides explain how you can set it up for your application.
Before you begin
Follow the guide and register your SAML application in WSO2 Identity Server.
Enable SAML artifact binding
To enable SAML artifact binding for your application,
-
On the WSO2 Identity Server Console, go to Applications and select your registered SAML application.
-
In the Protocol tab of your application, under Single Sign-On Profile, select Artifact.
-
Optionally select the Enable signature validation for artifact binding to validate the artifact resolve request signature against the application certificate.
-
If you selected the option in Step 3, provide the application's certificate under Certificate for WSO2 Identity Server to validate the request.
Note
Learn more about SAML 2.0 application configurations.
-
Click Update to save the changes.
Configure artifact expiration time
The SAML 2.0 Binding specification specifies that artifacts require an expiration time. WSO2 Identity Server resolves artifacts only within the artifact expiration period. Expired artifacts are rejected.
The default time limit is set for 4 minutes. To change it, set a custom time (in minutes) for the following configuration in the <IS_HOME>/repository/conf/deployment.toml file.
Resolve artifacts with WSO2 Identity Server
Your application can resolve artifacts issued by WSO2 Identity Server by sending a back-channel SOAP request to the following endpoint.
Your application should send an <ArtifactResolve> message wrapped in a SOAP envelope to the WSO2 Identity Server artifact resolution endpoint as shown below:
Note
If you enabled signature validation for artifact binding, the application should sign the request with its private key.
POST /samlartresolve HTTP/1.1
Host: wso2is.com
Content-Type: text/xml
Content-Length: nnn
SOAPAction: http://www.oasis-open.org/committees/security
<SOAP-ENV:Envelope
    xmlns:SOAP-ENV="http://schemas.xmlsoap.org/soap/envelope/">
    <SOAP-ENV:Body>
        <samlp:ArtifactResolve
            xmlns:samlp="urn:oasis:names:tc:SAML:2.0:protocol"
            xmlns="urn:oasis:names:tc:SAML:2.0:assertion"
            ID="_6c3a4f8b9c2d" Version="2.0"
            IssueInstant="2004-01-21T19:00:49Z">
            <Issuer>https://ServiceProvider.com/SAML</Issuer>
            <Artifact>
                AAQAADWNEw5VT47wcO4zX/iEzMmFQvGknDfws2ZtqSGdkNSbsW1cmVR0bzU=
            </Artifact>
        </samlp:ArtifactResolve>
    </SOAP-ENV:Body>
</SOAP-ENV:Envelope>
The response will look as follows:
HTTP/1.1 200 OK
Date: 21 Jan 2004 07:00:49 GMT
Content-Type: text/xml
Content-Length: nnnn

<SOAP-ENV:Envelope
    xmlns:SOAP-ENV="http://schemas.xmlsoap.org/soap/envelope/">
    <SOAP-ENV:Body>
        <samlp:ArtifactResponse
            xmlns:samlp="urn:oasis:names:tc:SAML:2.0:protocol"
            xmlns="urn:oasis:names:tc:SAML:2.0:assertion"
            ID="_FQvGknDfws2Z" Version="2.0"
            InResponseTo="_6c3a4f8b9c2d"
            IssueInstant="2004-01-21T19:00:49Z">
            <Issuer>https://wso2is.com</Issuer>
            <samlp:Status>
                <samlp:StatusCode Value="urn:oasis:names:tc:SAML:2.0:status:Success"/>
            </samlp:Status>
            <samlp:Response ID="d2b7c388cec36fa7c39c28fd298644a8"
                IssueInstant="2004-01-21T19:00:49Z"
                Version="2.0">
                ...
            </samlp:Response>
        </samlp:ArtifactResponse>
    </SOAP-ENV:Body>
</SOAP-ENV:Envelope>
Try it out
The following guide walks you through setting up a sample application to see SAML artifact binding in action.
Set up the sample
-
Download and install Apache Tomcat version 8.X.
-
Download the sample application.
-
Copy the
saml2-web-app-pickup-dispatch.com.warfile into the/webappsfolder of your Tomcat installation. -
Start the Tomcat server.
Note
Learn more about the /webapps directory location and Tomcat commands in the Tomcat documentation.
Configure Cross Origin Cross-Origin Resource Sharing (CORS)
SAML2 POST Binding sends the SAML response via browser POST, creating a cross-origin request when the SP and WSO2 Identity Server use different domains. To Configure WSO2 Identity Server to allow requests from the SP’s domain,
-
Open the
<IS_HOME>/repository/conf/deployment.tomlfile and add the following configurations.[cors] allow_generic_http_requests = true allow_any_origin = false allowed_origins = [ "http://localhost:8080" ] allow_subdomains = false supported_methods = [ "GET", "POST", "HEAD", "OPTIONS" ] support_any_header = true supported_headers = [] exposed_headers = [] supports_credentials = true max_age = 3600 tag_requests = falseNote
If your are using a different URL, add that as an allowed origin.
-
Restart WSO2 Identity Server.
Integrate application with WSO2 Identity Server
To integrate the sample application,
-
Register your SAML application in WSO2 Identity Server with the following information.
- Issuer - saml2-web-app-pickup-dispatch.com
- Assertion Consumer URL - http://localhost.com:8080/saml2-web-app-pickup-dispatch.com/home.jsp
-
On the Protocol tab of the created application, do the following:
- Under Response Singing enable Sign SAML responses.
- Under Single Sign-On Profile, select Artifact and select Enable signature validation for artifact binding.
- Under Certificate, select Provide certificate and upload the application certificate you extracted earlier.
-
Click Update to save the changes.
Note
-
The sample applications have request and response signing enabled by default. If you want to try the flow without dealing with certificates, open the
<APP_HOME>/WEB-INF/classes/sso.propertiesfile and set all signing-related properties to false: -
If you prefer to keep the default signing behavior, extract each application's public certificate from
<APP_HOME>/WEB-INF/classes/wso2carbon.p12, and upload it to WSO2 Identity Server under the Certificate section of your registered application's Protocol tab. -
If you enable response signing, make sure that in WSO2 Identity Server Console, you go to your registered application's Protocol section and under Response Signing, enable Sign SAML responses. Also from the Info tab of your registered application, download the IdP certificate and add it to your installed application as a trusted certificate.
Try artifact binding
Now that you have set the sample application, follow the steps to try out artifact binding.
-
Log into the sample application.
-
You will be redirected to the login page of WSO2 Identity Server. Enter your credentials and provide the necessary consent. You will be redirected to the Pickup Dispatch application home page.
-
You can use a SAML tracer add-on with your browser to view the SAML2 response artifact for the SSO authentication request. The code block below shows an example response.