Password recovery
Password recovery allows users to securely reset their password if they forget it. The user verifies their identity through a secure method, such as an email or SMS code, before setting a new password.
In the Flow Builder, you can create the password recovery journey in two ways:
-
Use a starter template – Load a ready made flow and customize it to your needs.
-
Build from scratch – Take full control by designing every step yourself.
Sample use case
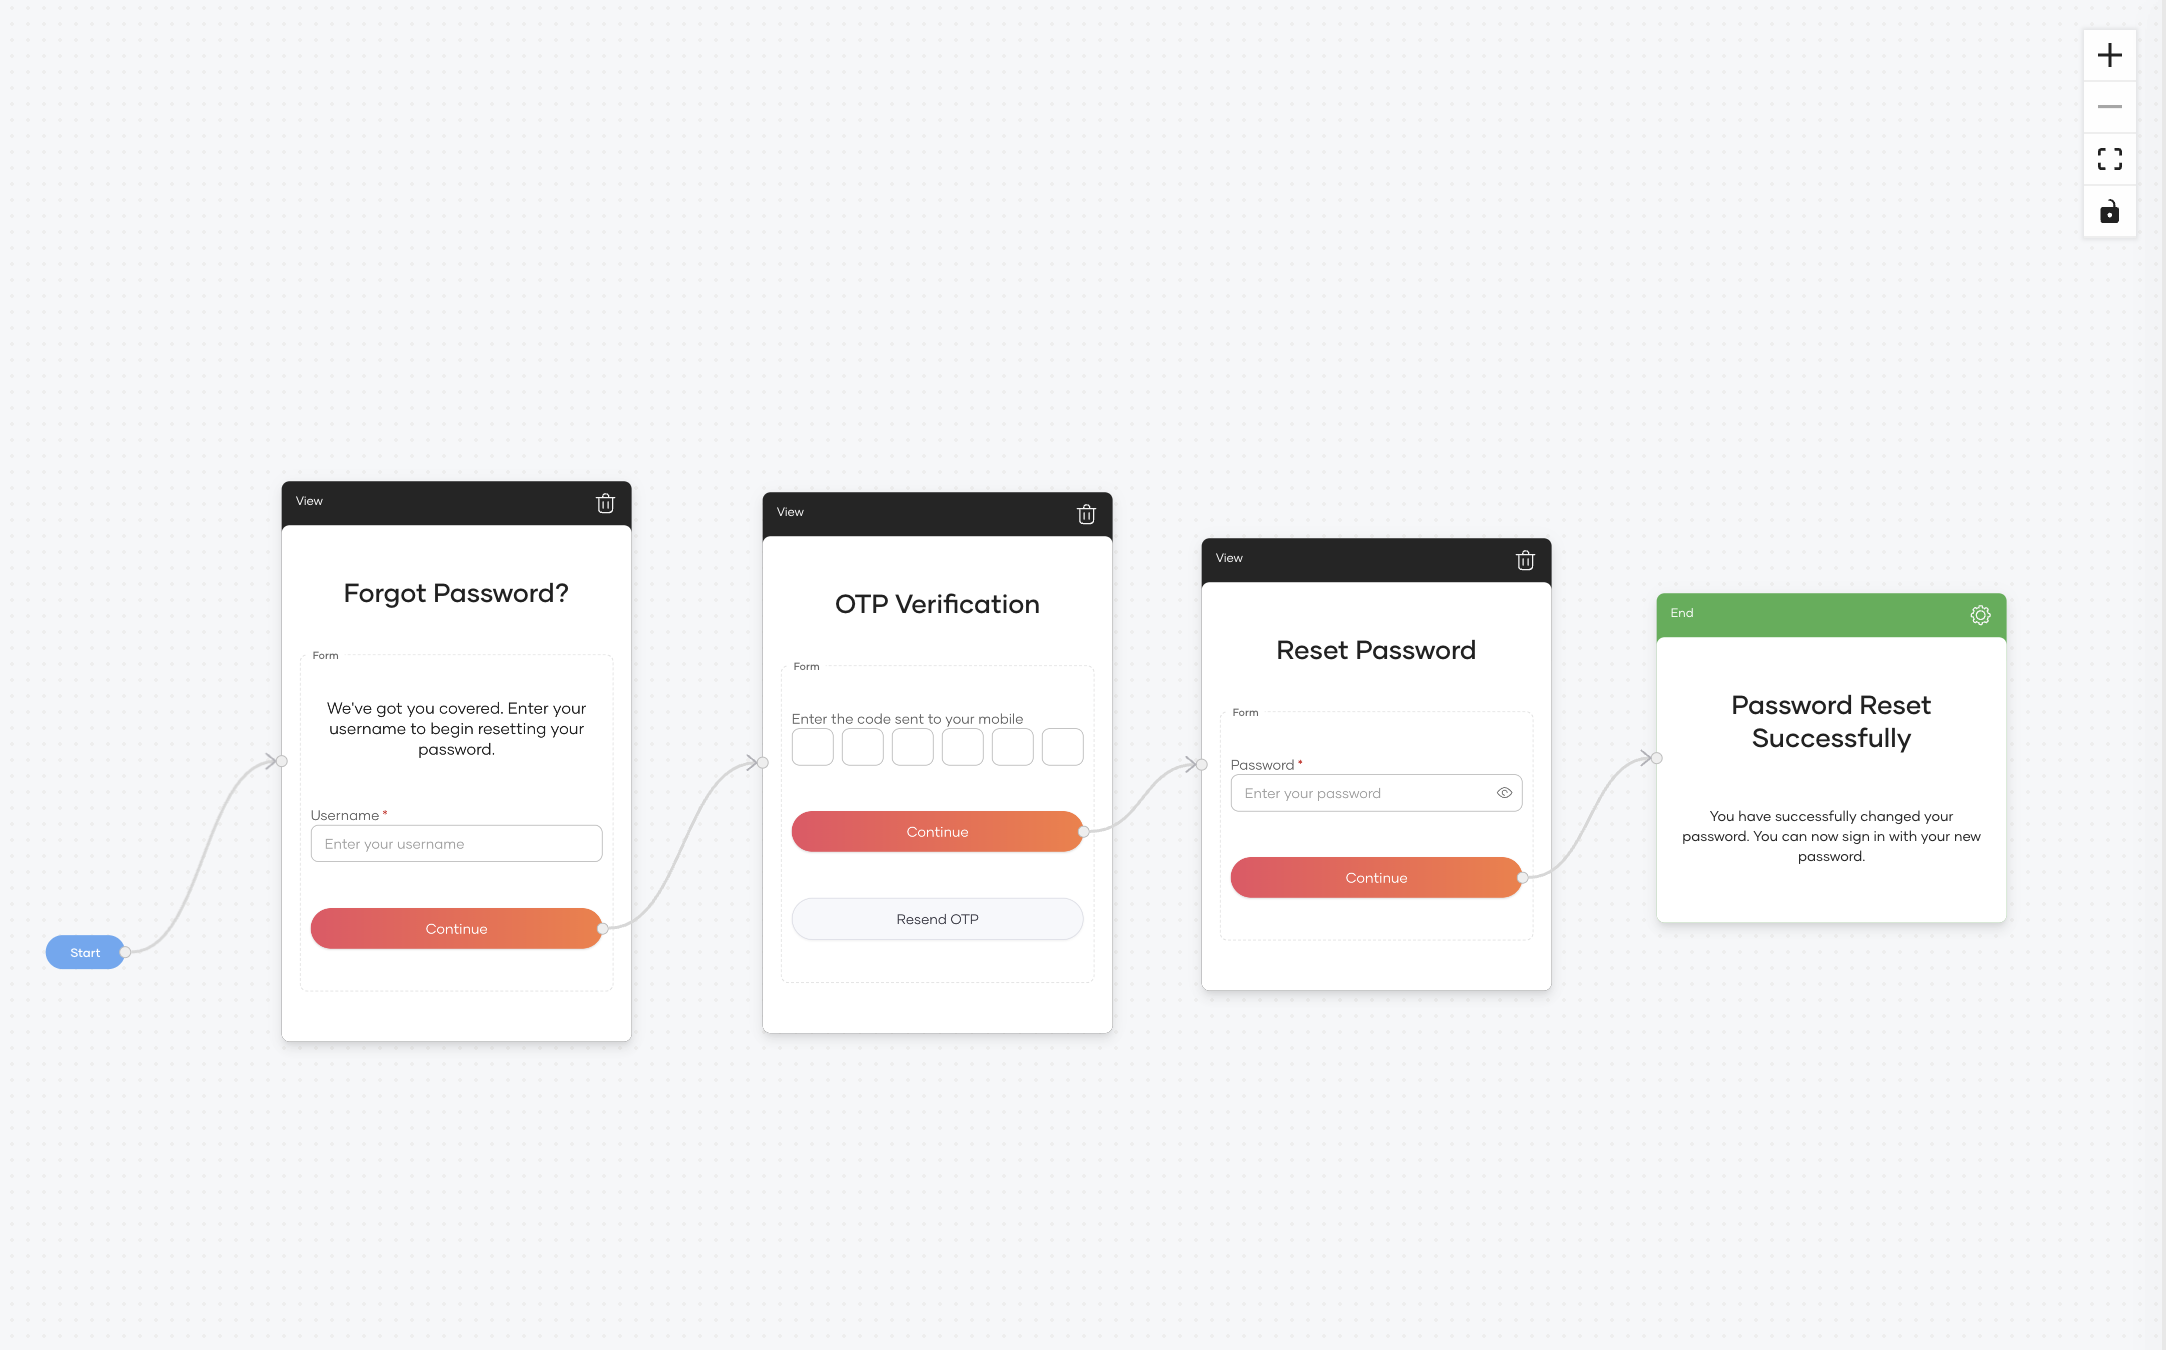
Imagine you want to verify the user’s identity via SMS OTP before allowing them to reset their password. The flow works as follows:
- The user enters the username.
- WSO2 Identity Server sends a one-time code to the user's registered mobile number.
- The user verifies their identity by entering the code.
- The user resets their password.
This ensures that only users with access to the registered mobile number can reset the password, enhancing security.
Build the flow
To build the sample use case, you can start from the Password Recovery with SMS OTP template and adjust it.
Follow the steps below to configure this flow.
Step 1 – Load the template
To load the template,
-
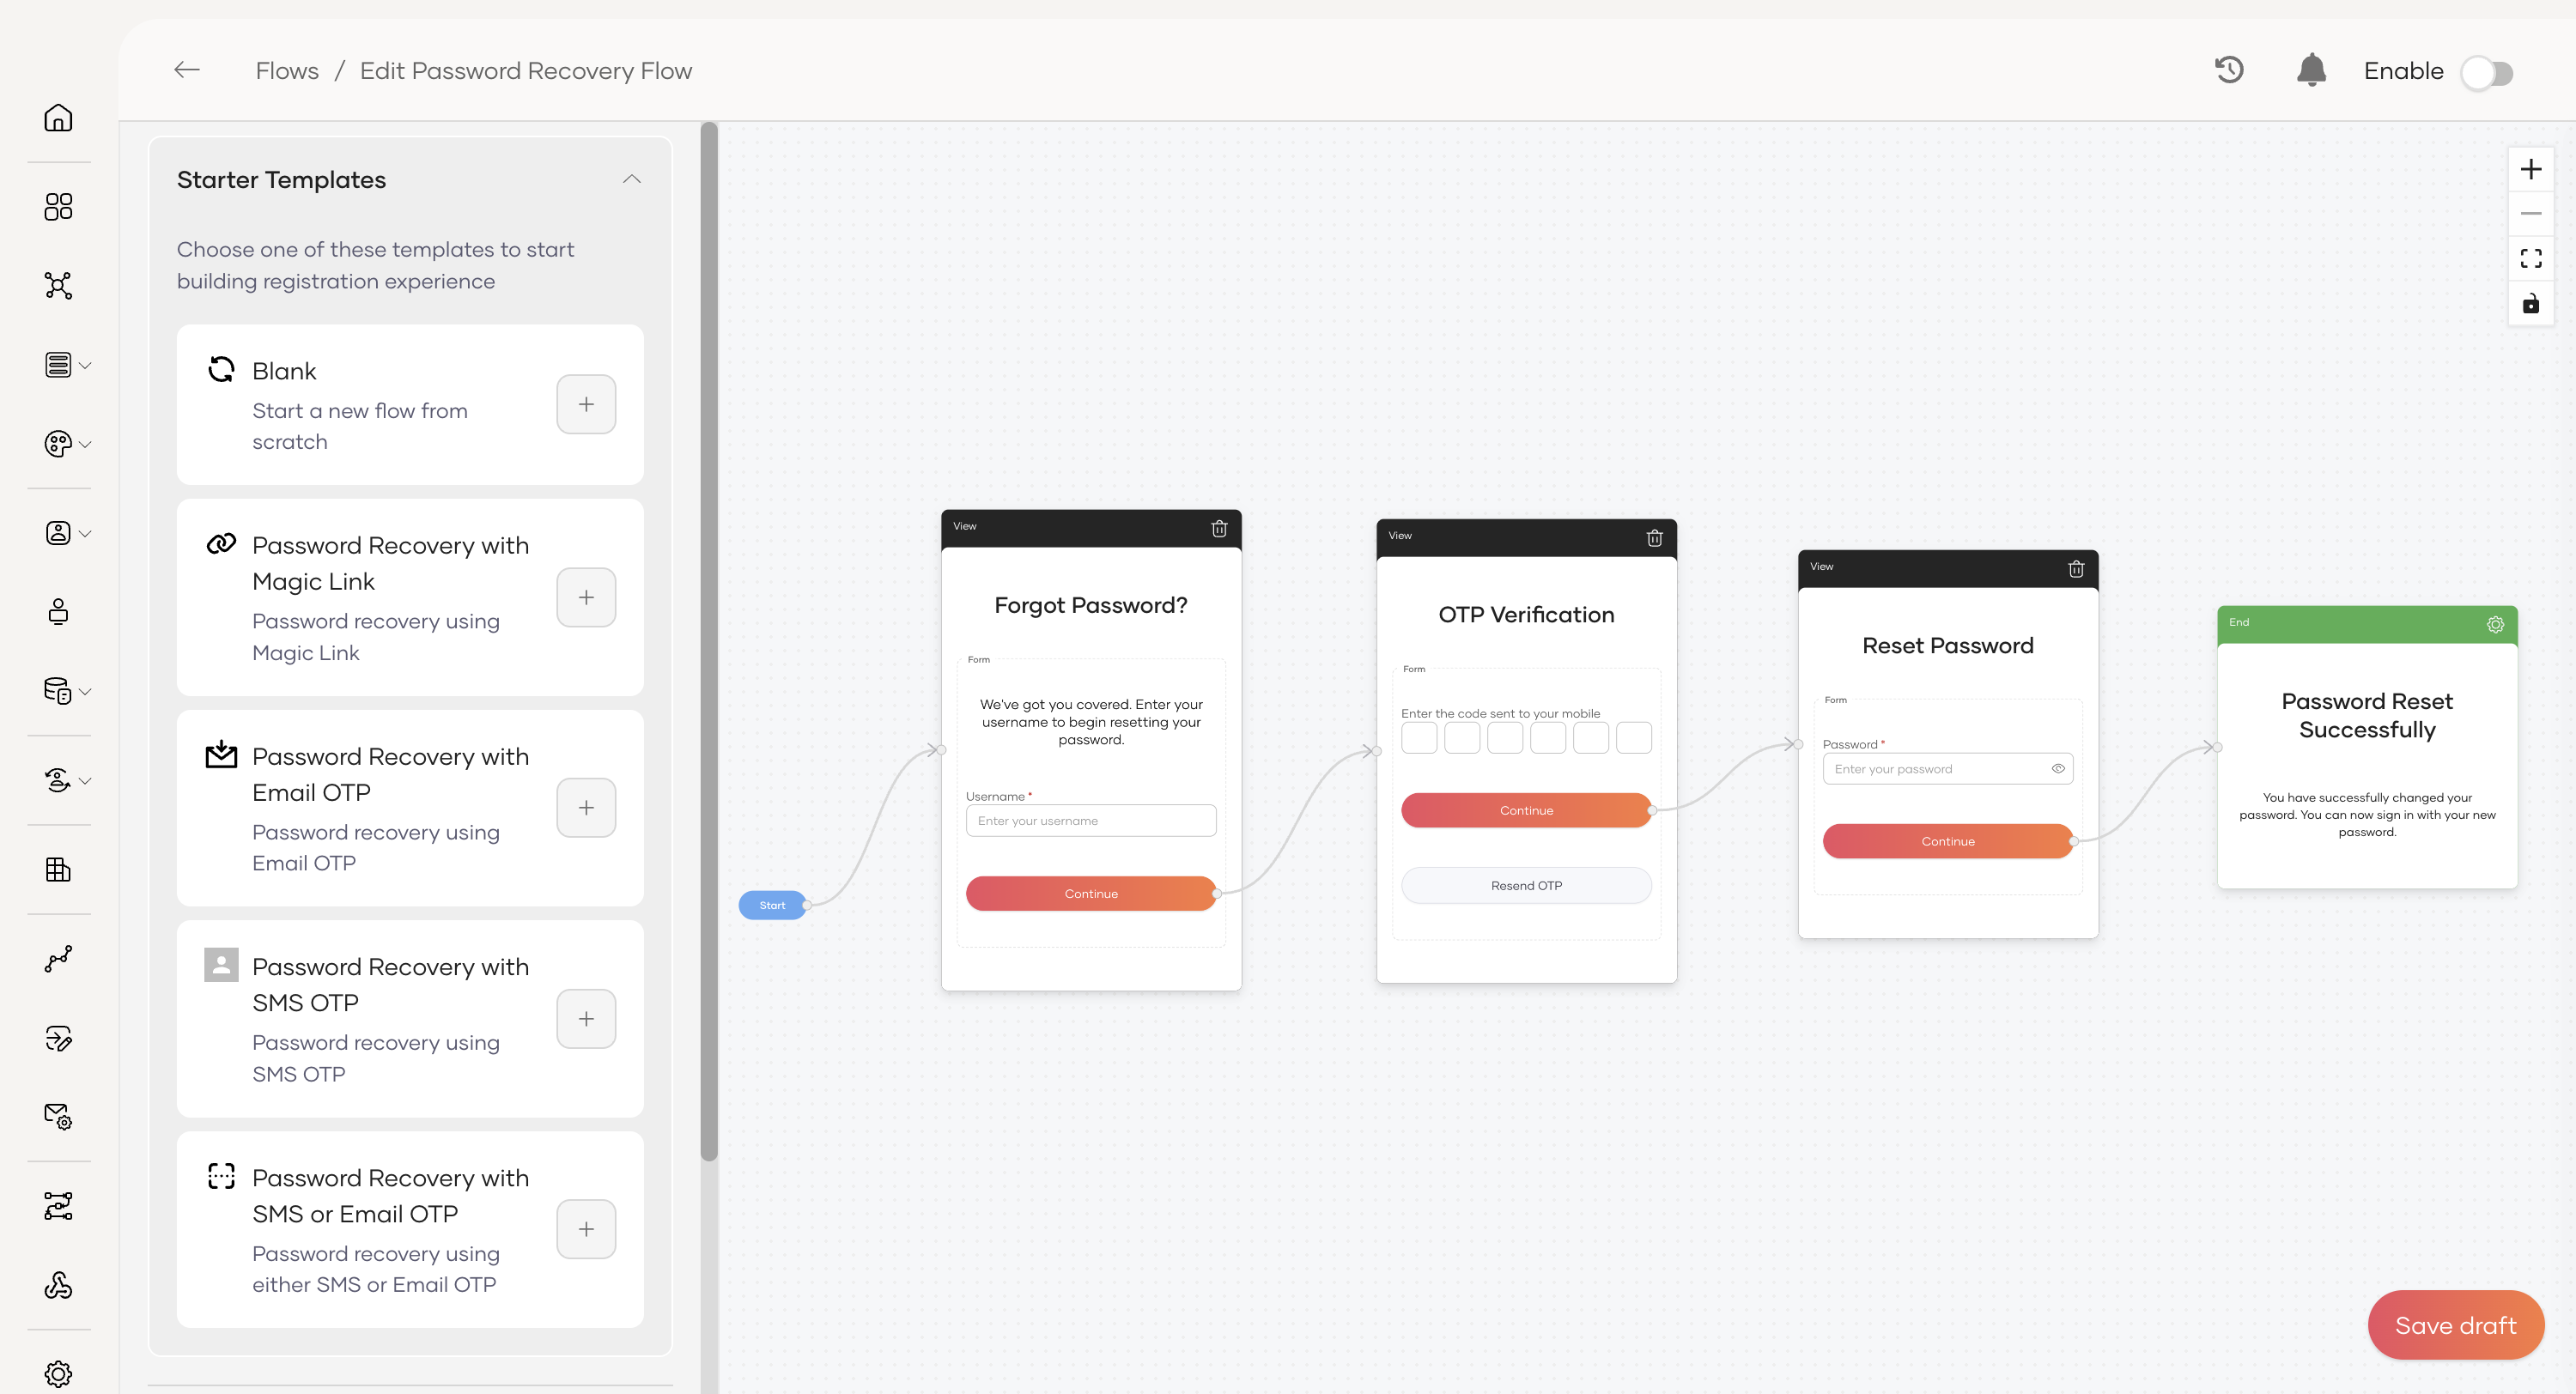
On the WSO2 Identity Server console, navigate to Flows.
-
Click on the password recovery card.
-
Click the
+button next to the Password Recovery with SMS OTP template to load it onto the canvas.
Step 2 – Configure the flow completion
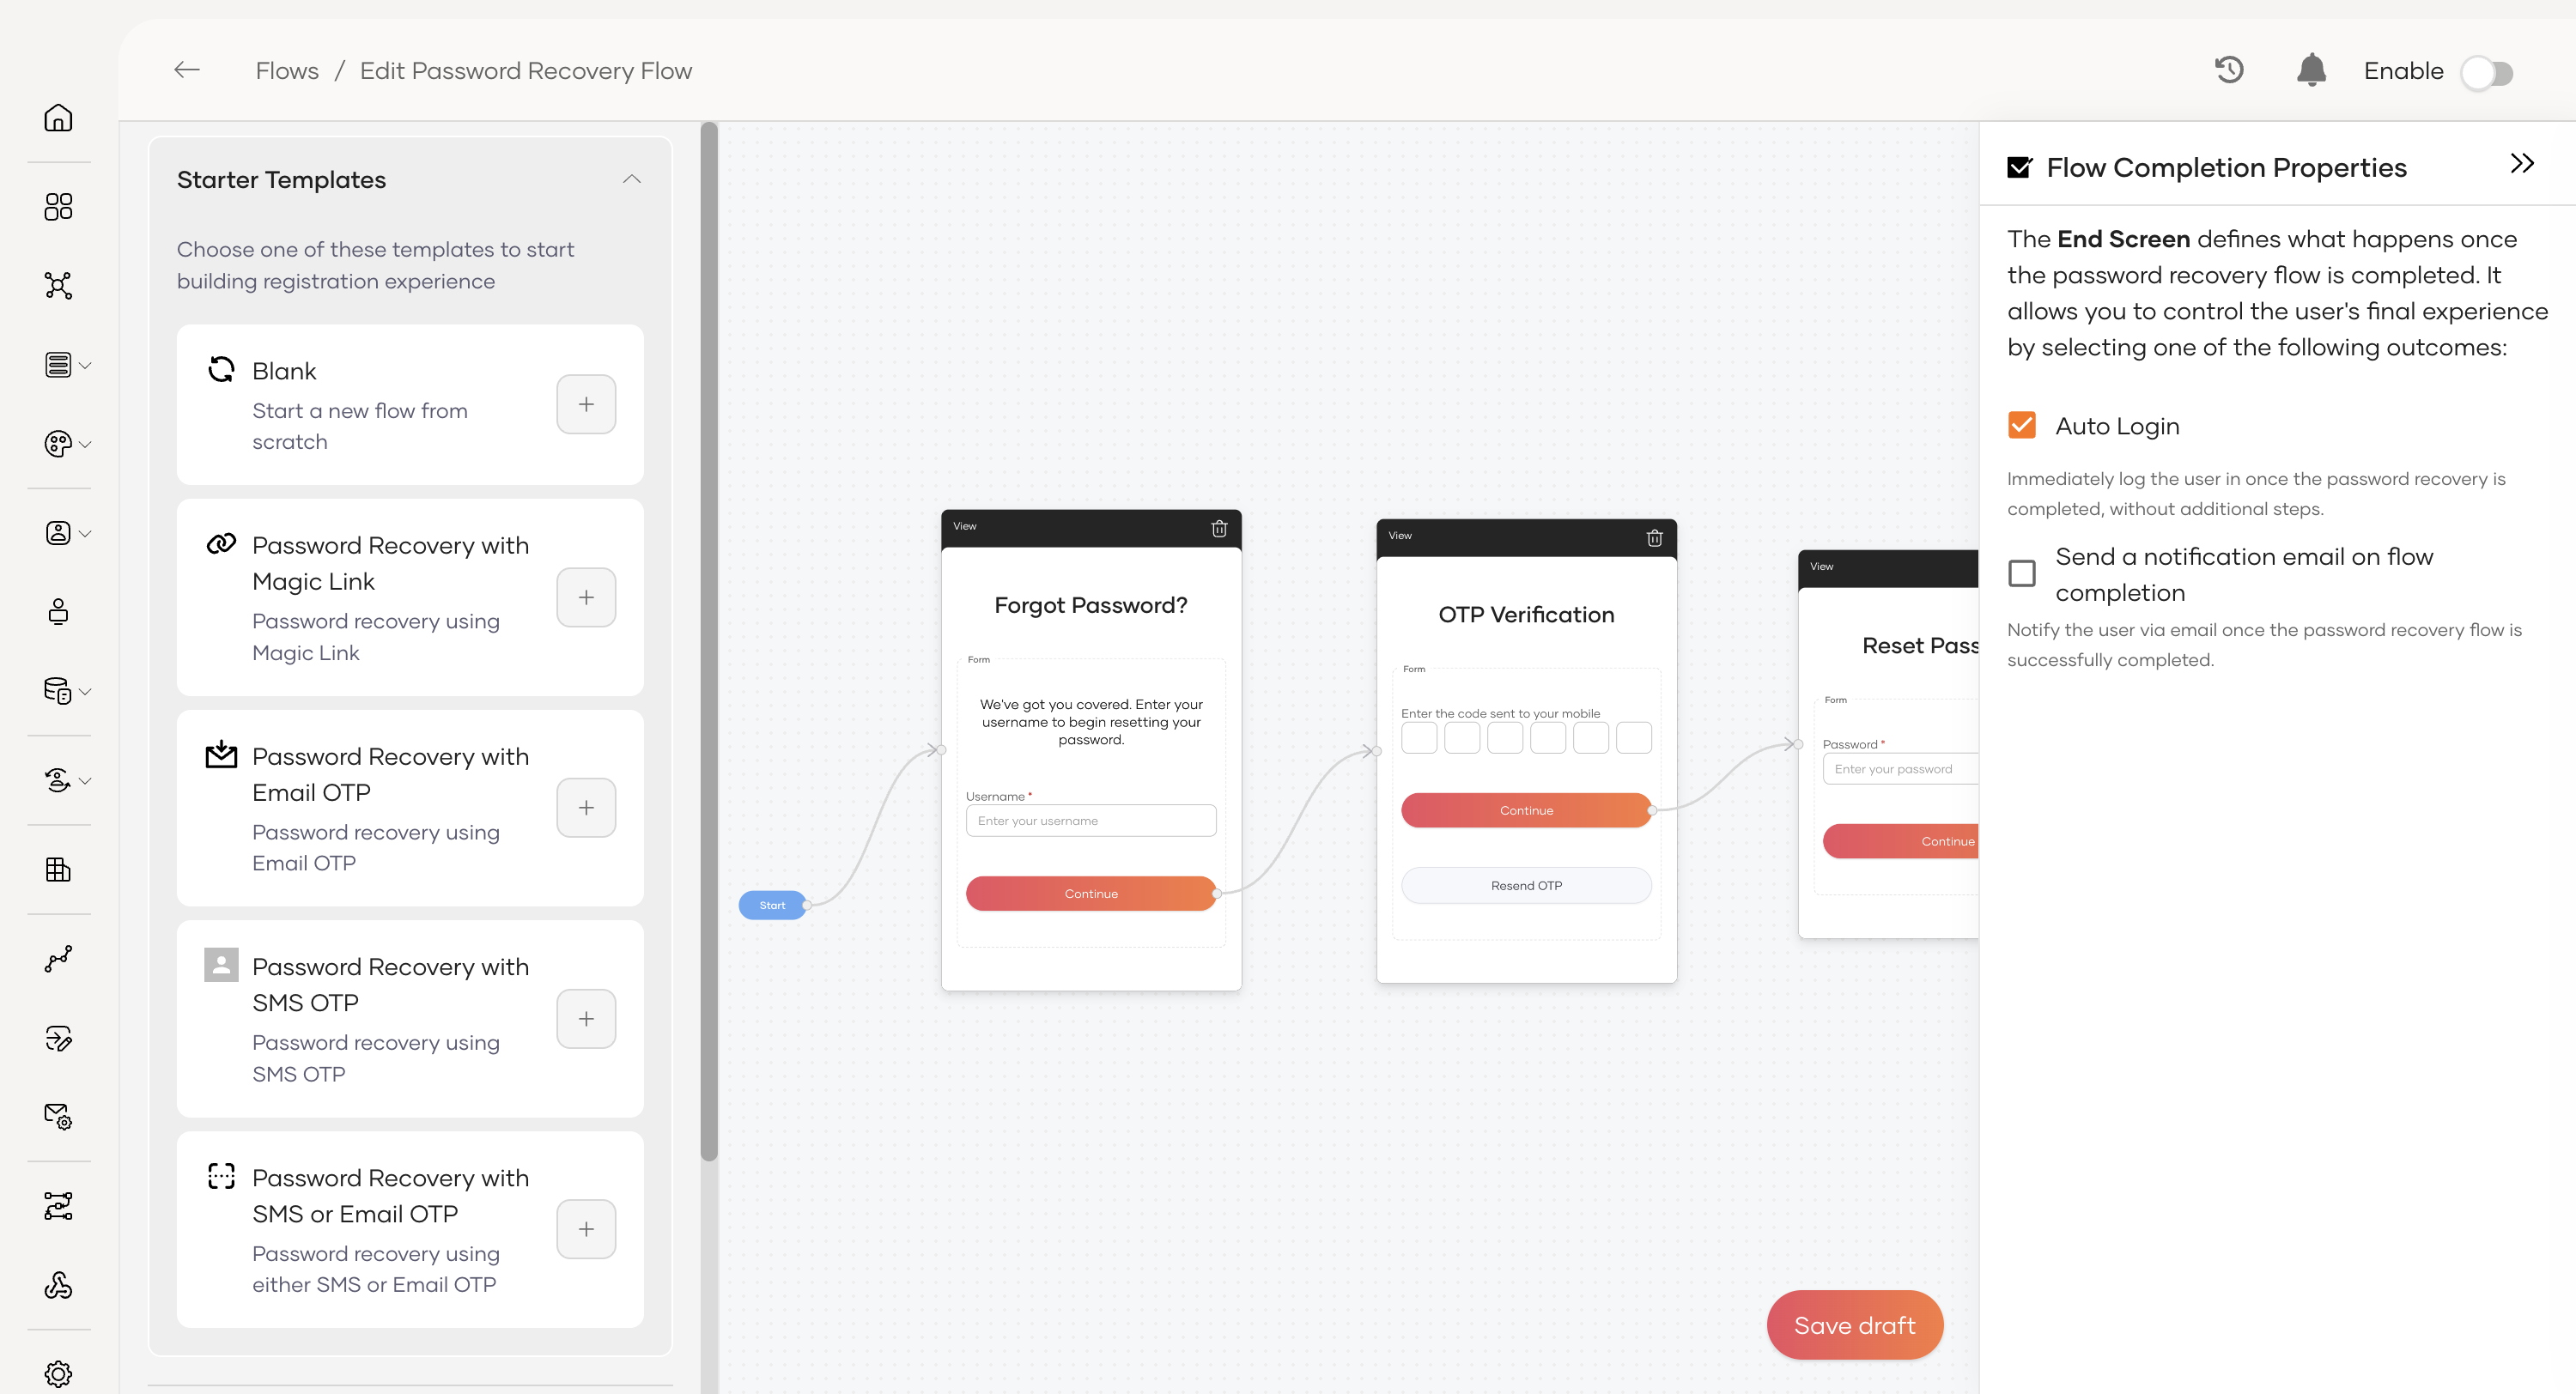
The End node determines what the user experiences after successfully resetting their password. Configure actions like auto login or sending a notification email.
-
Click on the green End node on the canvas (labeled "Password Reset Successfully").
-
With the End node selected, click the gear icon (⚙️) on the top-right to open the Flow Completion Properties.
-
Configure the desired outcomes:
-
Auto Login: Immediately logs the user in once the flow is completed.
-
Send a notification email on flow completion: Notifies the user via email that their password has been successfully reset.
-
-
Click Save Draft to keep your progress.
Step 3 – Enable the flow
Once the flow has been fully configured and is ready for users:
- On the top-right corner of the Flow Builder, turn the toggle ON to publish the flow.
Now that these changes are in place, you have built a secure and user-friendly password recovery flow using SMS OTP.
Configure for alternative login identifiers
If you have enabled alternative login identifiers, users can log in using configured attributes such as email address or mobile number as well as their username. To allow users to use these same identifiers when recovering their password, you need to update the identifier input field in the password recovery flow.
Follow the steps below:
-
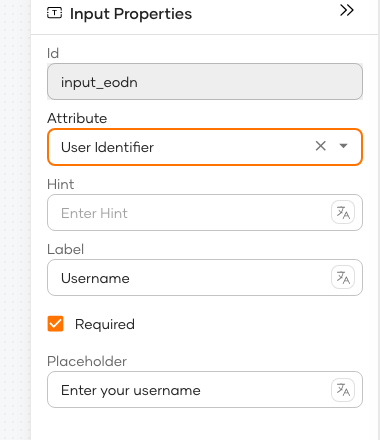
On the Edit Password Recovery Flow canvas, hover over the Username input field and click the gear icon (⚙️) that appears to open the Input Properties panel.
-
In the Attribute dropdown, select User Identifier.
Note
The User Identifier option only appears in the Attribute dropdown after alternative login identifiers have been enabled.
-
Click Save Draft, then publish the flow.
Users can now enter any of their configured alternative login identifiers (such as email address) on the Forgot Password? page to start password recovery.
Control account information disclosure
When a user enters the user identifier, and clicks Continue, you can control how much information is revealed about the account with the following options.
- Notify User Existence: Whether the identifier matches an existing account.
- Notify User Account Status: Whether the account is locked or disabled.
Both settings are disabled by default to prevent user enumeration. For the full behavior of each option, see Resolve user properties.
Warning
Enabling these notifications reveals account information (whether an account exists and its lock/disable status) and may lead to user enumeration. Keep them disabled unless immediate user feedback (such as catching a mistyped identifier) outweighs that risk.
To enable the notifications:
-
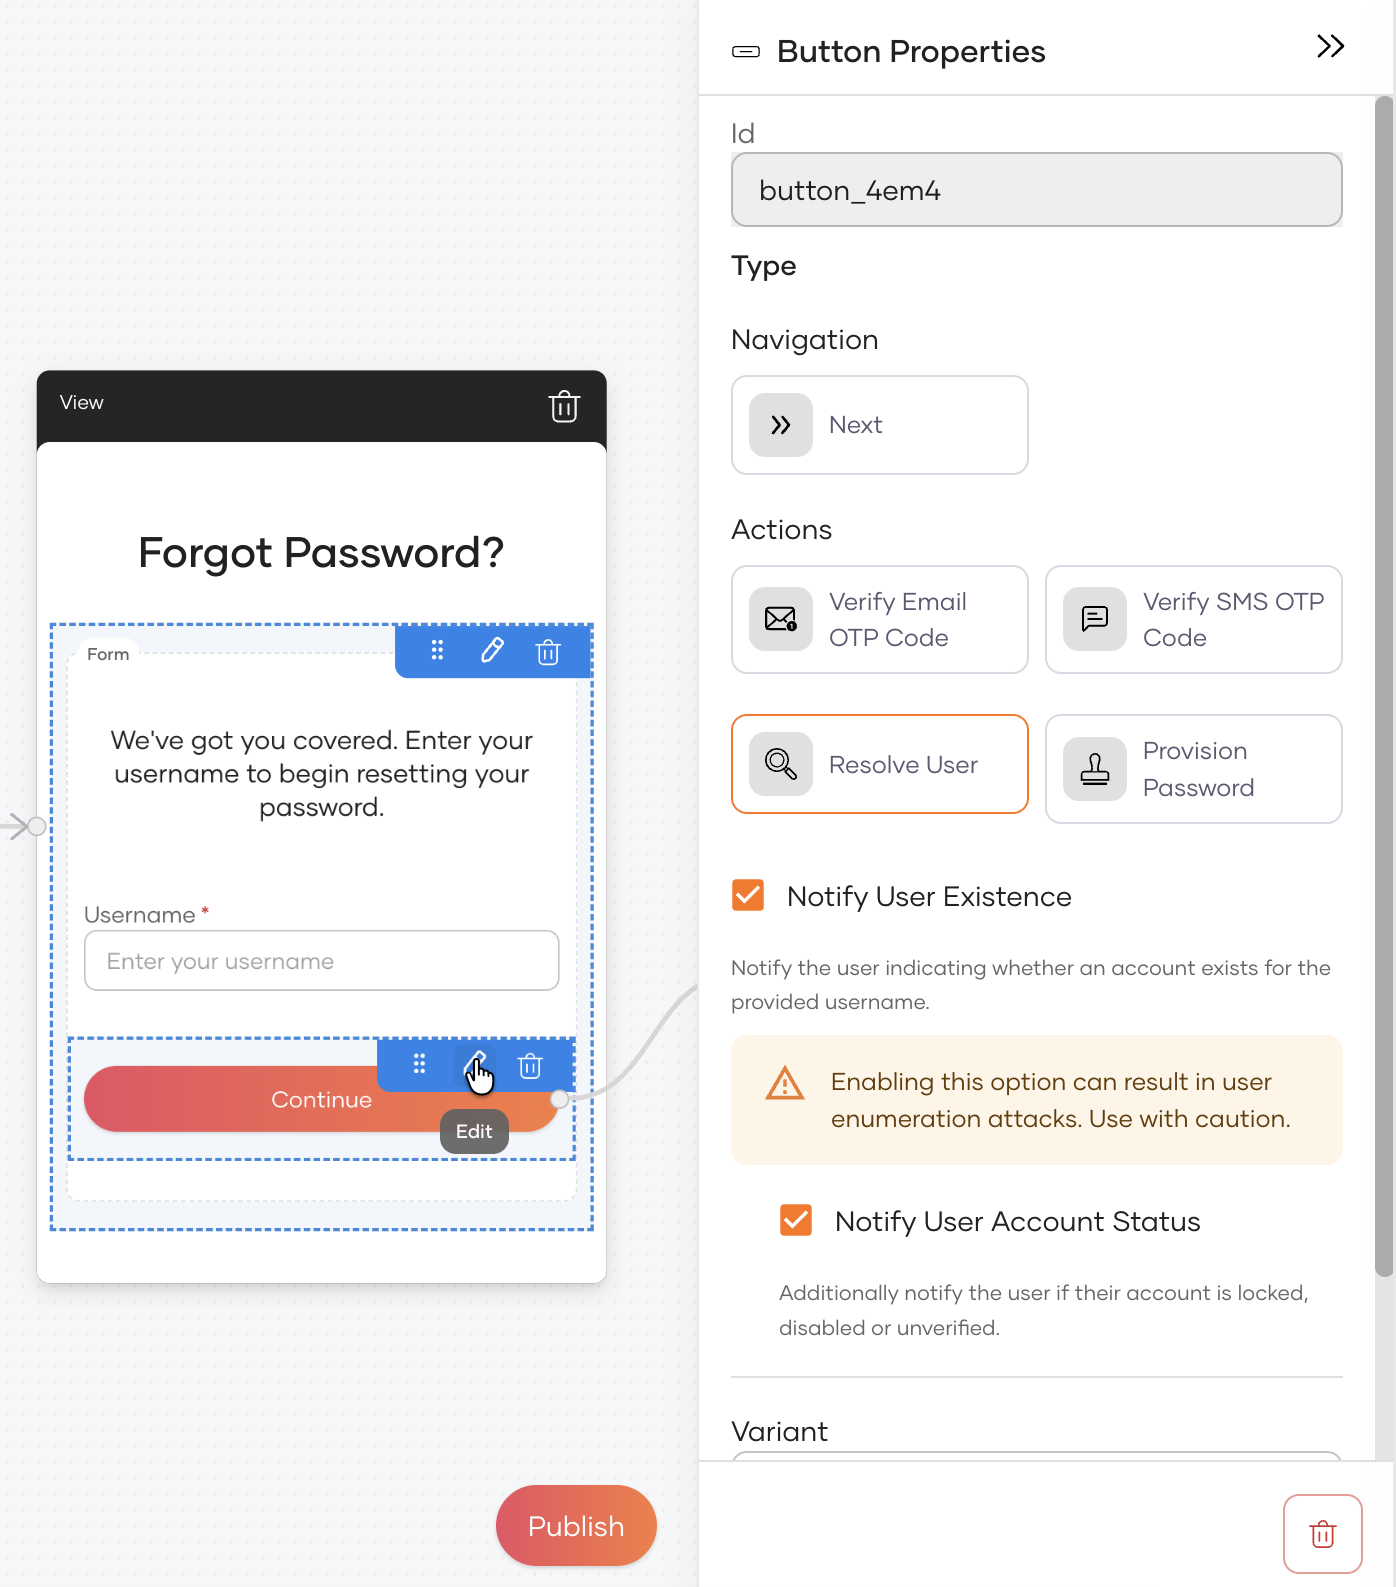
On the step in which a user enters the identifier, hover over the action button (for example, Continue) and click the pencil icon to open the button's Properties panel.
-
Under Resolve User, enable the preferred settings:
- Notify User Existence
- Notify User Account Status
-
Click Save Draft, then publish the flow.
Reference
This section provides details on the configuration options available in the Password Recovery Flow.
Flow completion properties
The Flow Completion Properties, configured on the End node, define the final actions that occur after a user successfully sets their password.
- Auto Login: If enabled, the user is automatically logged into their account immediately after successfully completing the password recovery flow.
- Send a notification email on flow completion: When enabled, the user will receive an email confirming that their password recovery is complete and their account is ready to use.
Resolve user properties
The Resolve User properties, configured on the action button of the first step, control what the recovery flow reveals when a user submits an identifier. Both are disabled by default — the secure posture, where every identifier (valid, non-existent, locked, or disabled) produces the same response, protecting the recovery form against user enumeration attacks. These controls apply regardless of whether the user starts recovery with a username or an alternative login identifier such as an email address or mobile number.
- Notify User Existence: When enabled, submitting an identifier that doesn't match any account shows a "User does not exist" error. When disabled, the flow continues to the next step (for example, the OTP screen) exactly as it would for a valid user, so it isn't possible to tell whether an account exists.
- Notify User Account Status: When enabled, a user with a locked or disabled account sees a specific error (for example, "The account is locked", with reason-specific variants). When disabled, the account status is not revealed and the flow continues.