Issue verifiable credentials to a Digital Wallet
This guide walks you through configuring WSO2 Identity Server to issue a verifiable credential (VC) to an OID4VCI-compatible digital wallet. Any wallet that supports the OID4VCI specification can receive credentials from WSO2 Identity Server.
Prerequisites
Before you begin, ensure the following:
- An OID4VCI-compatible digital wallet is installed on your device.
- A user exists in WSO2 Identity Server whose attributes you want to include in the credential.
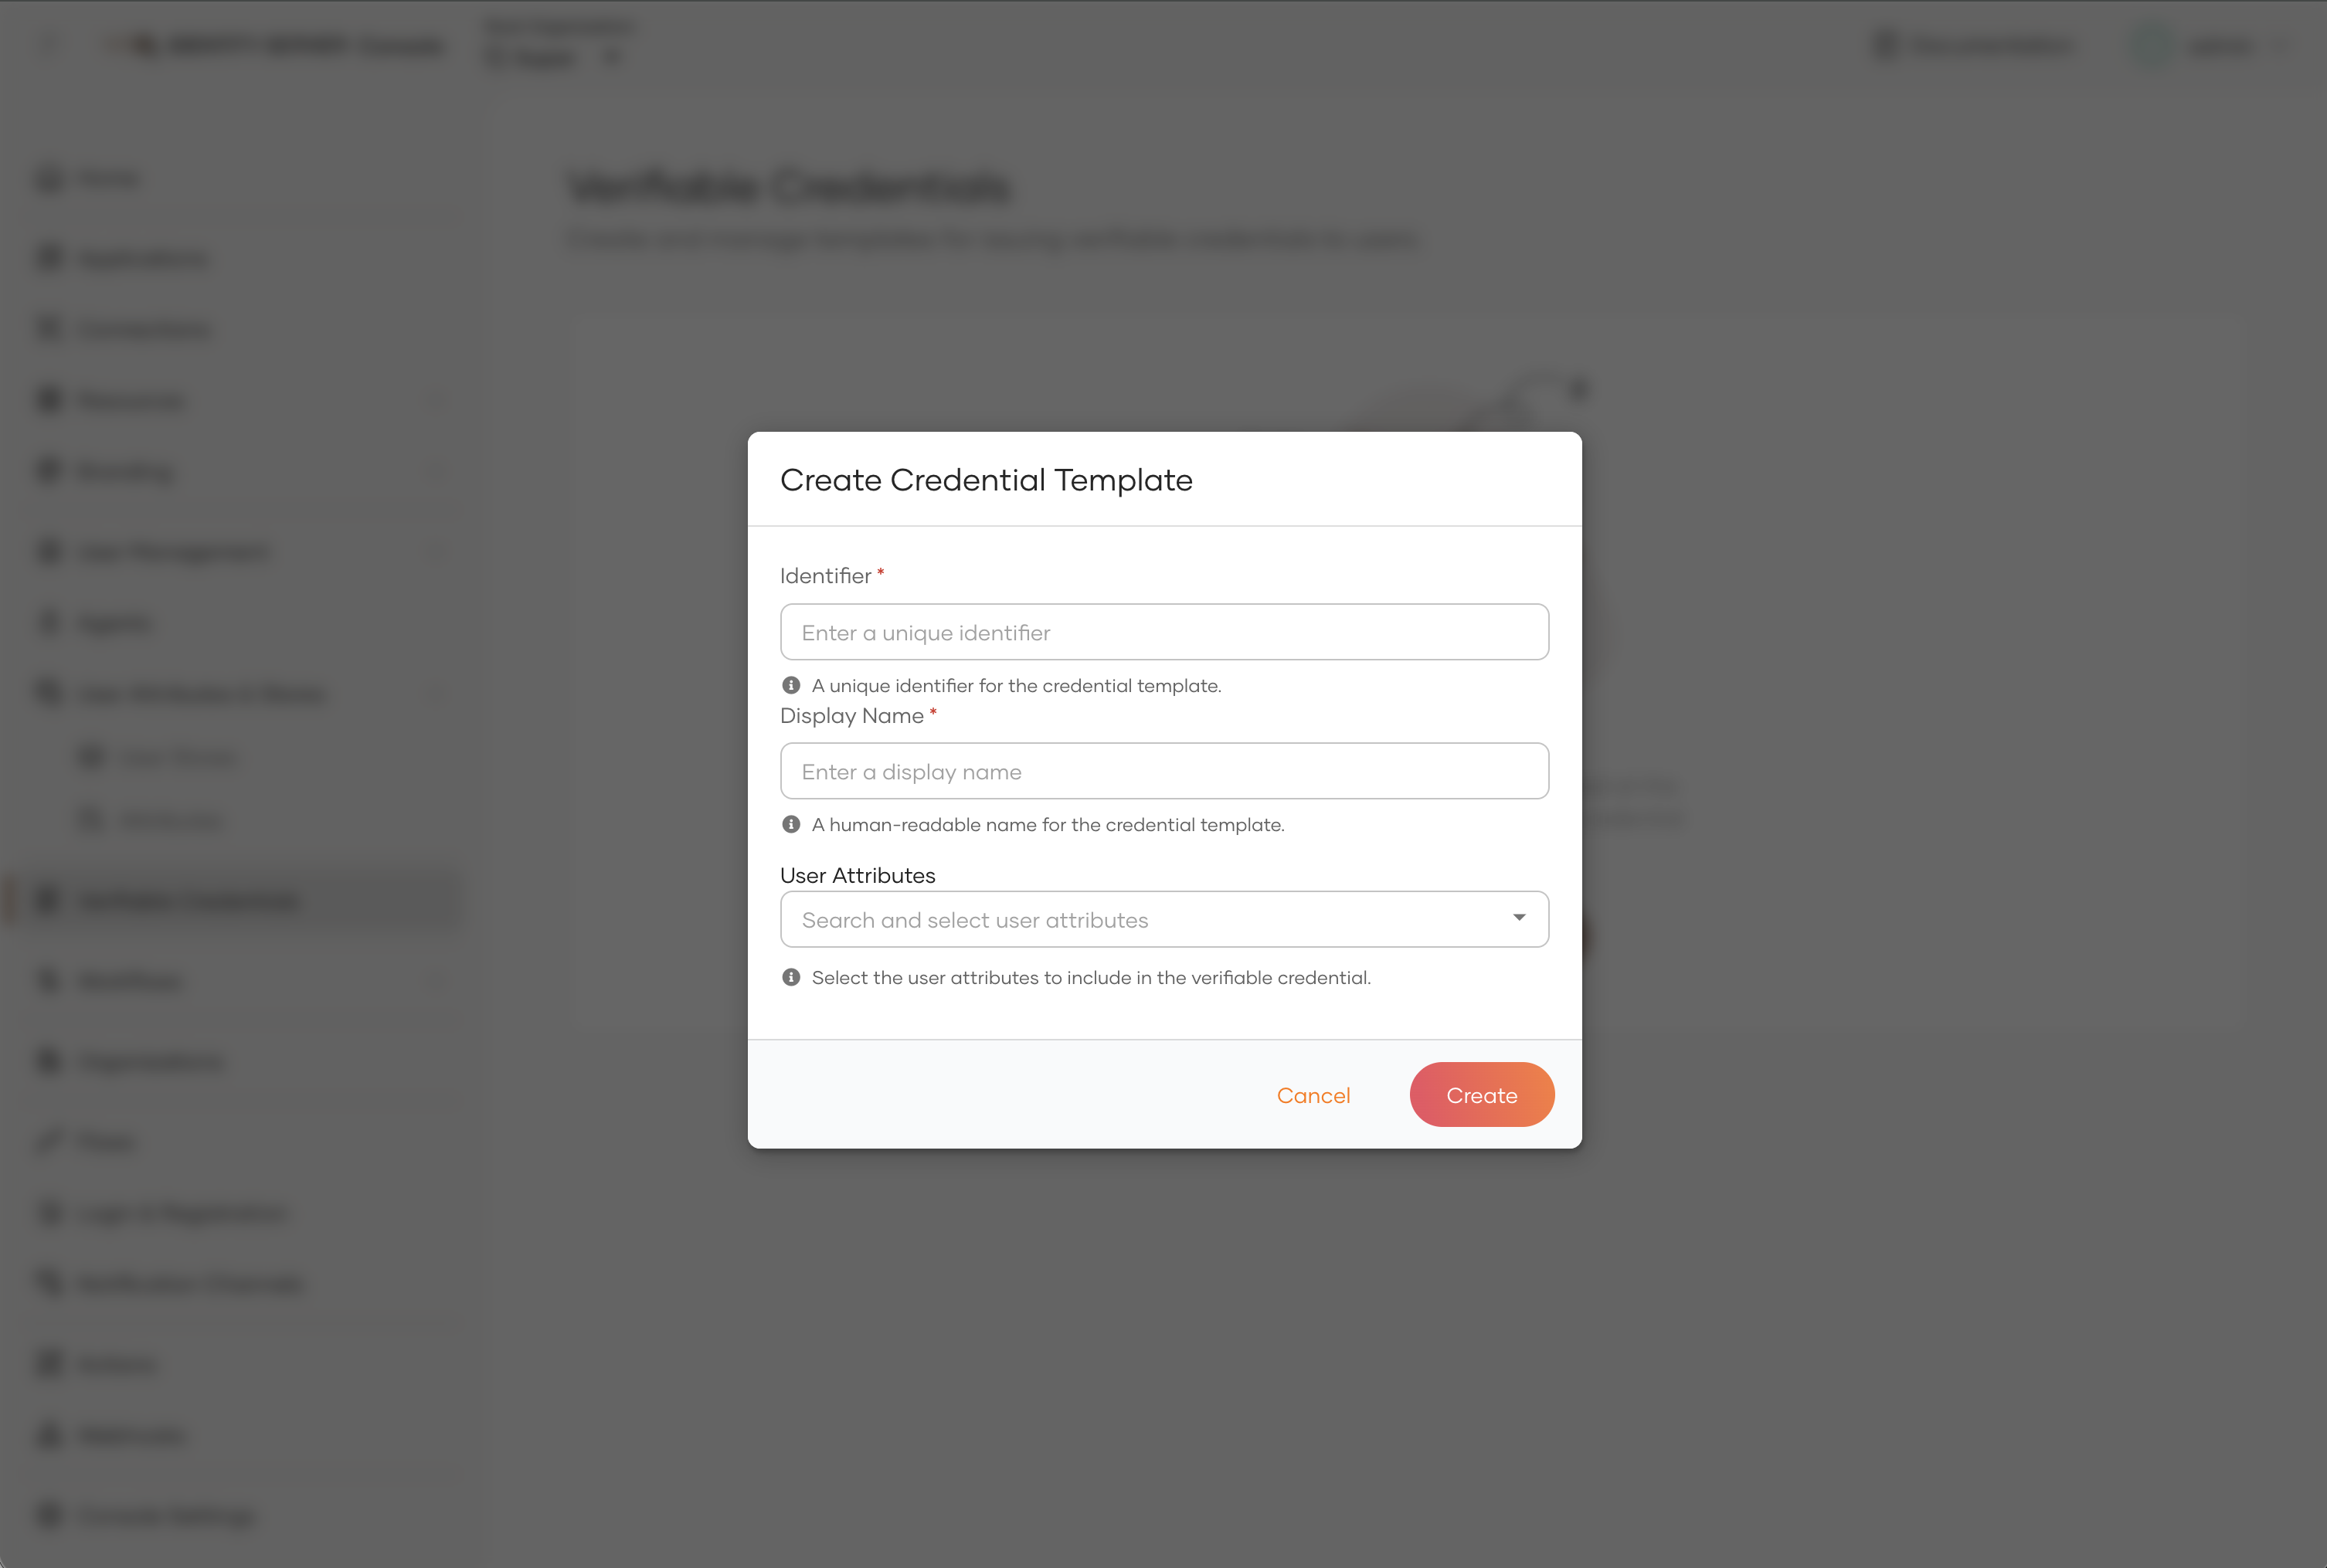
Step 1: Create a credential template
A credential template defines the name, format, and included attributes of a verifiable credential.
To create a credential template:
-
On the WSO2 Identity Server Console, go to Verifiable Credentials.
-
Click + New Credential Template.
-
Fill in the credential template details:
Field Description Example Identifier A unique name that becomes the credential scope. Use lowercase with underscores. work_idDisplay Name A human-readable name shown in the wallet. Work IDUser Attributes The user attributes include in the credential. given_name,family_name,email -
Click Create to save the template.
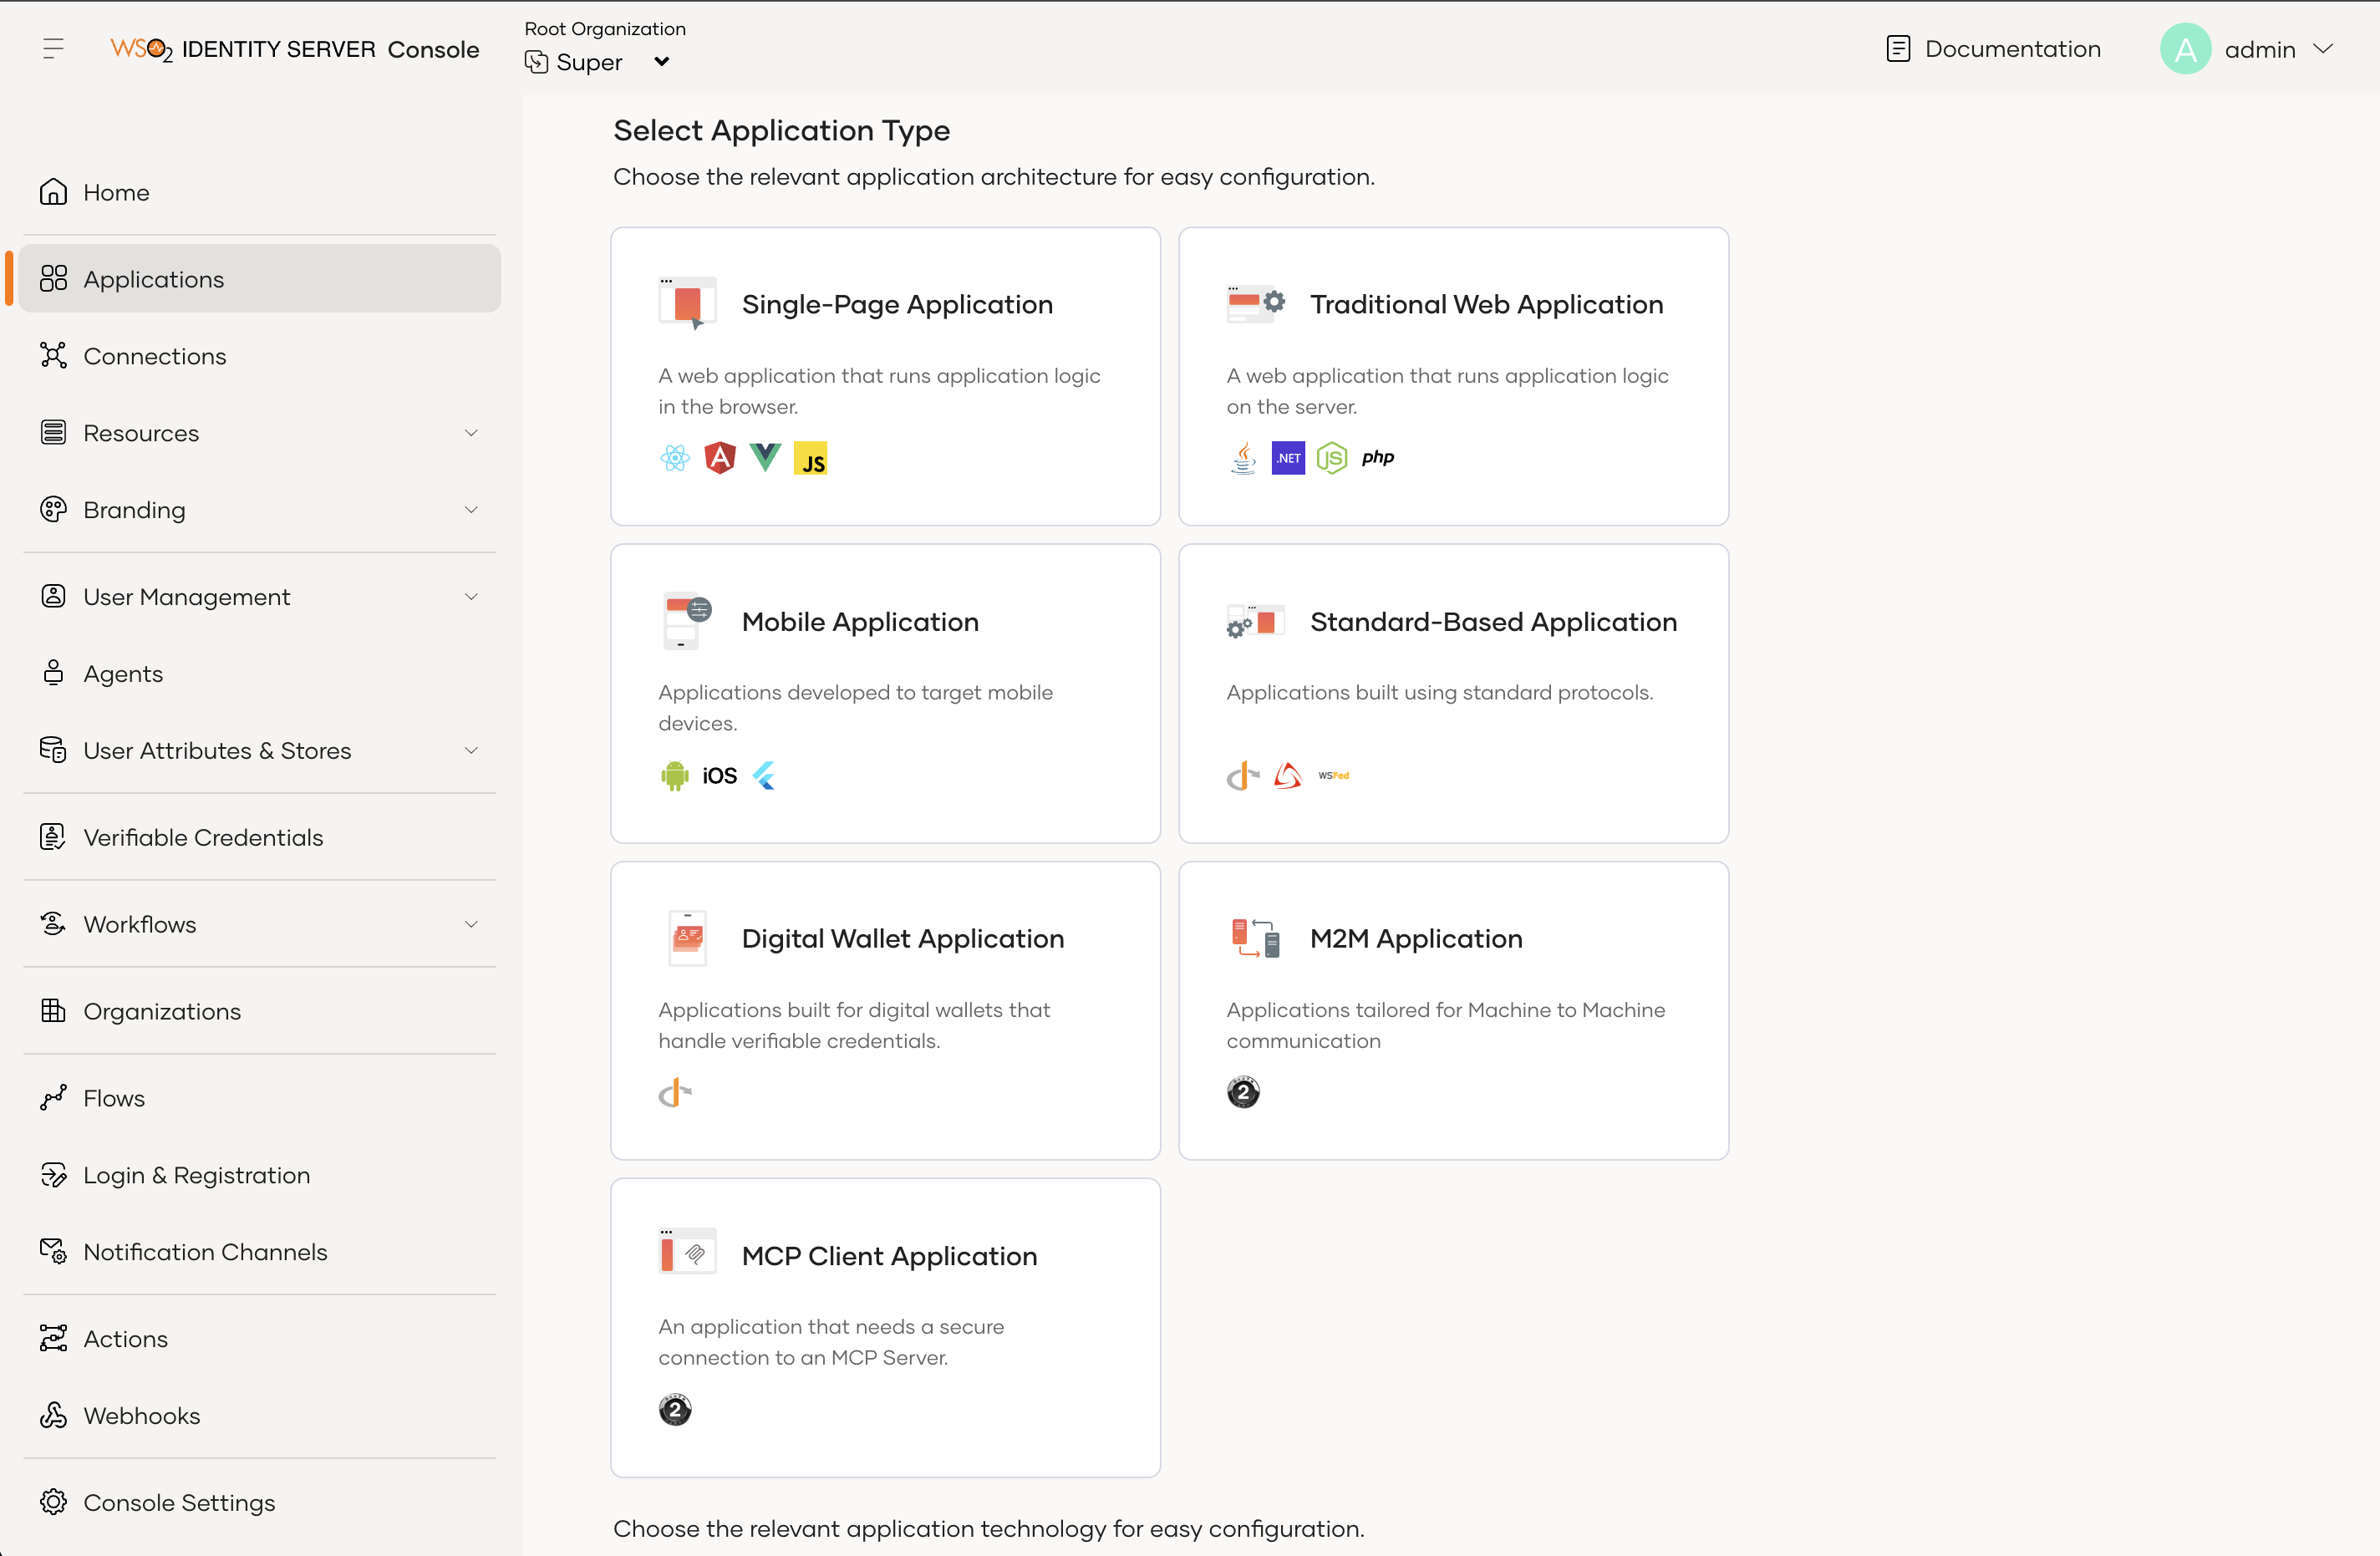
Step 2: Register a Digital wallet application
A Digital wallet application represents the digital wallet in WSO2 Identity Server. It holds the OAuth 2.0 client configuration that the wallet uses to exchange authorization codes for access tokens.
To register a Digital wallet application:
-
On the WSO2 Identity Server Console, go to Applications and click + New Application.
-
Select Digital Wallet Application from the application type list.
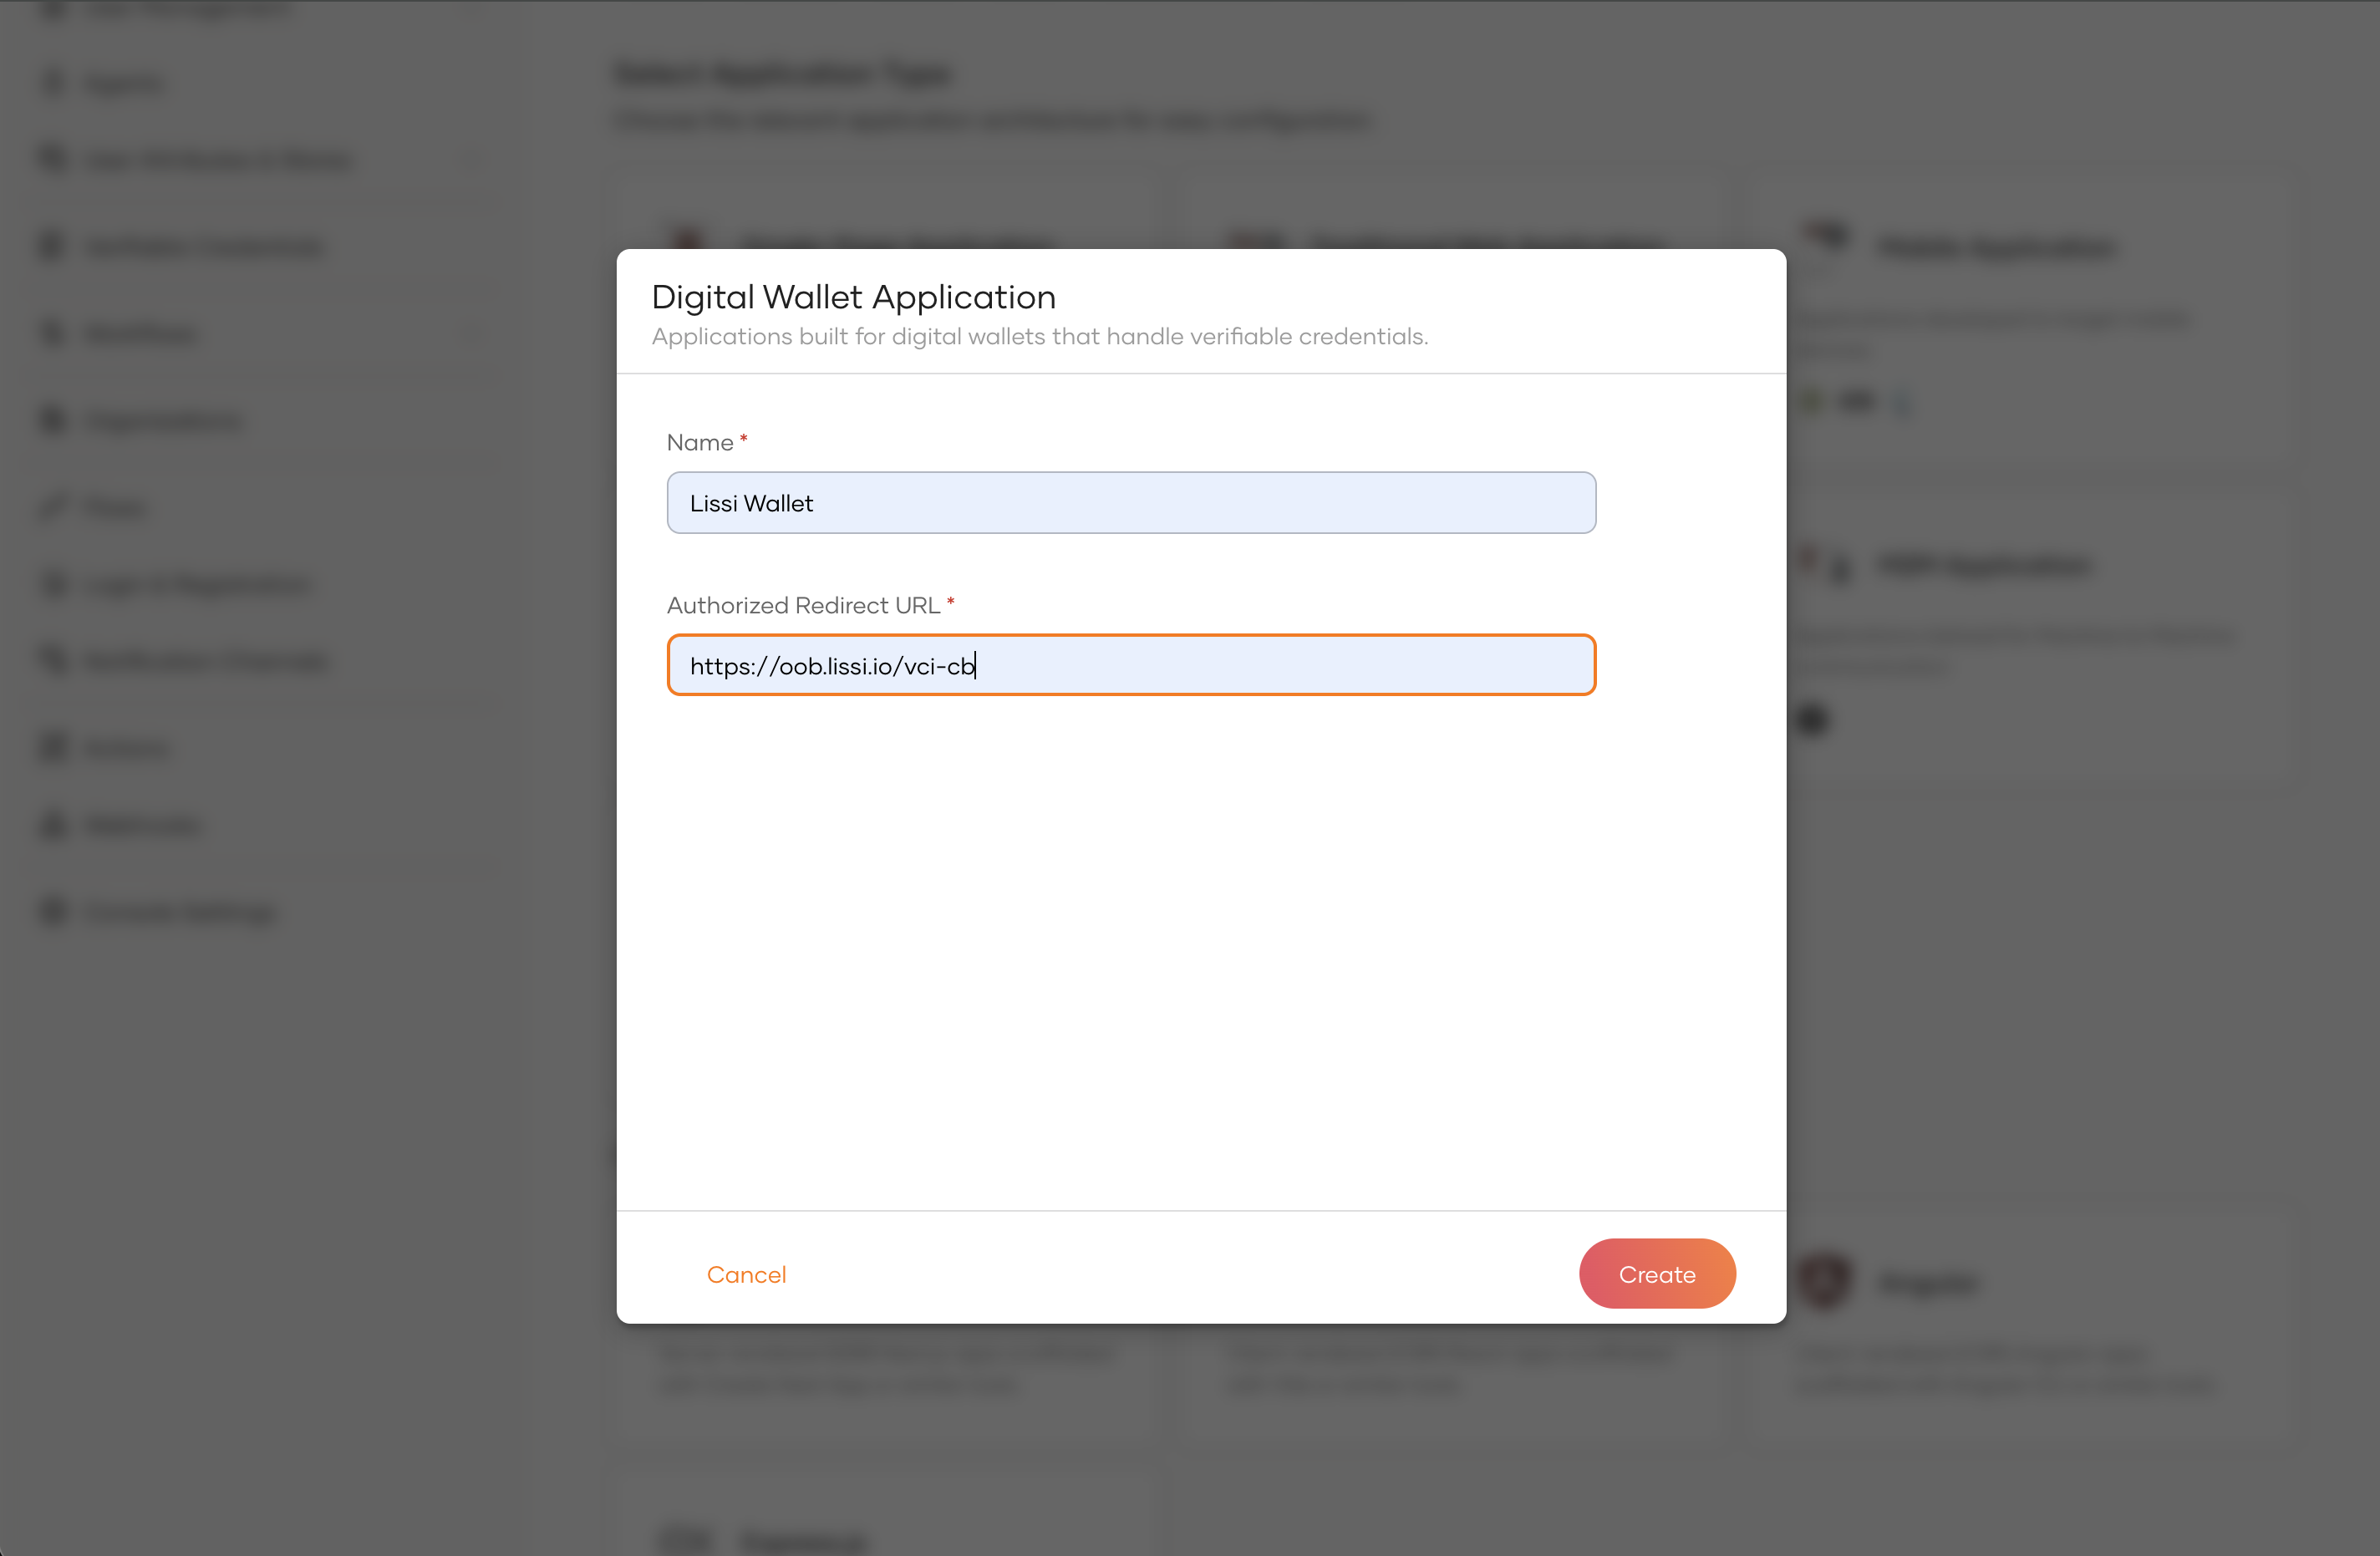
-
Fill in the application details:
Field Description Name A descriptive name for the wallet application (e.g., Lissi Wallet).Authorized Redirect URL The wallet's OID4VCI callback URL. See your wallet's documentation for this value. -
Click Create.
Tip
Refer to the tested wallets section below for the redirect URLs of Lissi, Heidi, and Inji wallets.
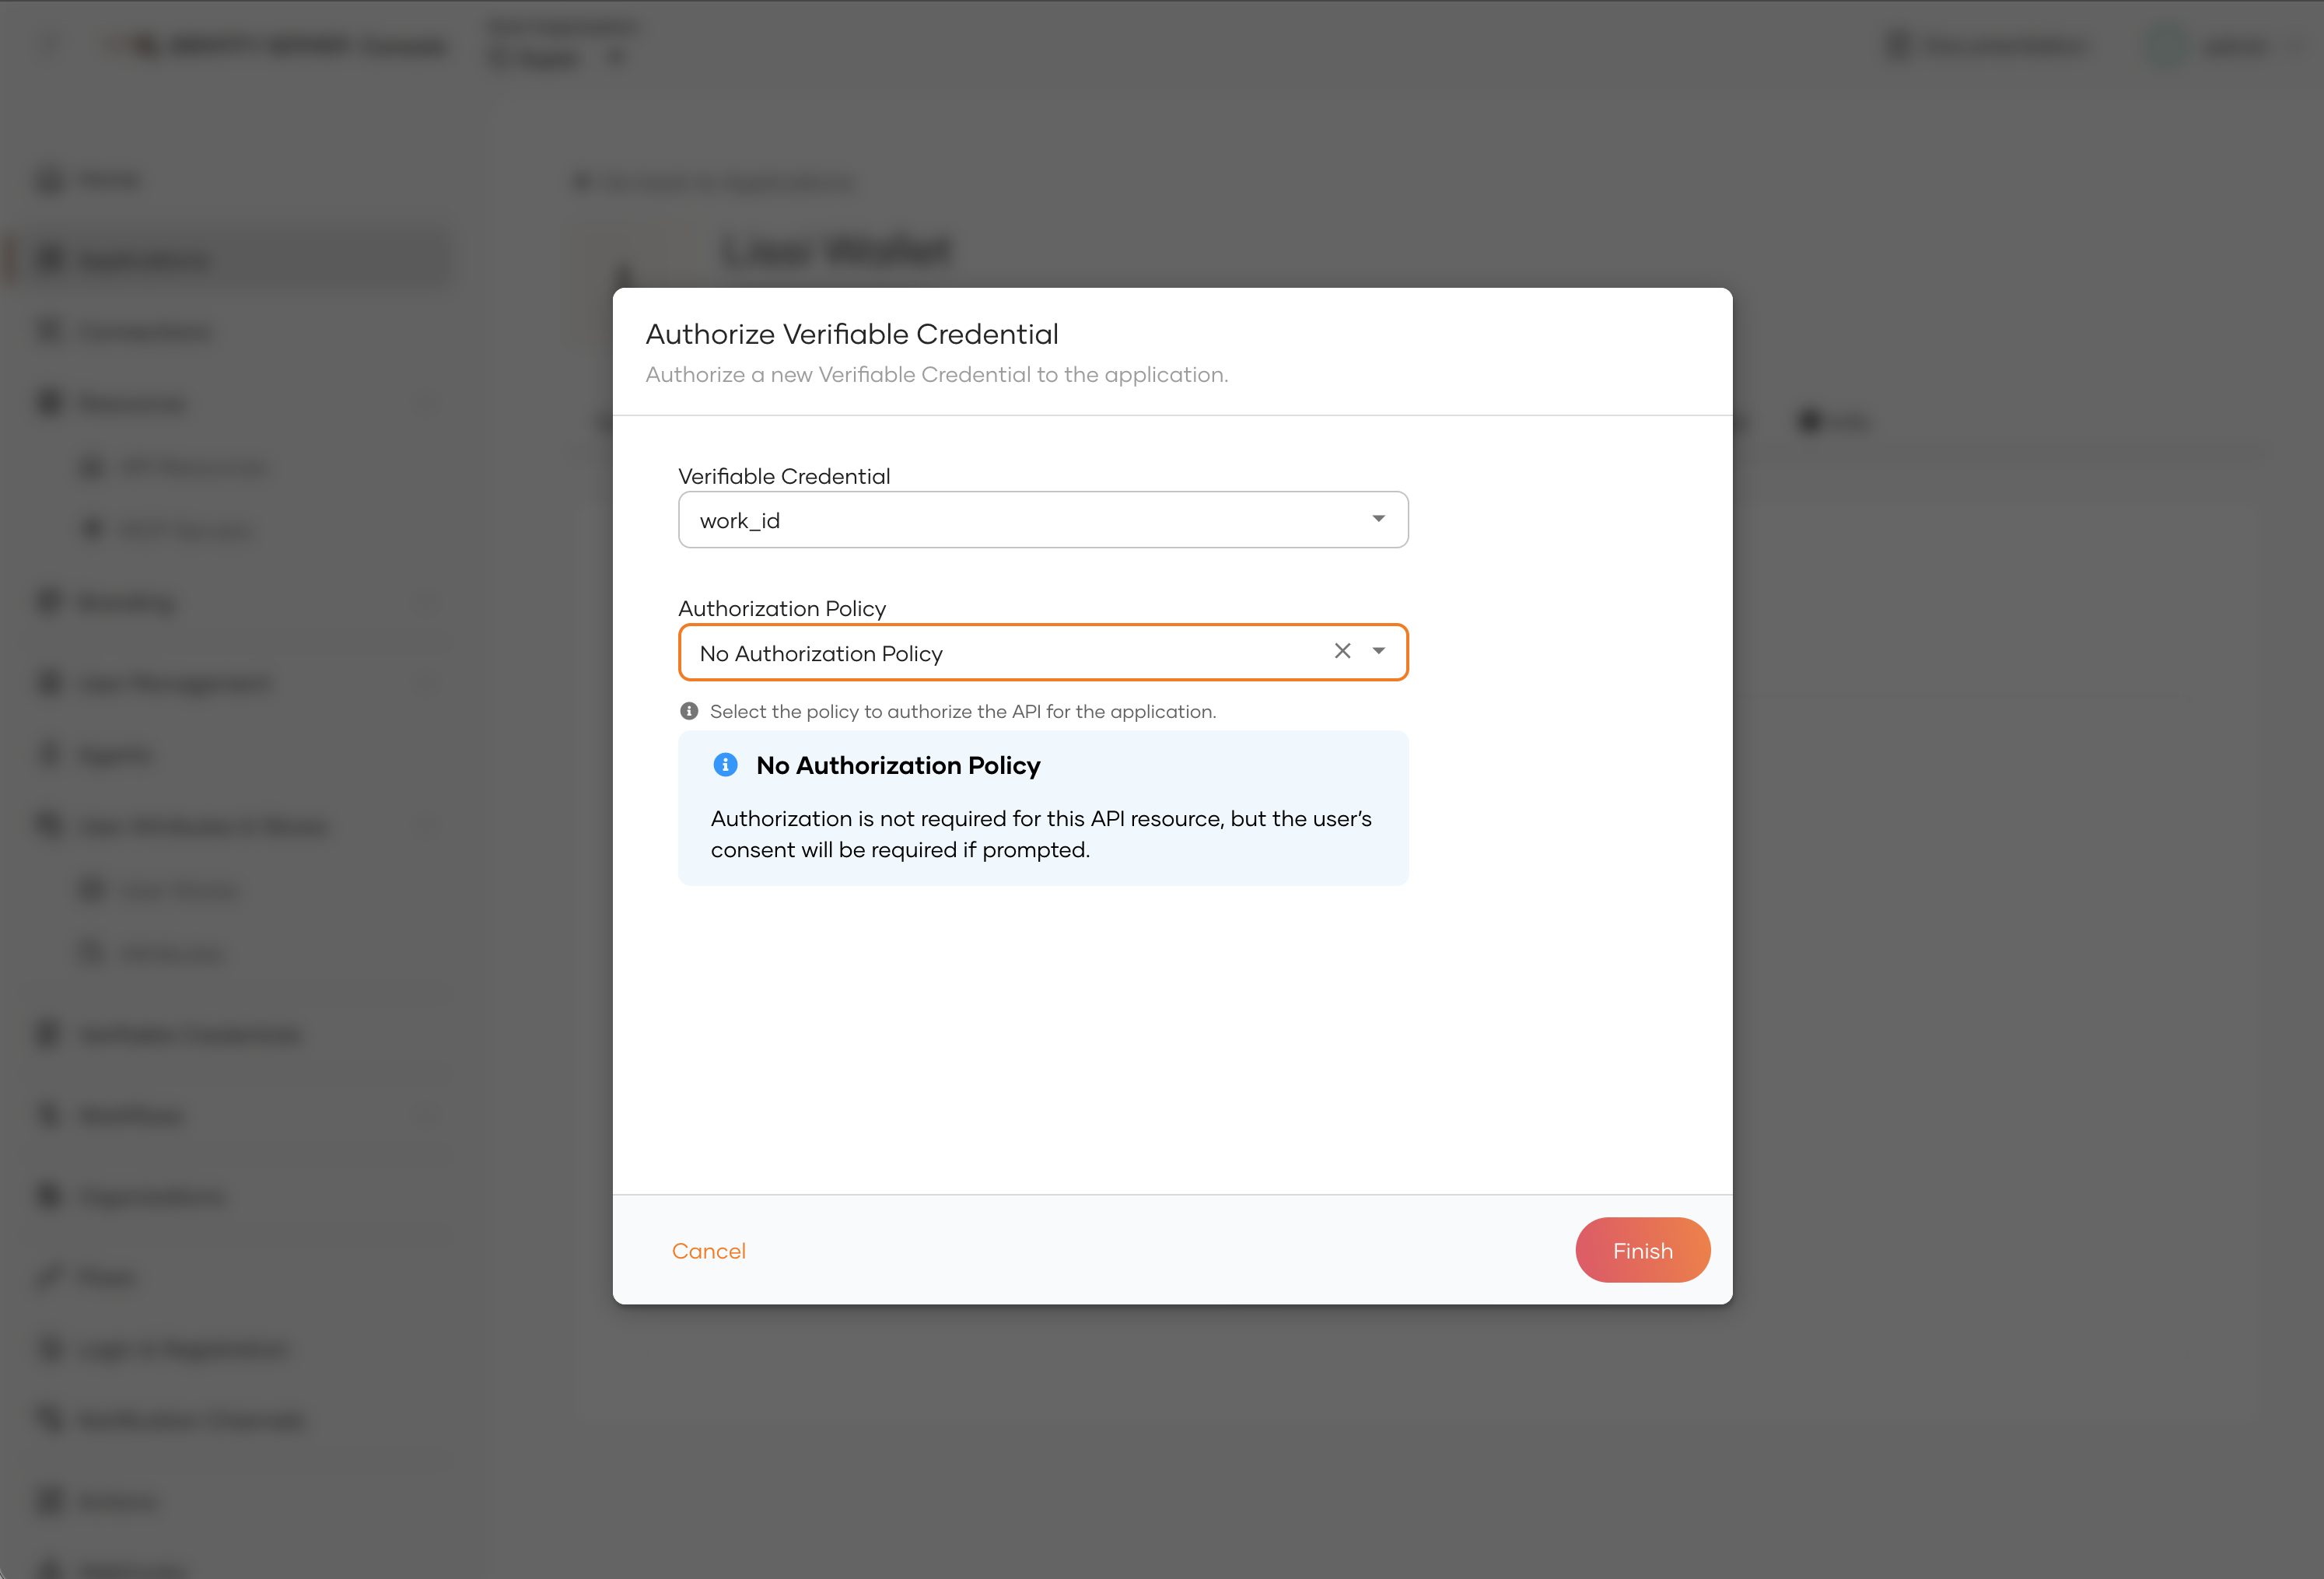
Step 3: Allow the wallet to request the credential
Once the Digital Wallet application is created, you must allow it to request the credential.
-
In the newly created application, go to Authorize tab and click Authorize Verifiable Credential.
-
Fill in the authorization details:
Field Description Example Verifiable Credential The credential template to authorize for this application. work_idAuthorization Policy The access policy to enforce. Select No Authorization Policy or Role Based Access Control (RBAC) to apply authorization policy. No Authorization Policy -
Click Finish.
The application is now allowed to request the work_id credential scope on behalf of an authenticated user.
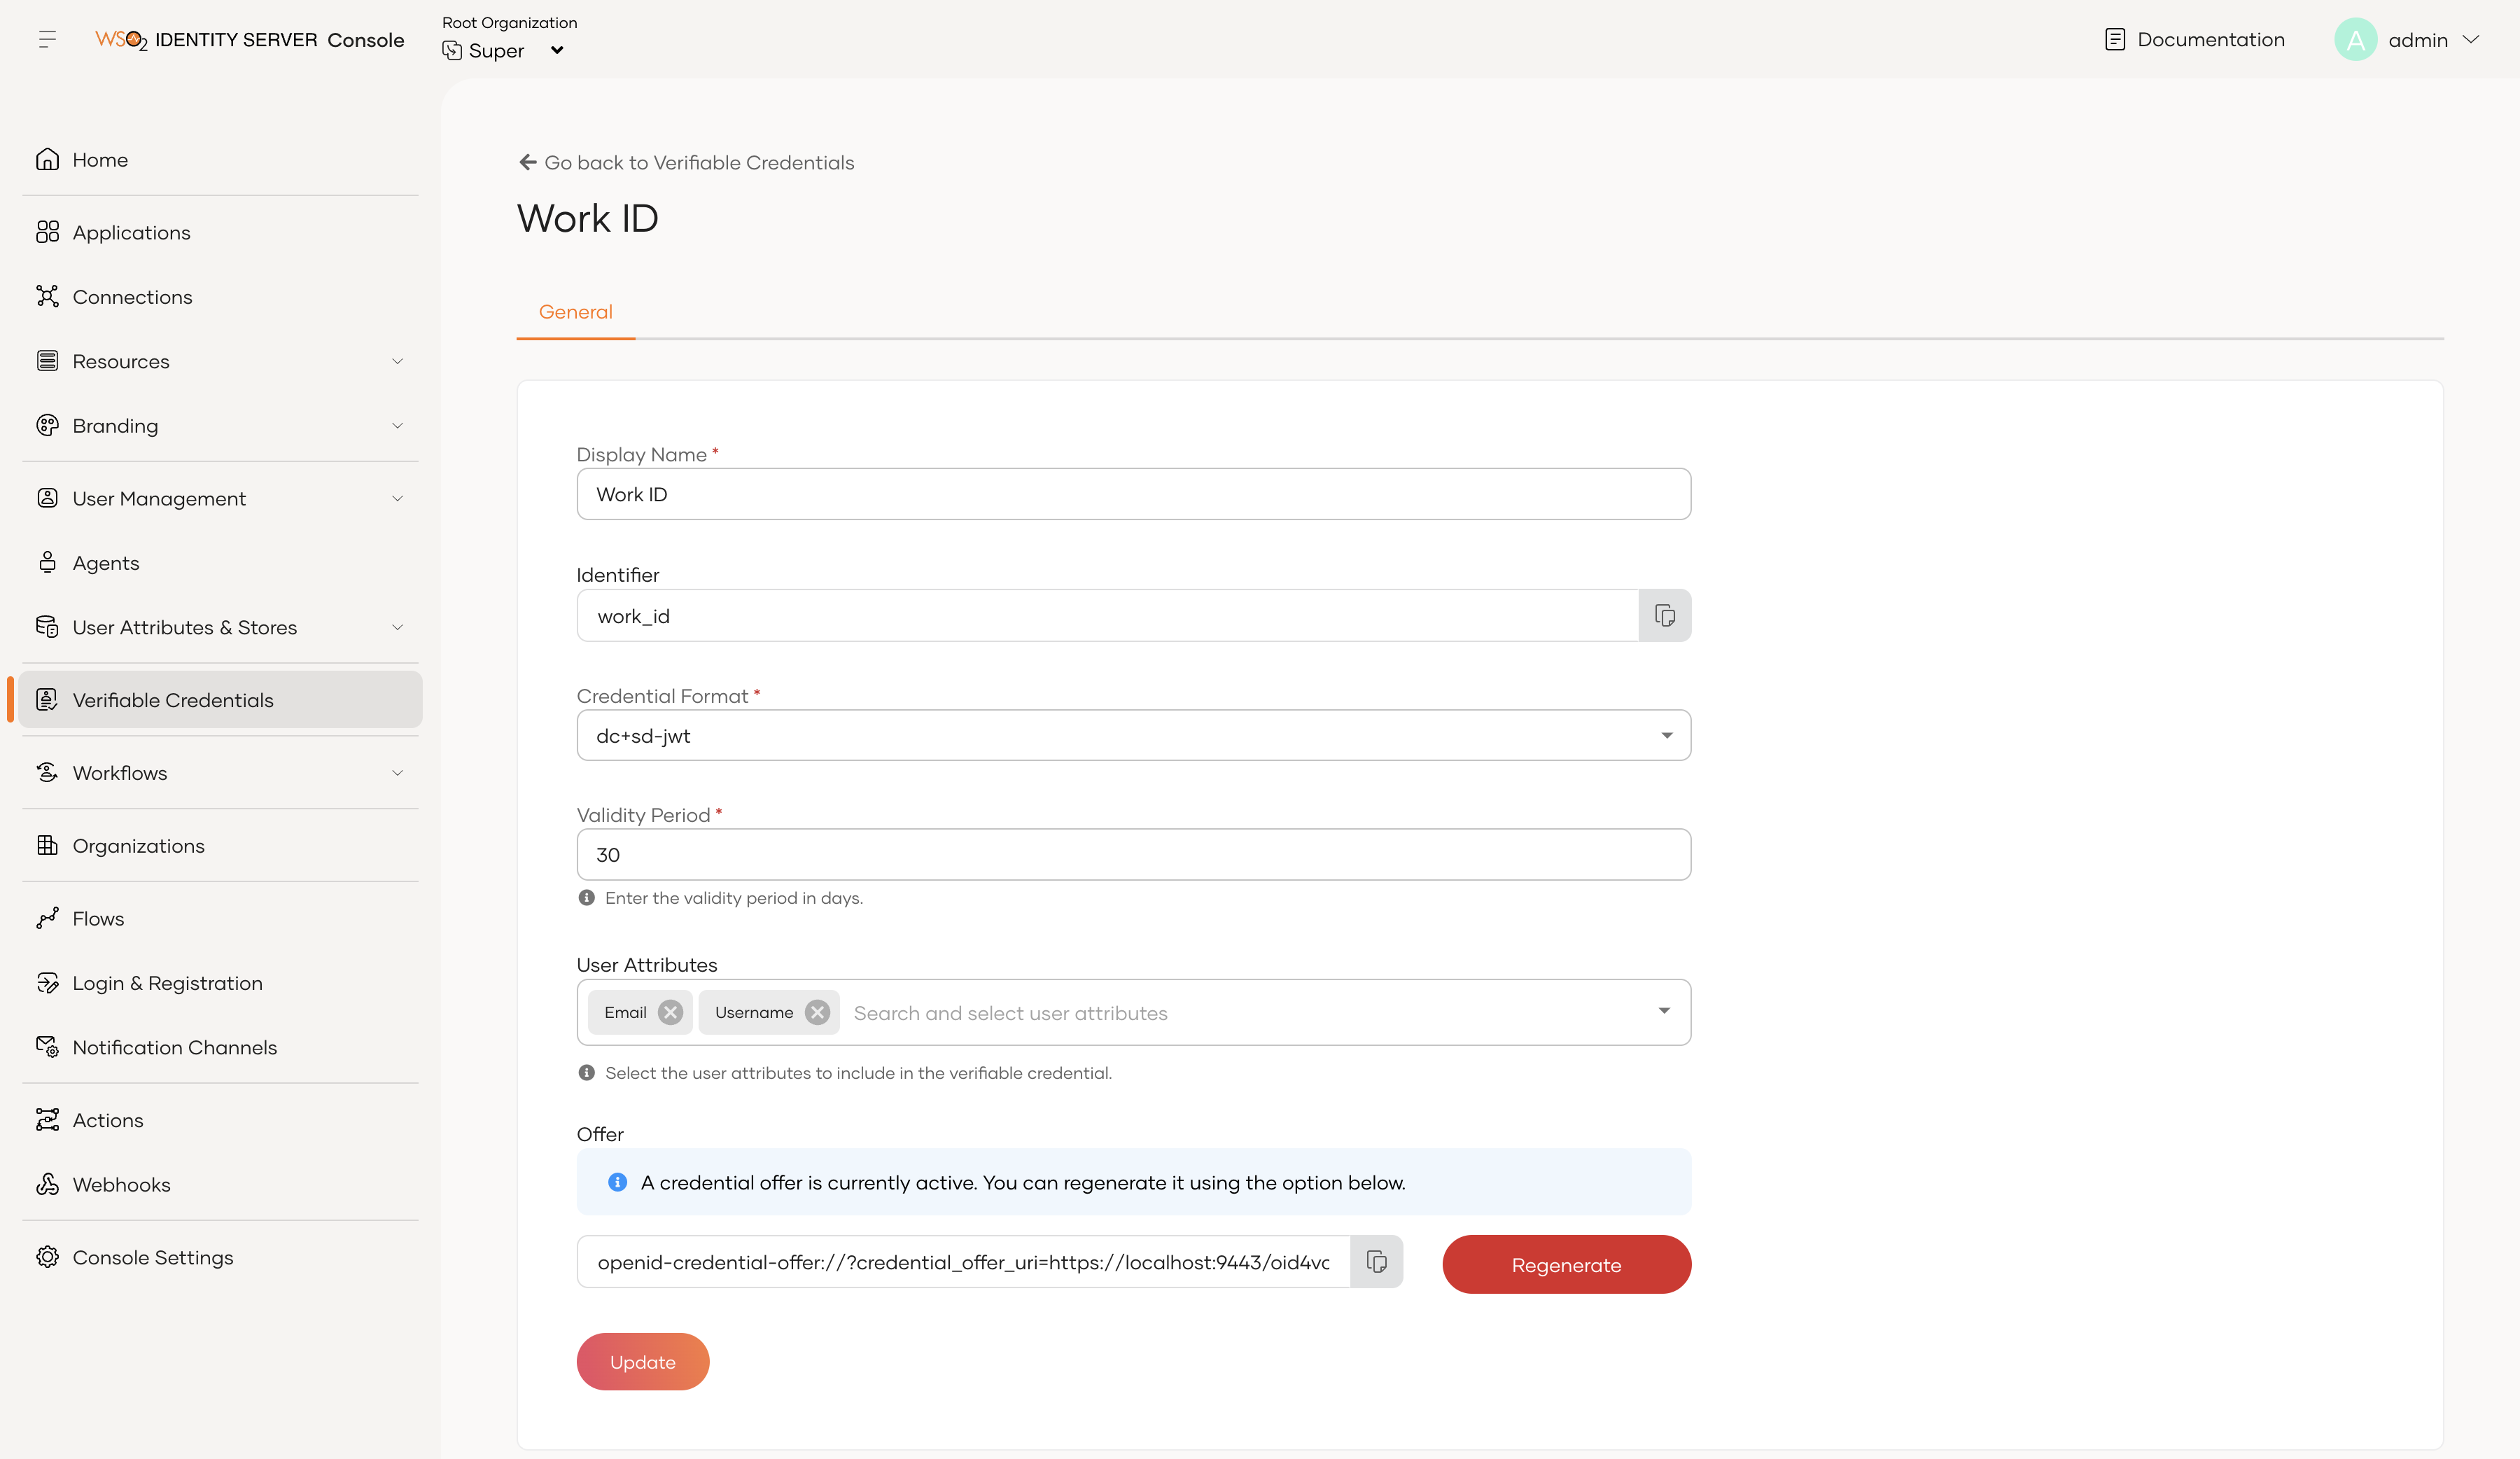
Step 4: Retrieve the credential offer URI
The credential offer URI is a link the wallet follows to begin the issuance flow.
To retrieve the offer URI:
-
On the WSO2 Identity Server Console, go to Verifiable Credentials and select your credential template (e.g., Work ID).
-
Locate the Credential Offer section and copy the URI. It appears in the format:
Note
The WSO2 Identity Server Console does not generate a QR code. To share the offer with a mobile wallet, paste the URI into an external QR code generator and present the resulting QR code for the wallet to scan.
Tested wallets
WSO2 Identity Server has been tested with the following OID4VCI-compatible wallets. Select a tab to see the wallet-specific configuration and steps for claiming the credential.
Note
The wallets listed below have been verified for compatibility with WSO2 Identity Server. Any digital wallet that implements the OID4VCI specification should be able to receive credentials — you are not limited to these wallets.
Note
These wallets require a specific client ID to be set when registering the Digital wallet application. The WSO2 Identity Server Console does not support defining a custom client ID at application creation time. Use the Application Management API to create these clients with the required client ID and redirect URI.
| Parameter | Value |
|---|---|
| Client ID | 9c481dc3-2ad0-4fe0-881d-c32ad02fe0fc |
| Redirect URI | https://oob.lissi.io/vci-cb |
Prerequisite: Register the openid_credential authorization type
The Lissi wallet sends an authorization_details parameter using the Rich Authorization Requests (RAR) mechanism when it initiates the PAR request. For this to succeed, the openid_credential authorization type must be registered in WSO2 Identity Server and authorized for your Digital wallet application.
Register the following schema as a new authorization type, then authorize it for the Digital wallet application you created in Step 2. See Configuring your application for RAR for instructions.
{
    "type": "openid_credential",
    "name": "openid_credential",
    "description": "openid_credential",
    "schema": {
        "type": "object",
        "required": [
            "type",
            "credential_configuration_id",
            "locations"
        ],
        "properties": {
            "locations": {
                "type": "array",
                "items": {
                    "type": "string",
                    "format": "uri"
                }
            },
            "type": {
                "type": "string",
                "enum": [
                    "openid_credential"
                ]
            },
            "credential_configuration_id": {
                "type": "string"
            }
        }
    }
}
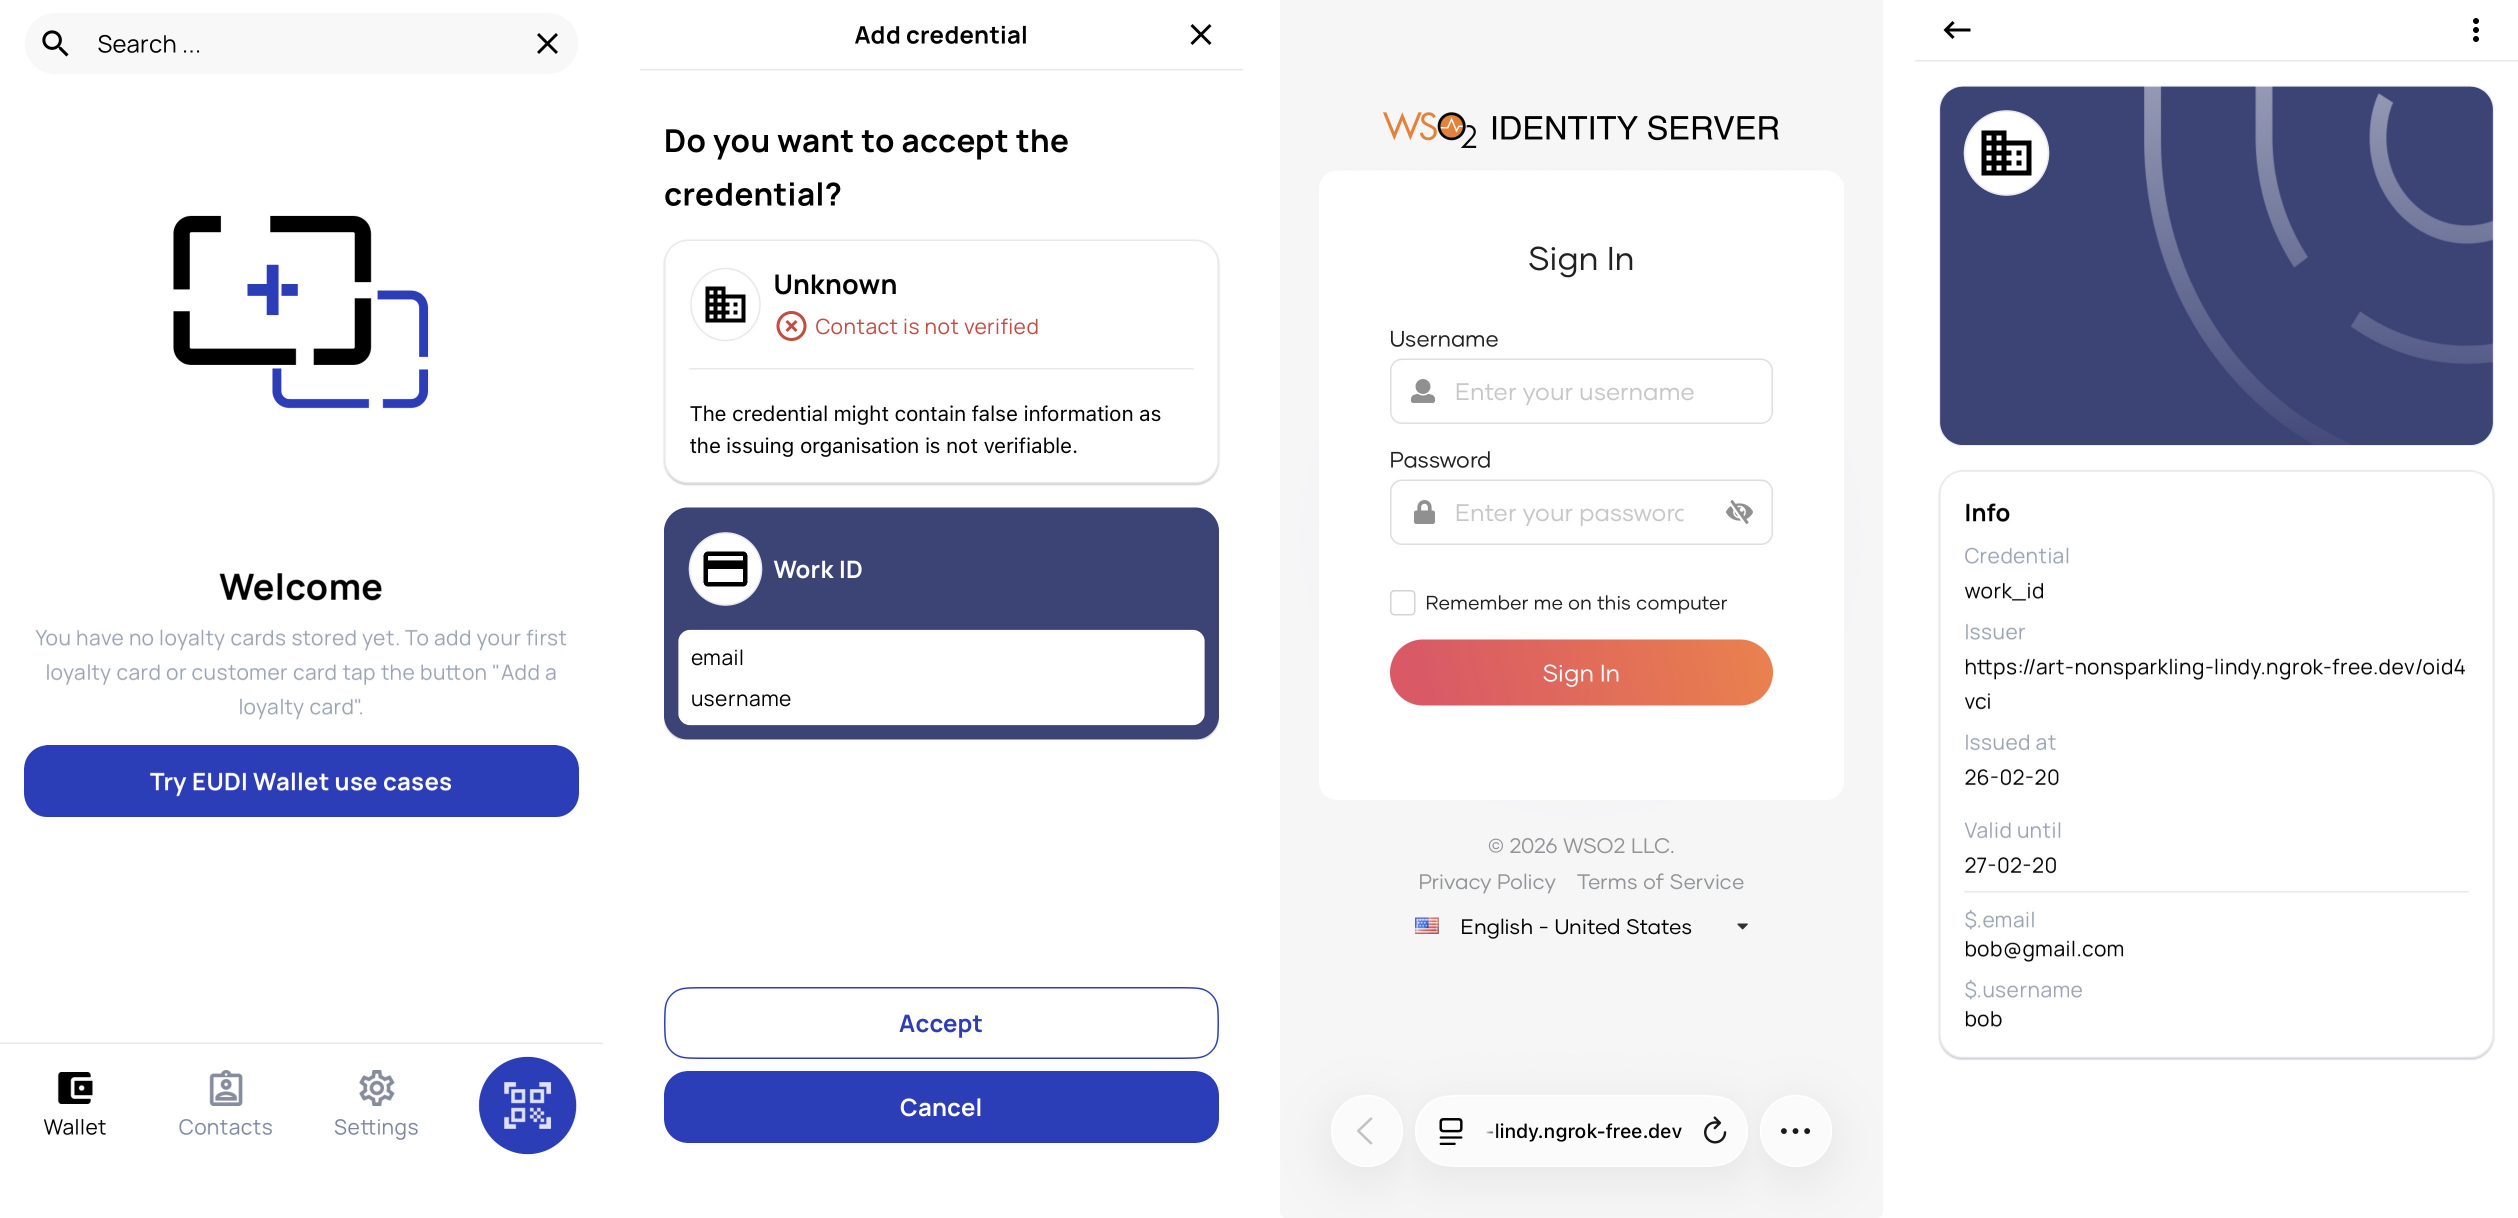
Claiming the credential:
-
Open the Lissi wallet on your mobile device.
-
Use the wallet's credential receive or QR scan feature, then scan the QR.
-
The Lissi wallet redirects you to the WSO2 Identity Server login page. Authenticate with the user account whose attributes you want in the credential.
-
Review and approve the consent screen if prompted.
-
The Lissi wallet exchanges the authorization code for an access token and calls the credential endpoint. The signed credential appears in your Lissi wallet.
| Parameter | Value |
|---|---|
| Client ID | c3ce7a6c-2bbb-4abe-909c-41bc9463d3c5 |
| Redirect URI | ch.ubique.funke://issuance |
Claiming the credential:
-
Open the Heidi wallet on your mobile device.
-
Use the wallet's credential receive or QR scan feature, then scan the QR.
-
Authenticate with your WSO2 Identity Server credentials when prompted.
-
The signed credential appears in your Heidi wallet after the wallet exchanges the authorization code and calls the credential endpoint.
| Parameter | Value |
|---|---|
| Client ID | wallet |
| Redirect URI | io.mosip.residentapp.inji://oauthredirect |
Claiming the credential:
-
Open the Inji wallet on your mobile device.
-
Use the wallet's credential receive or QR scan feature, then scan the QR.
-
Authenticate with your WSO2 Identity Server credentials when prompted.
-
The signed credential appears in your Inji wallet after the wallet completes the OID4VCI flow.
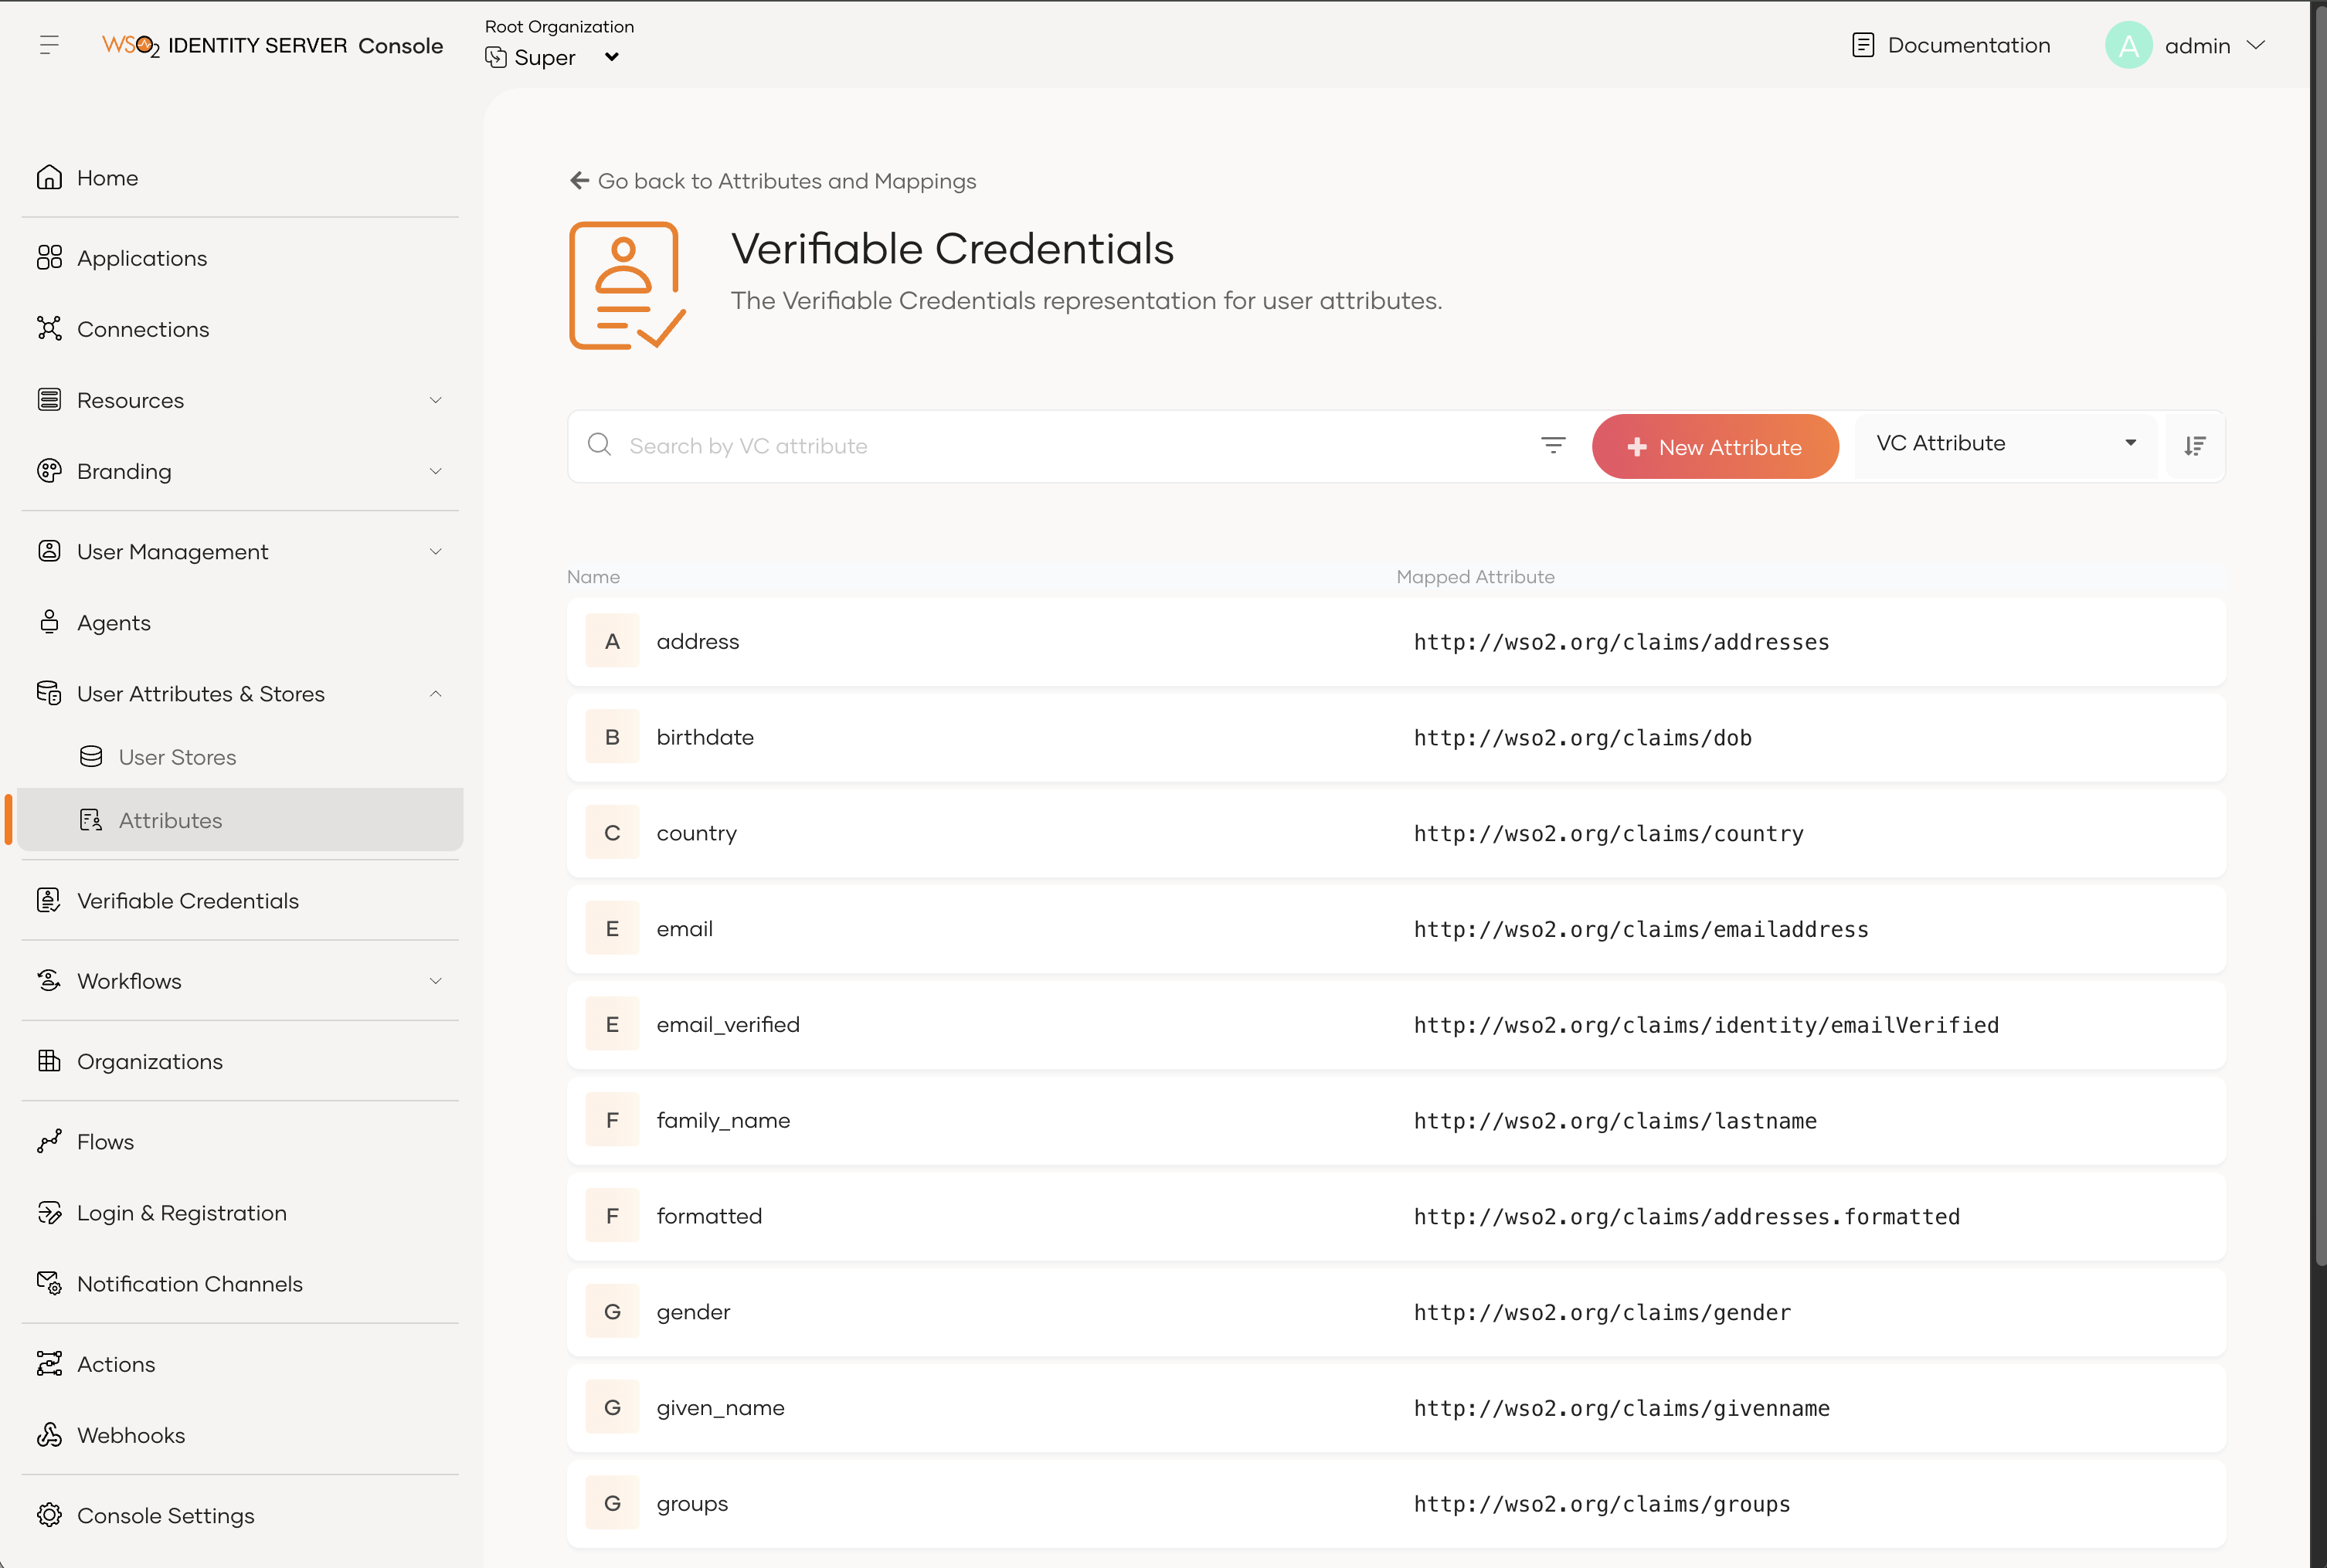
Configure VC attribute mappings
WSO2 Identity Server maps user profile attributes to verifiable credential claims using the Verifiable Credentials attribute dialect. Default mappings are pre-loaded for common claims such as given_name, family_name, and email.
To view or update the attribute mappings:
-
On the WSO2 Identity Server Console, go to User Attributes & Stores > Attributes.
-
Under Manage Attribute Dialects, click View on the Verifiable Credentials dialect.
-
Review the available claim mappings. Each mapped claim corresponds to a local claim URI (e.g.,
http://wso2.org/claims/givenname) that is resolved from the user's profile at issuance time.
Note
You can add custom claim mappings if you need to include additional user attributes in your credentials.
What's next
- Understand the protocol: Learn the technical details of the issuance flow in the OID4VCI concept page.
- Manage VC attributes: Customize the claims included in your credentials via VC attribute mappings.