Configure X509 Certificate Authenticator
This page guides you through configuring the X509 certificate authenticator with WSO2 Identity Server.
Work with certificates
X509 authentication requires the client to possess a Public Key Certificate (PKC).
To create a sample certificate and create your own Certificate Authority to sign the certificates, follow the following steps:
-
The first step is to create the private RSA key:
openssl genrsa -out rootCA.key 2048Here, the specified key size is 2048 bit. You can specify the key size for your private key.
-
Based on this key you can now generate an actual certificate which is valid for 10 years using the following command:
openssl req -new -x509 -days 3650 -key rootCA.key -out rootCA.crt -
You are prompted to provide the following details, and the details you provide are incorporated into the certificate request. An example is shown below. Make sure you use the values that fit your use case.
- Country Name (2 letter code) [AU]: SL
- State or Province Name (full name) [Some-State]: Western
- Locality Name (eg, city) [ ]: Colombo
- Organization Name (eg, company) [Internet Widgits Pty Ltd]: WSO2
- Organizational Unit Name (eg, section) [ ]: QA
- Common Name (e.g. serverFQDN or YOUR name) [ ]: wso2is.com
- Email Address [ ]: [email protected]
-
An OpenSSL CA requires new files and supporting directories. Therefore, create a new directory. Create the directory structure according to your
openssl.confformat.mkdir -p demoCA/newcerts -
You also need some initial files inside your CA directory structure.
touch demoCA/index.txt echo '01' > demoCA/serial -
For the JVM to trust your newly created certificate import your certificate into your JVM trust store by executing the following command:
keytool -import -noprompt -trustcacerts -alias rootCA -file rootCA.crt -keystore /Library/Java/JavaVirtualMachines/jdk1.8.0_191.jdk/Contents/Home/jre/lib/security/cacerts -storepass changeitGot the 'permission denied' error?
Note that when adding the certificate to the JVM trust store you may get the permission denied error. Running this command as an administrator resolves this permission issue.
For example, if you are a macOS user, you can use sudo in front of this command to fix the permission issue.
-
Now you have created the CA to sign the certificate. To create the server certificate follow the steps given below:
-
Create the keystore that includes the private key by executing the following command:
keytool -genkey -v -alias localcrt -keyalg RSA -validity 3650 -keystore localcrt.jks -storepass localpwd -keypass localpwdTip
You are prompted for details after executing the above command. For "What is your first and last name?" you need to give a name without space(e.g., wso2).
Note
Note that the CN value has to be the same as the user name of the user that will try to log in in the future.
This command will create a keystore with the following details: - Keystore name: localcrt.jks - Alias of public certificate: localcrt - Keystore password: localpwd - Private key password: localpwd (this is required to be the same as keystore password)
-
Execute the following command to generate the certificate signing request(CSR) using the generated keystore file.
keytool -certreq -alias localcrt -file localcrt.csr -keystore localcrt.jks -storepass localpwd -
To enable CRL or OCSP based certificate revocation validation, configure the necessary openSSL extension configurations.
-
Open either of the following files.
validation.cnf/usr/lib/ssl/openssl.cnf
-
Set the following properties under
x509\_extensions.crlDistributionPoints = URI:http://pki.google.com/GIAG2.crl authorityInfoAccess = OCSP;URI: http://clients1.google.com/ocsp
-
-
Once it is done, sign the CSR, which requires the CA root key.
openssl ca -batch -startdate 150813080000Z -enddate 250813090000Z -keyfile rootCA2.key -cert rootCA2.crt -policy policy_anything -config {File_Path}/openssl.cnf -notext -out localcrt.crt -infiles localcrt.csrThis creates a signed certificate called
localcrt.crtthat is valid for a specified period that is denoted by thestartdateandenddate. -
The next step is to import the CA and signed certificate into the keystore.
keytool -importcert -alias rootCA -file rootCA.crt -keystore localcrt.jks -storepass localpwd -noprompt keytool -importcert -alias localcrt -file demoCA/newcerts/01.pem -keystore localcrt.jks -storepass localpwd -noprompt -
Now, get the
pkcs12out of.crtfile using the command given below as it is been used to import certificates to the browser.keytool -importkeystore -srckeystore localcrt.jks -destkeystore localhost.p12 -srcstoretype JKS -deststoretype PKCS12 -srcstorepass localpwd -deststorepass browserpwd -srcalias localcrt -destalias browserKey -srckeypass localpwd -destkeypass browserpwd -nopromptMake sure to use the same password you used when creating the keystore for the
srcstorepassin the above step. Now you have thelocalhost.p12file that you can import into your browser as explained in the import certificate section.
-
-
Next, create a new trust store and import the server certificate into the trust store using the following commands:
keytool -import -keystore cacerts.jks -storepass cacertspassword -alias rootCA -file rootCA.crt -noprompt
keytool -importcert -alias localcrt -file localcrt.crt -keystore cacerts.jks -storepass cacertspassword -noprompt
CN
The User objects in the LDAP directory hierarchy have designators that start with CN, meaning Common Name. The CN designator applies to all but a few object types. Active Directory only uses two other object designators (although LDAP defines several).
Once you have done the above steps, you have the keystore (localcrt.jks), truststore (cacerts.jks), and pkcs12 (localhost.p12) files that you need to use later on in this guide.
Configure the X509 certificate for the app
-
Download the WSO2 Identity Server.
-
Replace your keystore file path, keystore password, trust store file path and trust store password (you can use the keystore and truststore, which you created in the Work with Certificates section) in the following configuration and add it to the
<IS_HOME>/repository/conf/deployment.tomlfile.[custom_transport.x509.properties] protocols="HTTP/1.1" port="8443" maxThreads="200" scheme="https" secure=true SSLEnabled=true keystoreFile="/path/to/keystore.jks" keystorePass="keystorepwd" truststoreFile="/path/to/truststore.jks" truststorePass="truststorespassword" bindOnInit=false clientAuth="want" ssl_protocol = "TLS"Note
-
The
clientAuthattribute causes the Tomcat to require the client with providing a certificate that can be configured as follows.true: valid client certificate required for a connection to succeedwant: use a certificate if available, but still connect if no certificate is availablefalse: no client certificate is required or validated
-
The
truststoreFileattributes specifies the location of the truststore that contains the trusted certificate issuers.
-
Disable certificate validation
The location that is used to disable certificate validation depends on whether WSO2 Identity Server was started at least once or not.
-
If you have never started WSO2 Identity Server before, the configurations should be made on the
deployment.tomlfile. -
If you have started WSO2 Identity Server at least once, the configurations should be made on the registry parameters.
Disable certificate validation in an unstarted WSO2 IS Pack
Follow the steps below to disable certificate validation if your WSO2 Identity Server pack has never been started.
-
Open the
deployment.tomlfile in the<IS_HOME>/repository/confdirectory. -
Add the following configuration to disable CRL-based certificate validation and OCSP-based certificate validation.
[certificate_validation]
ocsp_validator_enabled = false
crl_validator_enabled = false
Info
- CRL is a list of digital certificates that have been revoked by the issuing CA.
- OCSP is an internet protocol that is used for obtaining the revocation status of an X509 digital certificate using the certificate serial number.
Disable certificate validation in an already-started WSO2 IS pack
Follow the steps below to disable certificate validation if WSO2 Identity Server was started before.
-
Log in to the WSO2 Identity Server Management Console (
https://<IS_HOST>:<PORT>/carbon) using administrator credentials (admin:admin). -
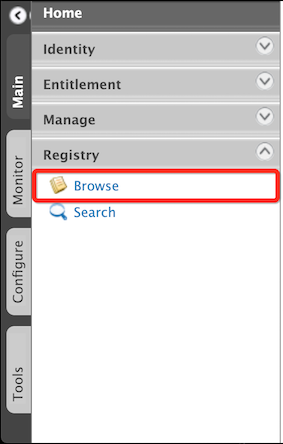
Click Main > Registry > Browse.
-
Disable CRL certificate validation.
-
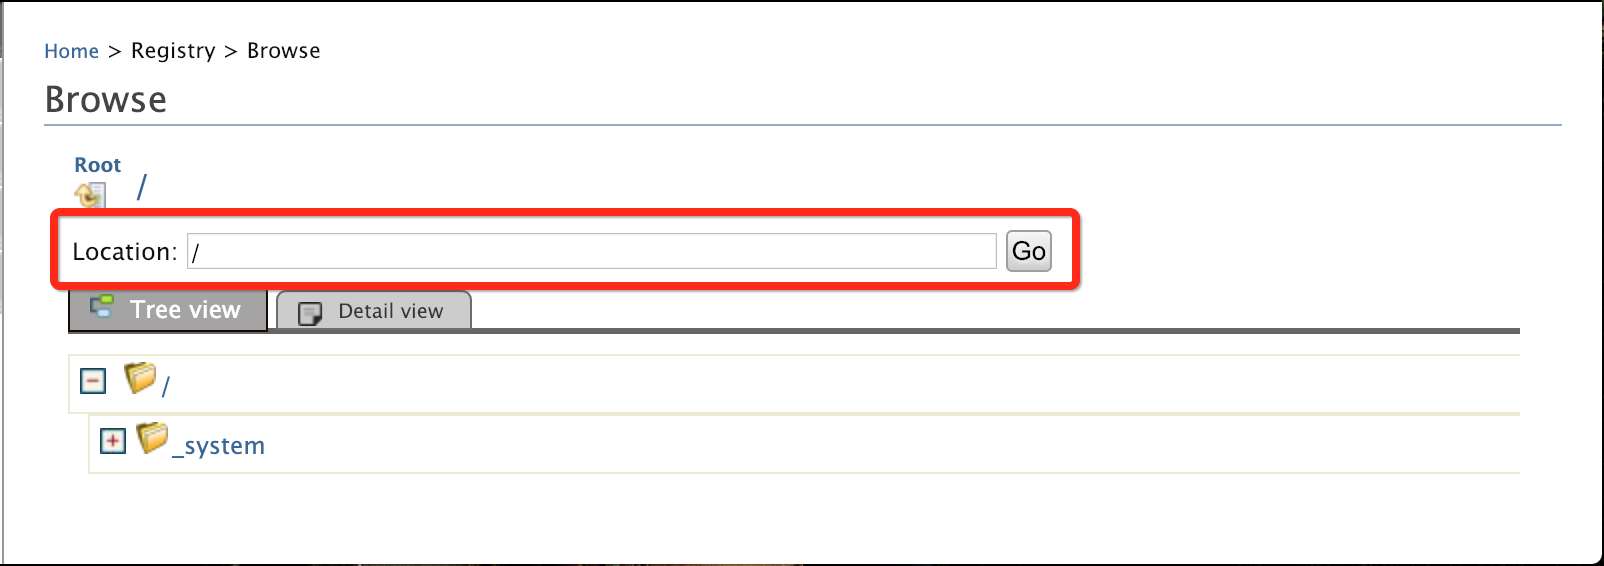
Locate the CRL parameter by entering
_system/governance/repository/security/certificate/validator/crlvalidatorin the Location search box.
-
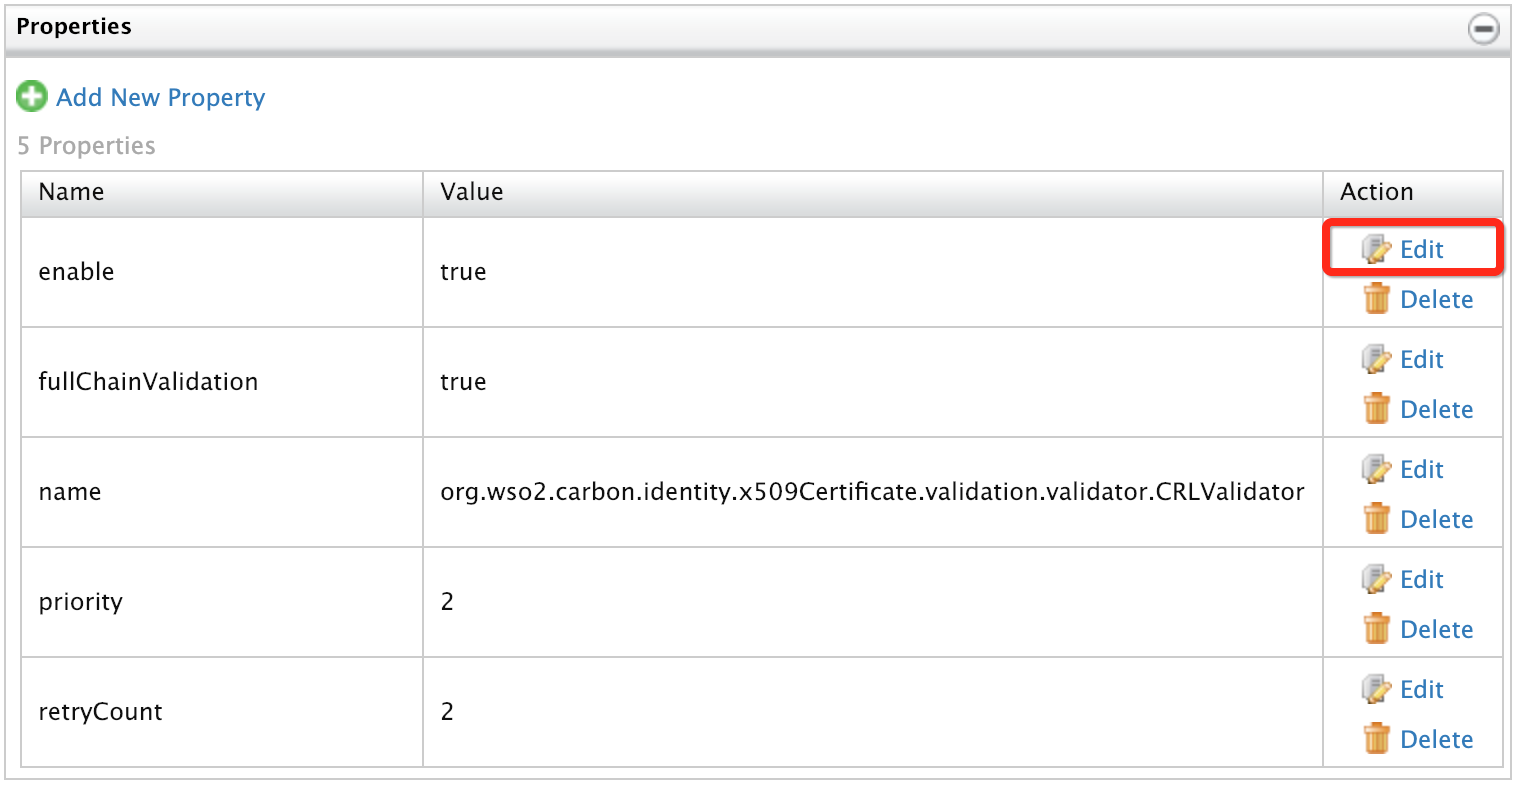
Expand Properties.

-
Click Edit pertaining to the Enable property.
-
Change the value to
falseand click Save.

-
-
Similarly, disable OCSP certificate validation in the
_system/governance/repository/security/certificate/validator/ocspvalidatorregistry parameter.
Configure the Authentication Endpoint
- Open the
deployment.tomlfile in the<IS_HOME>/repository/conf/directory. -
Add the following configuration to the file.
[authentication.authenticator.x509_certificate.parameters]
name ="x509CertificateAuthenticator"
enable=true
AuthenticationEndpoint="https://localhost:8443/x509-certificate-servlet"
username= "CN"
Info
name: This attribute identifies the authenticator that is configured as the second authentication step.enable: This attribute, when set to true makes the authenticator capable of being involved in the authentication process.AuthenticationEndpoint: This is the URL with the port that is secured with the certificate, e.g.,https://localhost:8443/x509-certificate-servlet. This value will be taken to extract the certificate from the browser by redirecting the user to the specified endpoint. Update this based on your host name.username: This attribute value will be taken as the authenticated user subject identifier. Update this with any of the certificate attributes, e.g., CN and Email.
Note
When X509 authentication is configured as the second authentication step, the certificate will be validated to check whether it is associated with the authenticated user in the first authentication step. For that, the
usernameparameter will be used. For that, the authenticated user name considered in the first authentication step will be validated with the certificate attribute in this property.When X509 authentication is configured as the first step, this certificate attribute will be treated as the authenticated user subject identifier.
-
If you are using the identity claim dialect URI to store X509 certificate, add the following parameter.
[authentication.authenticator.x509_certificate.parameters] setClaimURI = "http://wso2.org/claims/identity/userCertificate" -
To enable storing the X509 certificate as a user claim, add the following parameter.
[authentication.authenticator.x509_certificate.parameters] EnforceSelfRegistration = true -
Restart the server to apply the changes.
Add a claim mapping for the certificate
If storing the certificate as a user claim is enabled, the X509 certificate will be stored as a user claim and verified with the retrieved certificate from the request.
-
Log in to the WSO2 Identity Server Management Console (
https://<IS_HOST>:<PORT>/carbon) using administrator credentials (admin:admin). -
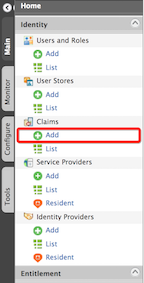
On the Main tab, click Claims > Add.
-
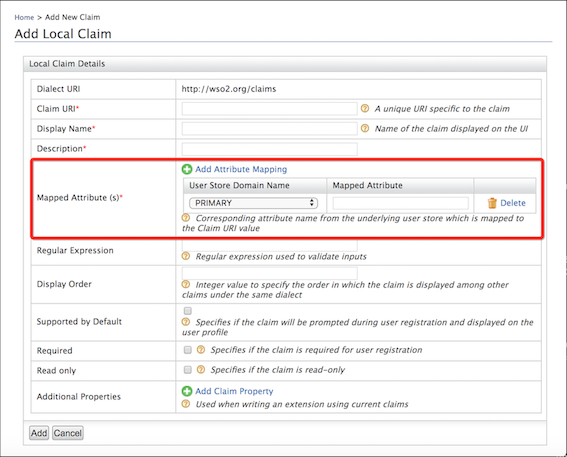
Click Add Local Claim.

-
Add a new claim for the certificate by giving the details as below, e.g., select a mapped attribute for the claim that is supported by the underlying database type.
-
Click Add.
Update the column size of the database for X509 certificates
Make note of the following points and configure your database to match your use case:
- Disabling Certificate Validation in an Unstarted WSO2 IS Pack
- Disabling Certificate Validation in an Already-started WSO2 IS Pack
Configure CRL Caching
CA provides a CRL that is valid for a limited duration, which is defined in the Next Update CRL field. This field indicates the date by which the next CRL will be issued. According to the Internet X.509 PKI Certificate and CRL Profile , the next CRL could be issued before but not later than the indicated date. This property is considered to validate the returned CRL from cache as a certificate in the CRL can be temporarily invalidated (Hold) rather than being irreversibly revoked, i.e., an outdated CRL creates a security exposure.
The X509CRL is downloaded from the CRL URL and persisted in cache. Follow the steps below to configure CRL caching.
- Open the
deployment.tomlfile located in the<IS_HOME>/repository/conf/directory. -
Add the following configuration.
[[cache.manager]] name="CRLCache" timeout="900" capacity="5000" -
Restart the server to apply the changes.
Import certificate
-
Chrome
- In your browser, navigate to Settings > Security > HTTPS/SSL > Manage
certificates.
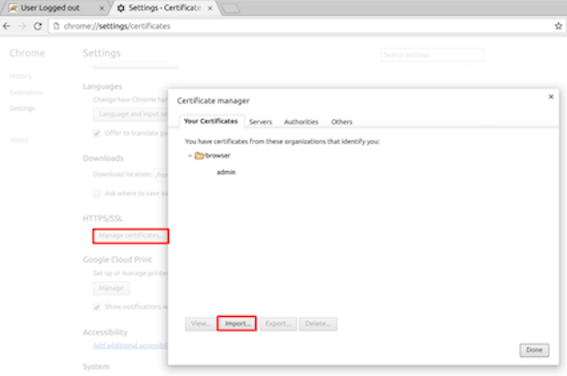
- Click on Import, select the localhost.p12 file, and then click Open. Note that you may have to enter the password that you used to generate the p12 file, (browserpwd) to open it.
- In your browser, navigate to Settings > Security > HTTPS/SSL > Manage
certificates.
-
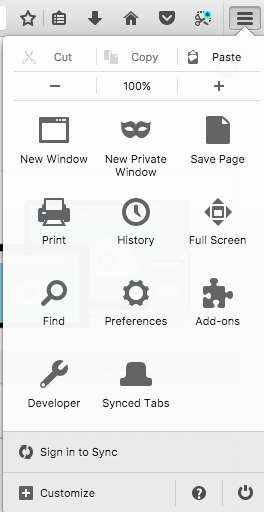
Firefox
-
Click on the menu option on the right of the screen and select Preferences.
-
Click Privacy & Security in the left navigation and scroll down to the Certificates section. Click View Certificates.
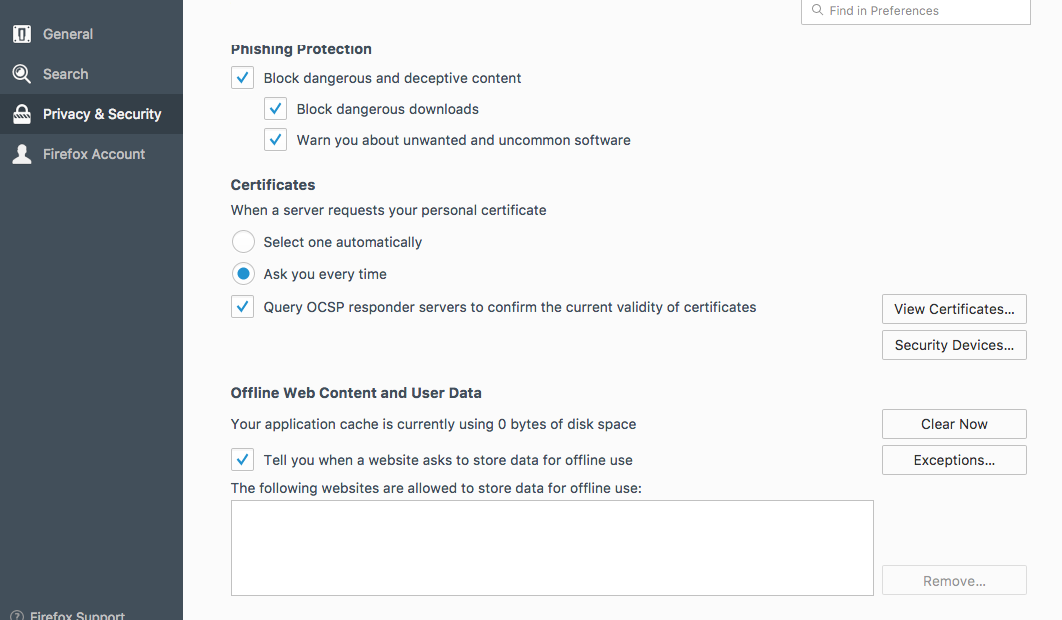 3. In the window that appears, click Import.
 4. Select the localhost.p12 file, and then click Open. Note
that you may have to enter the password that you used to generate
the p12 file, (browserpwd) to open it.
4. Select the localhost.p12 file, and then click Open. Note
that you may have to enter the password that you used to generate
the p12 file, (browserpwd) to open it.
-
Register a service provider
The next step is to configure the service provider.
- Return to the management console.
- In the Service Providers section under the Main tab, click Add.
- Since you are using Travelocity as the sample, enter travelocity.com in the Service Provider Name text box and click Register.
- In the Inbound Authentication Configuration section, click Configure under the SAML2 Web SSO Configuration section.
- Now set the configuration as follows:
- Issuer : travelocity.com
- Assertion Consumer URL : http://localhost:8080/travelocity.com/home.jsp
-
Select the following check-boxes:
- Enable Response Signing.
- Enable Single Logout.
- Enable Attribute Profile.
- Include Attributes in the Response Always.
-
Click Update to save the changes. Now you will be sent back to the Service Providers page.
- Go to the Local and Outbound Authentication Configuration section.
-
You have two options here. You can add X509 certificate authenticator as the first factor and also as the second factor.
-
Second factor
-
Select the Advanced configuration radio button option.
-
Add the Username & Password authentication as a first step and X509 Certificate authentication as the second step.
-
-
First factor
- Select Local Authentication as the Authentication
Type and select X509 Certificate from the drop-down
list.
-
When using X509 as first step authentication, you need to create a user in IS management console with the Email provided while creating the browser certificate.
Example:
Note
For more information on creating users and assigning roles using management console, refer here.
- Select Local Authentication as the Authentication
Type and select X509 Certificate from the drop-down
list.
-
-
Finally, click on Update to finish the service provider configurations.
You have now added and configured the service provider.
Try it
If you have configured the authentication successfully, you will be redirected to the home page of your application when you attempt to log in.
Top