Just-in-Time User Inbound Provisioning
This page guides you through configuring Just-in-Time (JIT) provisioning for users from external identity providers into WSO2 Identity Server during federated authentication.
Prerequisites
You need to add and configure an identity provider on the Identity Server.
Enable JIT provisioning
To enable JIT provisioning for an IdP:
- On WSO2 Identity Server Management Console, go to Main > Identity > Identity Providers section.
- Click List, select the identity provider you want to enable JIT provisioning, and click on the corresponding Edit link.
-
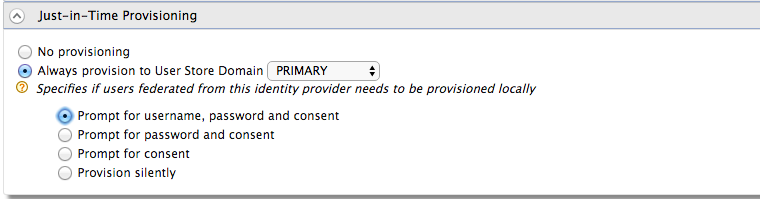
Expand the Just-In-Time Provisioning section and select the JIT provisioning options based on your requirement.
-
Select Always provision to User Store Domain, and select a required user store domain from the list of available user store domains.
Tip
The default user store domain you see is the PRIMARY user store provided with WSO2 Identity Server.
If you want to provision users to multiple user stores depending on the user name specified at the time of provisioning, select As in username from the dropdown.
If you select this option and do not specify the user name appropriately, the relevant user is provisioned to the PRIMARY user store domain.
For example,- If you specify the username as
user, the user is provisioned to the domain. - If you specify the username as
user1, the user is provisioned to the PRIMARY user store domain.
Suppose you want to select a user store domain other than the default primary user store domain. In that case, you need to configure a userstore of your preference for it to appear in the list for you to select.
- If you specify the username as
-
Select the provisioning options depending on how you want to prompt users for relevant credentials at the time of JIT provisioning. The provisioning options are as follows:
- Prompt for username, password, and consent
- Prompt for password and consent
- Prompt for consent
- Provision silently
Note
By default, Provision silently will be selected. You can change it as you wish.
-
Click Update to save your configurations.
Note
Provisioning claims should be compatible with the policies defined in the userstore manager configuration. For example
user name should match UsernameJavaRegEx and RolenameJavaScriptRegEx in the userstore configuration.
Disable JIT Provisioning
To disable JIT provisioning for an IdP:
Note
JIT provisioning is disabled by default. If you have enabled JIT provisioning for the IdP, use these instructions to disable it.
- On WSO2 Identity Server Management Console, go to Main > Identity > Identity Providers section.
- Click List, select the identity provider you want to enable JIT provisioning, and click on the corresponding Edit link.
- Expand the Just-In-Time Provisioning section and select the JIT provisioning options based on your requirement.
- Select No Provisioning and click Update to disable JIT provisioning.
Related topics
Enhanced Feature (Optional)
Add the following configuration to deployment.toml in the /conf directory.
[authentication.jit_provisioning]
enable_enhanced_feature = "true"
With the JIT provisioned enhanced feature, the following capabilities will be available.
- A Federated unique user id will be set as the username of the JIT provisioned user.
- Second-factor authenticators (Ex:- TOTP, Email OTP) will be able to configure for federated users when JIT provisioning is enabled
- When an IDP is deleted, the Identity Server will delete all provisioned users from that IDP.
- Editing JIT-provisioned user’s attributes will not be allowed.
- Ability to lock JIT provisioned user accounts based on social identity.
Preserve Locally Added Claims of JIT Provisioned Users
If a user already having an account in WSO2 Identity Server logs in using federated login with the same email address, WSO2 Identity Server deletes any locally added claims of the user and retains only the claims provided by the federated authenticator.
If you wish to change this default behavior and preserve the locally added claims of the user, go to the deployment.toml file found in the <IS_HOME>/repository/conf directory and add the following configuration.
[authentication.jit_provisioning]
preserve_locally_added_claims = "true"
Note
This configuration is available in IS 6.1.0 product from the update level 6.1.0.44 onwards
Customize JIT Provisioning User Interfaces
You can customize the default user interface that is displayed to prompt for credentials at the time of just-in-time provisioning.
To customize the user interfaces depending on your requirement, add the following configuration in the deployment.toml file.
[authentication.jit_provisioning]
username_provisioning_url= "/accountrecoveryendpoint/register.do"
password_provisioning_url= "/accountrecoveryendpoint/signup.do"
-
Update
username_provisioning_urlif you have selected Prompt for username, password and consent as the provisioning option. -
Update
password_provisioning_urlif you have selected Prompt for password and consent or Prompt for consent as the provisioning option.
Note
Learn more about configuring the provisioning methods.