Re-brand the Default Login Page for Your Application
WSO2 Identity Server usually displays a default login page for all service provider applications that send authentication requests to it. WSO2 IS supports re-branding the login page according to your requirements for SAML2 SSO, OAuth, or OpenID Connect applications.
The login pages and other pages, such as error and notification screens of SAML SSO, OAuth, OpenID Connect, and Passive STS are located in the authenticationendpoint webapp file, which is found in the <IS_HOME>/repository/deployment/server/webapps directory.
You can easily re-brand these pages within this web application by updating the respective JSPs, JavaScript and CSS. If you want to point to a different web application, you can do so by redirecting or forwarding from authenticationendpoint to your webapp. In the case of SAML SSO, the issuer id of the service provider is also sent to this webapp.
Therefore, different login pages can be given to different service providers by looking at the ' issuer ' request parameter.
This page guides you through re-branding the login page for a sample SAML2 SSO web application.
First, register two service providers in WSO2 Identity Server.
Configure travelocity application
Prerequisites
-
Download Apache Tomcat 8.x and install it. Tomcat server installation location will later be referred to as
<TOMCAT_HOME>in this guide. -
It is recommended that you use a hostname that is not
localhostto avoid browser errors. Modify your machine's/etc/hostsentry to reflect this.Info
Note that
wso2is.localis used in this documentation as an example, but you must modify this when configuring the authenticators or connectors with this sample application. -
Download the Travelocity application from the latest release assets.
Register a service provider
-
On the Management Console, go to Main > Identity > Service Providers and click Add.
-
Enter
travelocity.comas the Service Provider Name, and click Register. -
Expand the Inbound Authentication Configuration > SAML2 Web SSO Configuration section and, click Configure.
-
Enter the following values in the fields mentioned.
Field name Value Issuer travelocity.comAssertion Consumer URL http://wso2is.local:8080/travelocity.com/home.jspInfo
Click Yes on the dialog that appears after you add the Assertion Consumer URL. This dialog appears when you add an
httpURL. -
Enable the following by selecting the corresponding checkboxes:
- Enable Response Signing
- Enable Signature Validation in Authentication Requests and Logout Requests
- Enable Single Logout
- Enable Attribute Profile
- Include Attributes in the Response Always
Tip
For more information on the advanced configurations, see Advanced SAML Configurations.
-
Click Register to add the service provider and save the configurations.
CORS configuration
SAML2 POST Binding requires CORS configurations to be set up.
Before configuring the service provider, add the following configurations to the deployment.toml file found in <IS_HOME>/repository/conf/. Adding this configuration allows HTTP POST requests.
``` toml
[cors]
allow_generic_http_requests = true
allow_any_origin = false
allowed_origins = [
    "http://localhost:8080"
]
allow_subdomains = false
supported_methods = [
    "GET",
    "POST",
    "HEAD",
    "OPTIONS"
]
support_any_header = true
supported_headers = []
exposed_headers = []
supports_credentials = true
max_age = 3600
tag_requests = false
```
Deploy the sample web app
To deploy the sample web app on a web container:
-
Copy the downloaded
.warfile of the SAML application into thewebappsdirectory of the Tomcat folder. -
Open a terminal and add the following entry to the
/etc/hostsfile of your machine to configure the hostname.127.0.0.1 wso2is.local 127.0.0.1 localhost.comWhy is this step needed?
Some browsers do not allow you to create cookies for a naked hostname, such as
localhost. Cookies are required when working with SSO . Therefore, to ensure that the SSO capabilities work as expected in this tutorial, you need to configure theetc/hostfile as explained in this step.The
etc/hostfile is a read-only file. Therefore, you won't be able to edit it by opening the file via a text editor. Instead, edit the file using the terminal commands. For example, use the following command if you are working on a Mac/Linux environment.sudo nano /etc/hosts -
Open the
travelocity.propertiesfile in the<TOMCAT_HOME>/webapps/travelocity.com/WEB-INF/classesdirectory and configure the following property with the hostname that you configured above.#The URL of the SAML 2.0 Assertion Consumer SAML2.AssertionConsumerURL=http://<HOSTNAME>:8080/travelocity.com/home.jsp -
Restart the Tomcat server.
To check the sample application, navigate to http://<TOMCAT_HOST>:<TOMCAT_PORT>/travelocity.com/index.jsp on your browser.
Tip
If you wish to change properties like the issuer ID, consumerURL, and IdP URL, you can edit the travelocity.properties file in the travelocity.com/WEB-INF/classes directory.
Also if the service provider is configured in a tenant you can use QueryParams property to send the tenant domain. For example,QueryParams=tenantDomain=wso2.com.
This sample uses the following default values.
| Properties | Description |
|---|---|
SAML2.SPEntityId=travelocity.com |
A unique identifier for this SAML 2.0 Service Provider application. |
SAML2.AssertionConsumerURL=http://wso2is.local:8080/travelocity.com/home.jsp |
The URL of the SAML 2.0 Assertion Consumer. |
SAML2.IdPURL=https://localhost:9443/samlsso |
The URL of the SAML 2.0 Identity Provider. |
SAML2.IsPassiveAuthn=true |
Set this to send SAML2 passive authentication requests. |
For the changes to be effective, restart the Apache Tomcat server after updating the travelocity.properties file.
Configure avis application
-
Copy the downloaded
travelocity.com.warfile and rename it toavis.com.war. -
Add it to
<TOMCAT_HOME>/webapps/folder and restart the Tomcat server. -
Open the
<TOMCAT_HOME>/webapps/avis.com/avis.propertiesfile and update the following configurations.#The URL of the SAML 2.0 Assertion Consumer SAML2.AssertionConsumerURL=http://wso2.is:8080/avis.com/home.jsp #openid.return_to parameter OpenId.ReturnToURL=http://wso2.is:8080/avis.com/home.jsp -
Restart the Tomcat server to apply the configuration changes.
-
Register a new service provider with the name
avis.comsimilarly by following the steps given in configure travelocity application by replacingtravelocity.comreferences toavis.com.
Start the application server and access the following URLs to make sure both apps are running.
-
travelocity.com
URL: http://wso2is.local:8080/travelocity.com/index.jsp
-
avis.com
URL: http://wso2is.local:8080/avis.com/index.jsp
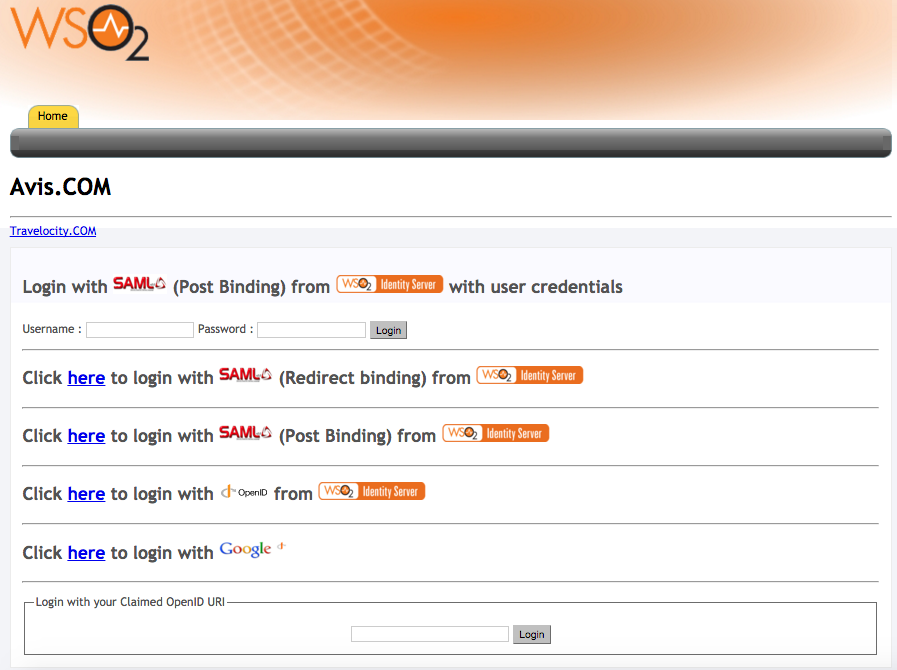
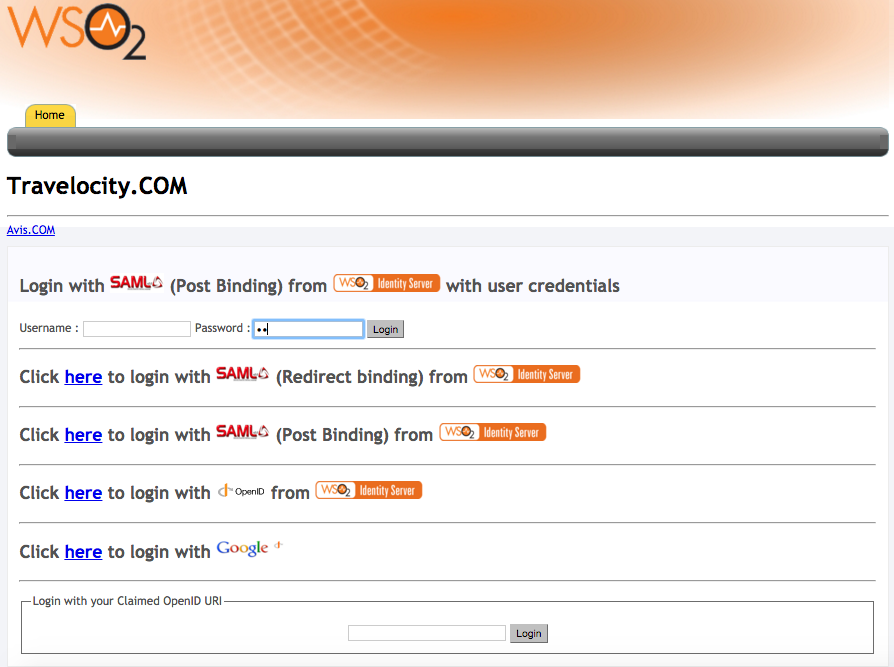
When attempting to log in with SAML from WSO2 Identity Server in Travelocity.com and Avis.com applications, you can see the following default page located at <IS_HOME>/repository/deployment/server/webapps/authenticationendpoint/login.jsp.
Configure the login page
authenticationendpoint web application
The login page that is displayed during SAML2 SSO, OAuth, OpenID Connect and Passive-STS flows is located inside the webapp named authenticationendpoint. The reason for storing this in a web app is:
- To easily customize the page according to user requirements.
- To place the whole web application in an external application server, if needed.
WSO2 Identity Server is aware of the location of this web application as it is specified with the configurations in the <IS_HOME>/repository/conf/deployment.toml file. The configurations are as follows:
[authentication.endpoints]
login_url="/authenticationendpoint/login.do"
retry_url="/authenticationendpoint/retry.do"
By default, the configuration points to a location inside WSO2 Identity Server itself, which is reprensted by the relative path. If it is necessary to point to an external application, the full path should be given instead.
Note
If this web app is moved outside the Identity Server, ensure that no one can access the login credentials that are passed between this application and the Identity Server. This means that the external location should ideally be either inside a secured intranet or the transport should be HTTPS. Other similar precautions may be necessary to secure the communication.
The structure of this web app is as follows:
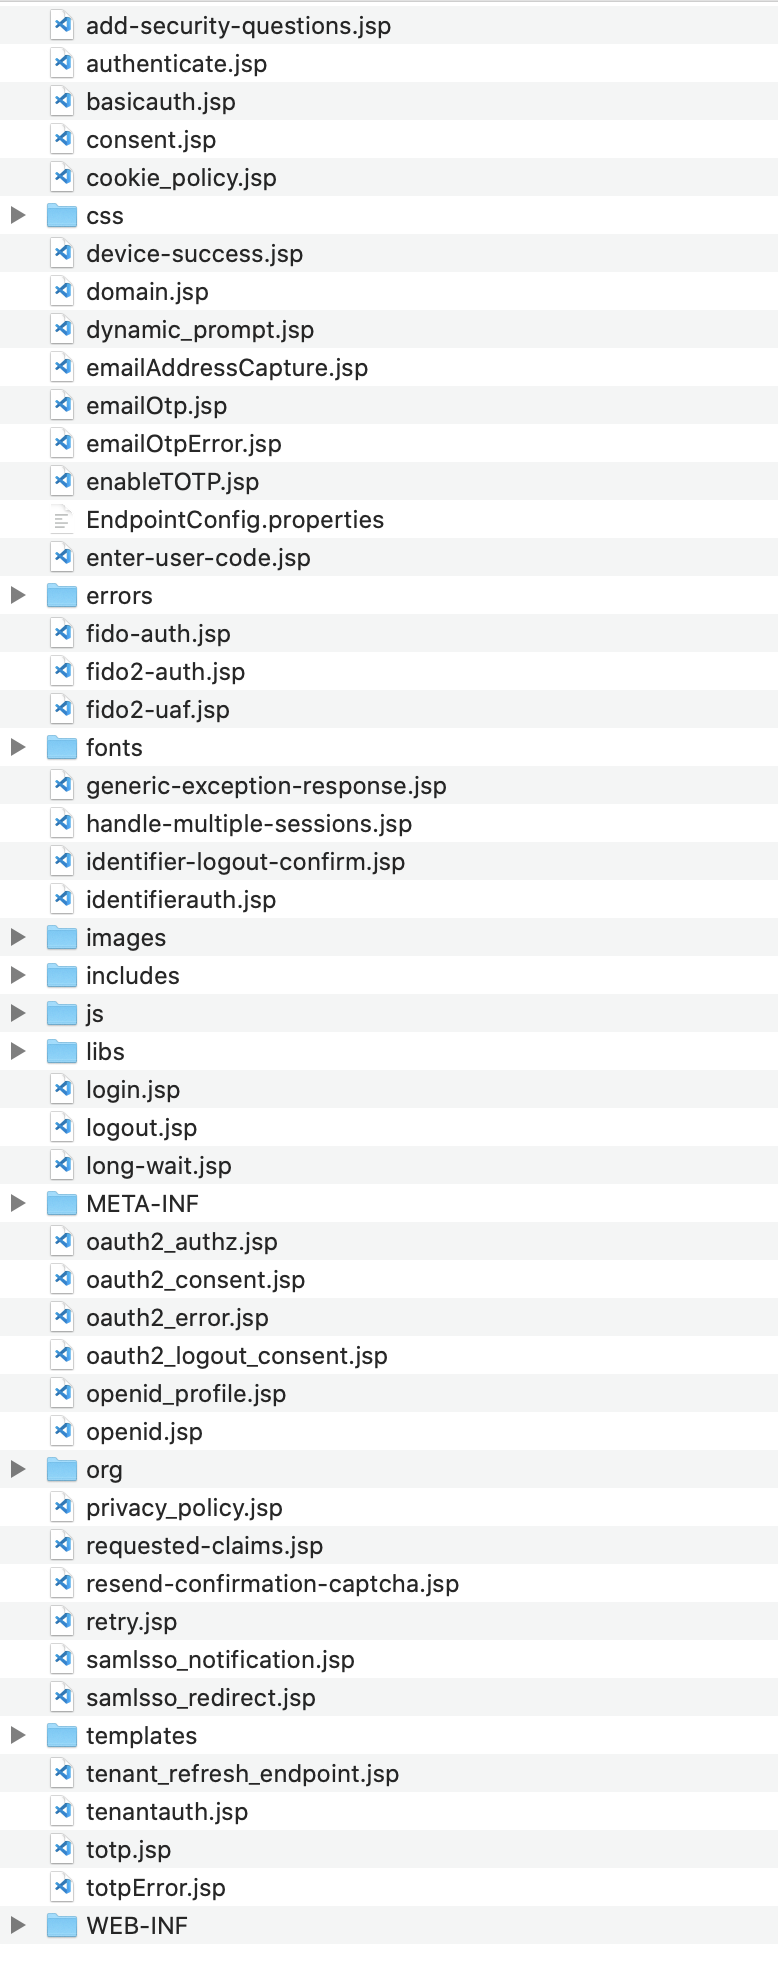
The authenticationendpoint web application uses a carbon component called org.wso2.carbon.identity.application.authentication.endpoint.util. This bundle includes a filter called the org.wso2.carbon.identity.application.authentication.endpoint.util.filter. AuthenticationEndpointFilter acts as the Front Controller.
When a request is made to the authenticationendpoint web application, based on the authentication protocol type identified by the request parameter ‘type’, the controller first forwards the request to the protocol based login url patterns defined.
For example, if the request to the authenticationendpoint web application is initiated as a result of a SAML SSO authentication request, the controller will forward the request to the url pattern /samlsso_login.do . In web.xml, this URL is mapped to the login.jsp file. The request is finally forwarded to this login.jsp page.
Everything on the authenticationendpoint web application can be modified according to your requirements. You can either add JSP pages or modify them and configure the web.xml respectively.
The only restriction involved is that the content already sent back by the pages inside the default web app must be submitted to the Identity Server. Additionally, you must point to the correct location via the <IS_HOME>/repository/conf/identity/application-authentication.xml file.
Re-brand the login page
When a request comes to the default login page, you will see several parameters being passed in the address bar. For this example, the focus is on the following two parameters:
-
sessionDataKey : This is an identifier used by the Identity Server to maintain state information related to this particular request by the service provider.
Note
The 'sessionDataKey' query parameter is used to coordinate the request state across components participating in the request flow. It does not correlate with the user session. Furthermore, the request state maintained against the 'sessionDataKey' parameter value is cleared by each participating component at the end of request flow. This means that even if an external party grabs the 'sessionDataKey' they will not be able to get into the authentication sequence, as the user session is not associated with that key.
-
relyingParty : This is the value we gave for the "Issuer" field when we registered the SAML2 SSO service provider (e.g.,travelocity.com). This value is used to display different login pages to different service providers.
When modifying the pages, ensure that the following is applied.
-
Form submissions should happen to the "commonauth" servlet as a POST.
<form id="form" name="form" action="https://is.docs.wso2.com/en/6.1.0/commonauth" method="POST"> -
Make sure to send back the "sessionDataKey" with the form submission, by using a hidden input field.
<%@ page import="org.owasp.encoder.Encode" %>

<input type="hidden" name="sessionDataKey" value="<%=Encode.forHtmlAttribute(request.getParameter("sessionDataKey"))%>"/>
Use a JSP to redirect to SP relevant pages
- Rename the existing
login.jspasdefault\_login.jsp -
Create a new file named
login.jspand add the following code:<% String relyingParty = request.getParameter("relyingParty"); if (relyingParty.equals("travelocity.com")) { RequestDispatcher dispatcher = request.getRequestDispatcher("travelocity_login.jsp"); dispatcher.forward(request, response); } else { RequestDispatcher dispatcher = request.getRequestDispatcher("default_login.jsp"); dispatcher.forward(request, response); } %>This code forwards the request to a different login page by checking the value of
relyingPartyparameter. -
Get the
travelocity\_login.jspfile and add it parallel tologin.jsp. -
Download the contents of the
cssandimagesfolders from this link and add them inside the respective folders in theauthenticationendpoint. -
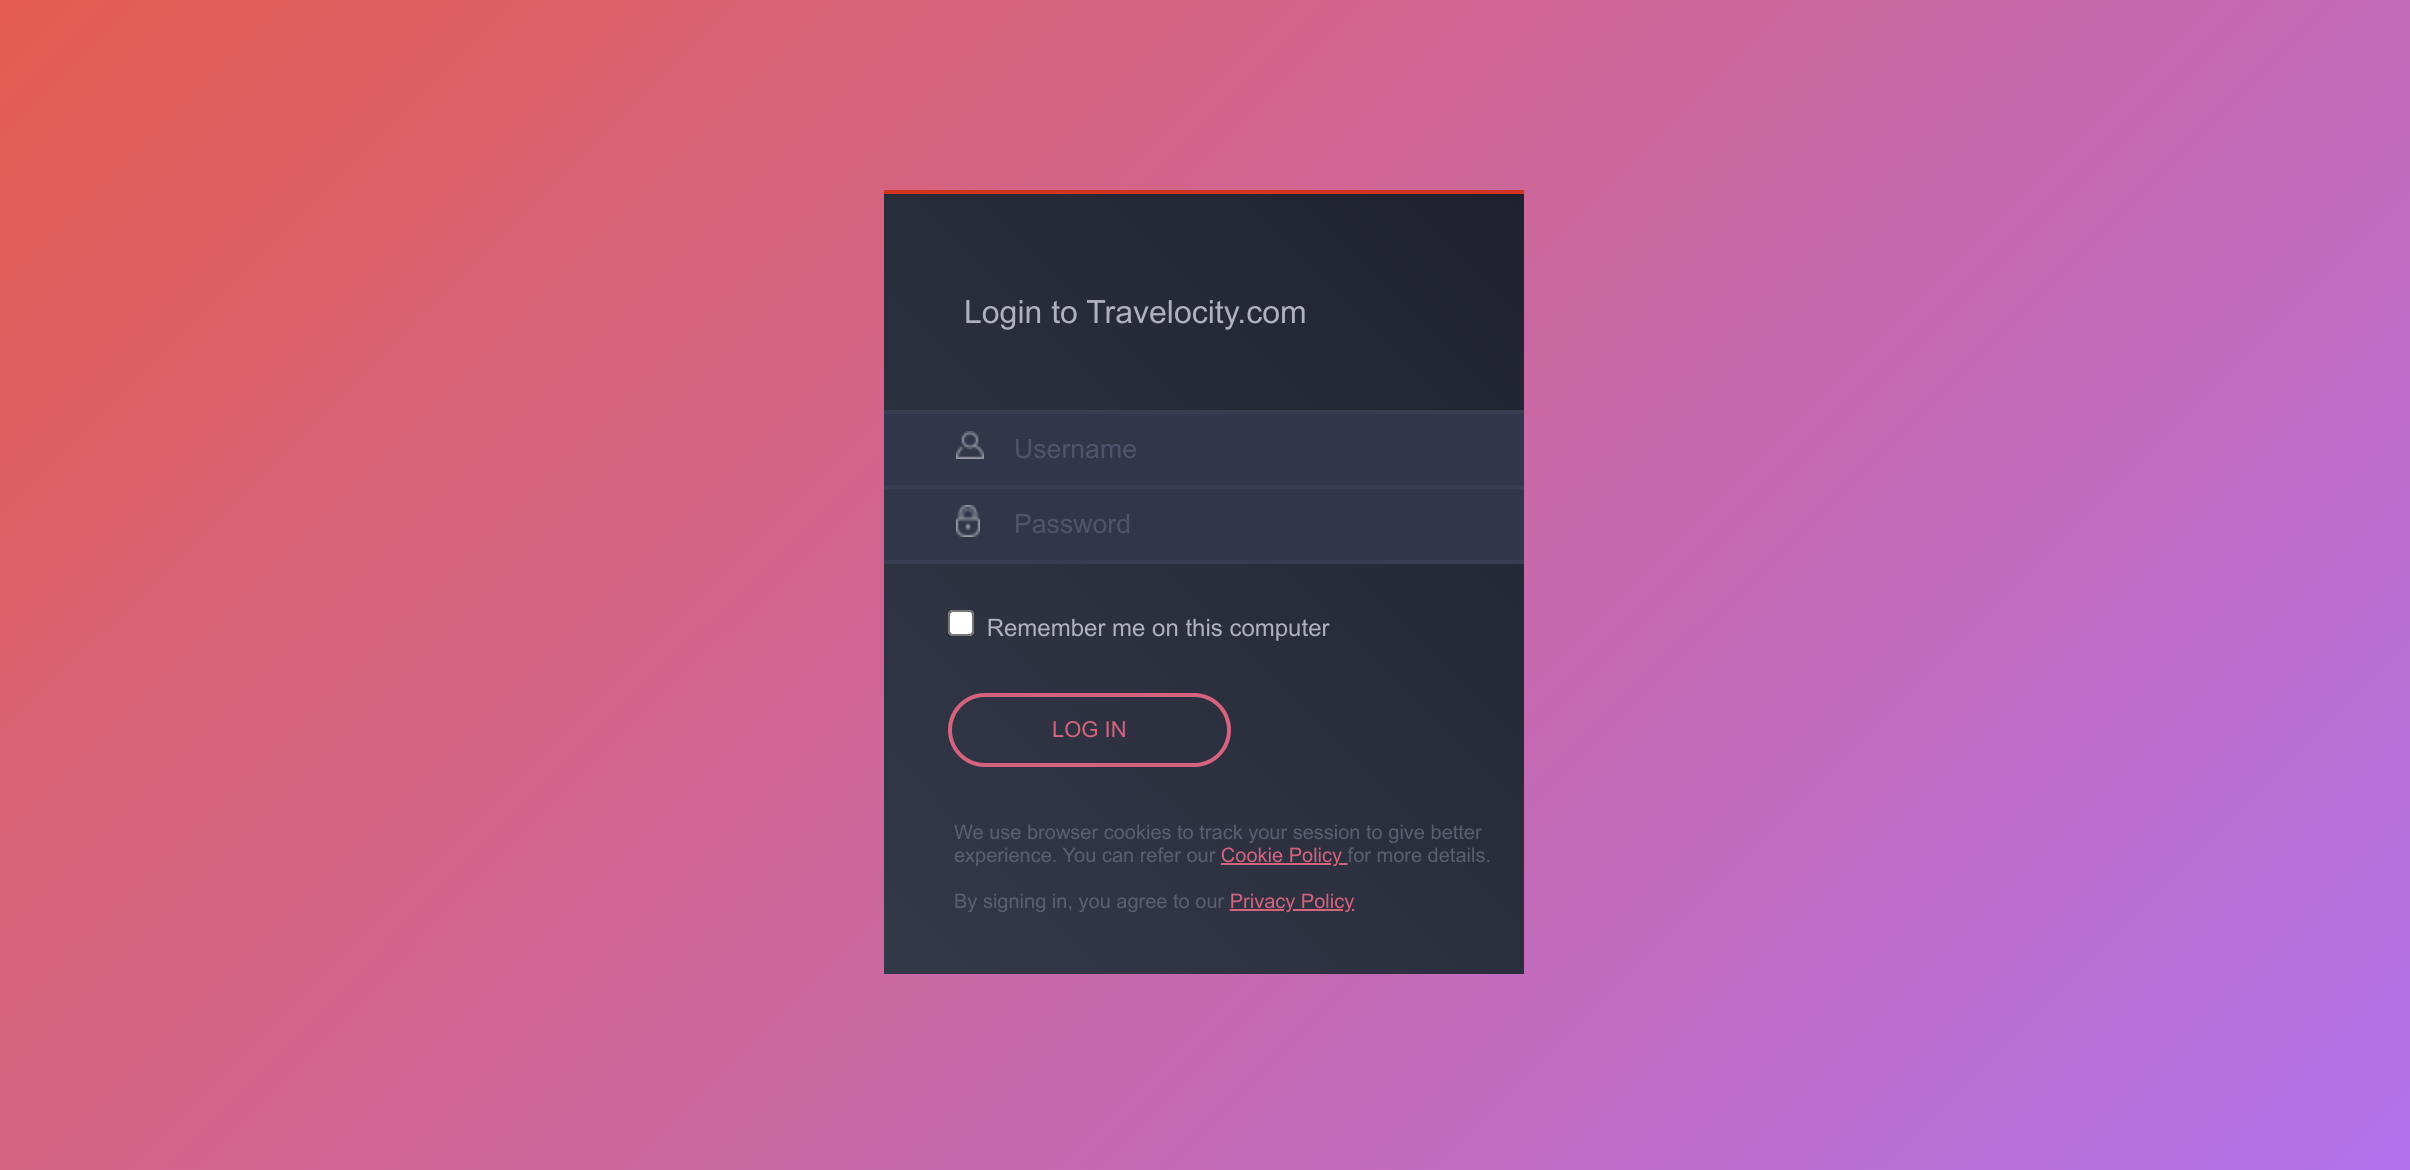
Log in to the travelocity.com web app again. You are presented with the re-branded page.