Registering an identity provider
WSO2 Identity Server allows you to add identity providers (IdP) and specify various details that help you link the identity provider to the WSO2 Identity Server. To properly configure the IdPs, you must specify all information required to send the authentication requests and get a response back from the identity provider.
This guide walks you through adding and configuring identity providers based on your requirements.
Note
Adding and configuring an IdP can be performed by administrators only.
Register an identity provider
To add a new identity provider.
-
On WSO2 Identity Server Management Console, go to Main > Identity > Identity Providers
-
Click Add, and enter the details in the Basic Information section.
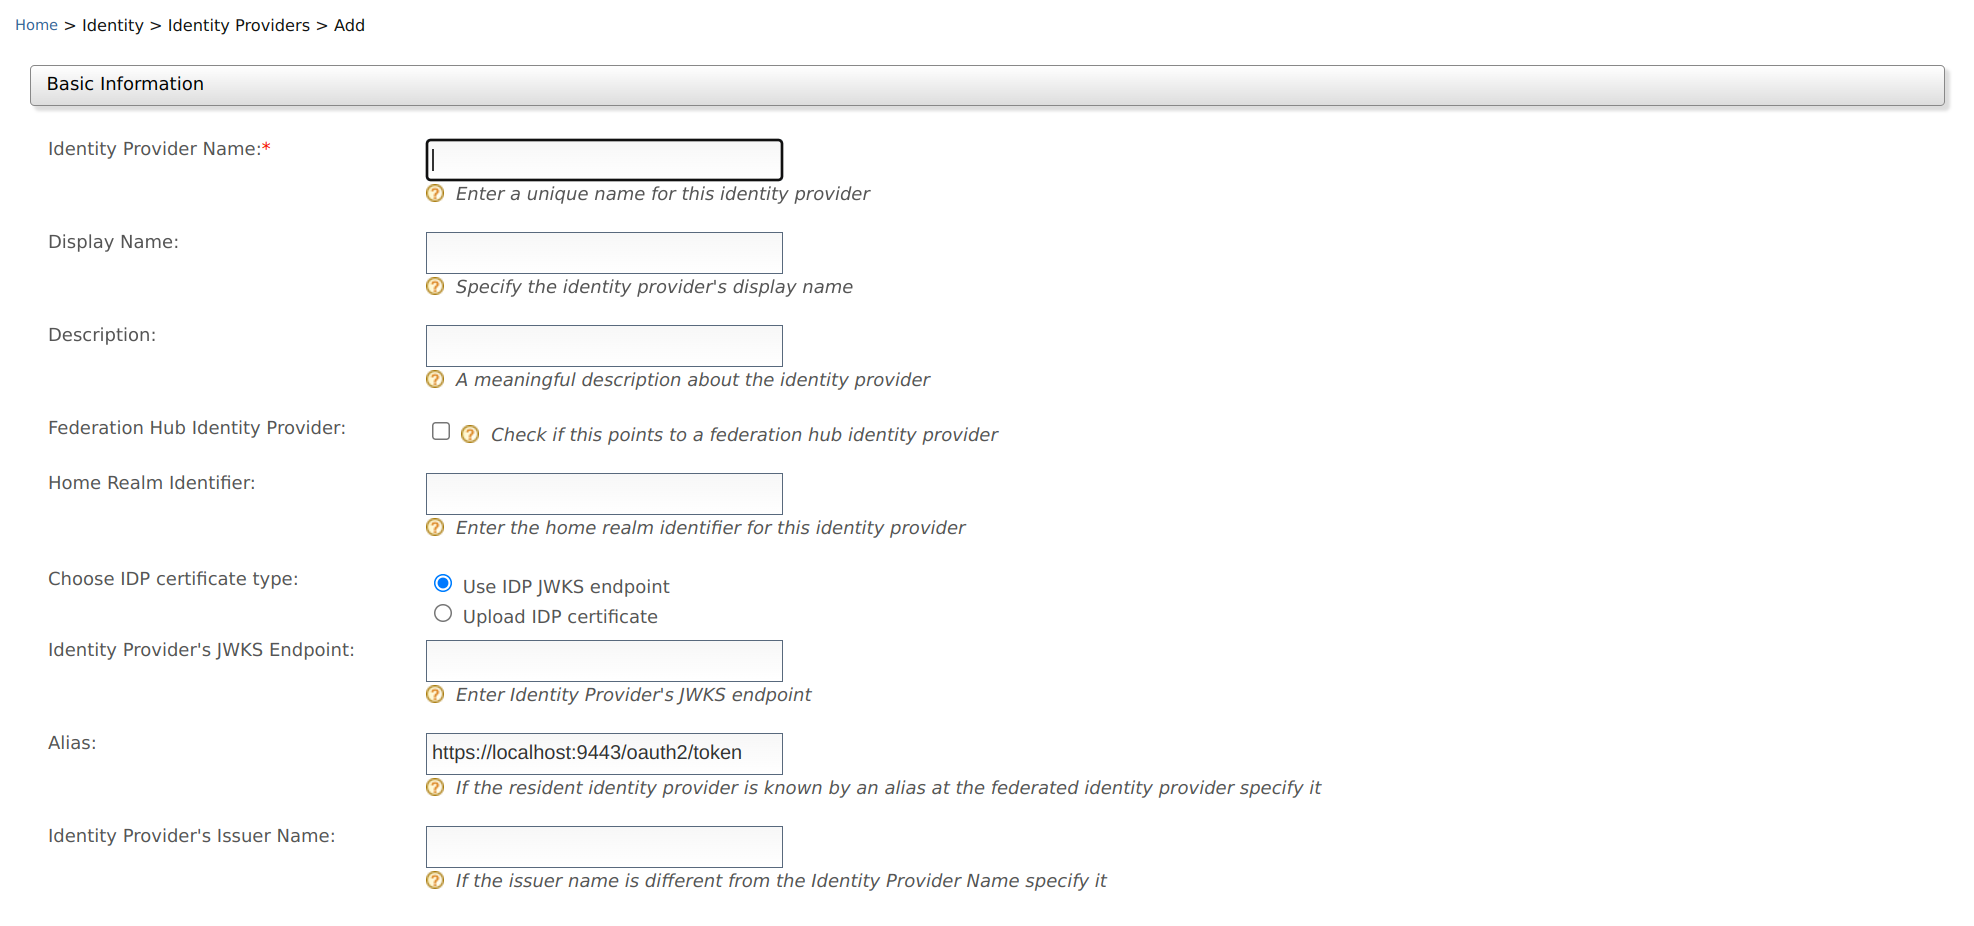
Method Description Sample Value Identity Provider Name A unique name used as the primary identifier of the IdP. FacebookIdPDisplay Name This is used to identify the identity provider. If this is left blank, the Identity Provider Name is used. FacebookDescription A description of the identity provider. This is the identity provider configuration for Facebook.Federation Hub Identity Provider Select the Federation Hub Identity Provider check-box to indicate if this points to an identity provider acting as a federation hub. Selected Home Realm Identifier This value is an identifier used when your application uses a federated IdP. If a user selects this IdP and sends an authentication request, the fidpquery parameter will be populated with this value. (example:fidp= googleIdP)googleIdPChoose IDP certificate type This is used to authenticate responses from the IdP. You can either Upload IDP certificate or use the Use IDP JWKS endpoint. Selected Identity Provider's JWKS Endpoint: If you have selected Use IDP JWKS endpoint in the above field, this field will appear. You need to add the JWKS endpoint URL in this field. Selected Identity Provider Public Certificate If you have selected Upload IDP certificate in the above field, this field will appear. You need to upload the public certificate of your IdP in this field. Selected Alias This is a value with an equivalent value specified in the identity provider we are configuring. This is required for authentication in some scenarios. http://localhost:9443/oauth2/token Identity Provider's Issuer Name This is an optional property that can be used to define the issuer name of the Identity Provider if it is different from the Identity Provider Name. http://is.wso2.com Create IdP certificate
To create the identity provider certificate, navigate to the
<IS_HOME>/repository/resources/security/directory, open a terminal, and execute the following command:keytool -export -alias wso2carbon -file wso2.crt -keystore wso2carbon.jks -storepass wso2carbonSee Using Asymmetric Encryption guide for more information about certificates.
Federation hub and the home realm identifier
A federation hub is a collection of multiple IdPs configured on WSO2 Identity Server.
On the federation hub, each IdP is recognized by the home realm identifier of the IdP. This home realm identifier is configured when creating the IdP.
The following diagrams illustrate the workflow of authentication with a federated hub.

On the application's login page, you can support local and federated authentication or just federated authentication. This can be done by setting the
proxy_modeconfiguration in thedeployment.tomlfile. Following are the modes available for configuration:proxy_modenameDescription smartAllows both local and federated authentication dumbAllows only federated authentication. The home realm identifier must be configured to operate in this mode. If it is not configured, a separate screen should be displayed to get it from the user To configure the
proxy_mode, open thedeployment.tomlfile in the<IS_HOME>/repository/confdirectory and add the following configuration.[authentication] proxy_mode="smart"Details about Alias
The Alias is used in the following authentication scenario.
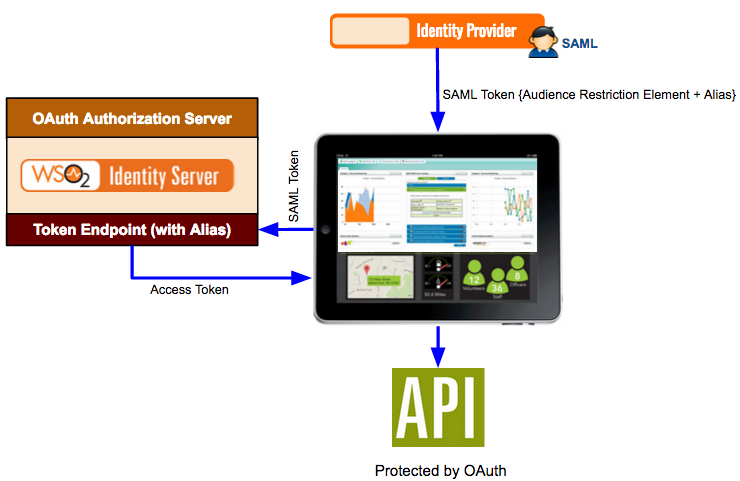
A SAML identity provider sends a SAML token to a web application for authentication. The SAML token has an audience restriction element that controls access and has a reference to the web application to access it. Authentication takes place by Using this token. Now, if the web application needs to access an API protected by OAuth 2.0, the same SAML token is sent to the token endpoint of the Identity Server. The Alias value you configure in the Identity Server is associated with this token endpoint. This alias value must be added to the audience restriction element of the SAML token. When this SAML token is sent to the Identity Server, you obtain an access token used to access the API.
So to configure this, you must add the SAML identity provider as an identity provider in the Identity Server using the instructions on this topic. When configuring this in the Identity Server, you must specify the token alias for this scenario to work. This indicates that any token from the SAML identity provider must have this alias value in the audience restriction element.
-
Click the expandables to check and update the available optional configurations.
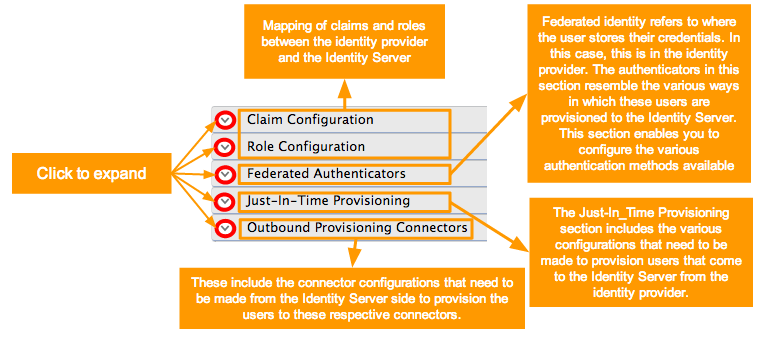
Info
Identity Provider Name is the only required field. You can fill in the remaining details if applicable.
For more information about the other configurations, see the following documentation.
-
Click Register to add the Identity Provider.
Related Topics
See the following topics for information on configuring service providers using different specifications.
- See Identity Federation for information on configuring federated authenticators.
See the following topics to configure different applications as service providers in Identity Server.