Configuring Risk-Based Adaptive Authentication
WSO2 Stream Processor (SP) is a lightweight, lean, streaming SQL-based stream processing platform that allows you to collect events, analyze them in real-time, identify patterns, map their impacts, and communicate the results within milliseconds. It is powered by Siddhi to be extremely high performing.
This tutorial demonstrates using WSO2 Stream Processor to publish transactional data and assess an end user's risk score based on the user's transaction history in an adaptive authentication scenario. Consider a business use case where a bank wants to prompt an additional authentication step when a user attempts to log in to the system after a doing a transaction of over $10,000.This usecase can be achieved by creating a Siddhi application in WSO2 SP and configuring a conditional authentication script in the service provider configuration of the WSO2 Identity Server (WSO2 IS).
Follow the instructions given in the sections below to set this up.
Risk profiling flow
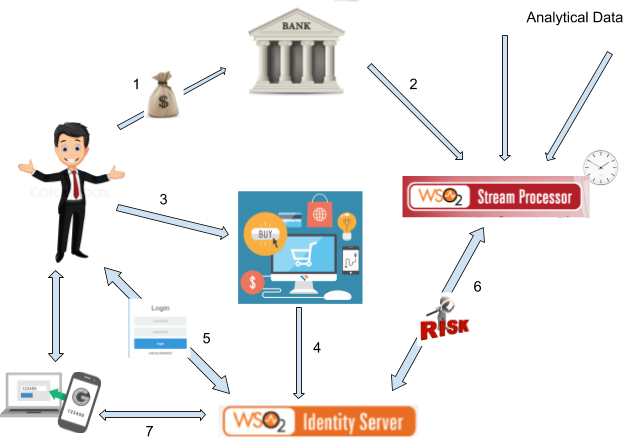
The diagram below shows how the connection between the client applications, WSO2 Stream Processor, and WSO2 Identity Server works to assess risk and provide adaptive authentication to users.

- The user performs bank transactions through different applications.
- Transactional data from all these applications are published to the WSO2 Stream Processor Analytics engine.
- The user attempts to access a service provider application that uses WSO2 IS as the identity provider.
- The service provider sends an authentication request to WSO2 IS.
- The user is prompted to log in and WSO2 IS authenticates the user using basic authentication (username/password credentials).
- WSO2 IS publishes an event to the Siddhi application in WSO2 SP, which computes the user's risk score based on the user's transaction history using the data received in step 2. If the user has made transactions that total to over $10,000 spent within the last five minutes, the risk score is 1. Else, the risk score is 0.
- If the risk score is 1, WSO2 IS prompts an additional step of authentication for the user (i.e., entering a hardware key number) before allowing the user to access the service provider application.
Configuring WSO2 Stream Processor
First, create a Siddhi application as instructed below. The application has two endpoints; one to publish transactional data, and the other to get the user's risk score.
-
Download the latest version of WSO2 Stream Processor.
-
Create and deploy the following Siddhi application on a WSO2 SP worker node.
For more detailed instructions on how to create and deploy the Siddhi application, see Using WSO2 Stream Processor for Adaptive Authentication.@App:name("RiskBasedLogin") @App:description("Description of the plan") @Source(type = 'http-request', source.id='testsource', basic.auth.enabled='true', parameters="'ciphers:TLS_ECDHE_RSA_WITH_AES_128_CBC_SHA256', 'sslEnabledProtocols:TLSv1.1,TLSv1.2'", receiver.url="https://localhost:8280/RiskBasedLogin/InputStream", @map(type='json', @attributes(messageId='trp:messageId',username='$.event.username'))) define stream InputStream (messageId string, username string); @sink(type='http-response', source.id='testsource', message.id='{{messageId}}', @map(type='json')) define stream OutputStream (messageId string, username string, riskScore int); define stream TempStream (messageId string, username string, sumTransactions double); @Source(type = 'http', receiver.url="http://localhost:8281/RiskBasedLogin/TransactionInputStream", basic.auth.enabled='false', @map(type='json', @attributes(username='$.event.username', transaction='$.event.transaction'))) define stream TransactionInputStream (transaction double, username string); from TransactionInputStream#window.time(5 min) right outer join InputStream#window.length(1) unidirectional on TransactionInputStream.username == InputStream.username select InputStream.messageId, InputStream.username, sum(transaction) as sumTransactions group by messageId, InputStream.username insert into TempStream; from TempStream select messageId, username, ifThenElse(sumTransactions > 10000, 1, 0) as riskScore insert into OutputStream;
Configuring WSO2 Identity Server
Next, configure WSO2 IS to communicate with the Siddhi application.
Before you begin
- Set up the service provider and sample application for adaptive authentication. For instructions on how to do this, see Configuring a Service Provider for Adaptive Authentication.
- For more information about adaptive authentication with WSO2 Identity Server, see Adaptive Authentication.
- Login to the management console and create a new user called "Alex" with login permission.
- Navigate to Service Providers>List and click Edit on the saml2-web-app-pickup-dispatch.com service provider.
- Expand the Local and Outbound Configuration section and click Advanced Authentication.
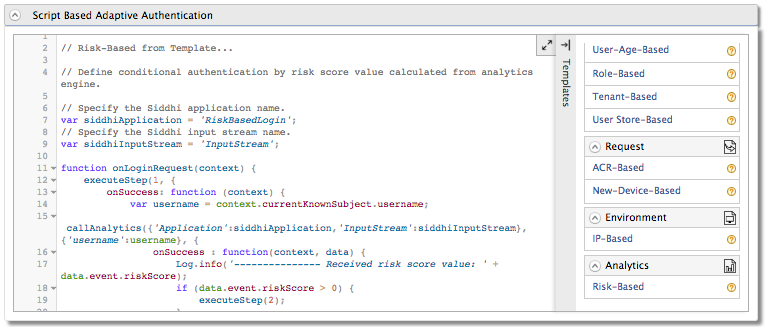
- Click on Templates on the right side of the Script Based
Conditional Authentication field and then click Risk-Based.

- Click Ok. The authentication script and authentication steps
are configured. The authentication script defines a conditional step
that executes the second step of authentication (the hardware key
authenticator) if the
riskScoreis greater than 0. -
The second authentication step that is added is
totp.However,totpis an authentication step that you would normally use in production. To try out this scenario sample authenticators with the sample application, delete thetotpauthenticator and add the following sample authenticator instead.- Click Delete to remove the
totpauthenticator from Step 2 (the second authentication step).

- Select Sample Hardware Key Authenticator and click
Add.

- Click Delete to remove the
-
Save the service provider configurations.
-
Restart WSO2 Identity Server.
Trying it out
- Start the Tomcat server and a ccess the following sample PickUp application URL: http://localhost.com:8080/saml2-web-app-pickup-dispatch.com .
-
Port offset the 9443 port in WSO2 Stream Processor. This is required because WSO2 IS also runs on the 9443 port.
-
Open the
deployment.yamlfile found in the<SP_HOME>/conf/worker/folder. -
Change the
Port: 9443to9444underlistenerConfigurations.listenerConfigurations: - id: "default" host: "0.0.0.0" port: 9090 - id: "msf4j-https" host: "0.0.0.0" port: 9444 scheme: https keyStoreFile: "${carbon.home}/resources/security/wso2carbon.jks" keyStorePassword: wso2carbon certPass: wso2carbon
-
-
Start the WSO2 SP server in a Worker profile.
- For Windows:
worker.bat - For Linux: ./
worker.sh
- For Windows:
-
Log in by giving username and password credentials. You are logged in to the application.
Note
The user is authenticated with basic authentication only.
-
Log out of the application.
-
Execute the following cURL command. This command publishes an event about a user bank transaction exceeding $10,000.
Tip
Replace the \<username> tag in the cURL command given below with a valid username and ensure that the WSO2 SP Worker profile is running.
curl -v -X POST http://localhost:8281/RiskBasedLogin/TransactionInputStream -H 'Accept: application/json' -H 'Cache-Control: no-cache' -H 'Content-Type: application/json' -H 'Postman-Token: 7847a682-012d-4939-88f5-6e8ec781c144' -d '{ "event": { "username": "chris", "transaction": 12000 } }' -v -
Log in to the sample PickUp application. You are prompted with the hardware key authentication after the basic authentication step.
Info
Before executing the cURL command given in step 4, the user had no transaction history and the user's riskScore was 0. The authentication script is programmed to prompt only basic authentication if the risk score is 0.
After executing the command, a transaction event that indicates the user spending more than $10,000 is published and recorded in the Siddhi application. Therefore, when the user now attempts to log in again, the user's riskScore is evaluated to 1 and the user is prompted for an extra step of authentication.
-
Re-enter the number given on the screen and click Sign In. You are logged into the application.