Outbound Provisioning with SPML
WSO2 Identity Server enables you to manage users with SPML compliant providers. The following steps illustrate how to do this.
- Install and configure a SPML compliant provider. Sun Identity Manager, Oracle waveset, and ActiveRoles Server SPML provider are some examples for SPML compliant providers.
- Download the WSO2 Identity Server from here and run it.
- Log in to the Management Console as an administrator.
- Navigate to the Main menu to access the Identity menu. Click Add under Identity Providers. See here for more information on this.
- Enter "spml Identity provider" as Identity Provider name for the purposes of this scenario.
-
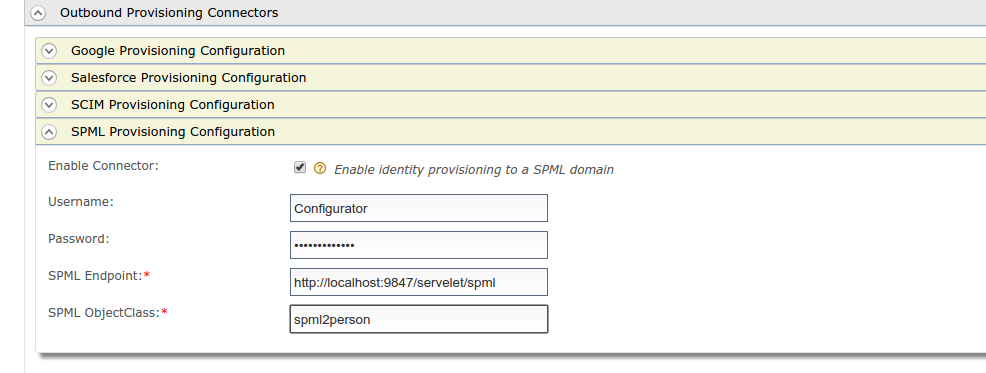
Under the Outbound Provisioning Connectors section, expand the SPML Provisioning Connector form.

Do the following changes:-
Select the Enable Connector checkbox.
-
Enter a Username for your SPML compliant provider.
-
Enter a Password for the SPML compliant provider.
-
Enter the SPML endpoint URL as SPML Endpoint.
-
Enter the supported SPML ObjectClass from the server. This object class defines the user attributes passed to the server.
-
-
Click Update to save changes.
-
In the Main menu under the Identity section, click Resident under Service Providers.
-
Then expand the Outbound Provisioning Configuration section and add the created identity provider and select spml from the dropdown list.

Info
-
If Blocking is enabled, WSO2 IS will wait for the response from the Identity Provider to continue provisioning.
-
If Enable Rules is enabled, the users will be provisioned based on pre-defined XACML rules. For more information about this, see Rule Based Provisioning.
-
-
Click Update.
- On the Main tab in the management console, click Add under Users and Roles in the Identity menu.
- Click Add New Role and add a role named "spml". See Configuring Roles and Permissions for more information on this process.
- On the Main tab in the management console, click Add under Users and Roles in the Identity menu.
- Click Add New User. See Configuring Users for more information on this process.
- Provide a username and a password(with confirmation) and Click Next.
- Add "spml" as the role in the resulting screen.
- Click Finish to create the user.
The user you created is now provisioned to the SPML provider server.
Top