Deploying the Sample Applications
This topic provides instructions on how to download and deploy the sample application used while trying out sample use cases in WSO2 Identity Server.
Before you begin
Download Apache Tomcat 8.x from
here and install. Tomcat
server installation location will be referred as <TOMCAT_HOME> later
in this guide.
Note
It is recommended that you use a hostname that is not
localhost to avoid browser errors. Modify the
/etc/hosts entry in your machine to reflect this.
Note that localhost is used in
this documentation as an example, but you must modify this when
configuring the authenticators or connectors with this sample
application.
Deploying the Travelocity webapp
Before you begin
Install Apache Tomcat 8.x as explained in the beginning of this document.
Download the sample
To be able to deploy a WSO2 Identity Server sample, you need to download it onto your machine first.
Follow the instructions below to download a sample from GitHub.
- Navigate to WSO2 Identity Server Samples.
- Download the
travelocity.com.warfile from the latest release assets.
Deploy the sample web application
Deploy this sample web app on a web container.
-
Copy the
travelocity.com.warfile into thewebappsfolder. For example,<TOMCAT_HOME>/apache-tomcat-<version>/webapps -
Open a terminal window and add the following entry to the
/etc/hostsfile of your machine to configure the hostname.127.0.0.1 wso2is.local 127.0.0.1 localhost.comWhy is this step needed?
Some browsers do not allow you to create cookies for a naked hostname, such as
localhost. Cookies are required when working with SSO . Therefore, to ensure that the SSO capabilities work as expected in this tutorial, you need to configure theetc/hostfile as explained in this step.The
etc/hostfile is a read-only file. Therefore, you won't be able to edit it by opening the file via a text editor. Instead, edit the file using the terminal commands.
For example, use the following command if you are working on a macOS/Linux environment.sudo nano /etc/hosts -
Open the
travelocity.propertiesfile found in the<TOMCAT_HOME>/webapps/travelocity.com/WEB-INF/classesdirectory and configure the following property with the hostname (wso2is.local) that you configured above. Finally restart the tomcat server.#The URL of the SAML 2.0 Assertion Consumer SAML2.AssertionConsumerURL=http://wso2is.local:8080/travelocity.com/home.jsp -
Start the Tomcat server.
To check the sample application, navigate to
http://<TOMCAT_HOST>:<TOMCAT_PORT>/travelocity.com/index.jsp
on your browser.
For example,
http://wso2is.local:8080/travelocity.com/index.jsp
Tip
If you wish to change properties like the issuer ID, consumer
URL, and IdP URL, you can edit the travelocity.properties file found
in the travelocity.com/WEB-INF/classes directory.
Also if the service provider is configured in a tenant you can use
"QueryParams" property to send the tenant domain.For example,
"QueryParams=tenantDomain=wso2.com".
This sample uses the following default values.
| Properties | Description |
|---|---|
SAML2.SPEntityId=travelocity.com |
A unique identifier for this SAML 2.0 Service Provider application |
SAML2.AssertionConsumerURL= http://wso2is.local:8080/travelocity.com/home.jsp |
The URL of the SAML 2.0 Assertion Consumer |
SAML2.IdPURL= https://localhost:9443/samlsso |
The URL of the SAML 2.0 Identity Provider |
SAML2.IsPassiveAuthn=true |
Set this to send SAML2 passive authentication requests |
If you edit the travelocity.properties file, you must restart the Apache Tomcat server for the changes to take effect.
Configuring the service provider
The next step is to configure the service provider.
-
Return to the WSO2 IS management console.
-
Navigate to Main>Identity>Service Providers and click Add.
-
Enter travelocity.com in the Service Provider Name text box, and click Register.
-
In the Inbound Authentication Configuration section, click Configure under the SAML2 Web SSO Configuration section.
-
Now set the configurations as follows:
-
Issuer :
travelocity.com -
Assertion Consumer URL :
http://wso2is.local:8080/travelocity.com/home.jsp
Click Yes, in the message that appears.
-
-
Select the following check-boxes:
-
Enable Response Signing
-
Enable Single Logout
-
Enable Attribute Profile
-
Include Attributes in the Response Always
-
Enable Signature Validation in Authentication Requests and Logout Requests
-
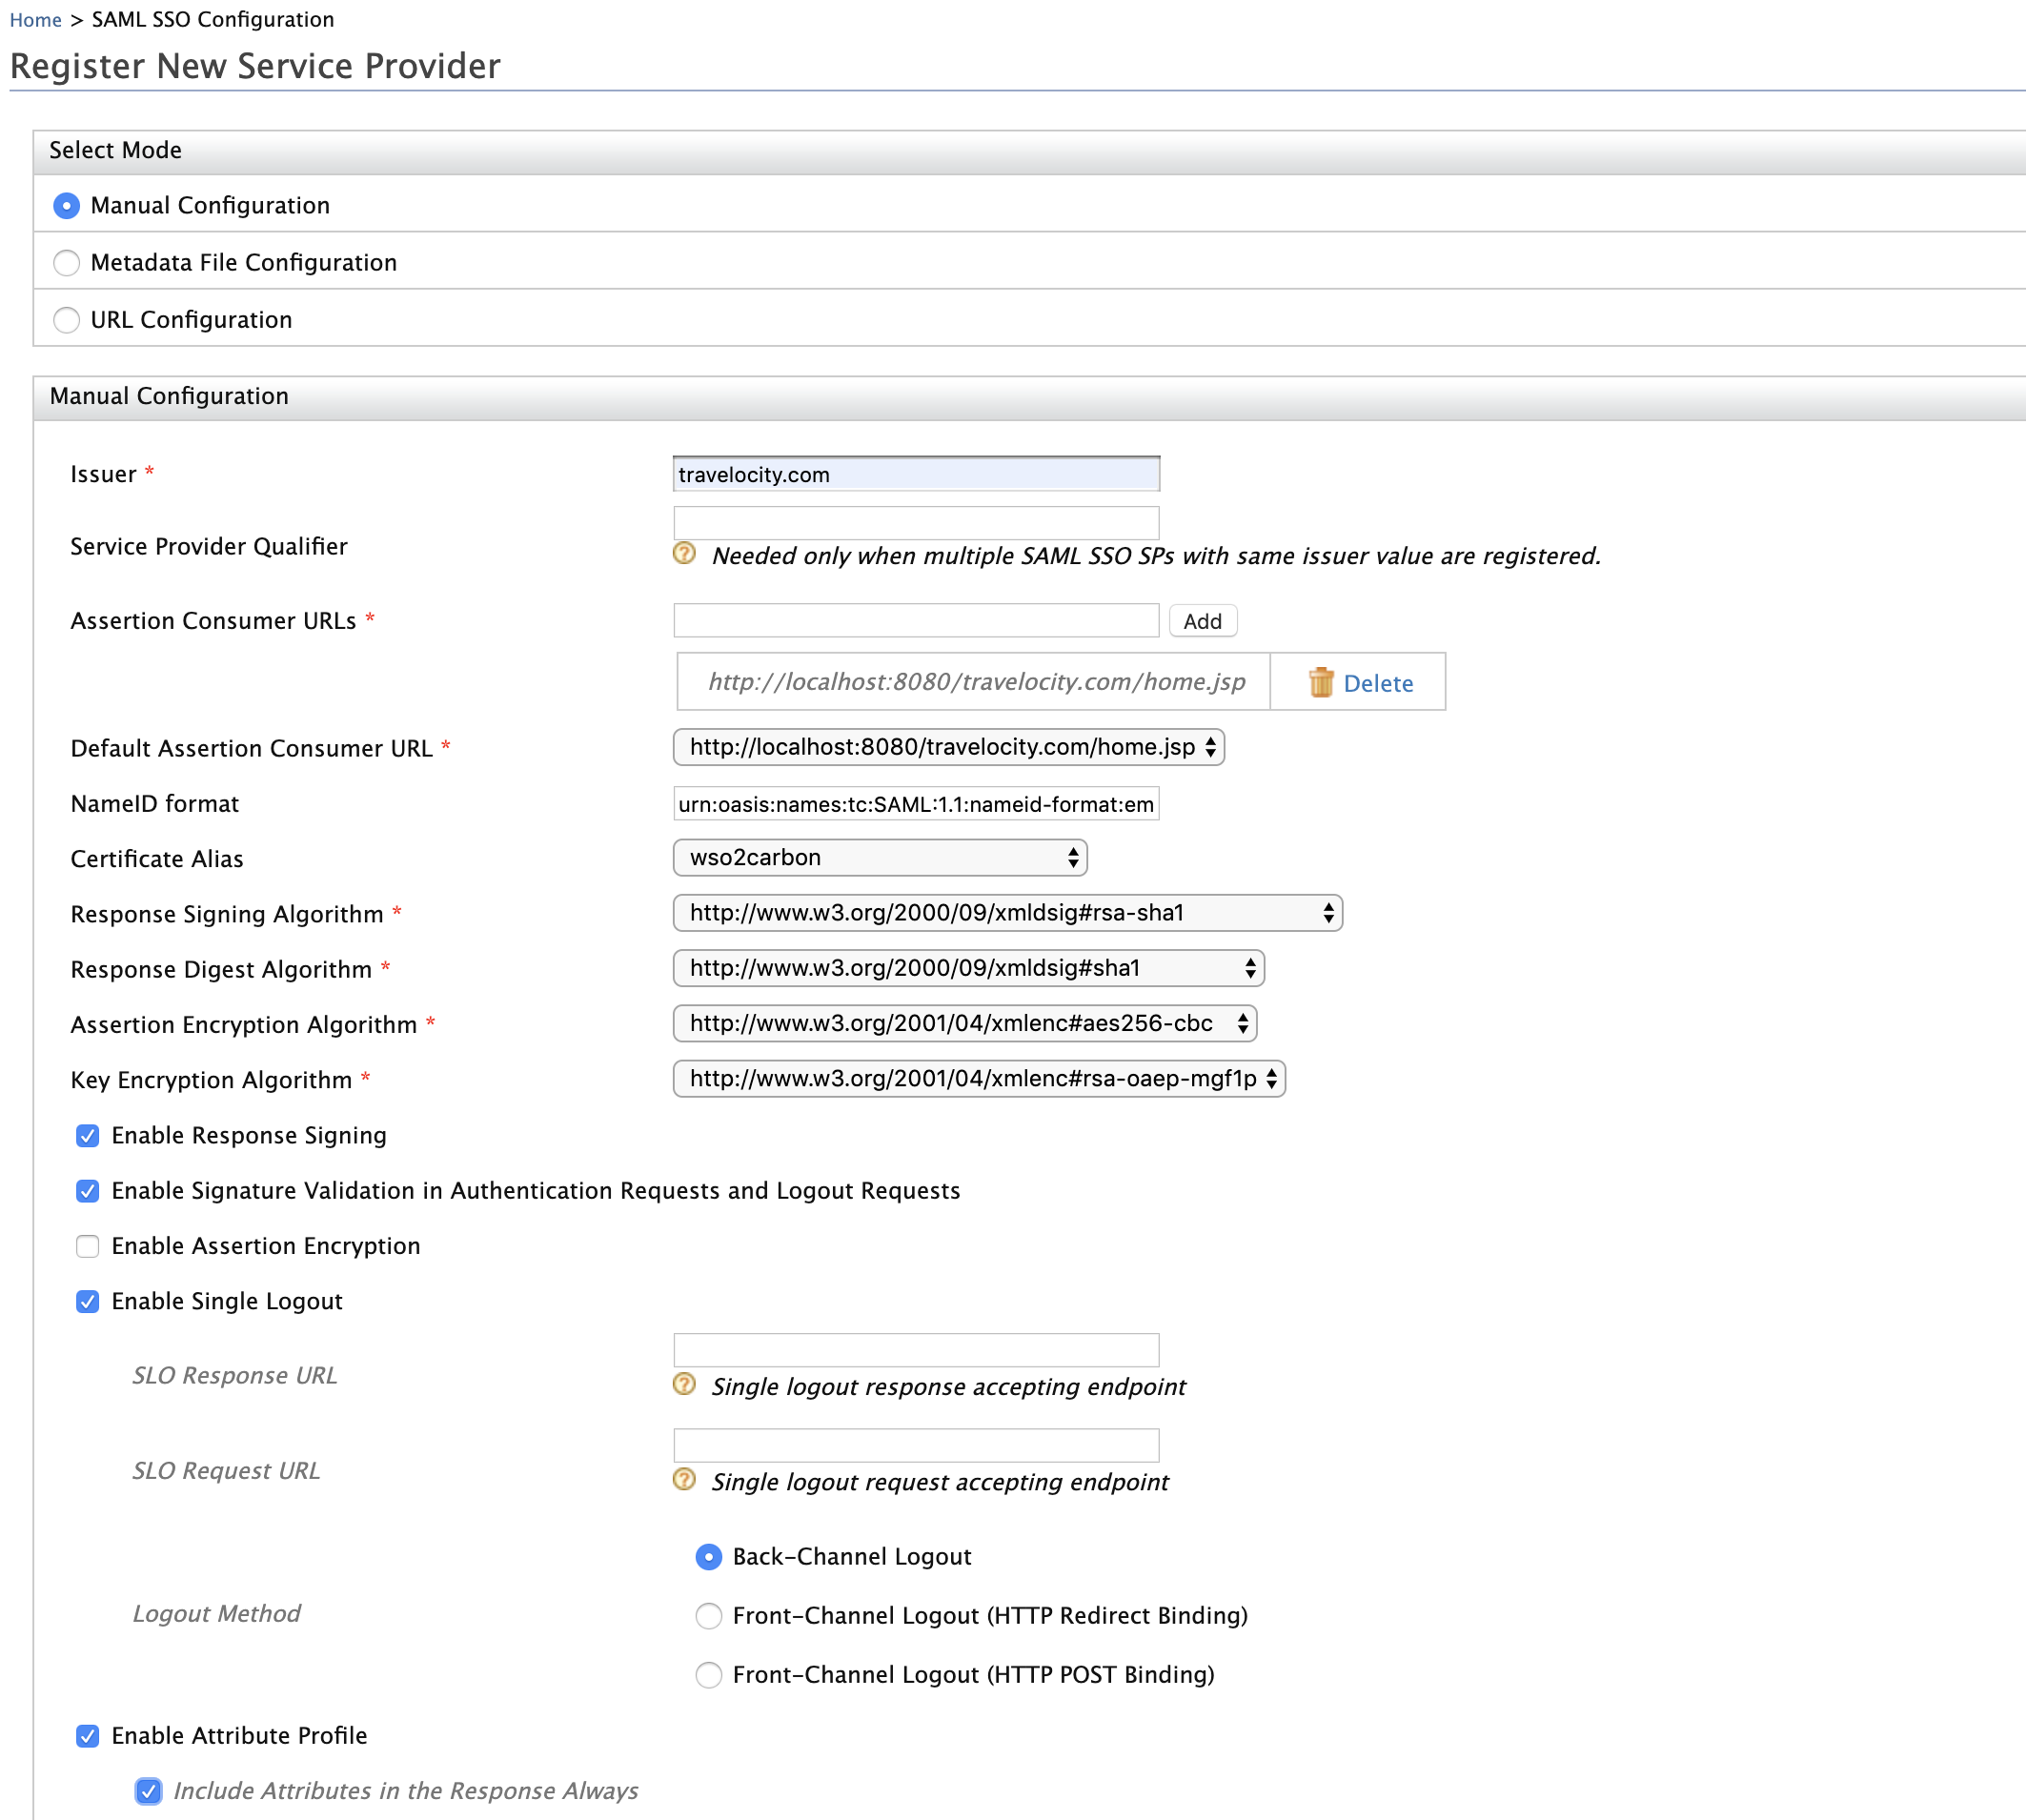
Tip
For more information on the advanced configurations refer, Configuring SAML2 WEB Single-Sign-On
-
-
Click Register to save the changes.
Now you are sent back to the Service Providers page.
Deploying the Playground2 webapp
Before you begin
Install Apache Tomcat 8.x as explained in the beginning of this document.
Download the sample
To be able to deploy a WSO2 Identity Server sample, you need to download it onto your machine first.
Follow the instructions below to download a sample from GitHub.
- Navigate to WSO2 Identity Server Samples.
- Download
the
playground2.warfile from the latest release assets.
Deploy the sample web app
Deploy this sample web app on a web container.
- Copy the the
playground2.warfile from the latest release assets. file into thewebappsfolder. For example,<TOMCAT_HOME>/apache-tomcat-<version>/webapps. - Start the Tomcat server.
Note
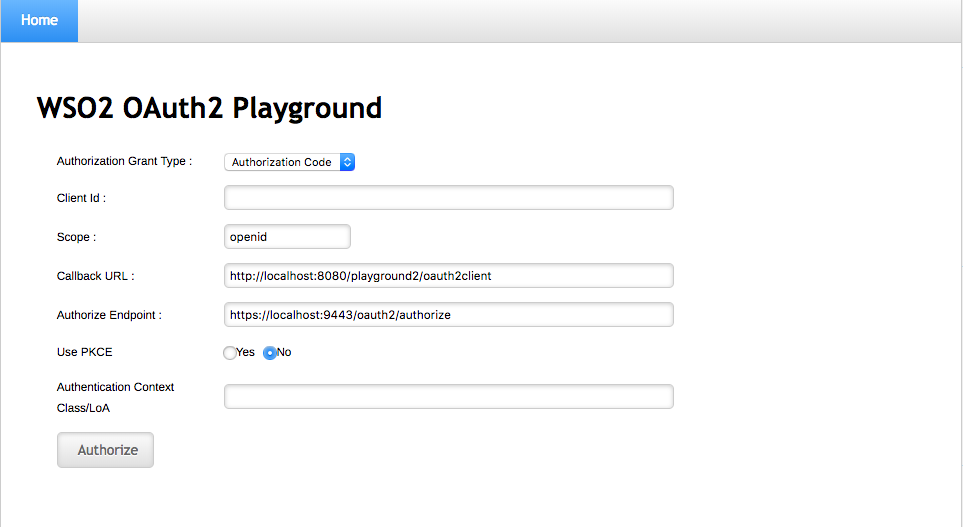
To check the sample application, navigate to
http://<TOMCAT_HOST>:<TOMCAT_PORT>/playground2/oauth2.jsp
on your browser.
For example,
http://localhost:8080/playground2/oauth2.jsp
-
Make sure to update the
param-valueparameter in theWEB-INF/web.xmlfile with the server URL of the Identity Server if required.
Make sure to enter the port the application is running on, in the URL. If you have started the Identity Server with a port off set, then the respective port needs to be configured here.<init-param> <description>serverUrl</description> <param-name>serverUrl</param-name> <param-value>https://localhost:9443/services/</param-value> </init-param>Info
Note that localhost is the server that hosts WSO2 Identity Server and 9443 is the default SSL port of it. Since playground application is accessing the admin service OAuth2TokenValidationService, you should have the correct serverUrl, username and password.
-
Update
param-valueparameter with credentials of an admin user if required.<init-param> <description>userName</description> <param-name>userName</param-name> <param-value>admin</param-value> </init-param> <init-param> <description>password</description> <param-name>password</param-name> <param-value>admin</param-value> </init-param> -
Restart Apache Tomcat and access
http://wso2is.local:8080/playground2/
By default Tomcat runs on port 8080. If you have configured it to run on a different port make sure to update the URL and access the playground application.
You are directed to the landing page of the sample application. Click on Import Photos and the following page appears.
Are you getting the error that is given below?
javax.net.ssl.SSLHandshakeException: sun.security.validator.ValidatorException: PKIX path building failed: sun.security.provider.certpath.SunCertPathBuilderException: unable to find valid certification path to requested targetConfiguring the service provider
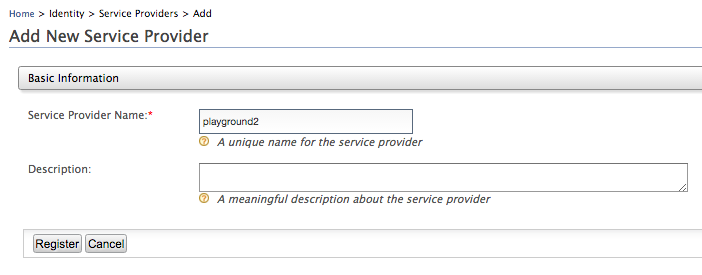
The next step is to configure the service provider.
-
Return to the WSO2 IS management console.
-
Navigate to Main>Identity>Service Providers and click Add.
-
Enter playground2 in the Service Provider Name text box, and click Register.
-
Expand the Inbound Authentication Configuration section and then the OAuth/OpenID Connect Configuration and click Configure.
-
Fill in the form that appears. For the Allowed Grant Types, you can disable the ones you do not require or block.
Note
The grant type highlighted below is a custom grant type. This will only appear on the UI if you have configured the JWT grant type. The value specified as the
nameof theoauth.custom_grant_typein thedeployment.tomlfile when creating the custom grant type is the value that will appear on the UI. For more information on writing a custom grant type, see Writing a Custom OAuth 2.0 Grant Type. -
Fill the
Callback Urlfield.Example :
http://wso2is.local:8080/playground2/oauth2client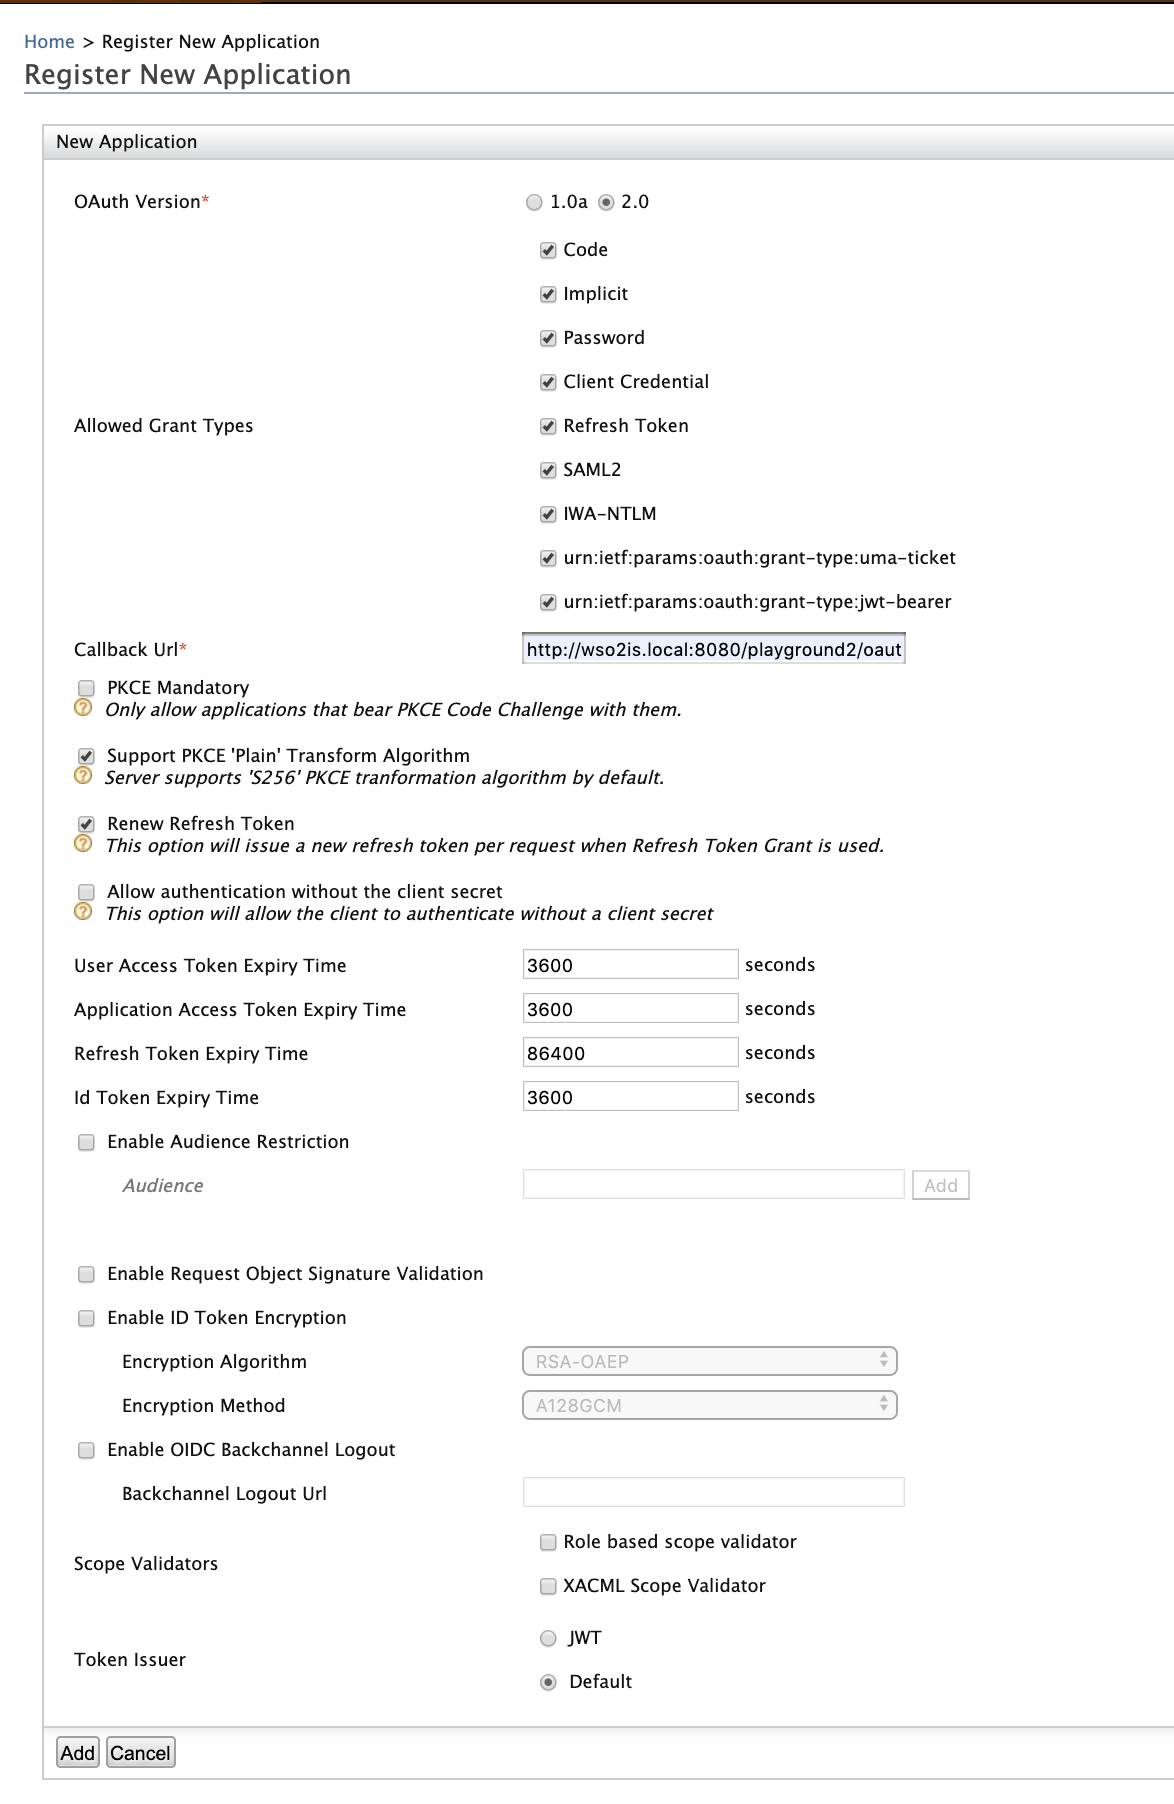
Tip
For more information on
Callback Urlfield and other advanced configurations refer, Configuring OAuth2-OpenID Connect Single-Sign-On -
Click Add. Note that
client keyandclient secretget generated.

- Update the service provider you have created by clicking the update button.
Deploying the saml2-web-app-pickup-dispatch webapp
Before you begin
- Install Apache Tomcat 8.x as explained in the beginning of this document.
- Note that this sample uses SAML2.
Download the samples
To be able to deploy a WSO2 Identity Server sample, you need to download it onto your machine first.
Follow the instructions below to download a sample from GitHub.
- Navigate to WSO2 Identity Server Samples.
- Download the
saml2-web-app-pickup-dispatch.com.warfile from the latest release assets.
Deploy the sample web app
Deploy this sample web app on a web container.
- Copy the .war file into the
webappsfolder. For example,<TOMCAT_HOME>/apache-tomcat-<version>/webapps. - Start the Tomcat server.
To check the sample application, navigate to
http://<TOMCAT_HOST>:<TOMCAT_PORT>/saml2-web-app-pickup-dispatch.com/index.jsp
on your browser.
For example,
http://localhost:8080/saml2-web-app-pickup-dispatch.com/index.jsp .
Configuring the service provider
The next step is to configure the service provider.
-
Return to the WSO2 IS management console.
-
Navigate to Main>Identity>Service Providers and click Add.
-
Enter saml2-web-app-pickup-dispatch in the Service Provider Name text box, and click Register.
-
In the Inbound Authentication Configuration section, click Configure under the SAML2 Web SSO Configuration section.
-
Now set the configuration as follows:
-
Issuer :
saml2-web-app-pickup-dispatch.com -
Assertion Consumer URL :
http://localhost.com:8080/saml2-web-app-pickup-dispatch.com/home.jsp
Click Yes, in the message that appears.
-
-
Select the following check-boxes:
-
Enable Response Signing
-
Enable Single Logout
-
Enable Attribute Profile
-
Include Attributes in the Response Always
-
Enable Signature Validation in Authentication Requests and Logout Requests
-
Tip
For more information on the advanced configurations refer, Configuring SAML2 WEB Single-Sign-On
-
-
Click Register to save the changes.
Now you are sent back to the Service Providers page.
Deploying the saml2-web-app-pickup-manager webapp
Before you begin
- Install Apache Tomcat 8.x as explained in the beginning of this document.
- Note that this sample uses SAML2.
Download the sample
To be able to deploy a WSO2 Identity Server sample, you need to download it onto your machine first.
Follow the instructions below to download a sample from GitHub.
- Navigate to WSO2 Identity Server Samples.
- Download the
saml2-web-app-pickup-manager.com.warfile from the latest release assets.
Deploy the sample web app
Deploy this sample web app on a web container.
- Copy the .war file into the
webappsfolder. For example,<TOMCAT_HOME>/apache-tomcat-<version>/webapps. - Start the Tomcat server.
To check the sample application, navigate to
http://<TOMCAT_HOST>:<TOMCAT_PORT>/saml2-web-app-pickup-manager.com/index.jsp
on your browser.
For example,
http://localhost:8080/saml2-web-app-pickup-manager.com/index.jsp .
Configuring the service provider
The next step is to configure the service provider.
-
Return to the WSO2 IS management console.
-
Navigate to Main>Identity>Service Providers and click Add.
-
Enter saml2-web-app-pickup-manager in the Service Provider Name text box, and click Register.
-
In the Inbound Authentication Configuration section, click Configure under the SAML2 Web SSO Configuration section.
-
Now set the configuration as follows:
-
Issuer :
saml2-web-app-pickup-manager.com -
Assertion Consumer URL :
http://localhost.com:8080/saml2-web-app-pickup-manager.com/home.jspClick Yes, in the message that appears.
-
-
Select the following check-boxes:
-
Enable Response Signing
-
Enable Single Logout
-
Enable Attribute Profile
-
Include Attributes in the Response Always
-
Enable Signature Validation in Authentication Requests and Logout Requests
-
Tip
For more information on the advanced configurations refer, Configuring SAML2 WEB Single-Sign-On
-
-
Click Register to save the changes.
Now you are sent back to the Service Providers page.
Deploying the pickup-dispatch webapp
Before you begin
- Install Apache Tomcat 8.x as explained in the beginning of this document.
- Note that this sample uses OpenID Connect.
Download the samples
To be able to deploy a WSO2 Identity Server sample, you need to download it onto your machine first.
Follow the instructions below to download a sample from GitHub.
- Navigate to WSO2 Identity Server Samples.
- Download the
pickup-dispatch.warfile from the latest release assets.
Configuring the service provider
The first step is to configure the service provider.
-
Return to the WSO2 IS management console.
-
Navigate to Main>Identity>Service Providers and click Add.
-
Enter pickup-dispatch in the Service Provider Name text box, and click Register.
-
In the Inbound Authentication Configuration section, click Configure under the OAuth/OpenID Connect Configuration section.
-
Enter the following value as the Callback URL: http://localhost.com:8080/pickup-dispatch/oauth2client
Tip
The callback URL is the service provider URL to which the authorization codes are sent. Upon successful authentication, the browser should be redirected to this URL.
-
Click Add. Note the OAuth Client Key and Client Secret that is displayed. You will need these values later on when deploying the sample application.
Tip
For more information on the advanced configurations refer, Configuring OAuth2-OpenID Connect Single-Sign-On
-
Click Register to save the changes.
Now you are sent back to the Service Providers page.
Deploy the sample web app
Next, deploy the sample web app on a web container.
-
Extract the
pickup-dispatch.warfile and open thedispatch.propertiesfile located in the<EXTRACT>/WEB-INF/classesfolder. -
Replace the
consumerKeyandconsumerSecretvalues with the OAuth client key and OAuth client secret values that were generated for the newly created service provider.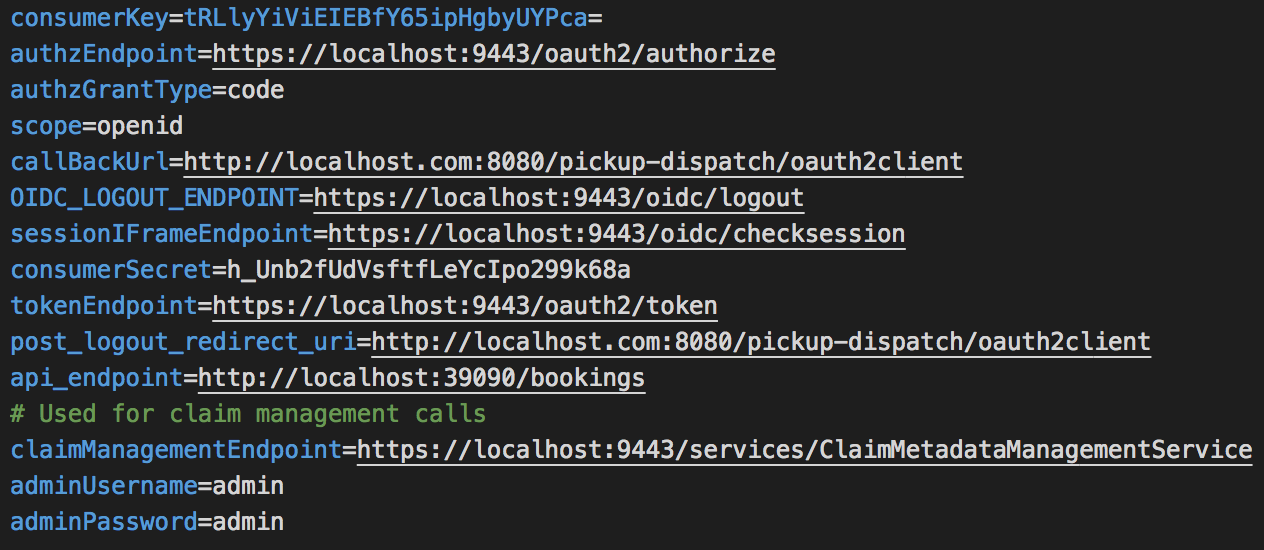
-
Next, copy the extracted and modified
pickup-dispatchfolder to the<TOMCAT_HOME>/webappsfolder. -
Start the Tomcat server.
To check the sample application, navigate to
http://<TOMCAT_HOST>:<TOMCAT_PORT>/pickup-dispatch/home.jsp
on your browser.
For example,
http://localhost.com:8080/pickup-dispatch/home.jsp .
Deploying the pickup-manager webapp
Before you begin
- Install Apache Tomcat 8.x as explained in the beginning of this document.
- Note that this sample uses OpenID Connect.
Download the sample
To be able to deploy a WSO2 Identity Server sample, you need to download it onto your machine first.
Follow the instructions below to download a sample from GitHub.
- Navigate to WSO2 Identity Server Samples.
- Download the
pickup-manager.warfile from the latest release assets.
Configuring the service provider
The first step is to configure the service provider.
-
Return to the WSO2 IS management console.
-
Navigate to Main>Identity>Service Providers and click Add.
-
Enter pickup-manager in the Service Provider Name text box, and click Register.
-
In the Inbound Authentication Configuration section, click Configure under the OAuth/OpenID Connect Configuration section.
-
Enter the following value as the Callback URL: http://localhost.com:8080/pickup-manager/oauth2client
Tip
The callback URL is the service provider URL to which the authorization codes are sent. Upon successful authentication, the browser should be redirected to this URL.
-
Click Add. Note the OAuth Client Key and Client Secret that is displayed. You will need these values later on when deploying the sample application.
Tip
For more information on the advanced configurations refer, Configuring OAuth2-OpenID Connect Single-Sign-On
-
Click Register to save the changes.
Now you are sent back to the Service Providers page.
Deploy the sample web app
Next, deploy the sample web app on a web container.
-
Extract the
pickup-manager.warfile and open themanager.propertiesfile located in the<EXTRACT>/WEB-INF/classesfolder. -
Replace the
consumerKeyandconsumerSecretvalues with the OAuth client key and OAuth client secret values that were generated for the newly created service provider.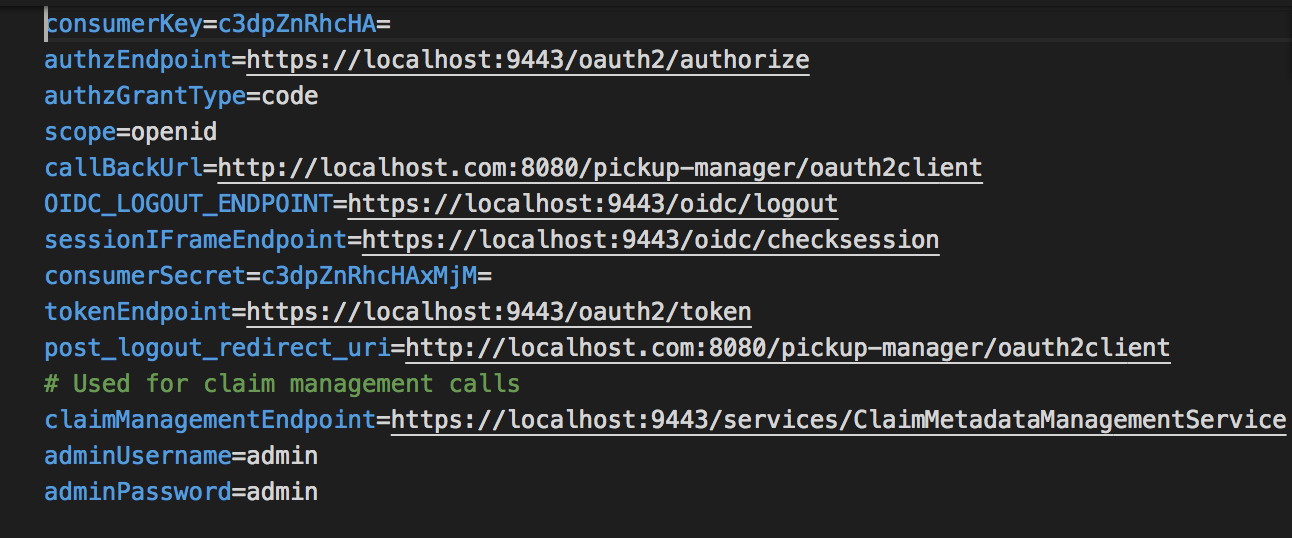
-
Next, copy the extracted and modified
pickup-managerfolder to the<TOMCAT_HOME>/webappsfolder. -
Start the Tomcat server.
To check the sample application, navigate to
http://<TOMCAT_HOST>:<TOMCAT_PORT>/pickup-manager/home.jsp
on your browser.
For example,
http://localhost.com:8080/pickup-manager/home.jsp .
Deploying the photo-editor and photo-viewer webapps
Before you begin
Install Apache Tomcat 8.x as explained in the beginning of this document.
Download the samples
To be able to deploy a WSO2 Identity Server sample, you need to download it onto your machine first.
Follow the instructions below to download the samples from GitHub.
- Navigate to WSO2 Identity Server Samples.
- Download the
photo-edit.warfile from the latest release assets. - Download the
photo-view.warfile from the latest release assets.
Deploy the sample web app
Deploy the sample web apps on a web container.
- Copy the .war files into the
webappsfolder. For example,<TOMCAT_HOME>/apache-tomcat-<version>/webapps. - Start the Tomcat server.
To check the photo-edit sample application, navigate to
http://<TOMCAT_HOST>:<TOMCAT_PORT>/photo-edit/index.jsp
on your browser.
For example,
http://localhost.com:8080/photo-edit/index.jsp .
Configuring the service provider
Once the application is deployed, the relevant service providers are created on the management console using dynamic client registration. Follow the steps below to view the service providers and the configurations.
-
Return to the WSO2 IS management console.
-
Navigate to Main>Identity>Service Providers and click List. Note that the
photo-editorandphoto-viewservice providers have been created using dynamic client registration.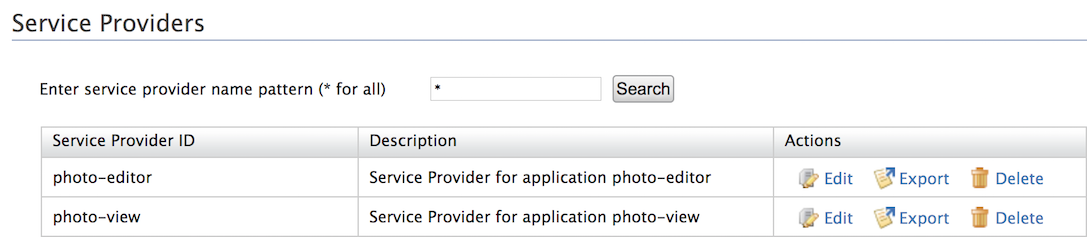
-
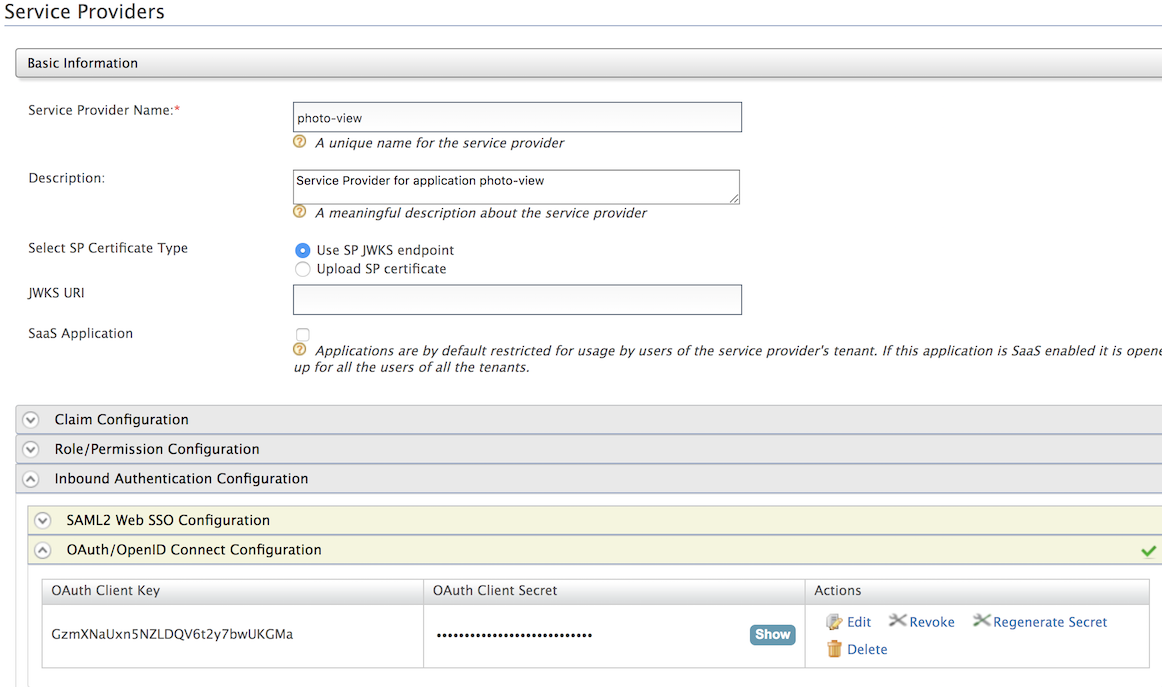
Click Edit to view the photo-editor and photo-view service provider configurations.
-
Expand Inbound Authentication Configuration section and then expand OAuth/OpenID Connect Configuration.
-
Click Edit to view the OAuth/OpenID Connect configurations.
Note that the
urn:ietf:params:oauth:grant-type:uma-ticketgrant type has been enabled for the photo-viewer application along with thecodeandpasswordgrant types.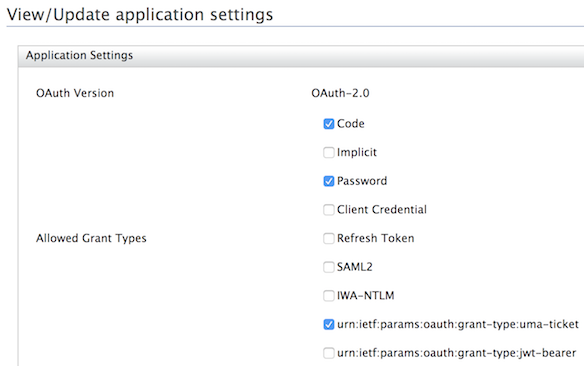
Deploying the PassiveSTSSampleApp webapp
Before you begin
Install Apache Tomcat 8.x as explained in the beginning of this document.
Download the sample
To be able to deploy a WSO2 Identity Server sample, you need to download it onto your machine first.
Follow the instructions below to download a sample from GitHub.
- Navigate to WSO2 Identity Server Samples.
- Download the
PassiveSTSSampleApp.warfile from the latest release assets.
Deploy the sample web app
Deploy this sample web app on a web container.
- Copy the .war file into the
webappsfolder. For example,<TOMCAT_HOME>/apache-tomcat-<version>/webapps. - Start the Tomcat server.
Configure sample properties
Open the <TOMCAT_HOME>/apache-tomcat-<version>/webapps/PassiveSTSSampleApp/WEB-INF/web.xml file and configure the following.
-
Specify
idpUrlas the URL of Identity Server's Passive STS. The following is an example.<init-param> <param-name>idpUrl</param-name> <param-value>https://localhost:9443/passivests</param-value> </init-param> -
Specify the
replyURLas the URL of the web app. The following specifiesPassiveSTSSampleAppas the web app.<init-param> <param-name>replyUrl</param-name> <param-value>http://localhost:8080/PassiveSTSSampleApp/index.jsp</param-value> </init-param> -
Specify the
realm. This should be a unique identifier for the web app as seen in the example below.<init-param> <param-name>realm</param-name> <param-value>PassiveSTSSampleApp</param-value> </init-param> -
For tenant user logins, specify the
tenantDomain.<init-param> <param-name>requestParams</param-name> <param-value>tenantDomain=tenant4.com</param-value> </init-param> -
Restart the tomcat server.
To check the sample application, navigate to http://<TOMCAT_HOST>:<TOMCAT_PORT>/PassiveSTSSampleApp/home.jsp on
your browser.
For example, http://localhost:8080/PassiveSTSSampleApp/home.jsp .
Configuring the service provider
The next step is to configure the service provider.
-
Return to the WSO2 IS management console.
-
Navigate to Main>Identity>Service Providers and click Add.
-
Enter PassiveSTSSampleApp in the Service Provider Name text box, and click Register.
-
In the Inbound Authentication Configuration section, click Configure under the WS-Federation (Passive) Configuration section.
-
Now set the configuration as follows:
-
Passive STS Realm: :
PassiveSTSSampleApp -
Assertion Consumer URL :
http://localhost:8080/PassiveSTSSampleApp/index.jspClick Yes, in the message that appears.
-
Tip
For more information on the advanced configurations refer, Configuring WS-Federation
-
-
Expand the Claim Configuration section and click Add Requested Claim to add the following claims.
- http://wso2.org/claims/username
- http://wso2.org/claims/emailaddress
-
Select
http://wso2.org/claims/emailaddressas the Subject Claim URI.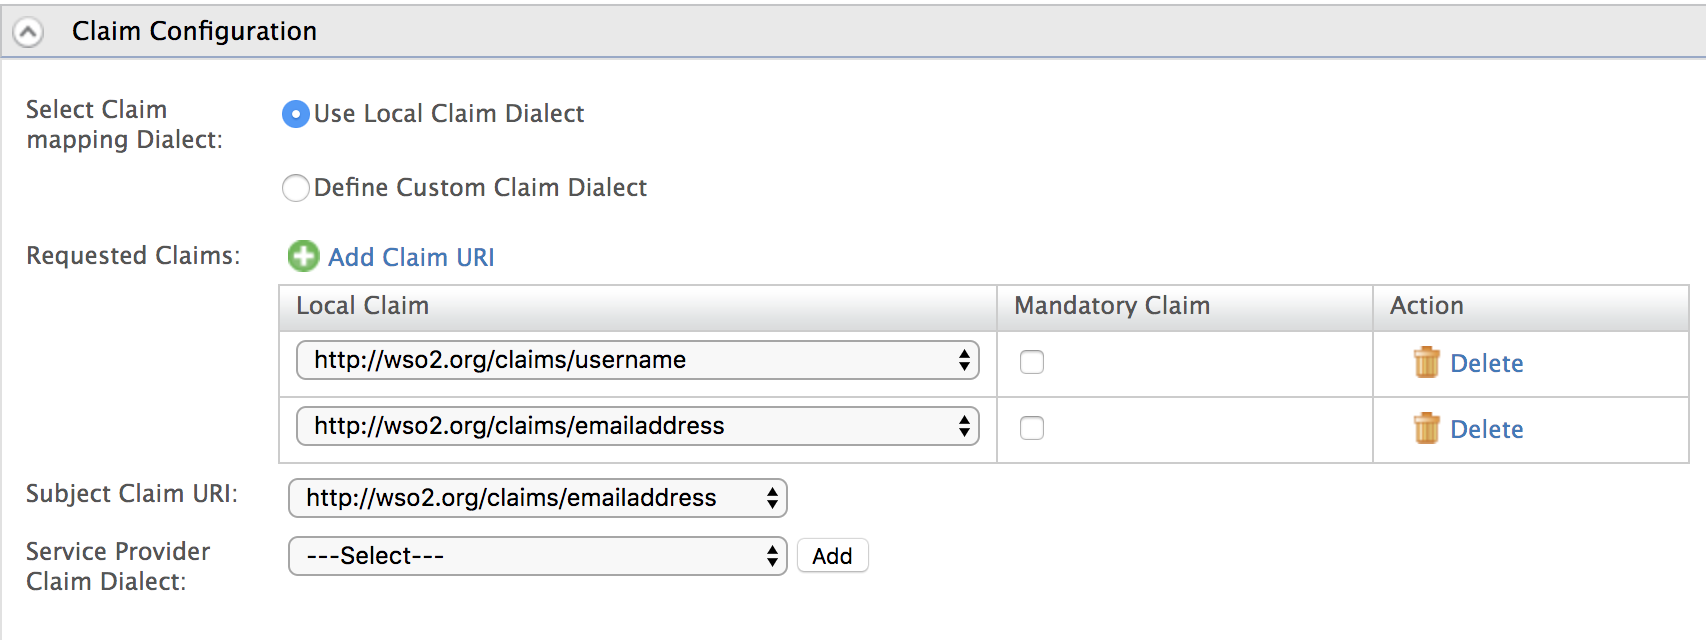
-
Click Update to save the changes.
Now you are sent back to the Service Providers page.