Mutual TLS for OAuth Clients
Mutual TLS is a widely used, secure authentication technique that ensures the authenticity between a client and an authorization server using an encrypted channel established with a mutual X.509 certificate. The client certificate and certificate verification messages will be sent during the TLS handshake.
The TLS handshake is a set of steps to establish a secure connection between the client and server.
Mutual TLS is also used in the OAuth 2.0 Authorization Framework as a secure authentication mechanism.
Mutual TLS for OAuth client authentication can be implemented using either of the following mechanisms:
- PKI mutual TLS OAuth client authentication: This approach uses a subject Distinguished Name (DN) and validated certificate chain to identify the client.
- A self-signed certificate: In this approach, the client needs to register an X.509 certificate during the service provider configuration and import it to the trust store.
WSO2 Identity Server currently supports the approach that uses self-signed certificates.
How it works
The flow of mutual TLS client authentication is as follows.
- A client makes a
/tokenendpoint call. - WSO2 IS issues a token by validating certificate information in the HTTP header with a certificate stored in the service provider.
- As per the specification, an MTLS certificate validates against the stored SP certificate for a
/tokenrequest issued with the client-credential grant, authorization code grant, or refresh token grant. - The response from the
/introspectendpoint will present the bounded certificate according to the introspection response defined in the specification.
Let's try configuring mutual TLS in WSO2 Identity Server and testing it with a sample.
Configure the authenticator
To configure the mutual TLS authenticator, follow the prequisite steps and then configure the mutual TLS client authenticator artifacts.
Prerequisites
-
You need to disable the mutual SSL authenticator.
Warning
The mutual SSL authenticator allows the OAuth client to access the WSO2 Identity Server admin services without having the required privileges.
To disable the mutual SSL authenticator, open the
deployment.tomlfile in the<IS_HOME>/repository/conf/directory and add the following configuration.[admin_console.authenticator.mutual_ssl_authenticator] enable = false -
If a load balancer fronts WSO2 Identity Server, enable SSL tunneling.
Configure the mutual TLS client authenticator
-
Open the
deployment.tomlfile in the<IS_HOME>/repository/conf/directory and add the following in the[transport.https]section.[transport.https] trustManagerClassName="org.wso2.carbon.identity.core.util.ClientAuthX509TrustManager" -
To make the server-side validation optional, set the
clientAuthattribute towantin the same configuration, similar to the following.Info
Mutual TLS supports two-way TLS authentication that allows the server to validate the client and vice versa. Specific applications, e.g., mobile applications, may not require server-side validation.
[transport.https] trustManagerClassName="org.wso2.carbon.identity.core.util.ClientAuthX509TrustManager" clientAuth="want" -
Open the
deployment.tomlfile in the<IS_HOME>/repository/conf/directory and add the following configuration.[[event_listener]] id = "custom_event_listener" type = "org.wso2.carbon.identity.core.handler.AbstractIdentityMessageHandler" name= "org.wso2.carbon.identity.oauth2.token.handler.clientauth.mutualtls.MutualTLSClientAuthenticator" order = 158 enable = true -
For mutual TLS authentication to work, the public certificates of the client application and authorization server (WSO2 Identity Server) should be imported to each other's trust stores.
For demonstration purposes, let's assume that both the authorization server's truststore (
WSO2_TRUSTSTORE) and the client's truststore (CLIENT_TRUSTSTORE) are in WSO2 Identity Server.-
Navigate to the
<IS_HOME>/repository/resources/securitydirectory in a command prompt.cd <IS_HOME>/repository/resources/security -
To generate the client's private key and public certificate, execute the following commands and enter Distinguished Name (DN) when prompted.
Format
openssl req -newkey rsa:2048 -x509 -keyout <CLIENT_PRIVATE_KEY> -out <CLIENT_PUBLIC_CERTIFICATE> -days <VALIDITY_PERIOD> -nodesExample
openssl req -newkey rsa:2048 -x509 -keyout key.pem -out client-certificate.pem -days 3650 -nodesNote
The
CLIENT_PRIVATE_KEYandCLIENT_PUBLIC_CERTIFICATEwill be used to generate the access token at a later step. -
To import the client's public certificate to the authorization server's trust store, execute the following command.
Format
keytool -import -trustcacerts -alias <CLIENT_PUBLIC_CERTIFICATE_ALIAS> -file <CLIENT_PUBLIC_CERTIFICATE> -keystore <WSO2_TRUSTSTORE> -storepass <WSO2_TRUSTSTORE_PASSWORD>Example
keytool -import -trustcacerts -alias client -file client-certificate.pem -keystore client-truststore.jks -storepass wso2carbon -
To export the public certificate of WSO2 Identity Server, execute the following command.
Format:
Format
keytool -export -alias <WSO2_CERTIFICATE_ALIAS> -file <WSO2_CERTIFICATE> -keystore <WSO2_KEYSTORE> -storepass <WSO2_KEYSTORE_PASSOWRD>Example:
Example
keytool -export -alias wso2carbon -file wso2-certificate.crt -keystore wso2carbon.jks -storepass wso2carbon -
Import the public certificate of WSO2 Identity Server to the client's trust store. If the truststore uses the
jksformat, execute the following command.Format
keytool -import -trustcacerts -alias <WSO2_PUBLIC_CERTIFICATE_ALIAS> -file <WSO2_PUBLIC_CERTIFICATE> -keystore <CLIENT_TRUSTSTORE> -storepass <CLIENT_TRUSTSTORE_PASSWORD>Example
keytool -import -trustcacerts -alias wso2carbon -file wso2-certificate.crt -keystore truststore.jks -storepass client-password -
Click Update.
-
-
Restart the Identity Server.
Configure the authenticator artifacts
-
Add the following configurations to the
<IS_HOME>/repository/conf/deployment.tomlfile to deploy and configure the mutual TLS client authenticator artifacts.[[event_listener]] id = "introspection_response_interceptor" type = "org.wso2.carbon.identity.core.handler.AbstractIdentityHandler" name="org.wso2.carbon.identity.oauth2.token.handler.clientauth.mutualtls.introspection.IntrospectionResponseInterceptor" order=27 enable=true [[event_listener]] id = "is_introspection_data_provider" type = "org.wso2.carbon.identity.core.handler.AbstractIdentityHandler" name= "org.wso2.carbon.identity.oauth2.token.handler.clientauth.mutualtls.introspection.ISIntrospectionDataProvider" order=28 enable=true [oauth.grant_type.authorization_code] grant_handler = "org.wso2.carbon.identity.oauth2.token.handler.clientauth.mutualtls.handlers.MTLSTokenBindingAuthorizationCodeGrantHandler" [oauth.grant_type.client_credentials] grant_handler = "org.wso2.carbon.identity.oauth2.token.handler.clientauth.mutualtls.handlers.MTLSTokenBindingClientCredentialsGrantHandler" [oauth.grant_type.refresh_token] grant_handler = "org.wso2.carbon.identity.oauth2.token.handler.clientauth.mutualtls.handlers.MTLSTokenBindingRefreshGrantHandler" [oauth.grant_type.uma_ticket] retrieve_uma_permission_info_through_introspection = true [oauth.mutualtls] client_certificate_header = "x-wso2-mtls-cert"Info
Add the relevant certificate header name as the
client_certificate_headervalue as it appears in the<IS_HOME>/repsoitory/conf/identity/identity.xmlfile. -
Restart the server to save the configurations.
Configure the service provider
Follow this section to deploy and configure the sample application.
Prerequisites
- Download Apache Tomcat 8.x and install it. This guide will later refer to the Tomcat server installation location as
<TOMCAT_HOME>. - It is recommended that you use a hostname that is not localhost to avoid browser errors. Modify your machine's
/etc/hostsentry to reflect this. - Download the playground2 application from the latest release assets.
Deploy the application
To deploy this sample web app on a web container.
- Copy the
playground2.warfile to the<TOMCAT_HOME>/apache-tomcat-<version>/webappsfolder. -
Start the Tomcat server.
Info
To check the sample application, navigate to
http://<TOMCAT_HOST>:<TOMCAT_PORT>/playground2/oauth2.jspon your browser. For example,http://localhost:8080/playground2/oauth2.jsp. -
Update the
param-valueparameter in theWEB-INF/web.xmlfile with the server URL of the Identity Server if required. Make sure to enter the port the application runs on in the URL. If you have started the Identity Server with a port offset, then the respective port needs to be configured here.<init-param> <description>serverUrl</description> <param-name>serverUrl</param-name> <param-value>https://localhost:9443/services/</param-value> </init-param>Info
Note that localhost is the server that hosts WSO2 Identity Server and 9443 is the default SSL port of it. Since the playground application is accessing the admin service
OAuth2TokenValidationService, you should have the correctserverUrl,username, andpassword. -
Update the
param-valueparameter with the credentials of an admin user if required.<init-param> <description>userName</description> <param-name>userName</param-name> <param-value>admin</param-value> </init-param> <init-param> <description>password</description> <param-name>password</param-name> <param-value>admin</param-value> </init-param> -
Restart Apache Tomcat and access
http://wso2is.local:8080/playground2/.
When you are directed to the landing page of the sample application, click Import Photos.
Configure the playground application
To configure the application:
-
On the Management Console, go to Service Providers and click Add.
-
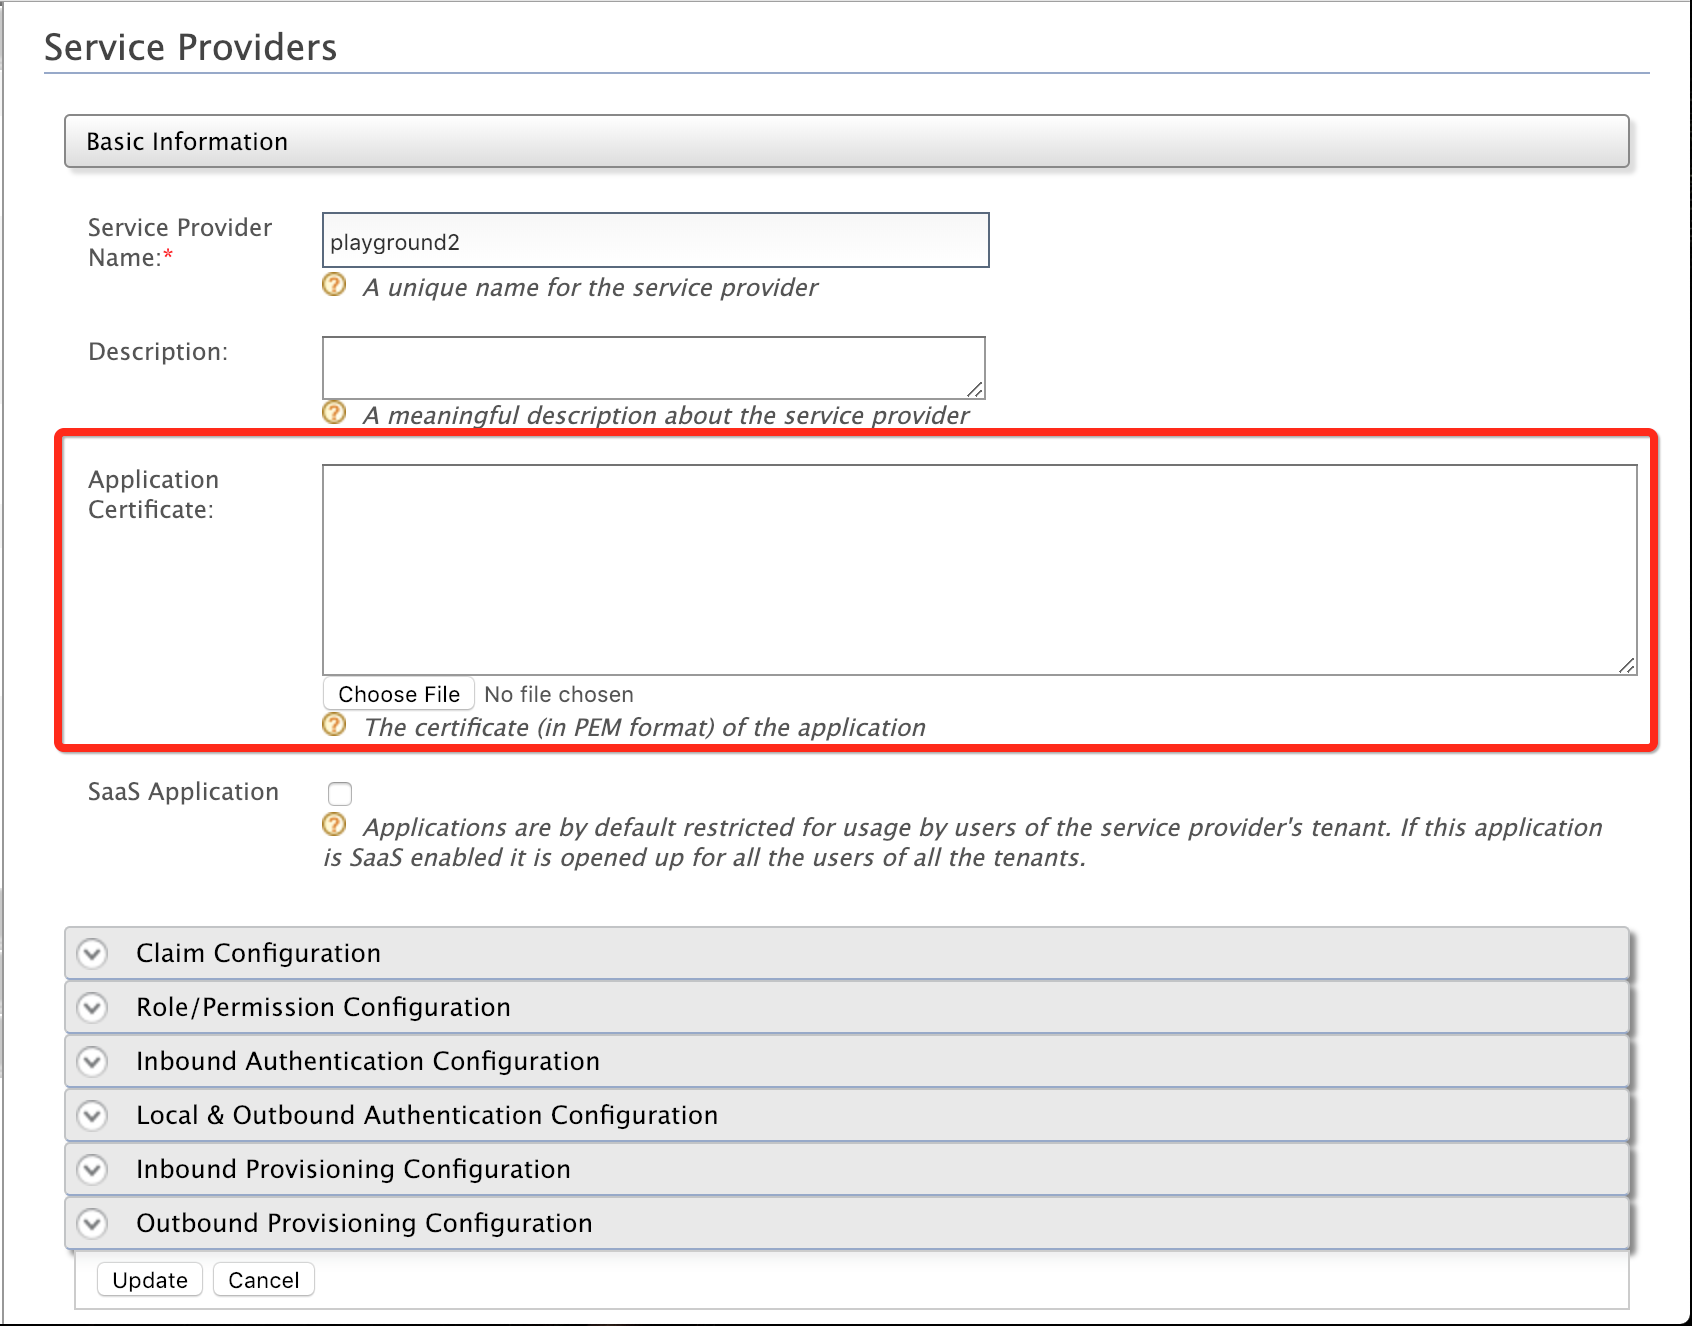
Enter
playground2in the Service Provider Name and click Register. -
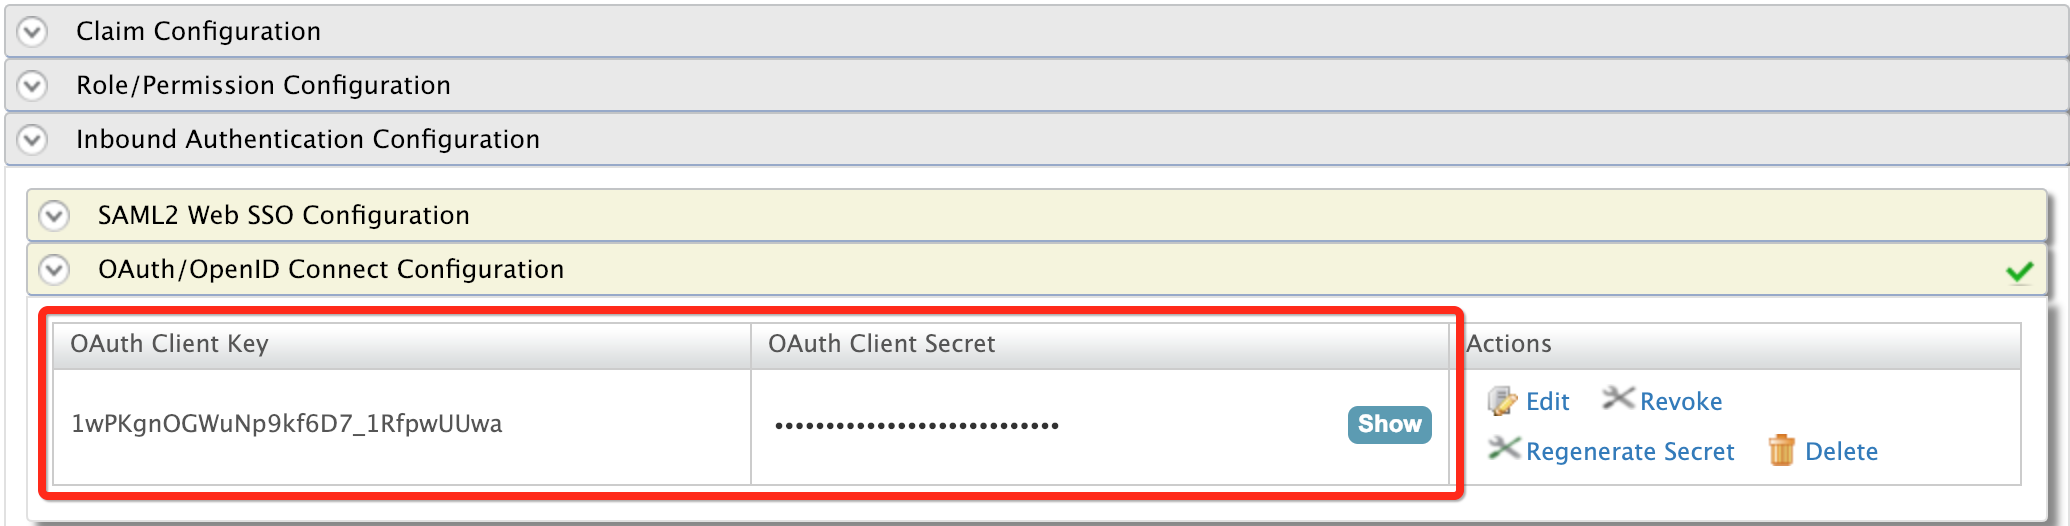
Expand Inbound Authentication Configuration > OAuth/OpenID Connect Configuration and click Configure.
-
Select the relevant grant types that you wish to try out from the Allowed Grant Types list.
-
Enter
http://wso2is.local:8080/playground2/oauth2clientas the Callback Url, and click Add.Info
Note down the OAuth Client Key and Client Secret. You will need them when deploying the sample application.
-
Click Register to add and save the configurations.
To upload the client certificate:
Generate private key and public certificate
To generate the client’s private key and public certificate, execute the following command and enter Distinguished Name (DN) when prompted.
Format
openssl req -newkey rsa:2048 -x509 -keyout <CLIENT_PRIVATE_KEY> -out <CLIENT_PUBLIC_CERTIFICATE> -days <VALIDITY_PERIOD> -nodes
Example
openssl req -newkey rsa:2048 -x509 -keyout key.pem -out client-certificate.pem -days 3650 -nodes
You will see the client certificate content in the client-certificate.pem file. A sample client certificate is shown below.
-
Copy the content in your client application's certificate in PEM format into the Application Certificate.
Note
Instead of uploading the service provider certificate (as shown above), you can use the JWKS endpoint below and add the relevant JWKS URI.
-
Click Update to save the configurations.
Try it out
Use the following sample requests to try out each grant.
Mutual TLS client authentication
This request contains the client ID, the client's public certificate, and any other additional claims and is signed using the client's private key.
-
Format
curl -k -d "grant_type=password&username=<USERNAME>&password=<PASSWORD>&client_id=<CLIENT_KEY>" -H "Content-Type: application/x-www-form-urlencoded" https://localhost:9443/oauth2/token -i --cert <CLIENT_PUBLIC_CERTIFICATE> --key <CLIENT_PRIVATE_KEY> -
Request
curl -k
-d "grant_type=password&username=admin&password=admin&client_id=qiB6avlILBqnJLSxOfadoJYwOnQa"
-H "Content-Type: application/x-www-form-urlencoded" https://localhost:9443/oauth2/token
-i  --cert certificate.pem
--key key.pem
Note that an access token gets generated. You can use this access token to access the APIs or other secured client application resources.
Mutual TLS certificate-bound access token
You can obtain a certificate-bound access token using client credentials, authorization code, and refresh grant types. This section guides on getting certificate-bound access tokens for each grant type.
Client credential grant type
The following token request uses mutual TLS client authentication.
-
Request Format
curl -X POST \ https://localhost:9443/oauth2/token \ -H 'content-type: application/x-www-form-urlencoded' \ -H '<CERTIFICATE_HEADER_NAME>: <CLIENT_PUBLIC_CERTIFICATE>' \ -d 'grant_type=client_credentials&client_id=<CLIENT_ID>' -
Sample Request
curl -X POST \ https://localhost:9443/oauth2/token \ -H 'content-type: application/x-www-form-urlencoded' \ -H 'x-wso2-mtls-cert: -----BEGIN CERTIFICATE-----MIID3TCCAsWgAwIBAgIUJQW8iwYsAbyjc/oHti8DPLJH5ZcwDQYJKoZIhvcNAQELBQAwfjELMAkGA1UEBhMCU0wxEDAOBgNVBAgMB1dlc3Rlcm4xEDAOBgNVBAcMB0NvbG9tYm8xDTALBgNVBAoMBFdTTzIxDDAKBgNVBAsMA0lBTTENMAsGA1UEAwwER2FnYTEfMB0GCSqGSIb3DQEJARYQZ2FuZ2FuaUB3c28yLmNvbTAeFw0yMDAzMjQxMjQyMDFaFw0zMDAzMjIxMjQyMDFaMH4xCzAJBgNVBAYTAlNMMRAwDgYDVQQIDAdXZXN0ZXJuMRAwDgYDVQQHDAdDb2xvbWJvMQ0wCwYDVQQKDARXU08yMQwwCgYDVQQLDANJQU0xDTALBgNVBAMMBEdhZ2ExHzAdBgkqhkiG9w0BCQEWEGdhbmdhbmlAd3NvMi5jb20wggEiMA0GCSqGSIb3DQEBAQUAA4IBDwAwggEKAoIBAQC+reCEYOn2lnWgFsp0TF0R1wQiD9C/N+dnv4xCa0rFiu4njDzWR/8tYFl0koaxXoP0+oGnT07KlkA66q0ztwikLZXphLdCBbJ1hSmNvor48FuSb6DgqWixrUa2LHlpaaV7RvlmG+IhZEgKDXdS+/tK0hlcgRzENyOEdETDO5fFlKGGuwaGv6/w69h2LTKGu5nyDLF51rjQ18xp026btHC7se/XSlcp3X63xeOIcFv6m84AN2lnV+g8MOfu2wgWtsKaxn4BL64E7nHZNNLxMRf7GtUm2bl9ydFX4aD1r1Oj4iqFWMNcfQ676Qshk8s7ui3LKWFXwNN/SRD0c/ORtv23AgMBAAGjUzBRMB0GA1UdDgQWBBRDu/vqRafReh4fFHS3Nz4T6u9mUDAfBgNVHSMEGDAWgBRDu/vqRafReh4fFHS3Nz4T6u9mUDAPBgNVHRMBAf8EBTADAQH/MA0GCSqGSIb3DQEBCwUAA4IBAQB7NH51Yj4moEhMonnLUh3eTtf6DUnrpscx6td28rryoDZPfCkJs4VHU9F50etw54FoHqoIaHp5UIB6l1OsVXytUmwrdxbqW7nfOItYwN1yV093aI2aOeMQYmS+vrPkSkxySP6+wGCWe4gfMgpr6iu9xiWLpnILw5q71gmXWtS900S5aLbllGYe74jkyldLIdhS4TyEBIDgcpZrD8x/Z42al6T/6EANMpvu4Jopisg+uwwkEGSM1I/kjiW+YkWC4oTZ1jMZUWC11WbcouLwjfaf6gt4zWitYCP0r0fLGk4bSJfUFsnJNu6vDhx60TbRhIh9P2jxkmgNYPuAxFtF8v+h-----END CERTIFICATE-----' \ -d 'grant_type=client_credentials&client_id=h9gd1bLEgzUwftAhnrof0fZWcZwa' -
Sample Response
{“access_token”:”9d109c6d-d42e-3b6e-9d93-ae3cb8f65ade”,”scope”:”default”,”token_type”:”Bearer”,”expires_in”:3445}
Authorization code grant type
-
Visit the
http://wso2is.local:8080/playground2/oauth2.jspURL to start the scenario with the sample application. -
Enter the following details and click Authorize.
Parameter Value Authorization Grant Type Authorization CodeClient ID Add the client id received when registering the service provider for the application Scope Add any scope you wish to obtain the token for. Callback URL http://wso2is.local:8080/playground2/oauth2clientAuthorize Endpoint https://localhost:9443/oauth2/authorize -
Click Authorize and log in with the user credentials.
-
Copy the
authorization codethat you received. -
Send the following request.
-
Request Format
curl -X POST \ https://localhost:9443/oauth2/token \ -H 'content-type: application/x-www-form-urlencoded' \ -H '<CERTIFICATE_HEADER_NAME>: <CLIENT_PUBLIC_CERTIFICATE>' \ -d 'grant_type=authorization_code&client_id=<CLIENT_ID>&code=<CODE>&redirect_uri=http%3A%2F%2Flocalhost%3A8080%2Fplayground2%2Foauth2client' -
Sample Request
curl -X POST \ https://localhost:9443/oauth2/token \ -H 'content-type: application/x-www-form-urlencoded' \ -H 'x-wso2-mtls-cert: -----BEGIN CERTIFICATE-----MIID3TCCAsWgAwIBAgIUJQW8iwYsAbyjc/oHti8DPLJH5ZcwDQYJKoZIhvcNAQELBQAwfjELMAkGA1UEBhMCU0wxEDAOBgNVBAgMB1dlc3Rlcm4xEDAOBgNVBAcMB0NvbG9tYm8xDTALBgNVBAoMBFdTTzIxDDAKBgNVBAsMA0lBTTENMAsGA1UEAwwER2FnYTEfMB0GCSqGSIb3DQEJARYQZ2FuZ2FuaUB3c28yLmNvbTAeFw0yMDAzMjQxMjQyMDFaFw0zMDAzMjIxMjQyMDFaMH4xCzAJBgNVBAYTAlNMMRAwDgYDVQQIDAdXZXN0ZXJuMRAwDgYDVQQHDAdDb2xvbWJvMQ0wCwYDVQQKDARXU08yMQwwCgYDVQQLDANJQU0xDTALBgNVBAMMBEdhZ2ExHzAdBgkqhkiG9w0BCQEWEGdhbmdhbmlAd3NvMi5jb20wggEiMA0GCSqGSIb3DQEBAQUAA4IBDwAwggEKAoIBAQC+reCEYOn2lnWgFsp0TF0R1wQiD9C/N+dnv4xCa0rFiu4njDzWR/8tYFl0koaxXoP0+oGnT07KlkA66q0ztwikLZXphLdCBbJ1hSmNvor48FuSb6DgqWixrUa2LHlpaaV7RvlmG+IhZEgKDXdS+/tK0hlcgRzENyOEdETDO5fFlKGGuwaGv6/w69h2LTKGu5nyDLF51rjQ18xp026btHC7se/XSlcp3X63xeOIcFv6m84AN2lnV+g8MOfu2wgWtsKaxn4BL64E7nHZNNLxMRf7GtUm2bl9ydFX4aD1r1Oj4iqFWMNcfQ676Qshk8s7ui3LKWFXwNN/SRD0c/ORtv23AgMBAAGjUzBRMB0GA1UdDgQWBBRDu/vqRafReh4fFHS3Nz4T6u9mUDAfBgNVHSMEGDAWgBRDu/vqRafReh4fFHS3Nz4T6u9mUDAPBgNVHRMBAf8EBTADAQH/MA0GCSqGSIb3DQEBCwUAA4IBAQB7NH51Yj4moEhMonnLUh3eTtf6DUnrpscx6td28rryoDZPfCkJs4VHU9F50etw54FoHqoIaHp5UIB6l1OsVXytUmwrdxbqW7nfOItYwN1yV093aI2aOeMQYmS+vrPkSkxySP6+wGCWe4gfMgpr6iu9xiWLpnILw5q71gmXWtS900S5aLbllGYe74jkyldLIdhS4TyEBIDgcpZrD8x/Z42al6T/6EANMpvu4Jopisg+uwwkEGSM1I/kjiW+YkWC4oTZ1jMZUWC11WbcouLwjfaf6gt4zWitYCP0r0fLGk4bSJfUFsnJNu6vDhx60TbRhIh9P2jxkmgNYPuAxFtF8v+h-----END CERTIFICATE-----' \ -d 'grant_type=authorization_code&client_id=h9gd1bLEgzUwftAhnrof0fZWcZwa&code=d7678fec-2cb0-374b-82cb-d368d301be57&redirect_uri=http%3A%2F%2Flocalhost%3A8080%2Fplayground2%2Foauth2client' -
Sample Response
{"access_token":"72480539-a018-3611-aeb3-1e3e8b7f78da","refresh_token":"47757b20-1013-3fd7-a547-c8b080427abd","scope":"openid","id_token":"eyJ4NXQiOiJaalJtWVRNd05USmpPV1U1TW1Jek1qZ3pOREkzWTJJeU1tSXlZMkV6TWpkaFpqVmlNamMwWmciLCJraWQiOiJaalJtWVRNd05USmpPV1U1TW1Jek1qZ3pOREkzWTJJeU1tSXlZMkV6TWpkaFpqVmlNamMwWmdfUlMyNTYiLCJhbGciOiJSUzI1NiJ9.eyJhdF9oYXNoIjoiZXgyci1tZGhhRXJoT0MxSjlUTjZXQSIsImF1ZCI6Img5Z2QxYkxFZ3pVd2Z0QWhucm9mMGZaV2Nad2EiLCJjX2hhc2giOiI3bnlHb0Y5b0NuRFdIWk9uZlVuT3VnIiwic3ViIjoiYWRtaW4iLCJuYmYiOjE1ODY4OTA3MTYsImF6cCI6Img5Z2QxYkxFZ3pVd2Z0QWhucm9mMGZaV2Nad2EiLCJhbXIiOlsiQmFzaWNBdXRoZW50aWNhdG9yIl0sImlzcyI6Imh0dHBzOlwvXC9sb2NhbGhvc3Q6OTQ0M1wvb2F1dGgyXC90b2tlbiIsImV4cCI6MTU4Njg5NDMxNiwiaWF0IjoxNTg2ODkwNzE2LCJzaWQiOiIwMTQxOGNiYS1kZWMxLTRjY2UtODg1MC0yM2Q5YWVmNDdhMjUifQ.c7zueSgckyK7la0fWCVXsDL7zEQV40VmI2FUCDrlN4sFY3U90ObtwXVp0V6Di_BzOWCGc7RN6xWTBkfo2ayph8FxVtUyO-c4tUZCB_EDCsyOLBjV-s1Z7bhy4lw5-utSCcE5d4TZoDTFKvL7PrUCrRZ2VcGfmqNKZKgRo1eCfVcT5M7Udzkq22JdOp1jkv0tTso3zvQFqUKFaNNi1gKDdWR00WjBEnAMhmbz0Sd2HZ2GNuKbwYZLPz3P2FZvS7mVJJW_kku4nTksP3cMIrDjZz8fCST210GmlW_GC1f2XudhiM8Qkdcu011cdEmG5bmJcWCQs-90GLn5u-e1gjIaQw","token_type":"Bearer","expires_in":3600}
-
Refresh token grant
To try this out, first, send an authorization code grant-type request and obtain the refresh token from the response.
-
Request Format
curl -X POST \ https://localhost:9443/oauth2/token \ -H 'content-type: application/x-www-form-urlencoded' \ -H '<CERTIFICATE_HEADER_NAME>: <CLIENT_PUBLIC_CERTIFICATE>' \ -d 'grant_type=refresh_token&refresh_token=<REFRESH_TOKEN>&client_id=<CLIENT_ID>' -
Sample Request
curl -X POST \ https://localhost:9443/oauth2/token \ -H 'content-type: application/x-www-form-urlencoded' \ -H 'x-wso2-mtls-cert: -----BEGIN CERTIFICATE-----MIID3TCCAsWgAwIBAgIUJQW8iwYsAbyjc/oHti8DPLJH5ZcwDQYJKoZIhvcNAQELBQAwfjELMAkGA1UEBhMCU0wxEDAOBgNVBAgMB1dlc3Rlcm4xEDAOBgNVBAcMB0NvbG9tYm8xDTALBgNVBAoMBFdTTzIxDDAKBgNVBAsMA0lBTTENMAsGA1UEAwwER2FnYTEfMB0GCSqGSIb3DQEJARYQZ2FuZ2FuaUB3c28yLmNvbTAeFw0yMDAzMjQxMjQyMDFaFw0zMDAzMjIxMjQyMDFaMH4xCzAJBgNVBAYTAlNMMRAwDgYDVQQIDAdXZXN0ZXJuMRAwDgYDVQQHDAdDb2xvbWJvMQ0wCwYDVQQKDARXU08yMQwwCgYDVQQLDANJQU0xDTALBgNVBAMMBEdhZ2ExHzAdBgkqhkiG9w0BCQEWEGdhbmdhbmlAd3NvMi5jb20wggEiMA0GCSqGSIb3DQEBAQUAA4IBDwAwggEKAoIBAQC+reCEYOn2lnWgFsp0TF0R1wQiD9C/N+dnv4xCa0rFiu4njDzWR/8tYFl0koaxXoP0+oGnT07KlkA66q0ztwikLZXphLdCBbJ1hSmNvor48FuSb6DgqWixrUa2LHlpaaV7RvlmG+IhZEgKDXdS+/tK0hlcgRzENyOEdETDO5fFlKGGuwaGv6/w69h2LTKGu5nyDLF51rjQ18xp026btHC7se/XSlcp3X63xeOIcFv6m84AN2lnV+g8MOfu2wgWtsKaxn4BL64E7nHZNNLxMRf7GtUm2bl9ydFX4aD1r1Oj4iqFWMNcfQ676Qshk8s7ui3LKWFXwNN/SRD0c/ORtv23AgMBAAGjUzBRMB0GA1UdDgQWBBRDu/vqRafReh4fFHS3Nz4T6u9mUDAfBgNVHSMEGDAWgBRDu/vqRafReh4fFHS3Nz4T6u9mUDAPBgNVHRMBAf8EBTADAQH/MA0GCSqGSIb3DQEBCwUAA4IBAQB7NH51Yj4moEhMonnLUh3eTtf6DUnrpscx6td28rryoDZPfCkJs4VHU9F50etw54FoHqoIaHp5UIB6l1OsVXytUmwrdxbqW7nfOItYwN1yV093aI2aOeMQYmS+vrPkSkxySP6+wGCWe4gfMgpr6iu9xiWLpnILw5q71gmXWtS900S5aLbllGYe74jkyldLIdhS4TyEBIDgcpZrD8x/Z42al6T/6EANMpvu4Jopisg+uwwkEGSM1I/kjiW+YkWC4oTZ1jMZUWC11WbcouLwjfaf6gt4zWitYCP0r0fLGk4bSJfUFsnJNu6vDhx60TbRhIh9P2jxkmgNYPuAxFtF8v+h-----END CERTIFICATE-----' \ -d 'grant_type=refresh_token&refresh_token=47757b20-1013-3fd7-a547-c8b080427abd&client_id=h9gd1bLEgzUwftAhnrof0fZWcZwa' -
Sample Response
{"access_token":"e01612d2-5538-32ac-9b1c-c2978ce47e91","refresh_token":"0278af3e-e75b-3f66-bad5-13a773397b8e","scope":"openid","id_token":"eyJ4NXQiOiJaalJtWVRNd05USmpPV1U1TW1Jek1qZ3pOREkzWTJJeU1tSXlZMkV6TWpkaFpqVmlNamMwWmciLCJraWQiOiJaalJtWVRNd05USmpPV1U1TW1Jek1qZ3pOREkzWTJJeU1tSXlZMkV6TWpkaFpqVmlNamMwWmdfUlMyNTYiLCJhbGciOiJSUzI1NiJ9.eyJhdF9oYXNoIjoiSHJsTl9PNGZ3THNldnlRWXcxdjdGdyIsImF1ZCI6Img5Z2QxYkxFZ3pVd2Z0QWhucm9mMGZaV2Nad2EiLCJzdWIiOiJhZG1pbiIsIm5iZiI6MTU4Njg5MTU4MywiYXpwIjoiaDlnZDFiTEVnelV3ZnRBaG5yb2YwZlpXY1p3YSIsImFtciI6WyJyZWZyZXNoX3Rva2VuIl0sImlzcyI6Imh0dHBzOlwvXC9sb2NhbGhvc3Q6OTQ0M1wvb2F1dGgyXC90b2tlbiIsImV4cCI6MTU4Njg5NTE4MywiaWF0IjoxNTg2ODkxNTgzfQ.XonQryWAEoUAsEWBYh97N8Wra1o1g-gs_VQfD1jeKpIMXONrRJt9ArTwf7THE0AmwoiHqv3JDsFDfj7FY4-xMEXb9bbwm2CB7ptWdw_Z0_rEoLv8uFo69k0G07C1bPsE4Lfdg4_BKMWN5-h8U0l7p35AQW-hT4qGkASOkgo0xz2AaBpXgItP91NsUoJ3Xmr1E9Bmv_0vIO8XK1hvZkk95inCVp2HVBBRuQNIO4PIaqrGNijMUoKN5DokUr_pyZ3xHbHL8pJ5Smg5wLfDAng7BSwiBd1Lf_8wyWaNSHCvI27sVtU8fLRi7X0_p-4mVtmfK2Qe-hK8wQA3E_vFLr3WMA","token_type":"Bearer","expires_in":3600}
OAuth token introspection
Use the following OAuth token introspection request to obtain a sample introspection response from an active token using an x5t#S256 certificate thumbprint confirmation method. The new introspection response content introduced by this feature is the cnf confirmation method with the x5t#S256 confirmation method member containing the value that is the hash of the client certificate to which the access token is bound.
-
Request Format
curl -X POST \ https://localhost:9443/oauth2/introspect \ -H 'authorization: Basic YWRtaW46YWRtaW4=' \ -H 'content-type: application/x-www-form-urlencoded' \ -d token=9d109c6d-d42e-3b6e-9d93-ae3cb8f65ade -
Sample Request
curl -X POST \ https://localhost:9443/oauth2/introspect \ -H 'authorization: Basic YWRtaW46YWRtaW4=' \ -H 'content-type: application/x-www-form-urlencoded' \ -d token=9d109c6d-d42e-3b6e-9d93-ae3cb8f65ade -
Sample Response
{
    "nbf": 1586929210,
    "scope": "openid",
    "active": true,
    "cnf": {
        "x5t#SHA256": "mt3KDY1hofQurloTbphKHCSrTlAGl5MlgXX6Xxj9c_E"
    },
    "token_type": "Bearer",
    "exp": 1586932810,
    "iat": 1586929210,
    "client_id": "h9gd1bLEgzUwftAhnrof0fZWcZwa",
    "username": "[email protected]"
}