Configure Outbound Provisioning with Google
This topic provides instructions on how to configure Google as the Identity Provider to provision users from WSO2 Identity Server. The service provider in this scenario is WSO2 Identity Server(WSO2 IS).
Before you begin!
You need to have a Google domain. Click here for more information on creating the domain.
Configure Google
In this section, you are going to create a service account using the Google domain you created before you started this guide.
-
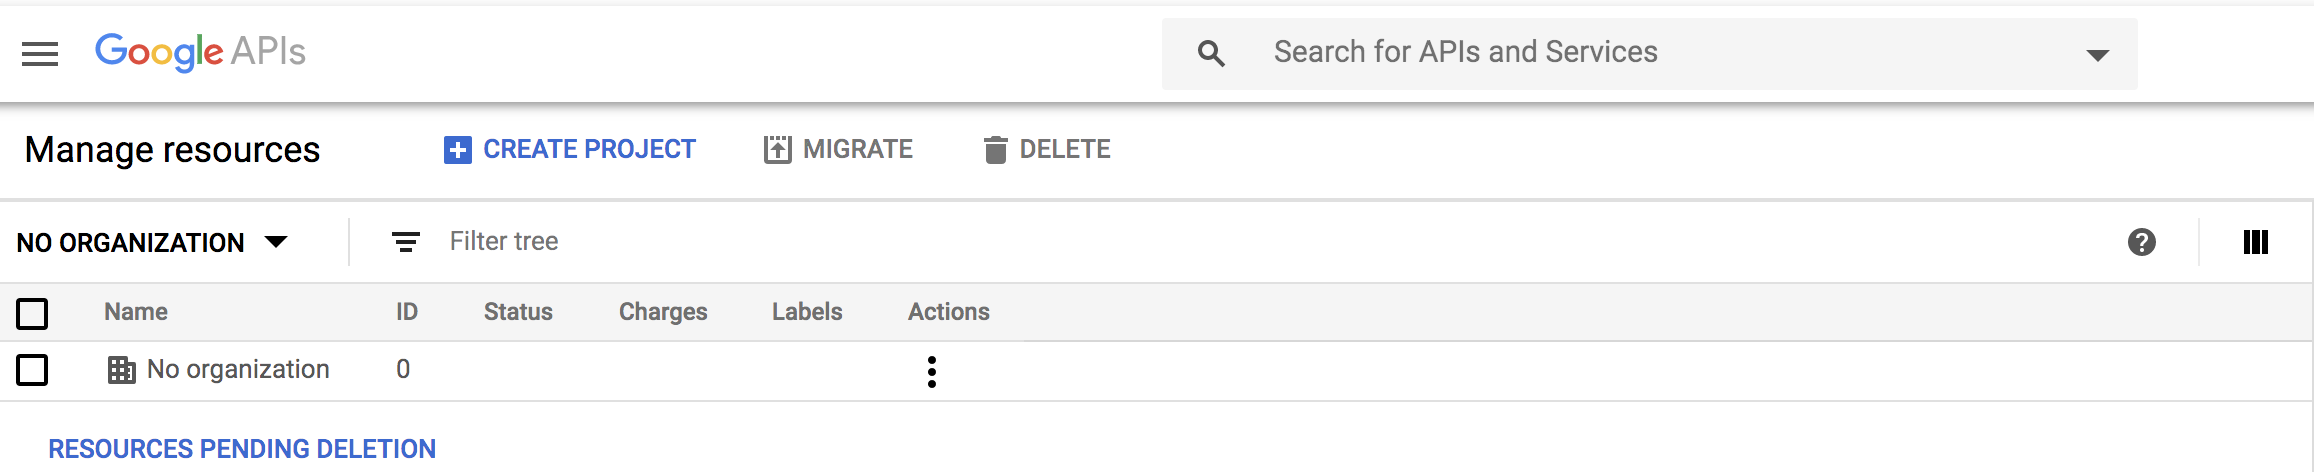
Open the Google developers console to create a new project.
-
Create a new project:
-
Click CREATE PROJECT on the top of the page.
-
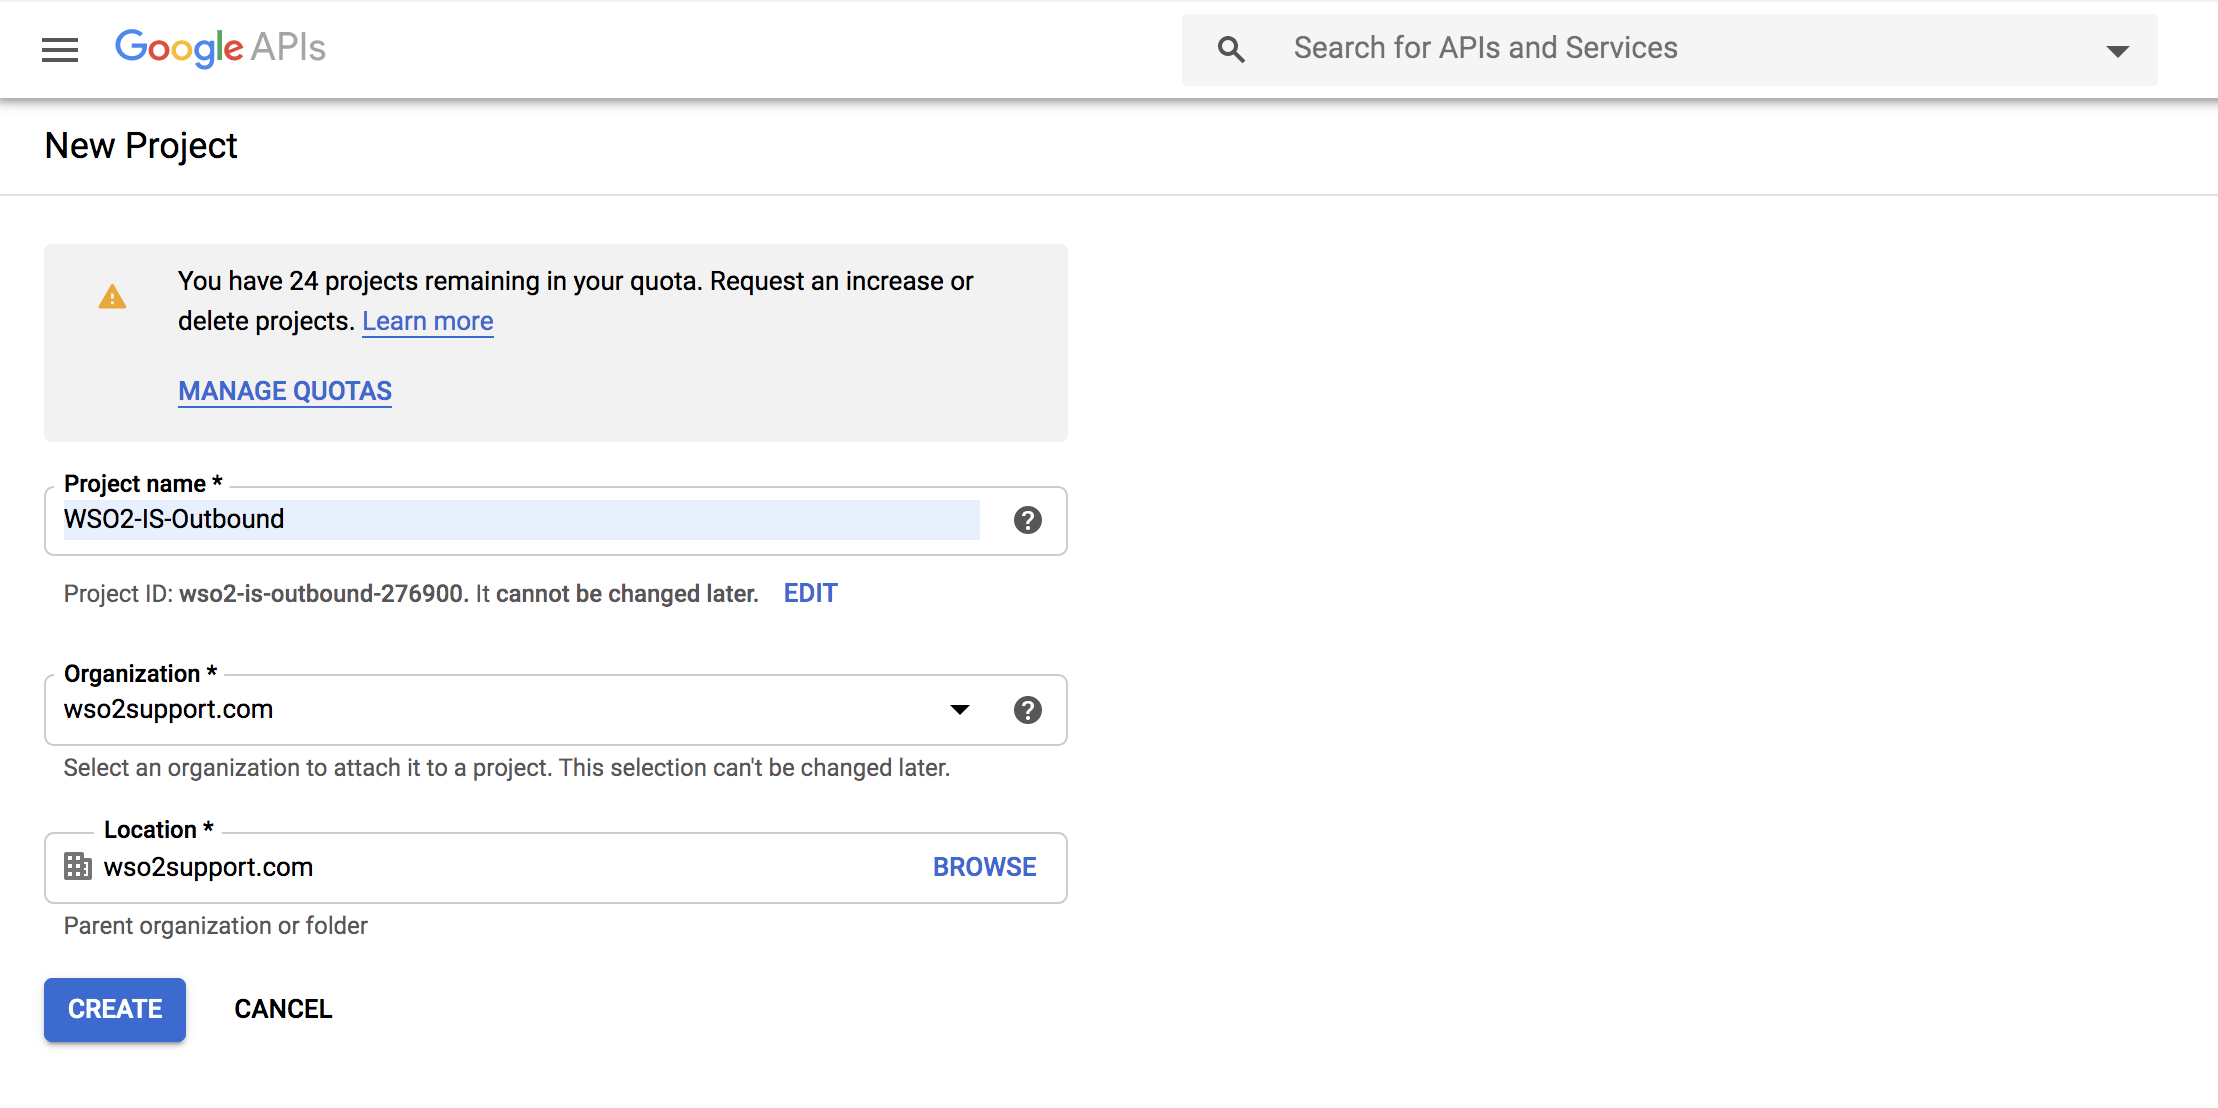
Provide a name for your project and click Create.
-
-
Search for the project you created and click it.
-
Create a service account for the project you created.
-
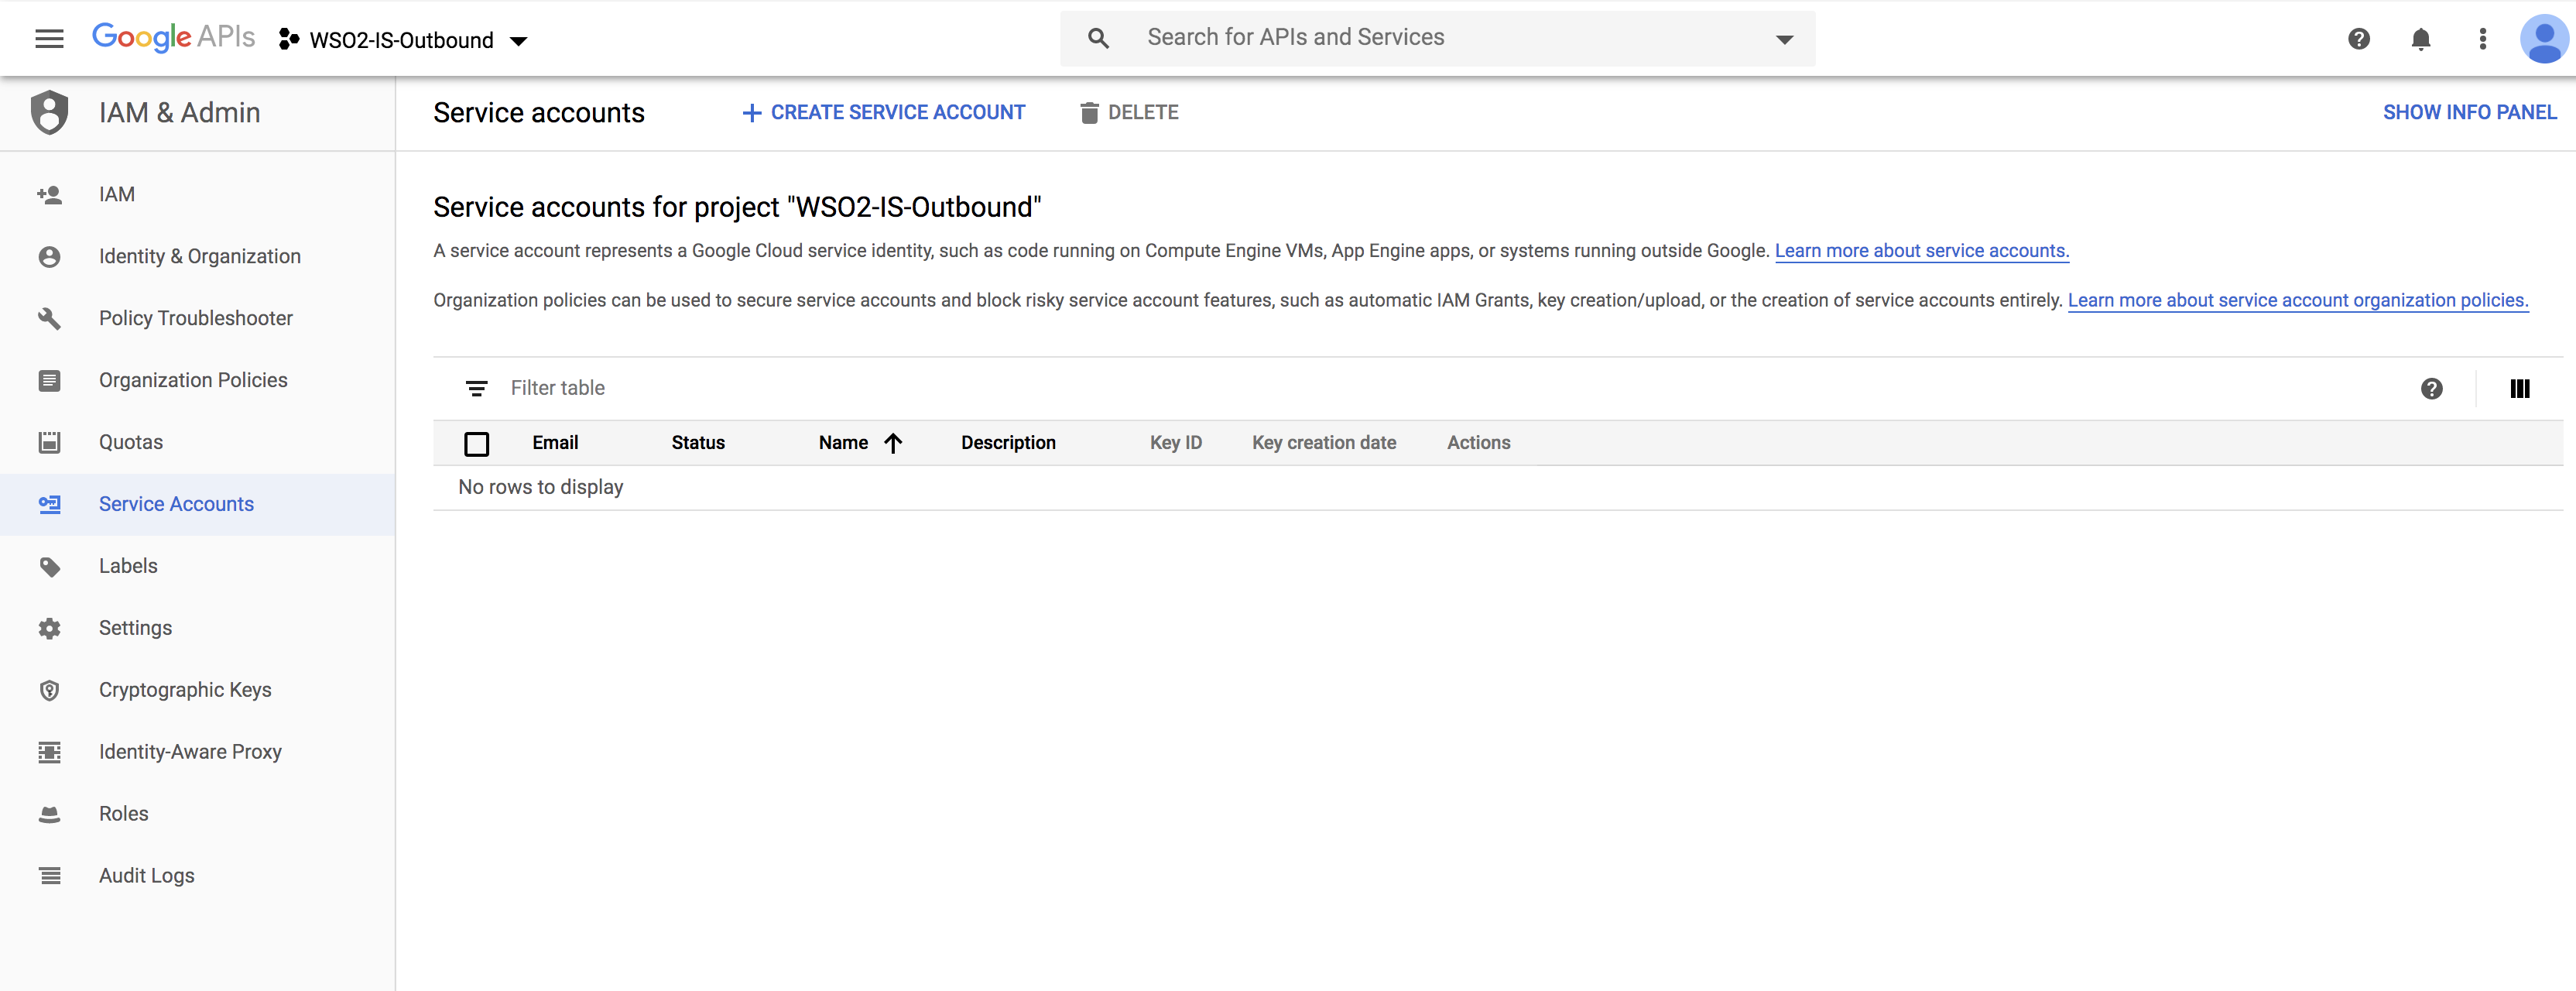
Click IAM and admin > Service accounts.
-
Click Create service account on the top panel.
-
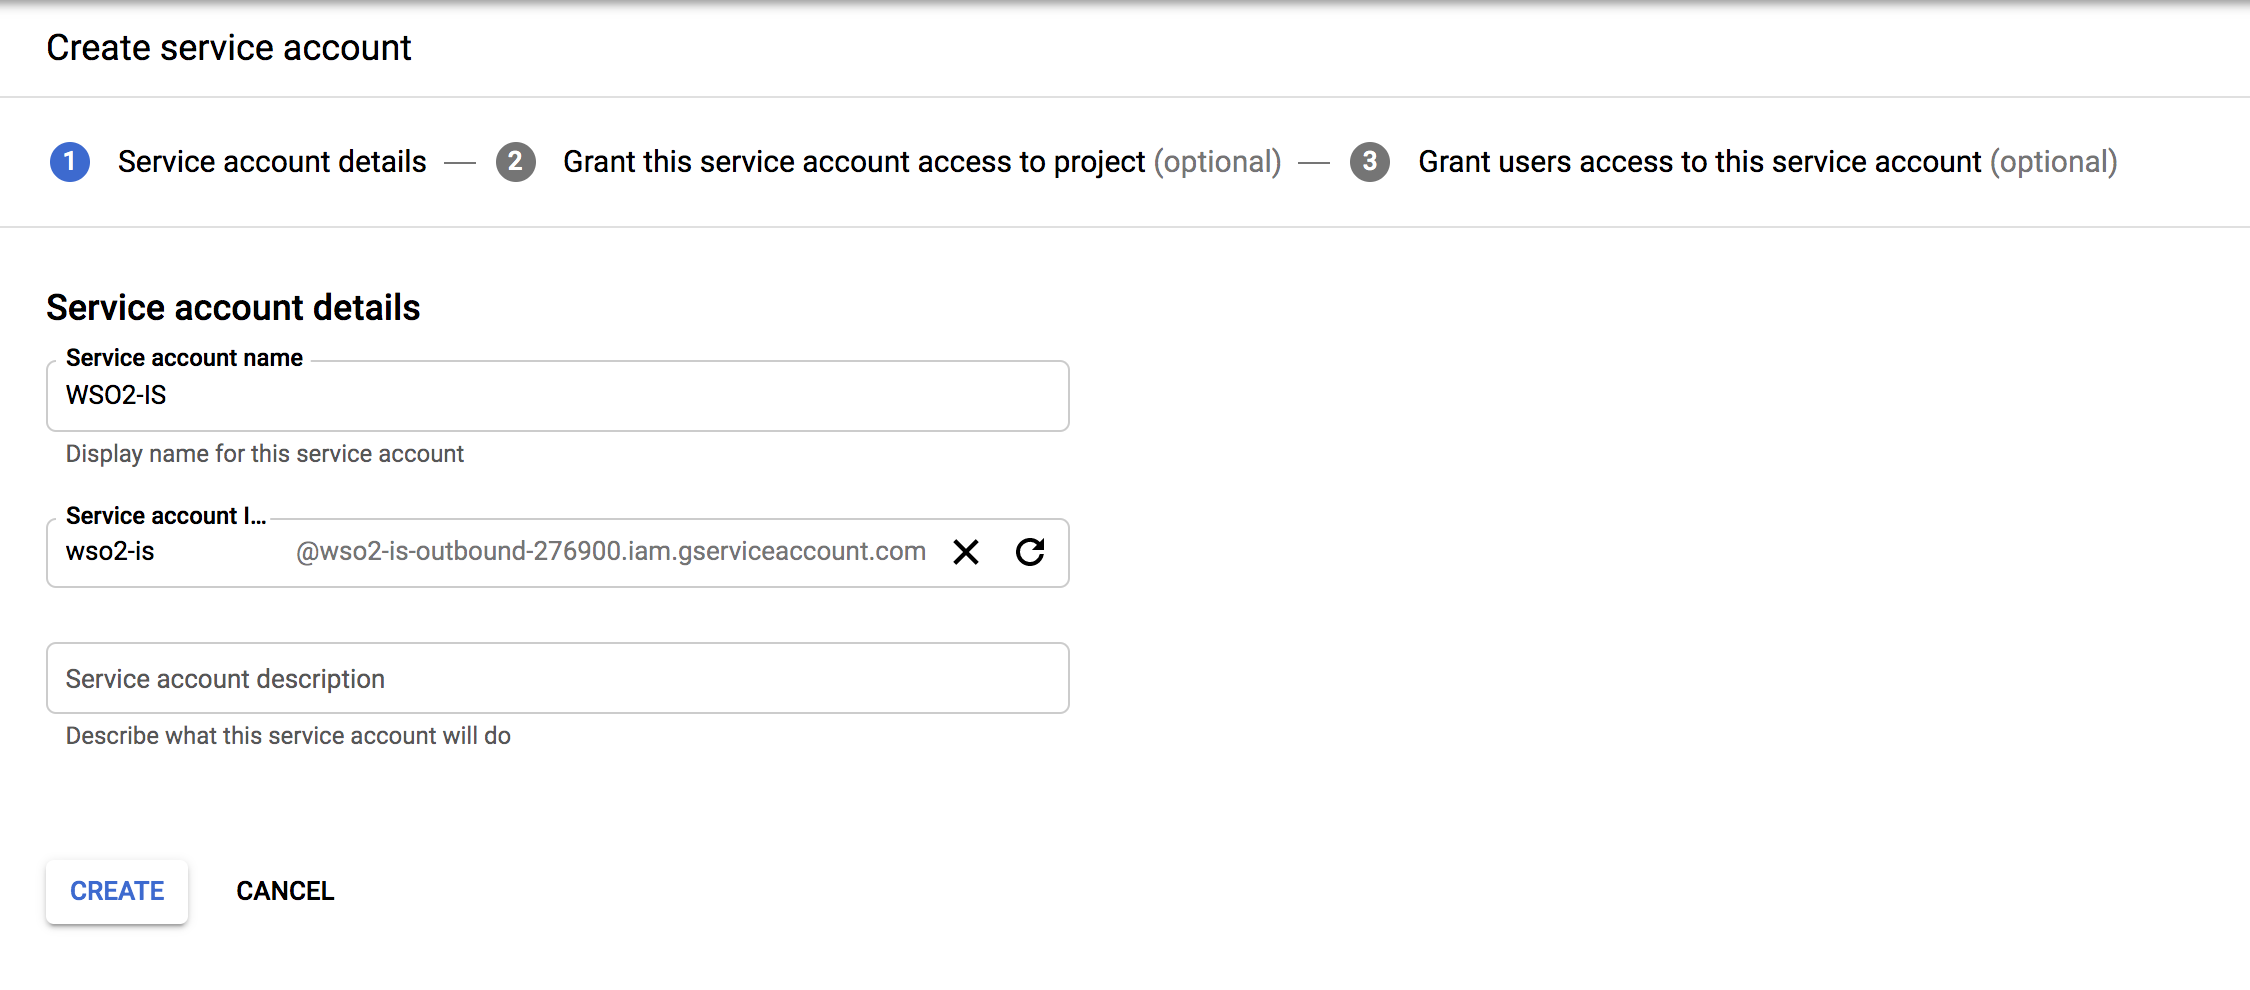
Fill in the form to create the service account:
-
Provide a service account name and click on Create.
-
Optionally, assign a role from the list of roles given.
- Click on Continue.
-
Click on Create Key.
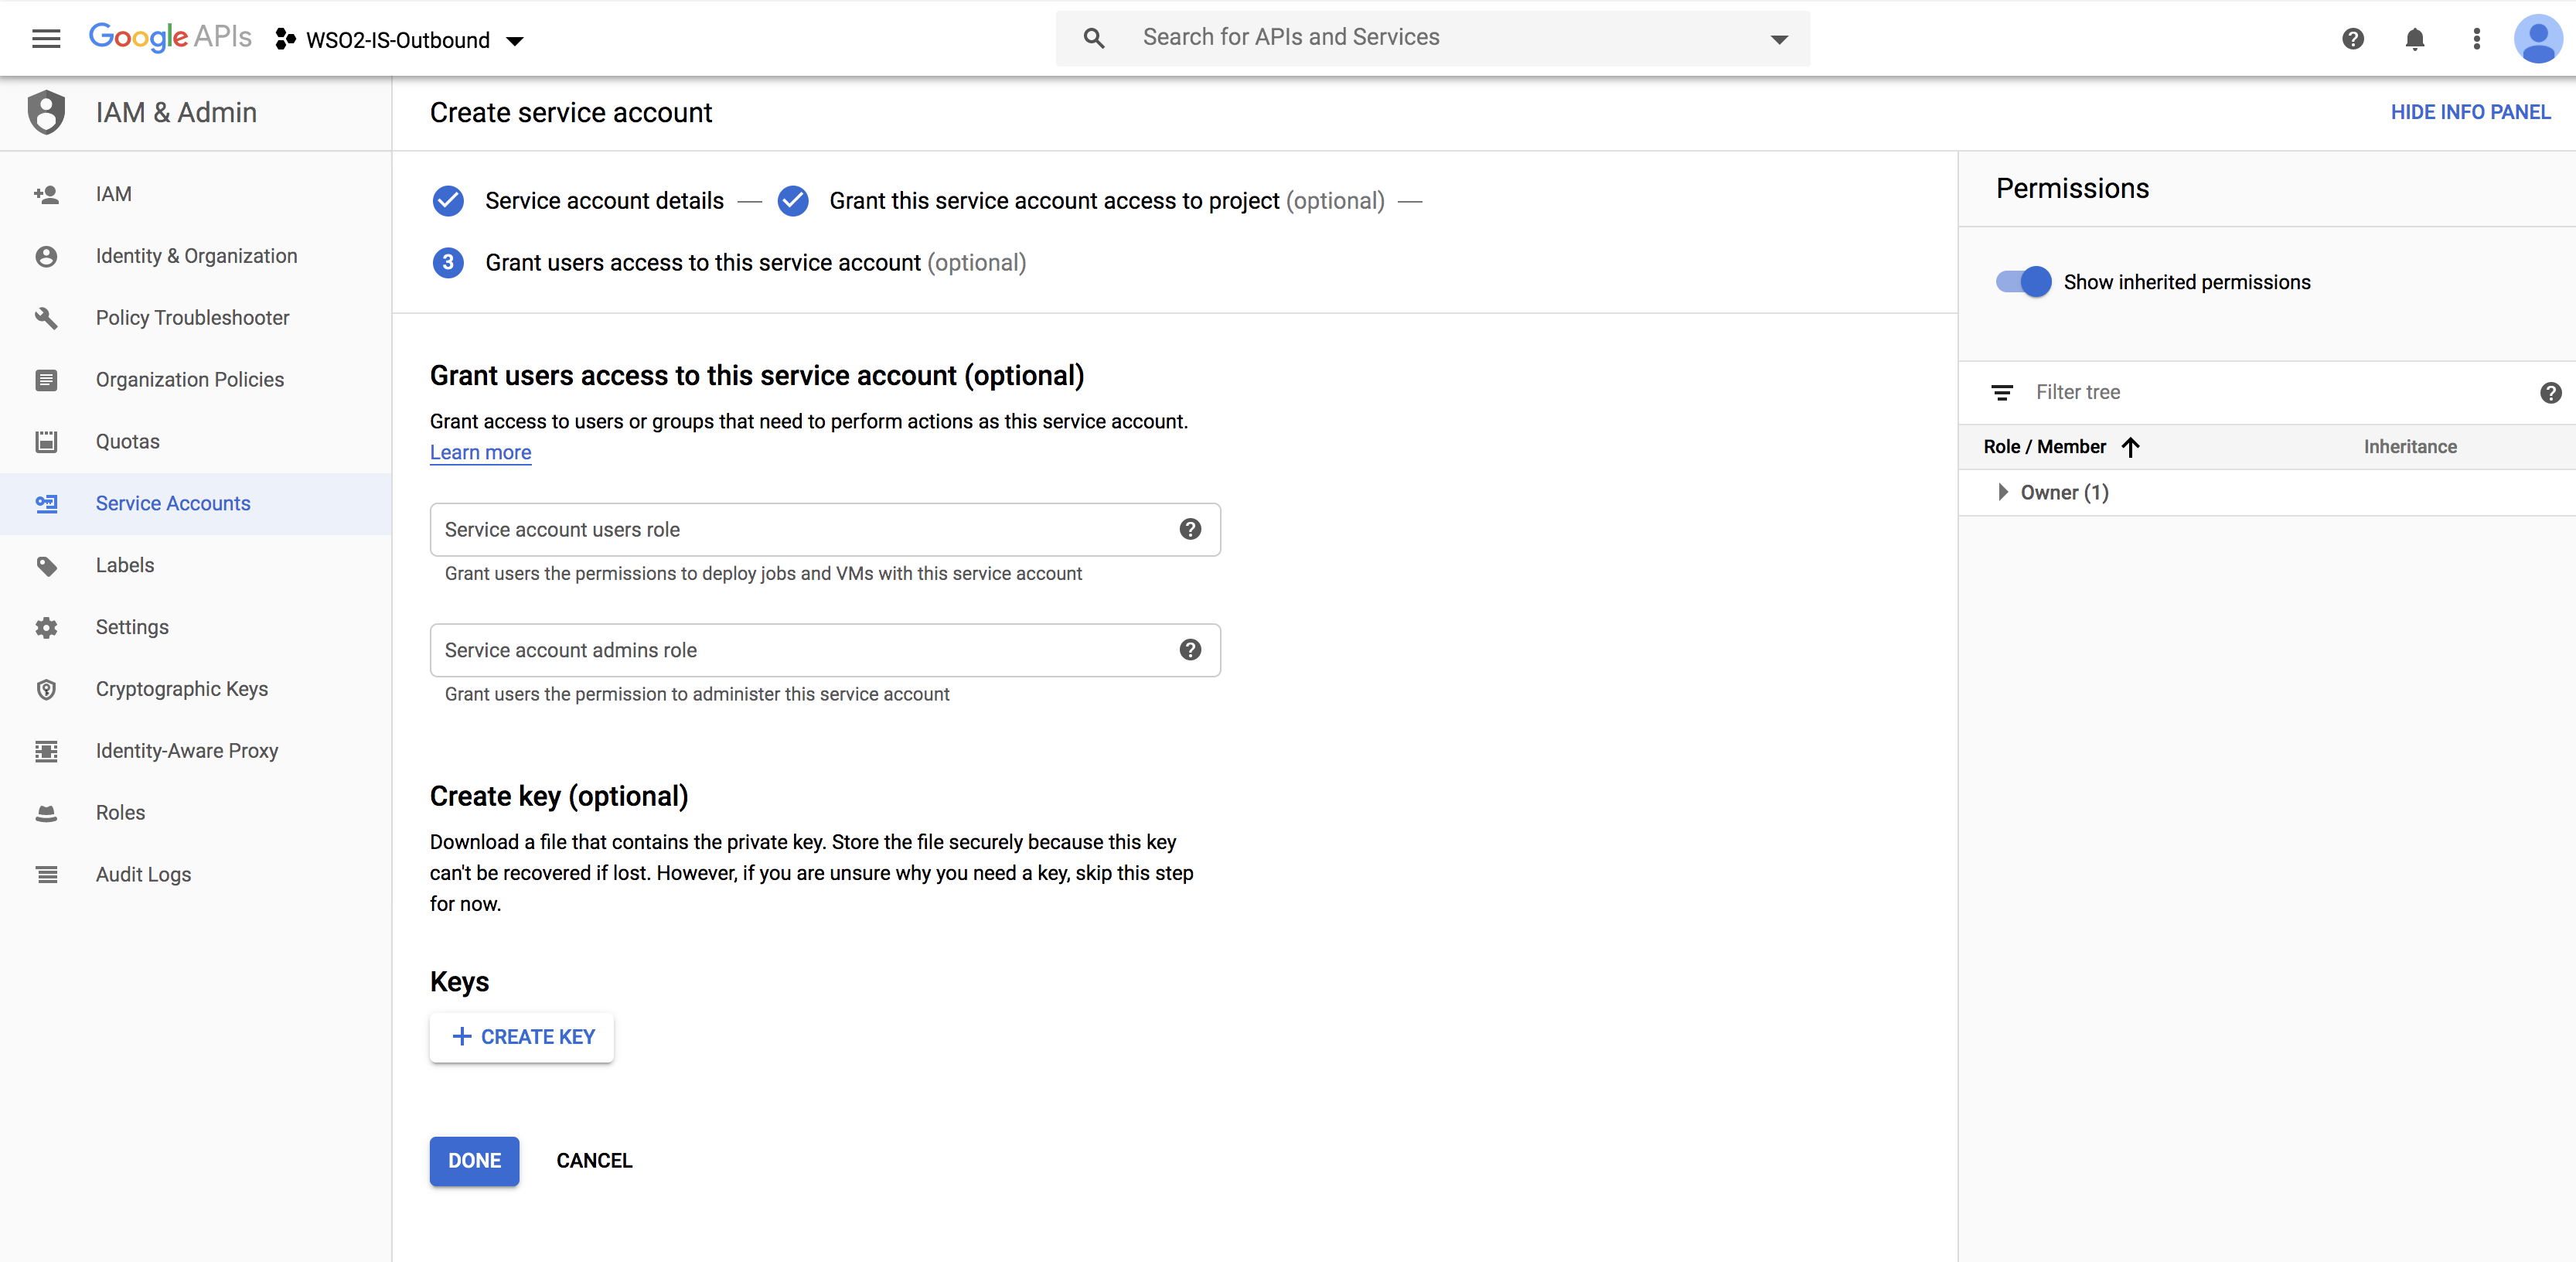
-
Choose your key type as
P12and click on Create.
-
-
Click CREATE.
The Service account and key created message is displayed and the service account'sP12file is downloaded to your machine.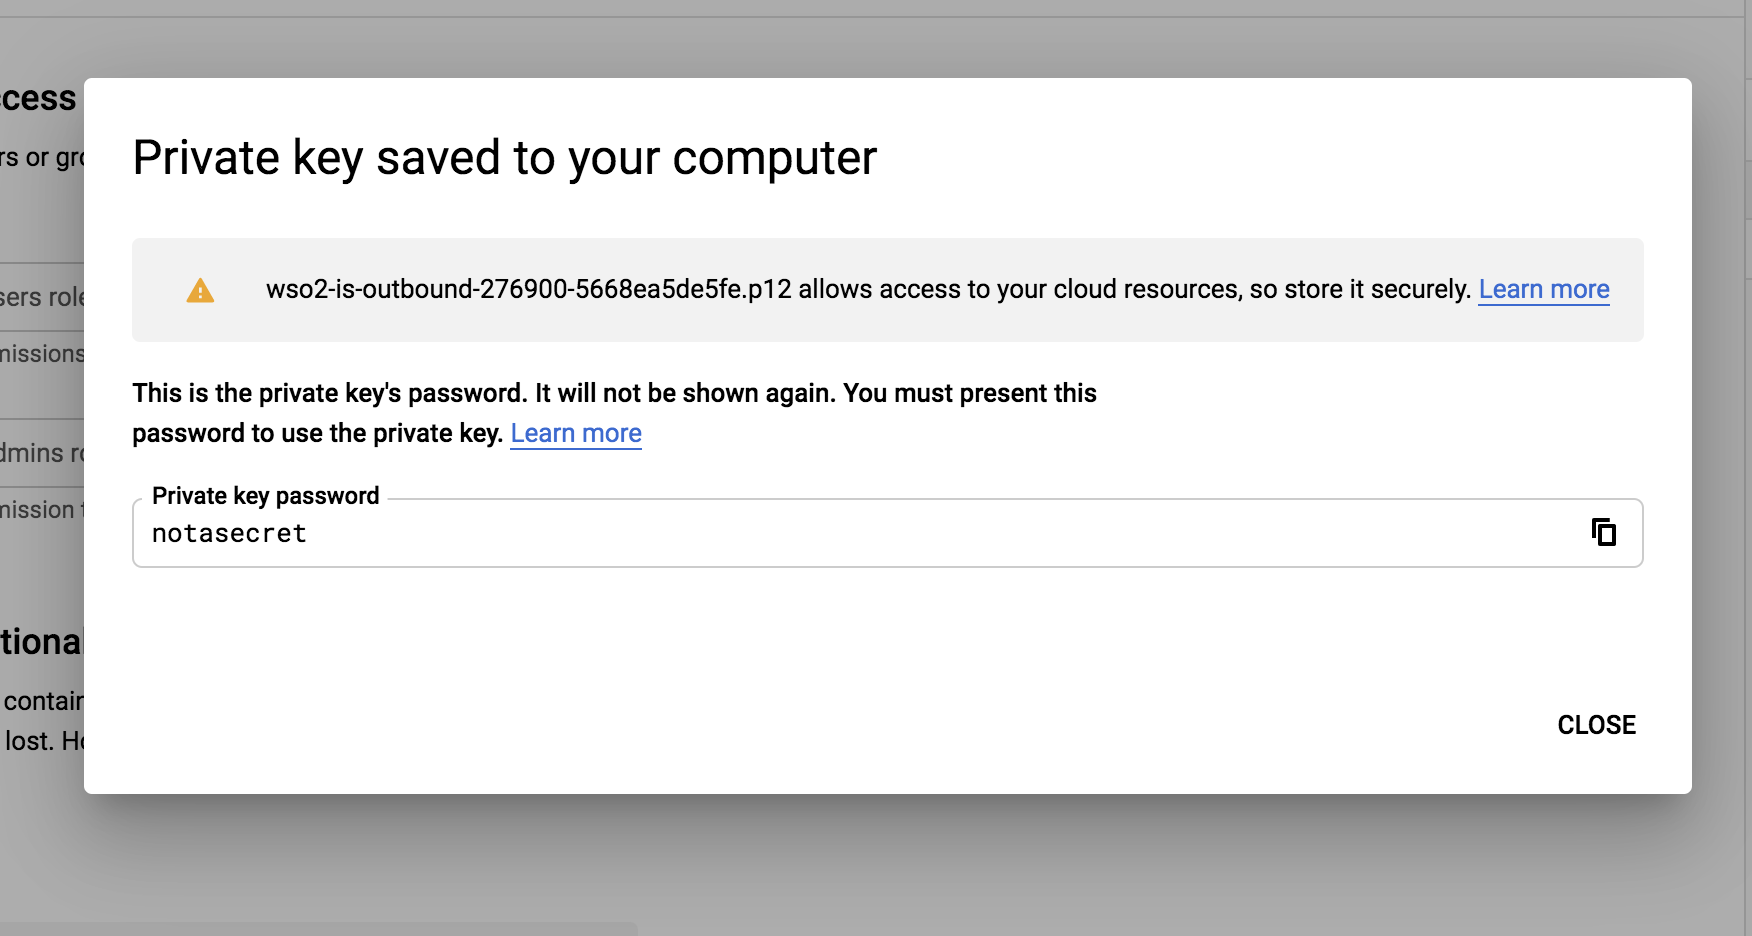
Info
Remember the location and name of this downloaded file as it is required later on in this guide.
-
-
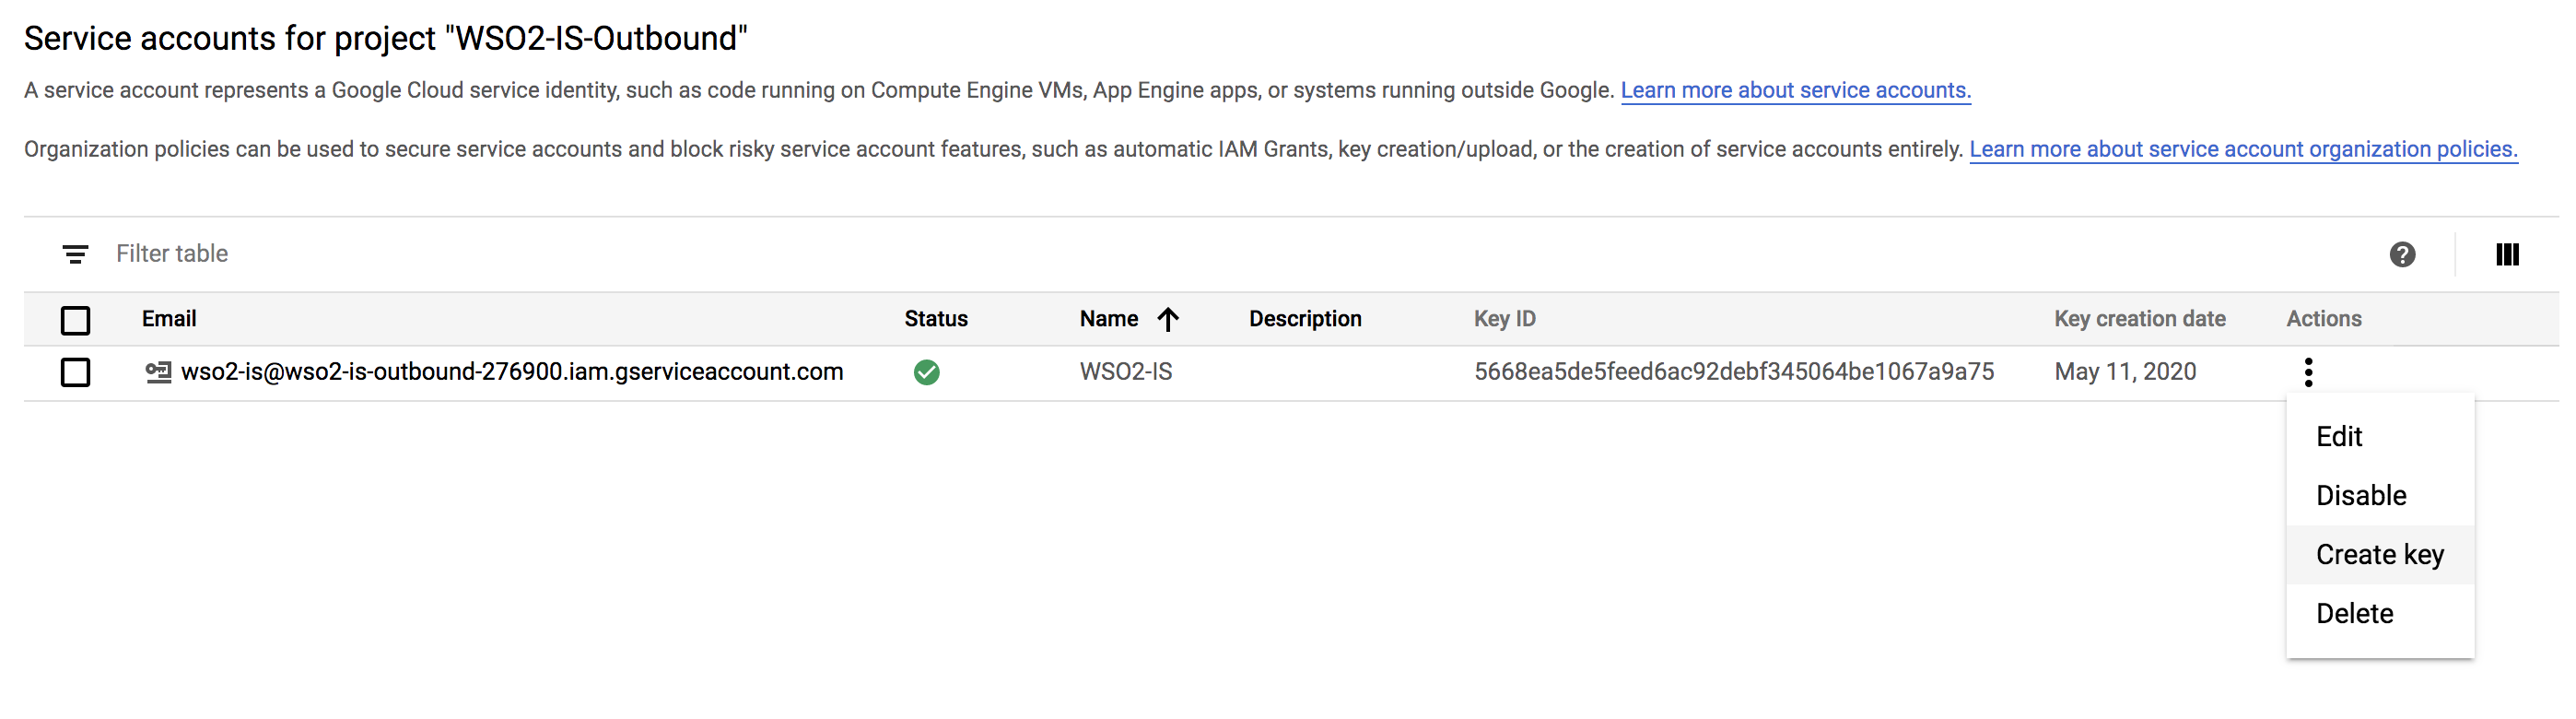
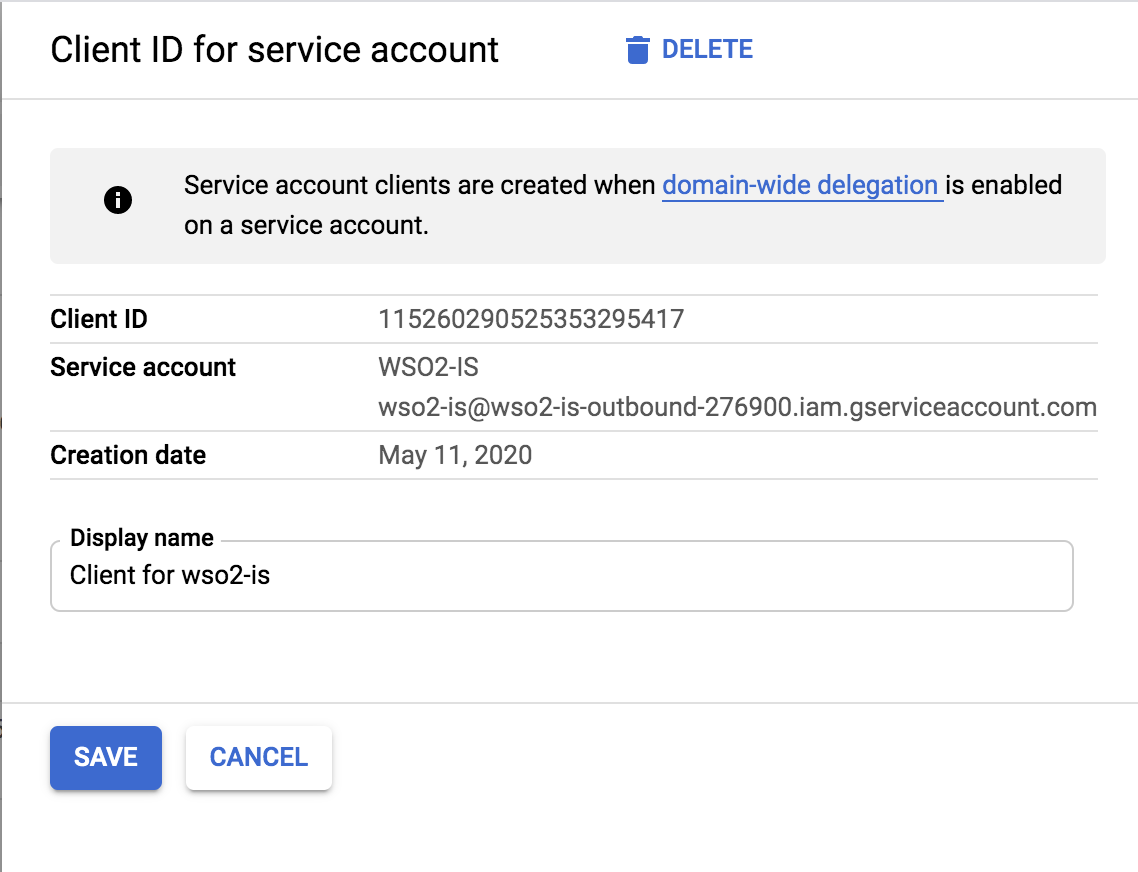
Get the Client ID of the service account.
-
Click IAM and admin > Service accounts. Choose Edit from the action items corresponding to the service account you just created.
-
Click on Show domain-wide delegation.
-
Select Enable G Suite Domain-wide Delegation, give a product name of your choice, and click SAVE.

-
-
Manage the API client access:
- Go to your domain's admin console via https://admin.google.com.
-
Click Security.
-
Click Advanced settings > Manage API client access.
-
Fill the following values:
- Paste the Client ID value you copied previously as the value for Client Name.
- Enter
https://www.googleapis.com/auth/admin.directory.user,https://www.googleapis.com/auth/admin.directory.orgunit,https://www.googleapis.com/auth/admin.directory.groupas the value for scopes. - Click Authorize.

-
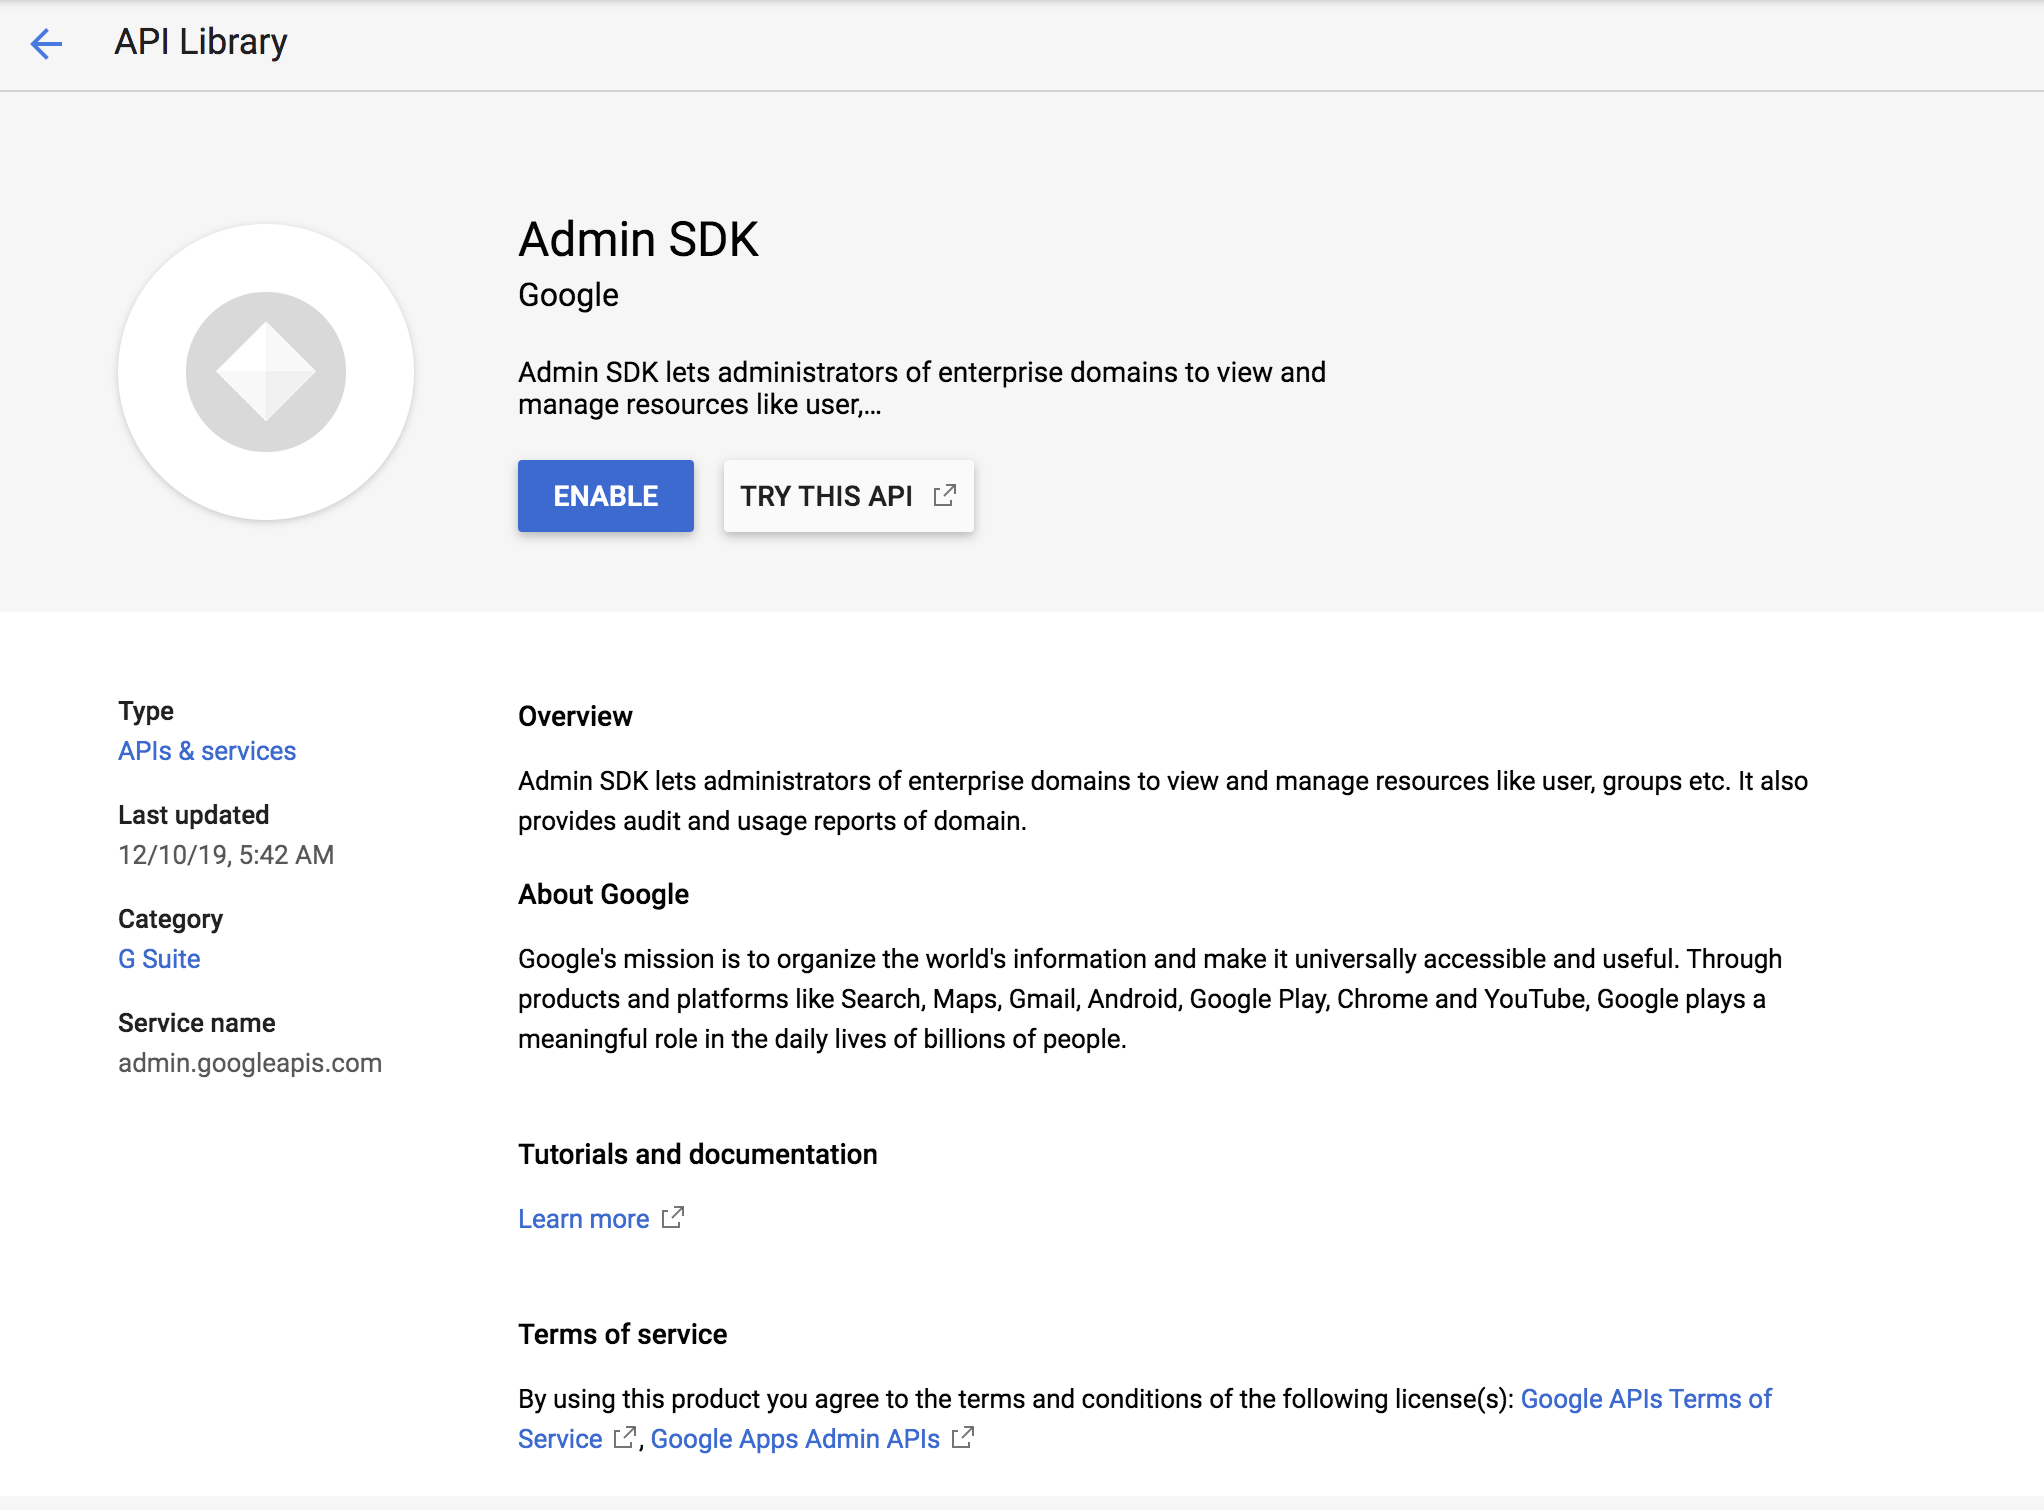
Enable Admin SDK.
- Open the Google developers console.
- Click the menu icon, and click APIs & Services > Dashboards.
- Click on Enable APIs AND Services.
-
Search for Admin SDK and click Enable.
Configure email address as the username
Provisioning is the process of coordinating the creation of user accounts, e-mail authorizations in the form of rules and roles, and other tasks such as provisioning of resources associated with enabling new users.
- Download WSO2 Identity Server from here.
- When you log into Google, you normally use an email address. So, to integrate this with the Identity Server, you need to configure WSO2 IS to enable users to log in using their email addresses. In order to do that, follow the steps found in Using Email Address as the Username topic.
-
Restart WSO2 IS using the -Dsetup parameter. This parameter is required because the username and password of the admin user was updated.
sh wso2server.sh -Dsetup
Now that you are done with configuring WSO2 Identity Server to use the email address, configure the identity provider and the service provider.
Configure Google as the identity provider
This section includes steps on how to register Google as an Identity Provider.
- Start the WSO2 Identity Server if it is not started up already, and log in using the email you configured for the realm configurations as instructed above in step 2 of Configuring the Identity Server to use the email address as the username.
- On the Management Console, navigate to Main > Identity > Identity Providers > Add.
-
In the form that appears, provide a name for your identity provider by filling in the Identity Provider Name, such as Google.com, and optionally, add a description.
-
Expand the Outbound Provisioning Connectors and click Google Provisioning Configuration section.
-
Do the following configurations for Google provisioning.
See here for more information on these fields
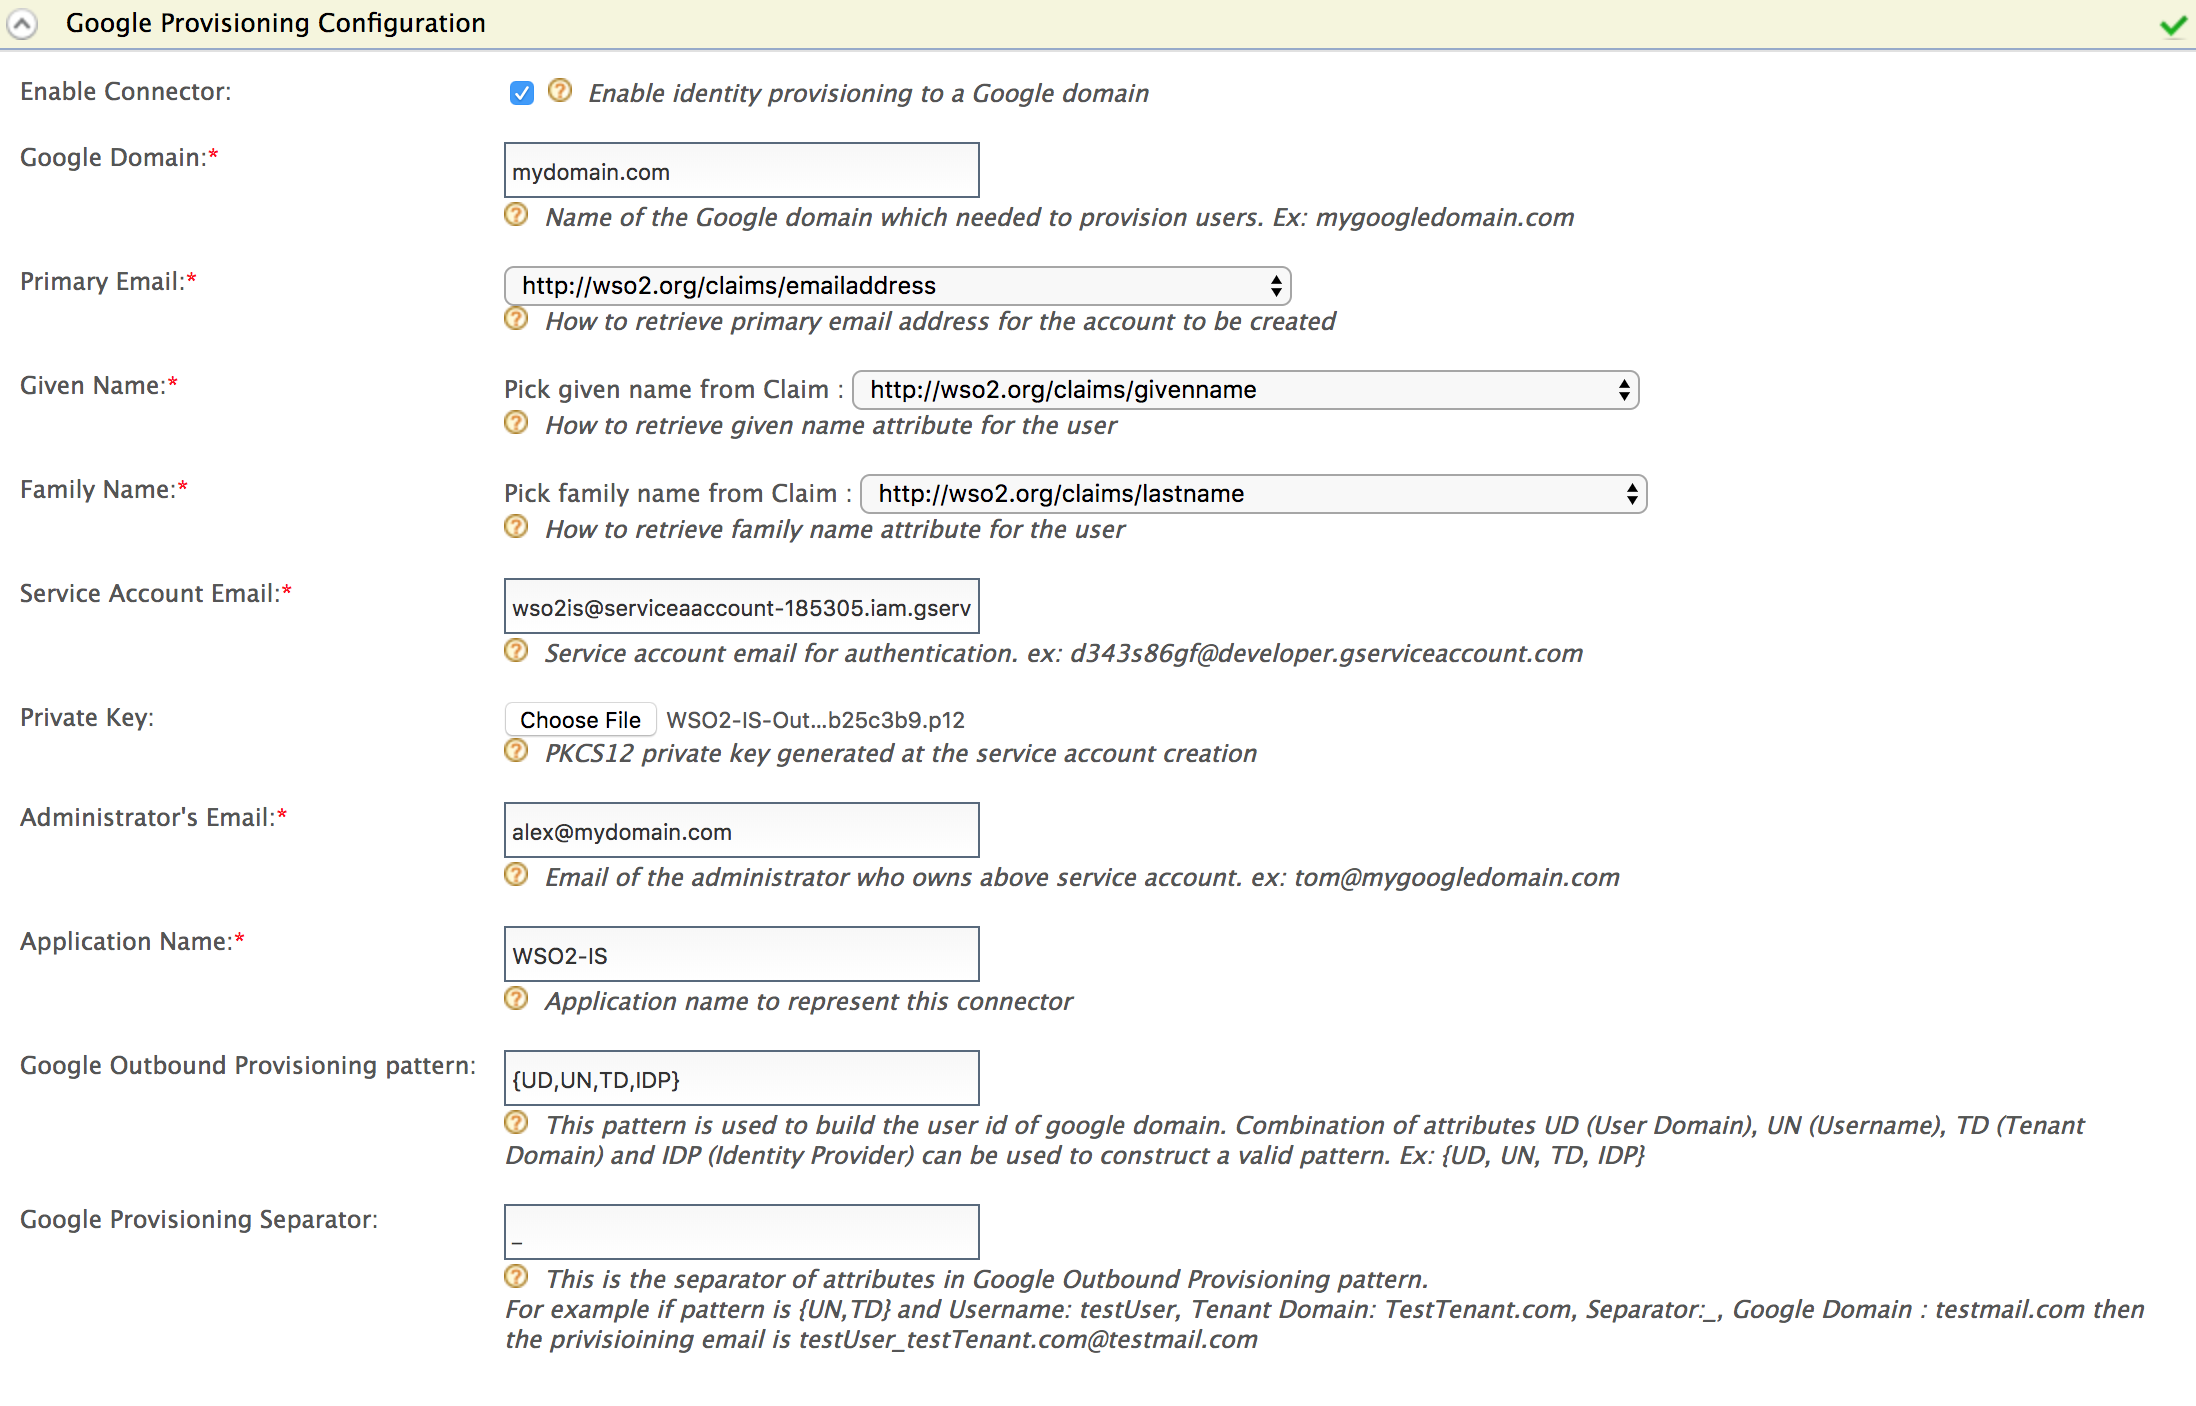
Field Description Sample value Enable Connector Selecting this enables identity provisioning through the Google domain. Selected Google Domain The name of the Google domain used to provision users. mygoogledomain.comPrimary Email Claim URI which will be used to retrieve primary email address for the account to be created. This must be a claim that is available and local in the Identity Server. http://wso2.org/claims/emailaddressGiven Name Claim URI which will be used to retrieve given name attribute for the user. This must be a claim that is available and local in the Identity Server. http://wso2.org/claims/givennameFamily Name Claim URI which will be used to retrieve the family name attribute for the user. This must be a local claim that is available and local in the Identity Server. http://wso2.org/claims/lastnameService Account Email This email is used for authentication purposes. [email protected]Private Key Browse and attach the private key from your local machine. This is the PKCS12 private key generated at the service account creation <uploaded_file>Administrator's Email This is the email of the administrator who owns the service account in the Google Domain specified. Provisioning takes place using this email, so specifying this here serves as a means for authentication. [email protected]Application Name This is the name of the application which is used to represent the Google connector. DomainGoogle Outbound Provisioning pattern This pattern is used to build the user id of Google domain. Combination of attributes UD (User Domain), UN (Username), TD (Tenant Domain) and IDP (Identity Provider) can be used to construct a valid pattern.
This is a way to differentiate following scenarios:
If there are several tenants and you must configure Google outbound provisioning for same Google domain in those tenants.
If there are several user stores and you must configure the specific user store that needs to be provisioned.
If there are multiple identity providers configured for same Google domain.{UD, UN, TD, IDP}Google Provisioning Separator This is used to separate the values that you configure in the Google Outbound Provisioning pattern. For this, it is better to use a character that is not normally used in the user domain/username/tenant domain/idp name. For example: "_" 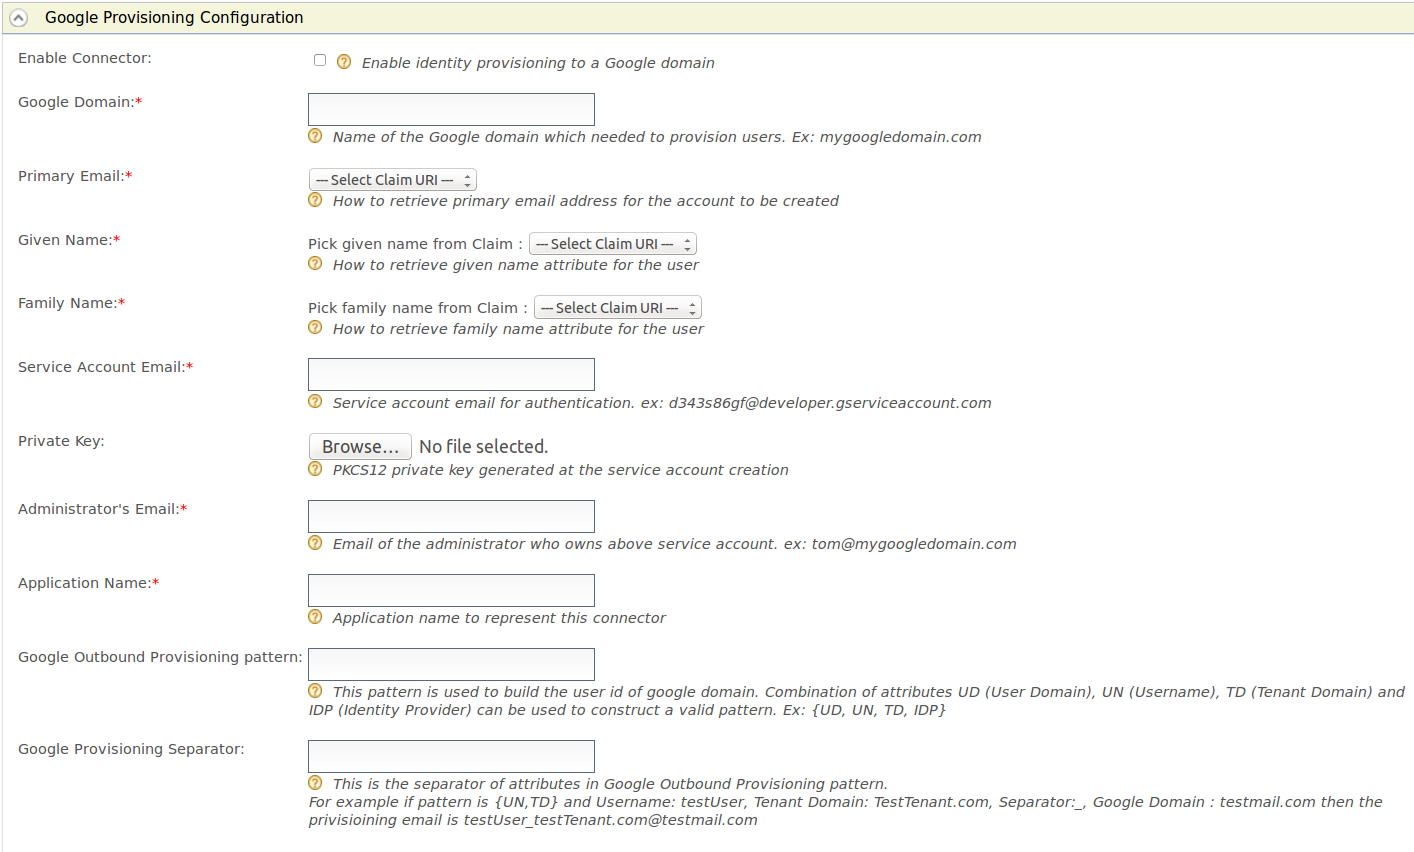 .
.- Select Enable Connector to enable the Google connector.
- Enter your Google domain name.
For example, in this guide,mydomain.comis used as the domain name. - Select the claim URI for the Primary Email.
For example, usehttp://wso2.org/claims/emailaddress. - Select the claim URI for the Given name.
For example, usehttp://wso2.org/claims/givenname. - Select the claim URI for the family name.
For example, usehttp://wso2.org/claims/lastname. -
Enter your service account ID as the value for the Service Account Email.
Can't remember your service account ID?
Follow the steps given below:
- Open the Google developers console and click the Menu icon in the top left corner.
- Click IAM and admin > Service accounts.
- Note the service account ID of your service account.
-
Attach the private key you downloaded in step 4.e under Configuring Google as the Private Key.
- Enter the email address you created using your domain before starting this tutorial as the Administrator's Email.
- Enter a name for your application in the Application Name field. It is used to help you identify requests made by this Google client.
- Enter {UD,UN,TD,IDP} as the value for Google Outbound Provisioning Pattern. This pattern is used to build the user id of Google domain.
- Enter _ (the underscore character) as the value for the Google Provisioning Separator.
-
Click Register.
Configure WSO2 IS as the resident service provider
- In the Main menu under the Identity section, click Resident under Service Providers.
- Expand the Outbound Provisioning Configuration on the screen that appears.
-
Select the Google identity provider you configured from the drop down and click the
 button.
Info
If you enable Blocking, Identity Server will wait for the response from the Identity Provider to continue.
If you enable Enable Rules and Blocking, blocking will block the provisioning till the rule completely evaluates and get the response back to the WSO2 IdP. Afterwards, you need to enable the XACML policy. For more information, see Rule-Based Provisioning
-
Click Update.
Manage users
The next step is to check if Google is configured properly with the Identity Server. If you add a user to the Identity Server via the management console, this user should also appear in Google too.
- On the Main tab in the Management Console, Navigate to Main > Identity > Users and Roles > Add.
- Click Add New User.
-
Enter the username in the form of an email and enter the password.
Info
Later on, if you want to update the user details, you won't be able to update the email address.
-
Assign a role to the user.
- Click Finish.
- In Google, log into admin console of your domain.
On the left navigation pane, expand Users and click Users. You will see that the user you created in the Identity Server has been added to Google as well.
You have successfully completed the configurations to provision users from WSO2 IS to Google.
Related topics