User Managed Access with WSO2 Identity Server
WSO2 Identity Server (WSO2 IS) supports the UMA 2.0 protocol, which allows a resource owner to easily share resources with other requesting parties. This tutorial demonstrates how you can use WSO2 IS as the authorization server to try out UMA for a sample scenario.
Introduction
To demonstrate the UMA flow using WSO2 IS as the authorization server, let’s consider a sample scenario where the resource owner wants to share a resource on their resource server with a requesting party. This requesting party uses a client to view the resource owner's resource. Note that the resource owner wants to allow this requesting party to only have view permission to their resource.
Once you try out the guide you will understand how to use UMA 2.0 to do the following:
- Outsource authorization.
- Control resources and share resources in a selective manner via a single console (authorization server).
Create the resource owner
- Log in to the WSO2 Identity Server Management Console (
https://<IS_HOST>:<PORT>/carbon) using administrator credentials (admin:admin). - On the Main > Identity section, click Add under Users and Roles.
- Click Add New User and create a new user by providing username and password.
- Click Next.
- Select the role as admin.
- Click Finish.
Create the requesting party
- On the Main > Identity section, click Add under Users and Roles.
- Click Add New User and create a new user by providing username and password.
- Click Finish.
Now that you have the resource owner and requesting party to try out the scenario, next step is to configure one service provider for the resource server and another service provider for the client acting on behalf of the requesting party.
Configure service provider to act as the resource server
To register your application as a service provider in the WSO2 Identity Server:
-
Log in to the WSO2 Identity Server Management Console using administrator credentials.
-
Go to Main > Identity > Service Providers > Add.
-
Enter a Service Provider Name. Optionally, enter a Description.
-
Click Register.
Basic OAuth/OpenID Connect configuration
-
Expand Inbound Authentication Configuration and then OAuth/OpenID Connect Configuration.
-
Click Configure.
-
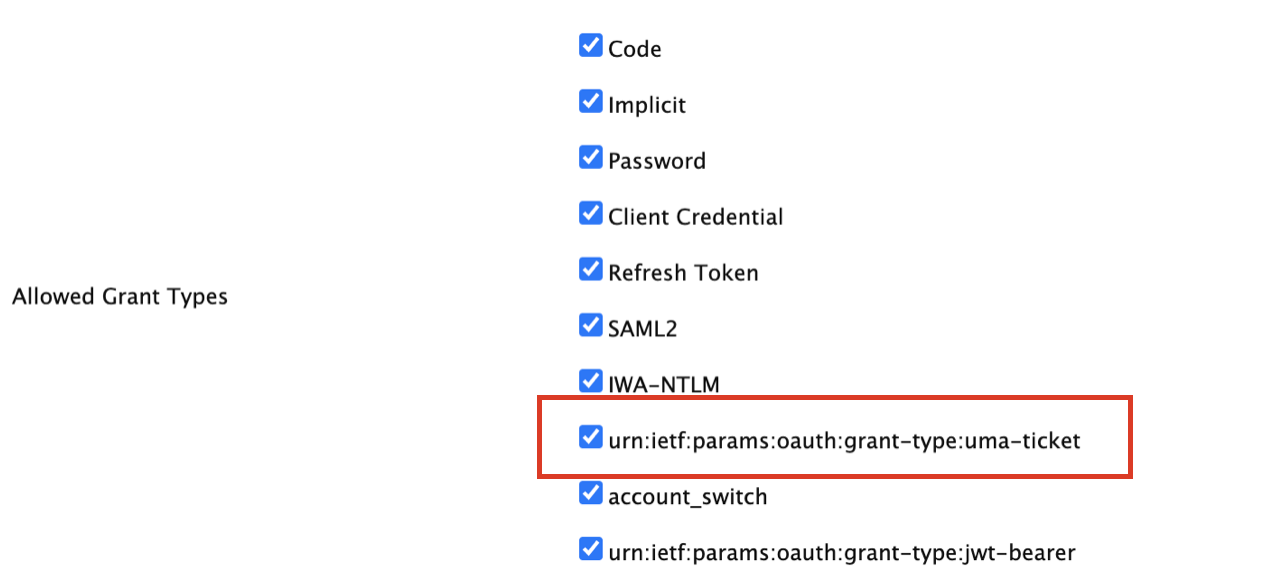
Make sure urn:ietf:params:oauth:grant-type:uma-ticket is selected from the Allowed Grant Types list.
-
Enter the Callback Url.
Tip
The Callback Url is the exact location in the service provider's application to which an access token will be sent. This URL should be the URL of the page that the user is redirected to after successful authentication.
-
Click Add.
Note
Note the generated OAuth Client Key and OAuth Client Secret. You will need this value later on when sending the request to the token endpoint.
Configure service provider to act as the client
To register your application as a service provider in the WSO2 Identity Server:
-
Log in to the WSO2 Identity Server Management Console using administrator credentials.
-
Go to Main > Identity > Service Providers > Add.
-
Enter a Service Provider Name. Optionally, enter a Description.
-
Click Register.
Basic OAuth/OpenID Connect configuration
Make the following changes to the created service provider.
-
Expand Inbound Authentication Configuration > OAuth/OpenID Connect Configuration and click Configure.
-
Enter the Callback Url.
Note
The Callback Url is the exact location in the service provider's application to which an access token will be sent. This URL should be the URL of the page that the user is redirected to after successful authentication.
-
Click Add. Note the OAuth Client Key and OAuth Client Secret that appear.
Tip
To configure more advanced configurations, see OAuth/OpenID Connect Configurations.
Claim configuration
Update claims for service provider:
- Expand Claim Configuration and select
http://wso2.org/claims/usernameas the Subject Claim URI.

- Click Update to save the changes.
Obtain the Protection API Access token (PAT)
-
Execute the following curl command to obtain the PAT:
Tip
- Be sure to replace the
<CLIENT_ID>and<CLIENT_SECRET>tags with the values you obtained when you configured the service provider for the resource server. - In this guide, the grant type that is used to obtain the PAT is the password grant type. Therefore, you need to pass the resource owners credentials in the curl command.
Request Format
curl -u <CLIENT_ID>:<CLIENT_SECRET> -k -d "grant_type=password&username=<USERNAME>&password=<PASSWORD>&scope=uma_protection" -H "Content-Type:application/x-www-form-urlencoded" https://<IS_HOST>:<IS_PORT>/oauth2/token
Sample Request
curl -u hwbR3jd2fikSApLKfv_wiwRWNSwa:q7Kb74s5dcK3FBh1MUWAJqvdrs8a -k -d "grant_type=password&username=larry&password=larry123&scope=uma_protection" -H "Content-Type:application/x-www-form-urlencoded" https://localhost:9443/oauth2/tokenYou will get a response similar to the following:
{ "access_token":"b8df48ff-feab-3632-b3dc-68ae6b4c62e2", "refresh_token":"1037ccad-f45a-38e7-96ad-40c00fbc7ca4", "scope":"uma_protection", "token_type":"Bearer", "expires_in":3600 } - Be sure to replace the
Register the resource
Now, you need to register the resource.
-
Execute the following curl command to put the resouce owner's resource under authorization server (WSO2 IS) protection.
Tip
- Make sure to replace the
<PAT>tag with the access token you got in the previous section.
Request Format
curl -X POST \
https://<IS_HOST>:<IS_PORT>/api/identity/oauth2/uma/resourceregistration/v1.0/resource \
-H 'Authorization: Bearer <PAT>' \
-H 'Content-Type: application/json' \
-d '<RESOURCE_PAYLOAD>'
Sample Request
curl -X POST \
https://localhost:9443/api/identity/oauth2/uma/resourceregistration/v1.0/resource \
-H 'Authorization: Bearer 64658549-47c1-3b5a-8637-c629f16c4118' \
-H 'Content-Type: application/json' \
-d '{
    "resource_scopes": [
        "view",
        "download"
    ],
    "description": "Collection of digital photographs",
    "icon_uri": "http://www.example.com/icons/flower.png",
    "name": "Photo Album",
    "type": "http://www.example.com/rsrcs/photoalbum"
    }'
You will get a response similar to the following:
{ "_id": "ceaa6506-1da9-456b-88d8-027797d2e081" } - Make sure to replace the
Now you have completed registering the resource.
Next, you need to create and publish an access policy to provide
specific users appropriate resource scopes (permissions) to access the resource.
e.g. The requesting party is allowed to have view permission to the registered resource of the resource owner.
Publish a policy
Follow the steps given below to create, register and publish a policy:
- Sign in to the management console (
https://<IS_HOST>:<IS_PORT>/carbon) using resource owner credentials. - On the Main tab, go to the Entitlement section and click Policy Administration under PAP.
- Click Add New Entitlement Policy and then click Write Policy in XML.
-
Copy the following sample policy and paste it on the Source View pane:
Note
- Replace the
{ENTER_YOUR_RESOURCE_ID}tag with the resource ID that you obtained when you registered the resource. - Replace the
{ENTER_REQUESTING_PARTY_USERNAME}tag with the username provided for the requesting party. - Replace the
{ENTER_PERMITTED_RESOURCE_SCOPE}tag with the permitted resource scope for the defined requesting party.
<Policy xmlns="urn:oasis:names:tc:xacml:3.0:core:schema:wd-17" PolicyId="UMApolicy" RuleCombiningAlgId="urn:oasis:names:tc:xacml:1.0:rule-combining-algorithm:first-applicable" Version="1.0"> <Target> <AnyOf> <AllOf> <Match MatchId="urn:oasis:names:tc:xacml:1.0:function:string-equal"> <AttributeValue DataType="http://www.w3.org/2001/XMLSchema#string">{ENTER_YOUR_RESOURCE_ID}</AttributeValue> <AttributeDesignator AttributeId="http://wso2.org/identity/identity-resource/resource-id" Category="http://wso2.org/identity/identity-resource" DataType="http://www.w3.org/2001/XMLSchema#string" MustBePresent="true"></AttributeDesignator> </Match> </AllOf> </AnyOf> </Target> <Rule Effect="Permit" RuleId="permit_for_username"> <Target> <AnyOf> <AllOf> <Match MatchId="urn:oasis:names:tc:xacml:1.0:function:string-equal"> <AttributeValue DataType="http://www.w3.org/2001/XMLSchema#string">{ENTER_REQUESTING_PARTY_USERNAME}</AttributeValue> <AttributeDesignator AttributeId="http://wso2.org/identity/user/username" Category="http://wso2.org/identity/user" DataType="http://www.w3.org/2001/XMLSchema#string" MustBePresent="false"></AttributeDesignator> </Match> </AllOf> </AnyOf> </Target> <Condition> <Apply FunctionId="urn:oasis:names:tc:xacml:1.0:function:string-at-least-one-member-of"> <Apply FunctionId="urn:oasis:names:tc:xacml:1.0:function:string-bag"> <AttributeValue DataType="http://www.w3.org/2001/XMLSchema#string">{ENTER_PERMITTED_RESOURCE_SCOPE}</AttributeValue> </Apply> <AttributeDesignator AttributeId="http://wso2.org/identity/identity-action/action-name" Category="http://wso2.org/identity/identity-action" DataType="http://www.w3.org/2001/XMLSchema#string" MustBePresent="true"></AttributeDesignator> </Apply> </Condition> </Rule> <Rule Effect="Deny" RuleId="Deny_all"></Rule> </Policy> - Replace the
-
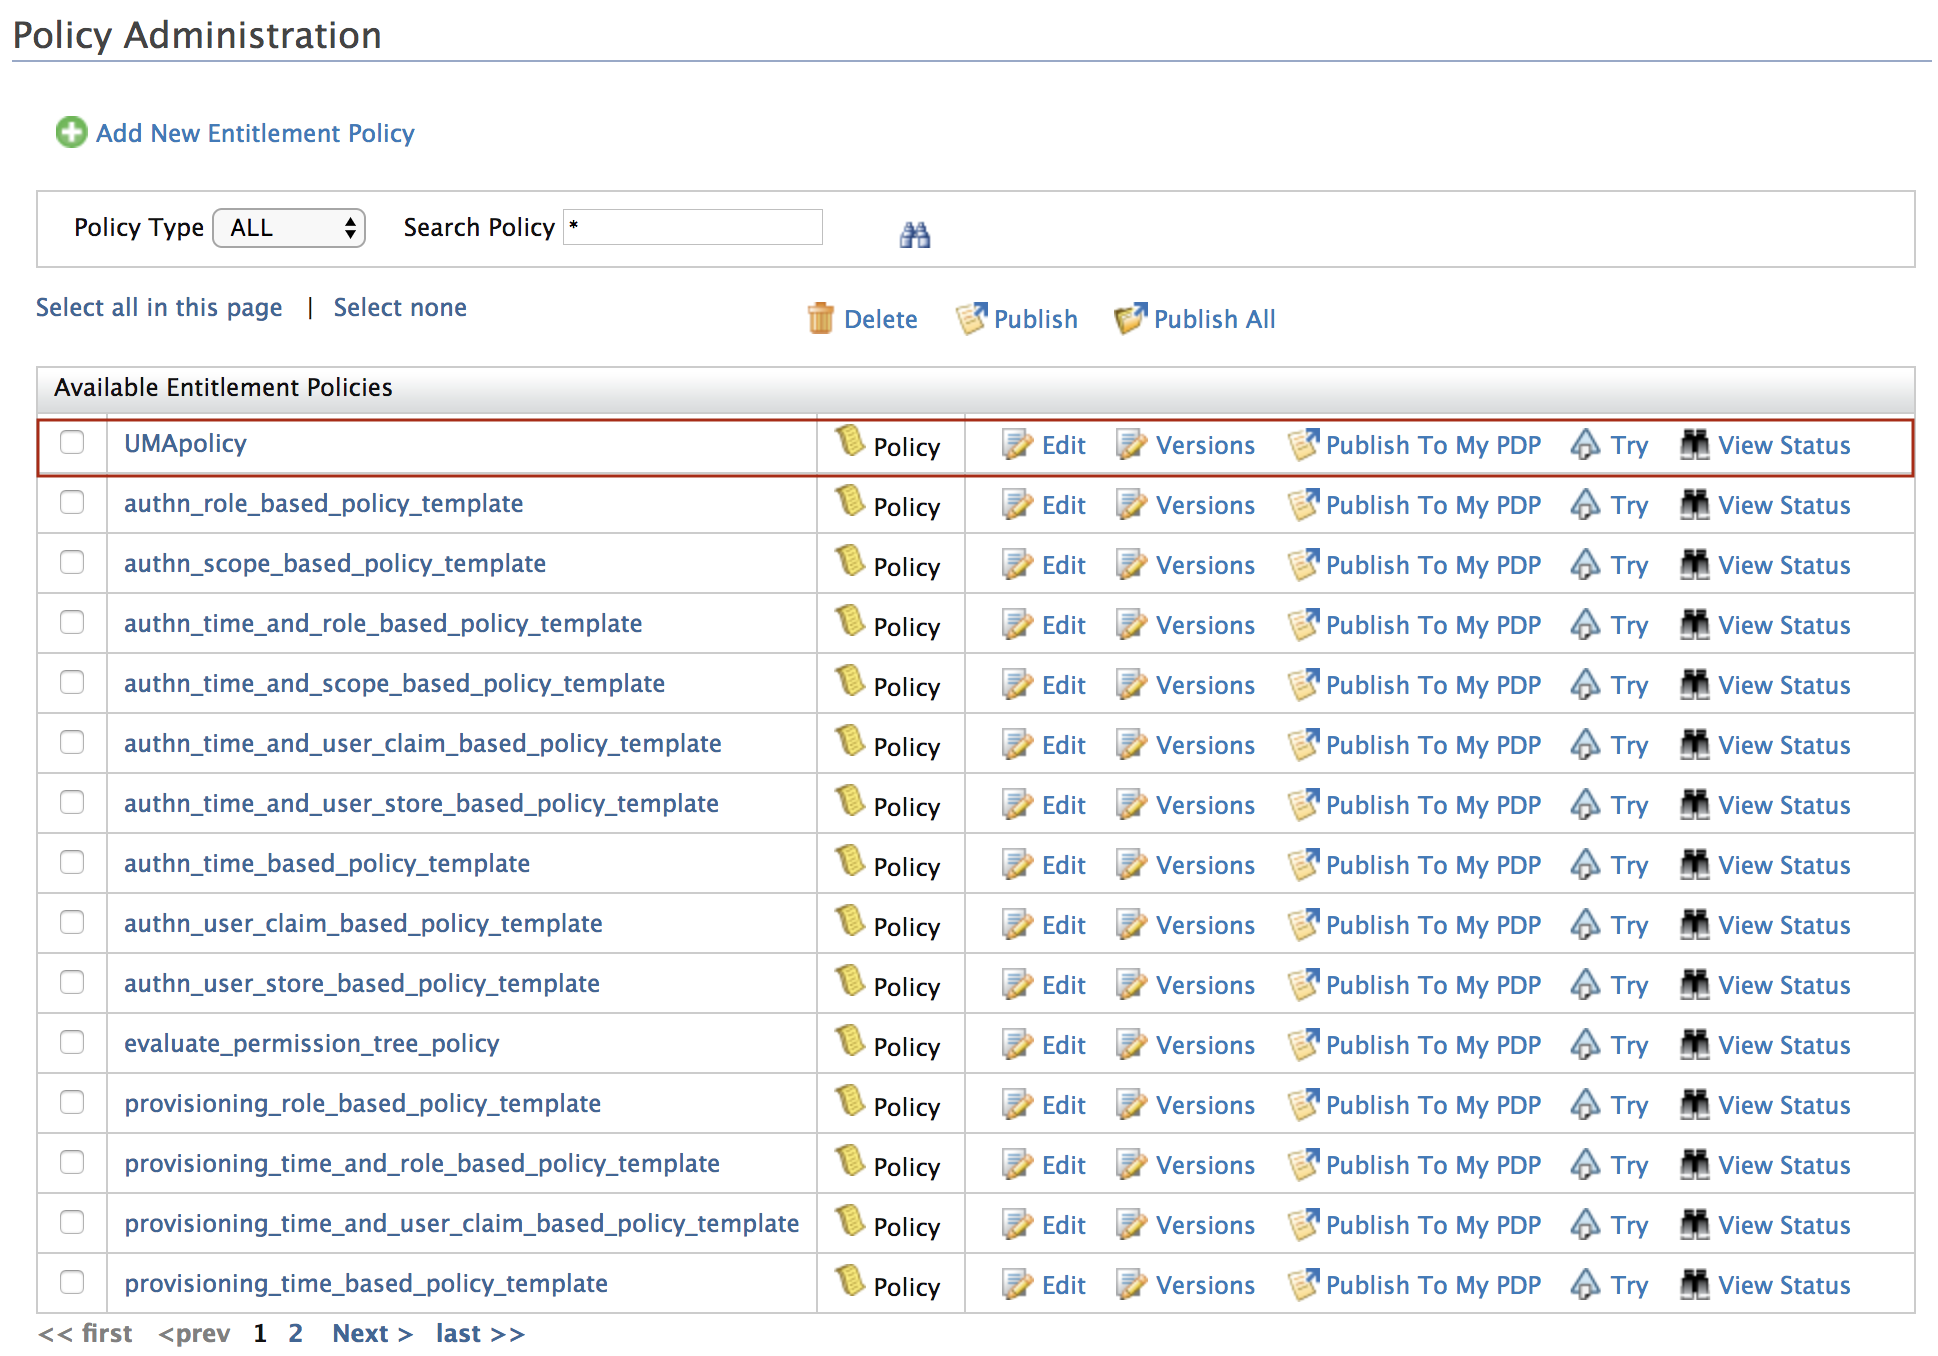
Save the policy. You will see the new policy that you created listed in the Policy Administration page.
-
Select the policy and click Publish To My PDP. This displays the Publish Policy page.
-
Click Publish. This displays a message for confirmation to publish the policy.
-
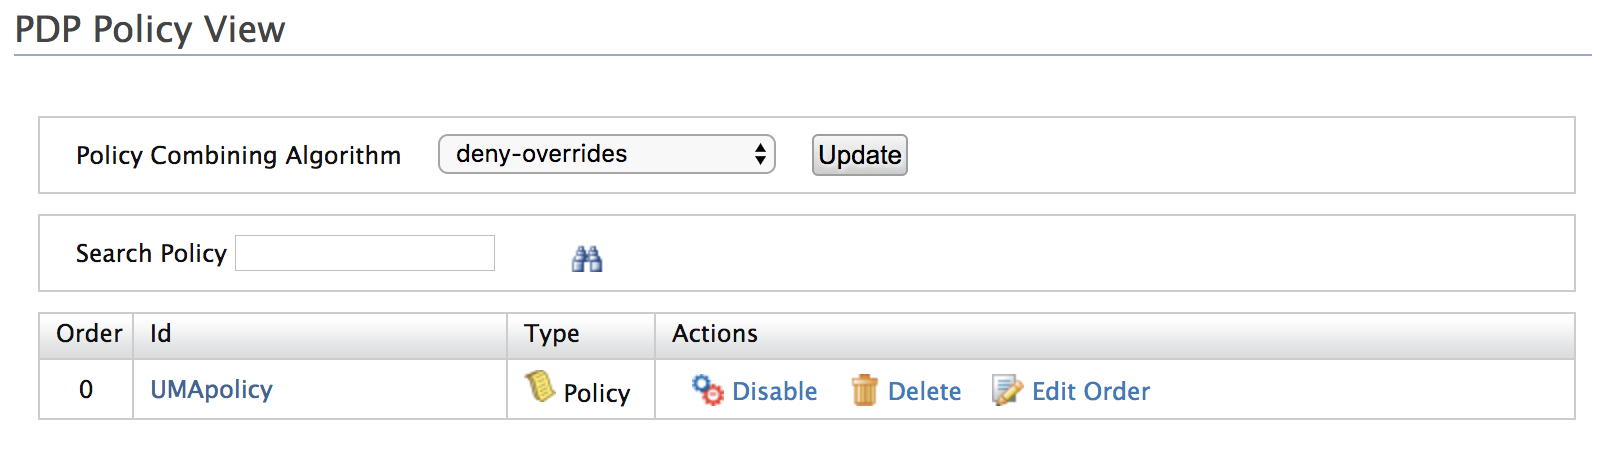
Click Yes. This publishes the policy. If you want to view the published policy, click Policy View under PDP.
Now that the resource owner has put their resource under the authorization server protection, let's try out the flow for a requesting party to access this resource.
Obtain a permission ticket
The permission endpoint allows the resource server to request permission when a client acting on behalf of the requesting party makes a resource request without a token or if the request contains an invalid token.
Tip
By default, the permission ticket is valid for 300 seconds. This time period might not be sufficient for you to try out this tutorial and if the permission ticket expires you need to obtain a new permission ticket in order to proceed
Therefore, to try out the tutorial without having to obtain a new permission ticket, you need to follow the step below to change the permission ticket expiration validity period:
- Add the following configuration to the
deployment.tomlfile in the<IS_HOME>/repository/conffolder and set the value to 3600.[oauth.token_validation] authorization_code_validity= "3600"
-
Execute the following curl command to obtain the permission ticket.
- Make sure to replace the
<PAT>tag with the access token you got in the previous section. - Replace the
<RESOURCE_ID>tag with the ID you got when registering the resource. -
Replace the
<PERMISSION_PAYLOAD>tag with required permissions.Note
The request can contain one or more permission values by having multiple resources and the relevant scopes. The sample request used in this guide contains a single permission.
Request Format
curl -X POST https://<IS_HOST>:<IS_PORT>/api/identity/oauth2/uma/permission/v1.0/permission -H 'authorization: Bearer <PAT>' -H "Content-Type: application/json" -d '["<PERMISSION_PAYLOAD>"]' -k
Sample Request
curl -X POST https://localhost:9443/api/identity/oauth2/uma/permission/v1.0/permission -H 'authorization: Bearer b8df48ff-feab-3632-b3dc-68ae6b4c62e2' -H "Content-Type: application/json" -d '[{"resource_id":"ceaa6506-1da9-456b-88d8-027797d2e081","resource_scopes":["view"]}]' -kYou will get a response similar to the following:
{"ticket":"97f476f2-72d0-4540-aa08-a4784bd2053e"} - Make sure to replace the
Obtain the OIDC id_token
The client should pass id token to prove its identity to the authorization server. For the sample scenario in this tutorial only the requesting party username is required.
-
Execute the following curl command to obtain the OIDC id_token.
Be sure to replace the
<CLIENT_ID>and<CLIENT_SECRET>tags with the values you got when you Configured the service provider for the client. Since the grant type used here is the password grant type, you need to specify the requesting party credentials in the curl command.Request Format
curl -u <CLIENT_ID>:<CLIENT_SECRET> -k -d "grant_type=password&username=<USERNAME>&password=<PASSWORD>&scope=openid" -H "Content-Type:application/x-www-form-urlencoded" https://localhost:9443/oauth2/token
Sample Request
curl -u IRBYPhUyAtYjjUIgjZySI800fUMa:6m_9dkM8e7RSxs77JW0dbf9ECr0a -k -d "grant_type=password&username=sam&password=sam123&scope=openid" -H "Content-Type:application/x-www-form-urlencoded" https://localhost:9443/oauth2/tokenYou will get a response similar to the following:
    {
       "access_token":"f2999d40-af06-3779-b157-731d6540c5de",
       "refresh_token":"f95adb62-34ae-311e-83c1-6b136eb49017",
       "scope":"openid",
       "id_token":"eyJ4NXQiOiJOVEF4Wm1NeE5ETXlaRGczTVRVMVpHTTBNekV6T0RKaFpXSTRORE5sWkRVMU9HRmtOakZpTVEiLCJraWQiOiJOVEF4Wm1NeE5ETXlaRGczTVRVMVpHTTBNekV6T0RKaFpXSTRORE5sWkRVMU9HRmtOakZpTVEiLCJhbGciOiJSUzI1NiJ9.eyJhdF9oYXNoIjoiMVhhWm43TE1LeU5sdFhFbnBOZ09fQSIsImF1ZCI6IkN6Ym42MVVmS09ZckF3azlBZjZidXIzbkthOGEiLCJzdWIiOiJzYW0iLCJhenAiOiJDemJuNjFVZktPWXJBd2s5QWY2YnVyM25LYThhIiwiYW1yIjpbInBhc3N3b3JkIl0sImlzcyI6Imh0dHBzOlwvXC9sb2NhbGhvc3Q6OTQ0M1wvb2F1dGgyXC90b2tlbiIsImV4cCI6MTUzNTE4MjM5OCwiaWF0IjoxNTM1MTc4Nzk4fQ.Rs3nPOMA_Fn8iWfDpVvmgWayhKU3_hhMQg_WHPxE0P_Dg2S8qxtSHBLMj6Z_b5iXNIAKFYFA_VF9fxZnSKgmVxZiYyrD0YADbZ5Hu6PW5uQPI59c0hdXT4rCH2WG2hP4slKRqsNZ1DCleWr0aiCPLwWixyUdnPub2c98IOcheOhkOOVV6WvAtI56f2gRDzUf66-t-3ZgKgfxkT0X6uNkvkRsk3oG7nK6_2wCuyoGYIS1h0yzryZYPmRLs7Db7QShshkB9yhAHrqo8b9b7Lf8S5NAXH2fcayEBq1MaqioBN9b_11swQ6R_2IA1EgoDfZ-eKGWCjOEsKusPmuDAI4xvQ",
       "token_type":"Bearer",
       "expires_in":3600
    }
Obtain the requesting party token
The client acting on behalf of the requesting party has to obtain the requesting party token (RPT) with the obtained permission ticket and the claim token.
Execute the following curl command to obtain the RPT.
- Make sure to replace the
<CLIENT_ID>and<CLIENT_SECRET>tags with the values you got after configuring service provider for the client. - Replace
<PERMISSION_TICKET>with the value you generated under the obtaining a permission ticket section. - Make sure to replace the
<ID_TOKEN>tag with the OIDC id_token you obtained.
curl --user <CLIENT_ID>:<CLIENT_SECRET> -k -d "grant_type=urn%3Aietf%3Aparams%3Aoauth%3Agrant-type%3Auma-ticket&ticket=<PERMISSION_TICKET>&claim_token=<ID_TOKEN>" -H "Content-Type: application/x-www-form-urlencoded" https://<IS_HOST>:<IS_PORT>/oauth2/token
You will get a response similar to the following:
{
   "access_token":"p8dj48ff-heah-3632-b3dc-68aenm4c62e9",
   "token_type":"Bearer",
   "expires_in":3600
}
Token introspection
Note
Add the following configuration to the deployment.toml file in the <IS_HOME>/repository/conf folder to enable introspection permissions.
[resource_access_control.introspect]
permissions = []
Execute the following curl command to get the token introspection:
-
Make sure to replace the
<PAT>tag with the access token you got in the previous section . -
Replace the
<RPT>tag with the request party token you obtained .
curl -v -k -H "Authorization: Bearer <PAT>" -H "Content-Type:application/x-www-form-urlencoded" -X POST --data "token=<RPT>" https://<IS_HOST>:<IS_PORT>/oauth2/introspect
You get a response similar to the following:
{
   "nbf":1553414959,
   "permissions":[
      {
         "resource_scopes":[
            "view"
         ],
         "resource_id":"08e69621-e418-4914-b85f-164e127c20de"
      }
   ],
   "active":true,
   "token_type":"Bearer",
   "exp":1553418559,
   "iat":1553414959,
   "client_id":"JfTSiJ24gh8sYHTQVuOl5RoftkAa",
   "username":"sam"
}
If the token introspection for the RPT is successful, the resource server can share the resource with the client.
This is how UMA works.
Note
In order to obtain UMA related information in the introspection end
point, add the following configuration to the deployment.toml file in the <IS_HOME>/repository/conf/ folder .
This is disabled by default. The response shown above with additional UMA
related details is what we get when the following configuration is
enabled.
[event.default_listener.uma_introspection_data_provider]
enable=true
Following is a sample response when the above configuration is disabled.
{
  "nbf": 1553411123,
  "active": true,
  "token_type": "Bearer",
  "exp": 1553414723,
  "iat": 1553411123,
  "client_id": "JfTSiJ24gh8sYHTQVuOl5RoftkAa",
  "username": "sam"
}
Related topics