Evolution of Identity Federation Standards
Identity and access management requirements are rapidly evolving over the years. Organizations cannot survive with authentication and authorization mechanisms that only span a single boundary of trust. Hence, these organizations often provide and consume services across trust boundaries, which may include partners, subsidiaries, customers or suppliers and may span across multiple buildings, cities, states, countries and even continents. Identity federation and single sign-on (SSO) come into the picture to provide and consume these services across trust boundaries.
Identity federation and SSO have similarities as well as key differences. Identity federation enables users to access multiple applications using the same access credentials. This makes access easy, as users do not have to remember a different set of credentials for every application they use. However, the users have to provide their credentials to each one of the applications separately although the credentials used are the same. On the other hand, SSO enables users to provide their credentials once and obtain access to multiple applications. In SSO, the users are not prompted for their credentials when accessing each application until their session is terminated.
This topic expands on Federated Identity and Single-Sign-On concepts.
SAML 2.0 based SSO
One of the key features in WSO2 Identity Server is SAML 2.0 based Single-Sign-On (SSO) feature. This implementation complies with the SAML 2.0 Web Browser SSO profile and the Single Logout Profile.
Info
Refer here for information on SAML 2.0 profiles.
Single sign-on (SSO) has become very popular since it is a very secure and convenient authentication mechanism. Google Apps can be taken as the best example for a single sign-on system where users can automatically log in to multiple web applications once they are authenticated once using a single set of credentials.
Security Assertion Markup Language (SAML) version 2.0 Profiles specification defines a web browser based single sign-on system. This article briefly explains the SAML 2.0 web browser-based SSO profile and guides you to build your own SAML 2.0 Assertions Consumer using the OpenSAML 2.2.3 Java library. This section helps you to understand how SAML 2.0 based SSO systems work and how to use WSO2 Identity Server as the identity provider in a SSO system.
The following sections expand on SAML 2.0 based SSO.
About SSO
There are two roles in a single sign-on (SSO) system: Service Providers and Identity Providers. The important characteristic of a single sign-on system is the pre-defined trust relationship between the service providers and the identity providers. Service providers trust the assertions issued by the identity providers and the identity providers issue assertions based on the results of authentication and authorization of principles which access services on the service provider's side.
The following are some of the advantages you can have with SSO:
- Users need only a single username/password pair to access multiple services. Thus they do not have the issue of remembering multiple username/password pairs.
- Users are authenticated only once at the identity provider and then they are automatically logged into all services within that "trust-domain". This process is more convenient to users since they do not have to provide their username/password at every service provider.
- Service providers do not have the overhead of managing user identities, which is more convenient for them.
- User identities are managed at a central point. This is more secure, less complex and easily manageable.
For more information on SSO, see here.
WSO2 Identity Server supports the SAML 2.0 web browser based SSO profile. WSO2 Identity Server can act as the identity provider of a single sign-on system with minimal configurations. This section provides information on how to configure the identity server and how your applications can be deployed in a SAML 2.0 web browser based SSO system.
SSO in reality
Single sign-on (SSO) is widely used in web technologies. Google is one of the best examples.
Try this simple exercise,
- Visit www.google.com from your web browser.
- Click on the SIGN IN button on the top right of the page.
- Once you sign in, you are redirected to www.google.com/accounts/ServiceLogin . There you are requested to enter your Username and Password. Enter your Google credentials there.
- Once you enter your Username and Password, you are directed back to www.google.com where you started.
- Next visit www.gmail.com, the Google mail server.
- Notice that you are automatically signed in and you directly access your Gmail Inbox. You did not have to enter your Username and Password at Gmail.
- In addition to that; now try www.youtube.com.
- Click on the Sign In button on the top right of the YouTube home page.
-
You are automatically signed in. You do not have to enter your username and password at YouTube.
Info
Notice the URL of the web browser. Each time you access an application, you see that you are being redirected to www.google.com/accounts/ServiceLogin and return immediately back to the website.
Single sign-on (SSO) allows you to sign in only once but provides access to multiple resources without having to re-enter your username and password.
SAML 2.0 web browser-based SSO profile
SAML 2.0 Web Browser based SSO profile is defined under the SAML 2.0 Profiles specification. SAML 2.0 provides five main specifications:
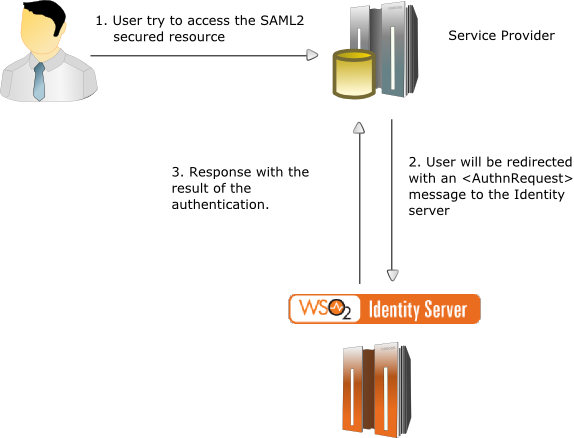
In a web browser based SSO system, the flow can be started by the user either by attempting to access a service at the service provider or by directly accessing the identity provider itself.
If the user accesses a service at a service provider:
- The service provider determines which identity provider to use (this is the case when there are multiple identity providers. SAML identity provider discovery profile may be used).
- The service provider generates a SAML message and then redirects the web browser to the identity provider along with the message.
- Identity provider authenticates the user.
- The identity provider generates a SAML message and then redirects the web browser back to the service provider.
- The service provider processes the SAML message and decides to grant or deny access to the user.
If the user accesses the identity provider directly, then only the steps 3, 4 and 5 are in the flow.
The message MUST contain an element which uniquely identifies the service provider who created the message. More information regarding the message can be found in SAML Core Specification.
The following diagram illustrates the scenario:
SAML 2.0 SSO assertion consumers
Service providers act as SAML assertion consumers. They have two basic functions:
- Create messages and redirect users to the identity provider with the created message.
- Process messages from the identity provider and make decisions based on them.
The following code is a sketch of a sample service provider servlet in a SAML 2.0 web browser-based SSO system.
public class Resource extends HttpServlet
{
     private static SamlConsumer consumer = new SamlConsumer();

     public void doGet(HttpServletRequest request, HttpServletResponse response)
     {
             requestMessage = consumer.buildRequestMessage();
             response.sendRedirect(requestMessage);
     }

     public void doPost(HttpServletRequest request, HttpServletResponse response)
     {
             responseMessage = request.getParameter("SAMLResponse").toString();
             result = consumer.processResponseMessage(responseMessage);
     }
}
When a web user attempts to access the above servlet, its doGet() method is called. Inside the doGet() method, it generates an message and then redirects the user to the identity provider.
After authentication is completed by the identity provider, it does a POST call back to the above servlet with a message. Then the doPost() method of the servlet gets called and inside the doPost() method, it retrieves the message from the request and then the message is passed to the SamlConsumer instance for processing.
The complete source code can be checked out here .
<AuthnRequest> message
To create an <AuthnRequest> message using the
OpenSAML library:
- Add the OpenSAML library to the build path of the project. You can download the open SAML JAR file from here .
-
A sample
message can be found here. -
According to SAML 2.0 specifications, the message must contain an element. Create the Issuer element first.
// the issuerUrl is the url of the service provider who generates the message String issuerUrl = "http://localhost:8080/saml2.demo/consumer"; IssuerBuilder issuerBuilder = new IssuerBuilder(); Issuer issuer = issuerBuilder.buildObject("urn:oasis:names:tc:SAML:2.0:assertion", "Issuer", "samlp"); issuer.setValue(issuerUrl); -
Create the
<AuthnRequest>next.DateTime issueInstant = new DateTime(); AuthnRequestBuilder authnRequestBuilder = new AuthnRequestBuilder(); AuthnRequest authnRequest = authnRequestBuilder.buildObject("urn:oasis:names:tc:SAML:2.0:protocol", "AuthnRequest", "samlp"); authnRequest.setForceAuthn(new Boolean(false)); authnRequest.setIsPassive(new Boolean(false)); authnRequest.setIssueInstant(issueInstant); authnRequest.setProtocolBinding("urn:oasis:names:tc:SAML:2.0:bindings:HTTP-POST"); authnRequest.setAssertionConsumerServiceURL(issuerUrl); authnRequest.setIssuer(issuer); authnRequest.setID(aRandomId); authnRequest.setVersion(SAMLVersion.VERSION_20); -
Next encode the message.
Marshaller marshaller = Configuration.getMarshallerFactory().getMarshaller(authnRequest); Element authDOM = marshaller.marshall(authnRequest); StringWriter rspWrt = new StringWriter(); XMLHelper.writeNode(authDOM, rspWrt); String requestMessage = rspWrt.toString(); Deflater deflater = new Deflater(Deflater.DEFLATED, true); ByteArrayOutputStream byteArrayOutputStream = new ByteArrayOutputStream(); DeflaterOutputStream deflaterOutputStream = new DeflaterOutputStream(byteArrayOutputStream, deflater); deflaterOutputStream.write(requestMessage.getBytes()); deflaterOutputStream.close(); /* Encoding the compressed message */ String encodedRequestMessage = Base64.encodeBytes(byteArrayOutputStream.toByteArray(), Base64.DONT_BREAK_LINES); String encodedAuthnRequest = URLEncoder.encode(encodedRequestMessage,"UTF-8").trim(); -
Construct the redirection URL.
redirectionUrl = identitypProviderUrl+ "?SAMLRequest=" + encodedRequestMessage; -
Redirect the user to the identity provider.
response.sendRedirect(redirectionUrl);
<Response> message
To read the <Response> message issued by the WSO2 Identity Server:
-
A sample <Response> message can be found here.
-
The response message must be fetched from the request.
responseMessage = request.getParameter("SAMLResponse").toString(); -
The fetched responseMessage is unmarshalled and the SAML message is retrieved.
DocumentBuilderFactory documentBuilderFactory = DocumentBuilderFactory.newInstance(); documentBuilderFactory.setNamespaceAware(true); DocumentBuilder docBuilder = documentBuilderFactory.newDocumentBuilder(); Document document = docBuilder.parse(new ByteArrayInputStream(authnReqStr.trim().getBytes())); Element element = document.getDocumentElement(); UnmarshallerFactory unmarshallerFactory = Configuration.getUnmarshallerFactory(); Unmarshaller unmarshaller = unmarshallerFactory.getUnmarshaller(element); Response response = (Response) unmarshaller.unmarshall(element); -
The retrieved SAML 2.0 Response message can be easily processed. For example, let's take the username or the subject's name ID.
String subject = response.getAssertions().get(0).getSubject().getNameID().getValue(); -
Alternatively, you can retrieve the certificate.
String certificate = response.getSignature().getKeyInfo().getX509Datas().get(0).getX509Certificates().get(0).getValue();
Likewise the message from the WSO2 Identity Server can be read easily.
Identity provider initiated SSO
To initiate identity provider initiated SSO you need to perform a HTTP GET/POST to the following URL (assume the registered service provider issuer ID is foo.com).
https://localhost:9443/samlsso?spEntityID=foo.com
This request will authenticate and redirect the user to the registered
Assertion Consumer URL. You can use acs query parameter in the request
to specify the Assertion Consumer URL that the browser should be redirected
to after the authentication is successful.
- If the
acsquery parameter is not present in the request, the Identity Server sends the response to default ACS URL of the service provider. -
If the
acsparameter is present and the value of that parameter matches with any of the registered ACS URLs of the service provider, then the Identity Server sends the response to the matched one.https://localhost:9443/samlsso?spEntityID=foo.com&acs=http://localhost:8080/foo.com/my-home.jsp
Optionally, you can send a RelayState parameter as follows:
https://localhost:9443/samlsso?spEntityID=foo.com&RelayState=http://localhost:8080/foo.com/my-home.jsp
This request will authenticate and redirect the user to the URL in the RelayState parameter itself.
Info
You could could have service provider initiated SSO alone, or service provider initiated SSO and identity provider initiated SSO together. You cannot have identity provider initiated SSO alone. By design, service provider initiated SSO is more restrictive and secure. If a service provider is allowed to do identity provider initiated SSO, it would automatically imply that this service provider is allowed to do service provider initiated SSO as well.