Write a Custom Federated Authenticator
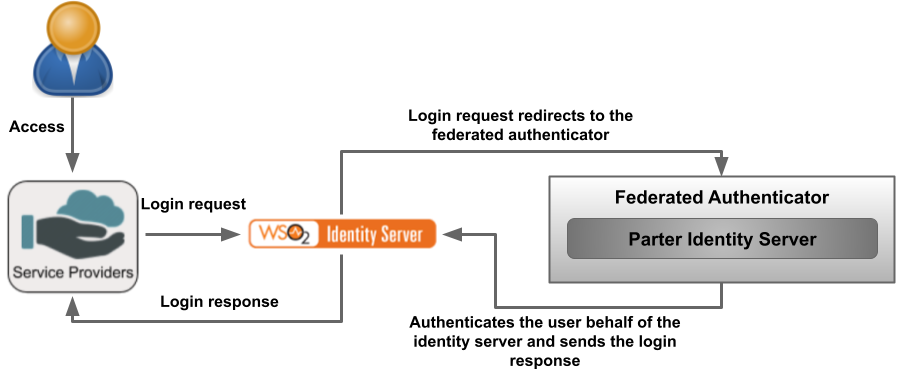
A custom federated authenticator can be written to authenticate a user with an external system. The external system can be any identity provider such as Facebook, Twitter, Google, Yahoo, etc. You can use the extension points available in WSO2 Identity Server to create custom federated authenticators.
Authenticator API
The following is the API used to implement a custom federated authenticator.
Click to view the API of the Application Authenticators
  /*
  *  Copyright (c) 2005-2013, WSO2 Inc. (http://www.wso2.org) All Rights Reserved.
  *
  *  WSO2 Inc. licenses this file to you under the Apache License,
  *  Version 2.0 (the "License"); you may not use this file except
  *  in compliance with the License.
  *  You may obtain a copy of the License at
  *
  *    http://www.apache.org/licenses/LICENSE-2.0
  *
  * Unless required by applicable law or agreed to in writing,
  * software distributed under the License is distributed on an
  * "AS IS" BASIS, WITHOUT WARRANTIES OR CONDITIONS OF ANY
  * KIND, either express or implied.  See the License for the
  * specific language governing permissions and limitations
  * under the License.
  */

  package org.wso2.carbon.identity.application.authentication.framework;

  import java.io.Serializable;
  import java.util.List;

  import javax.servlet.http.HttpServletRequest;
  import javax.servlet.http.HttpServletResponse;

  import org.wso2.carbon.identity.application.authentication.framework.context.AuthenticationContext;
  import org.wso2.carbon.identity.application.authentication.framework.exception.AuthenticationFailedException;
  import org.wso2.carbon.identity.application.authentication.framework.exception.LogoutFailedException;
  import org.wso2.carbon.identity.application.common.model.Property;

  /**
   * API of the Application Authenticators.
   *
   */
  public interface ApplicationAuthenticator extends Serializable {

      /**
       * Check whether the authentication or logout request can be handled by the
       * authenticator
       *
       * @param request
       * @return boolean
       */
      public boolean canHandle(HttpServletRequest request);

      /**
       * Process the authentication or logout request.
       *
       * @param request
       * @param response
       * @param context
       * @return the status of the flow
       * @throws AuthenticationFailedException
       * @throws LogoutFailedException
       */
      public AuthenticatorFlowStatus process(HttpServletRequest request,
              HttpServletResponse response, AuthenticationContext context)
              throws AuthenticationFailedException, LogoutFailedException;

      /**
       * Get the Context identifier sent with the request. This identifier is used
       * to retrieve the state of the authentication/logout flow
       *
       * @param request
       * @return
       */
      public String getContextIdentifier(HttpServletRequest request);

      /**
       * Get the name of the Authenticator
       * @return name
       */
      public String getName();

      /**
       * @return
       */
      public String getFriendlyName();

      /**
       * Get the claim dialect URI if this authenticator receives claims in a standard dialect
       * and needs to be mapped to the Carbon dialect http://wso2.org/claims
       * @return boolean
       */
      public String getClaimDialectURI();

      /**
       * @return
       */
      public List<Property> getConfigurationProperties();
  }
Write the federated authenticator
To write the federated authenticator:
-
Create a
mavenproject for the custom federated authenticator. Refer the following files:- The pom.xml file used for the sample custom federated authenticator.
- The service component class file to deploy in WSO2 Identity Server and register it as a federated authenticator.
-
Write the custom federated authenticator by extending the AbstractApplicationAuthenticator class and implementing the FederatedApplicationAuthenticator class.
Info
See the sample custom federated authenticator for your reference.
Methods in AbstractApplicationAuthenticator class and FederatedApplicationAuthenticator interface
| Method | Description |
|---|---|
| public String getName() | Return the name of the authenticator. |
| public String getFriendlyName() | Returns the display name for the custom federated authenticator. In this sample, we are using a custom-federated-authenticator. |
| public String getContextIdentifier(HttpServletRequest request) | Returns a unique identifier that will map the authentication request and the response. The value returned by the invocation of the authentication request and the response should be the same. |
| public boolean canHandle(HttpServletRequest request) | Specifies whether this authenticator can handle the authentication response. |
| protected void initiateAuthenticationRequest(HttpServletRequest request,HttpServletResponse response, AuthenticationContext context) | Redirects the user to the login page to authenticate and in this sample, the user is redirected to the login page of the application which is configured in the partner identity server which acts as the external service. |
| protected void processAuthenticationResponse(HttpServletRequest request,HttpServletResponse response, AuthenticationContext context) | Implements the logic of the custom federated authenticator. |
Deploy the authenticator
To deploy the custom federated authenticator:
-
Open a terminal, navigate to the root of your project, and compile the service by running the following command:
mvn clean install -
Copy the generated
org.wso2.carbon.identity.custom.federated.authenticator-1.0.0.jarfile from<Custom-federated-authenticator>/targetfolder to the<IS_HOME>/repository/components/dropinsfolder.
Configure the partner identity server
In this guide, the partner identity server acts as the external system. Therefore, it is required to run a second WSO2 Identity Server instance as the partner identity server.
Set up partner IS
Add the following config to the <PARTNER_IS_HOME>/repository/conf/deployment.toml file to be able to run the partner identity server on the same machine in a different port.
[server]
offset=1
After starting that partner identity server, it will run on localhost:9444.
Register a service provider
To register and configure the service provider on the partner IS:
-
On the management console (
https://<PARTNER_IS_HOST>:<PARTNER_IS_PORT>/carbon) of the partner identity server, go to Main > Identity > Service Providers > Add. -
Enter
pickup-dispatchas the Service Provider Name and click Register. -
Expand Inbound Authentication Configuration > OAuth/OpenID Connect Configuration and, click Configure.
-
Enter
https://localhost:9443/commonauthas the Callback Url. -
Click Add. Note that the
client keyandclient secretare generated. -
Click Update to save the configurations.
Download and deploy the application
On the partner identity server:
- Download the OIDC pickup-dispatch sample application.
- Deploy the sample pickup-dispatch application on the partner identity server.
Add a new user
To add a new user:
1. On the management console (https://<PARTNER_IS_HOST>:<PARTNER_IS_PORT>/carbon) of the partner identity server, go to Users and Roles > Add.
-
Click Add New User.
-
Enter a Username and Password for the new user.
-
Click Finish to add the new user.
Configure the Identity Server
This section guides you on how to configure the identity server to use the custom federated authenticator.
Prerequisites
- You need to set up the sample application.
- You need to register an Identity Provider named
Partner-Identity-Server.
Configure federated authenticator
To configure the custom fedrated authenticator:
- On the management console, go to Identity Providers > List.
- Click on Edit corresponding to the
Partner-Identity-Serveridentity provider. - Expand Federated Authenticators > Custom-federated-authenticator configurations.
-
Enter the following details
Field name Value Enable Selected Default Selected Client Id The Client Id value generated by the external service provider of the partner identity server. Client Secret The Client Secret value generated by the external service provider of the partner identity server. Callback URL https://localhost:9443/commonauthAuthorization Endpoint URL https://localhost:9444/oauth2/authorize/Token Endpoint URL https://localhost:9444/oauth2/token/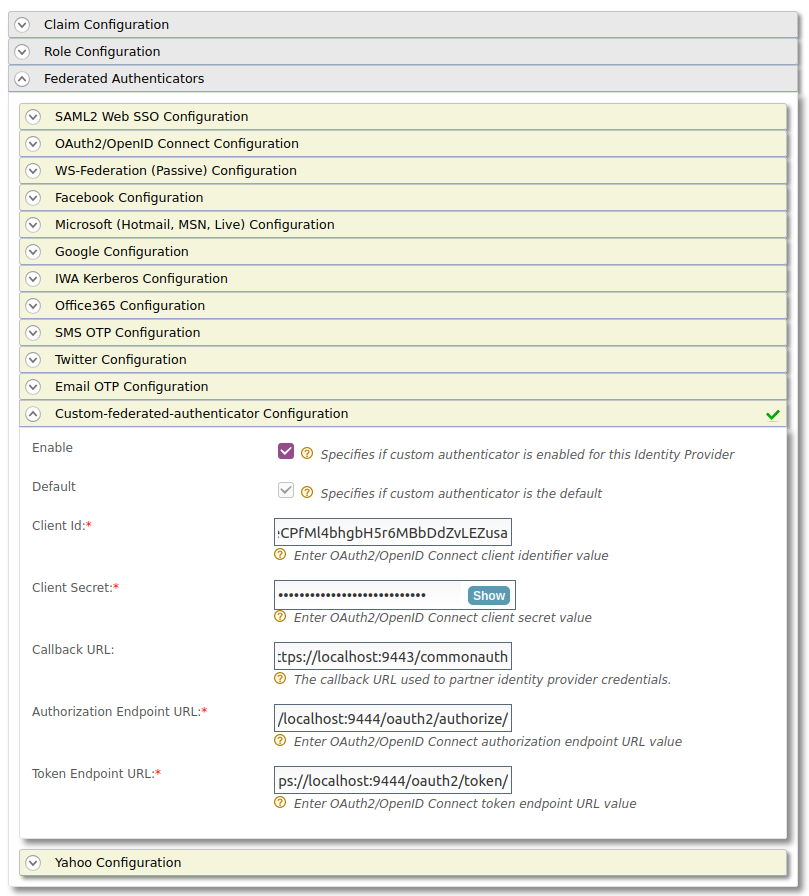
-
Click Update to save the configurations.
Configure the SP with the custom federated authenticator
To configure the custom federated authenticator for the SP:
-
On the management console, go to Main > Identity > Service Providers > List.
-
Click Edit on the
pickup-dispatchservice provider. -
Expand the Local and Outbound Authentication Configuration and select
Partner-Identity-Serverfrom the Federated Authentication list.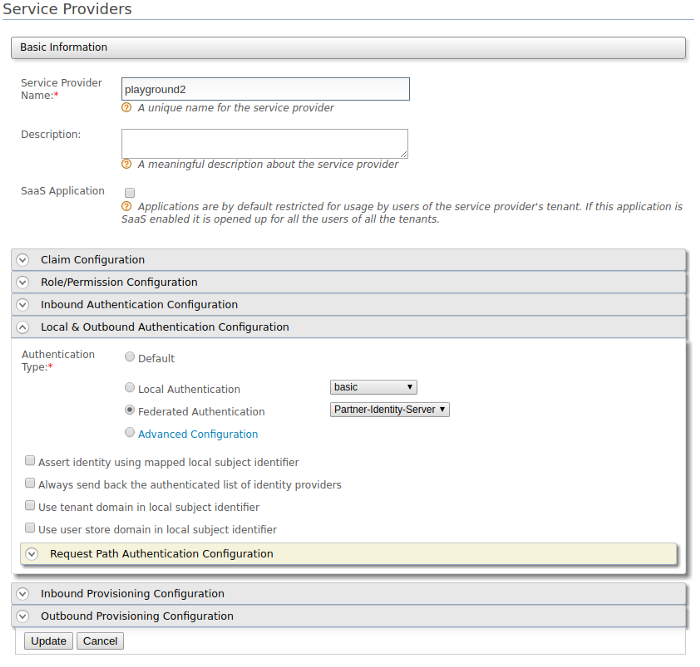
-
Click Update to save the configurations.
Tip
To configure more advanced configurations, see OAuth/OpenID Connect Configurations.
-
Expand the Local & Outbound Authentication Configuration section.
-
Select Federated Authentication and select the configured federated authenticator.
-
Click Update to save the configurations.
Try it out
-
Access the application URL of the service provider:
http://localhost:8080/pickup-dispatch/home.js -
Click Login and enter the credentials of the the new user created in the partner identity server.
-
Provide the required consent. You will be redirected to the Pickup Dispatch application home page.
The user is successfully authenticated by the partner Identity Server.
Similarly, you can write a federated authenticator to authenticate the users using an external system.
Contributing your connectors
You are welcome to share and host your connectors in our connector store. As an organization that believes in the open source paradigm, we always encourage our community to make contributions so that our community around WSO2 Identity server can benefit from using an open source product. Contributions can be made by following the procedure below.
- Create an issue in the product-is git repository.
- Provide a basic description of the purpose and functionality of your connector. Include the following information in the git issue.
- Downloadable connector artifact (ex: JAR files).
- Documentation on setup and testing instructions for the connector.
- Source code repository of the connector.
- Make sure your source code follows WSO2 coding standards and secure development guidelines.
- Our team will perform necessary functionality, security, and usability testing on the connector and provide suggestions for improvements.
- If your code and the functionality are deemed to comply with the standards of WSO2, you will be able to get the connector hosted on our connector store and contribute the source code to WSO2.
- You will be required to sign the Contributor License Agreement once the connector is accepted.
You can also contact us through our slack channel if you need more information.
Top