Configure IWA as a federated authenticator
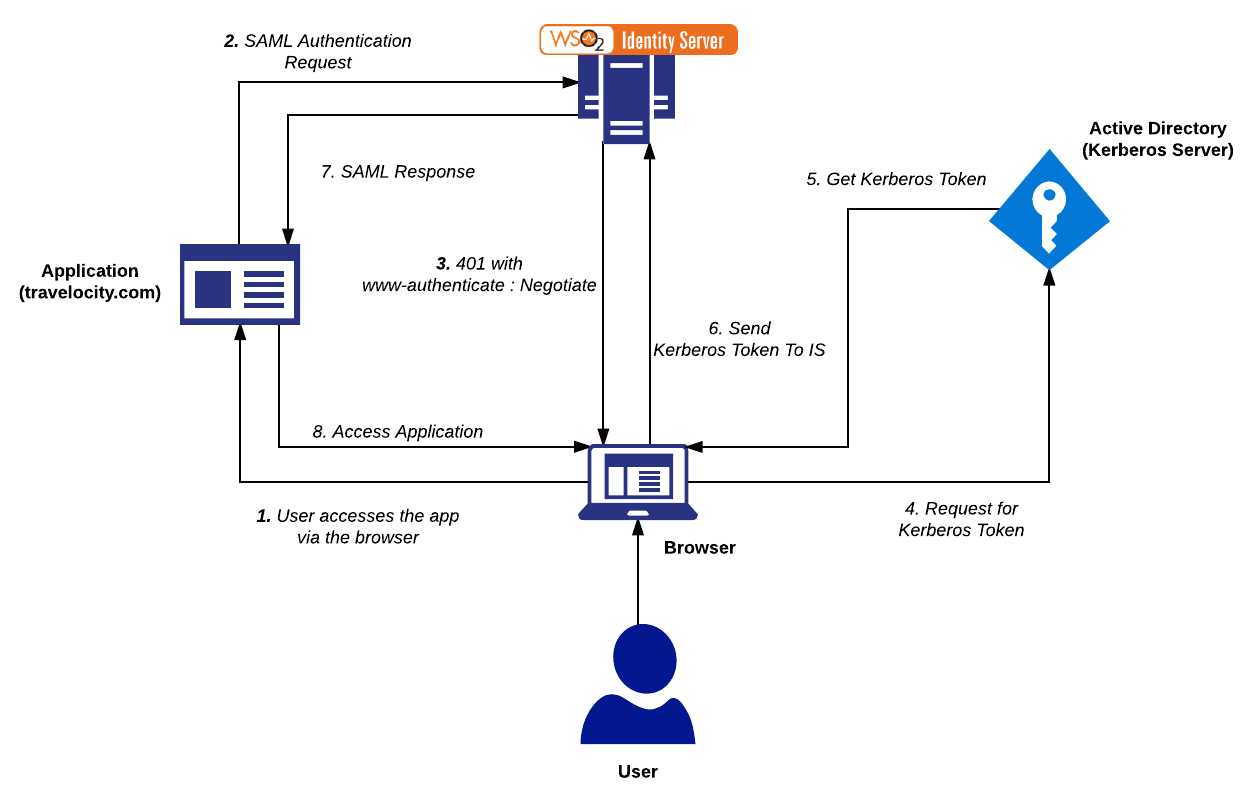
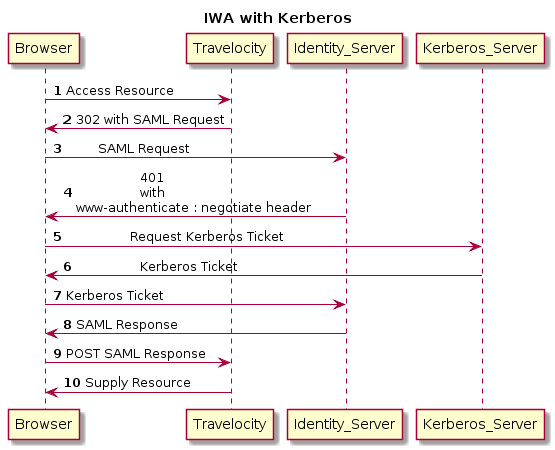
Integrated Windows Authentication (IWA) is a popular authentication mechanism that is used to authenticate users in Microsoft Windows servers.
It uses Negotiate/Kerberos or NTLM to authenticate users based on an encrypted ticket/message passed between a browser and a server.
IWA authenticator version
This IWA authenticator is provided OOTB and was implemented from WSO2 IS 5.3.0 onwards. It uses Kerberos internally and is the recommended approach as it overcomes some limitations of the IWA authenticator provided in previous versions of WSO2 IS which was based on NTLM.
If you still want to use the previous IWA authenticator that was based on NTLM, it is available as an extension. For more information on how to setup the NTLM-based IWA authenticator, see Configuring IWA Single-Sign-On.
The benefits of using the authenticator based on Kerberos vs the authenticator based on NTLM are as follows:
- Can be used on any operating system unlike NTLM which has to be run on a Windows server.
- Performance and security on Kerberos are better.
Related Links
-
For more information about IWA, see Integrated Windows Authentication
-
To configure Active Directory as a user store, see Configuring a Read-write Active Directory User Store.
Follow the instructions in the sections below to configure IWA for local or federated authentication in WSO2 Identity Server (IS).
Set up IWA
-
Add a DNS host entry in the Active Directory (AD) to map the IP address of WSO2 Identity Server to a hostname.
Info
- If there are multiple Kerberos domains, WSO2 IS should have a virtual host name for each Kerberos domain.
- When adding the DNS entry, generally the first part of the hostname is given. The AD will append the rest with its AD domain. For example, if the AD domain is
wso2.com, after you add a DNS host entry, the final result will be similar to the following:idp.wso2.com - Kerberos does not work with IP addresses, it relies on domain names and correct DNS entries only.
-
Open the
<IS_HOME>/repository/conf/deployment.tomlfile and add the following configuration:[server] hostname="idp.wso2.com" -
Open the
jaas.conffile found in the<IS_HOME>/repository/conf/identityfolder and check if the configuration is as follows:Info
Learn more about JAAS.
Server { com.sun.security.auth.module.Krb5LoginModule required useKeyTab=false storeKey=true useTicketCache=false isInitiator=false; }; Client { com.sun.security.auth.module.Krb5LoginModule required useTicketCache=false; }; -
Register WSO2 IS using the same hostname
idp.wso2.comin Active Directory:- Use the DNS tool on the machine that is running WSO2 IS to add an entry for the hostname (idp.is.local).
- Map it to the local IP address.
-
Create a service account in the Active Directory for WSO2 IS or use an existing account.
Note
- For this tutorial, the sample username of the service account is is_linux.
- The account used for WSO2 IS needs to be different from the one used by the user to login to the application.
-
Run the following commands to register WSO2 IS as a service principal in Active Directory:
Note
Replace
is_linuxwith the username of your service account in the command below. The format of the command is as follows:[setspn -A HTTP/<url of Identity Server> <service_account>]setspn -A HTTP/idp.wso2.com is_linux setspn -A HTTP/idp is_linux
You can now set up IWA either as a local authenticator or as a federated authenticator.
Configure WSO2 IS with IWA
Let's configure WSO2 IS with IWA as a local or federated authenticator.
Register an identity provider
-
Log in to the Management Console(
https://<IS_HOST>:<PORT>/carbon) using admin/admin credentials. -
Navigate to Main > Identity > Identity Providers > Add.
-
Enter an Identity Provider Name, Display Name, and Description.
-
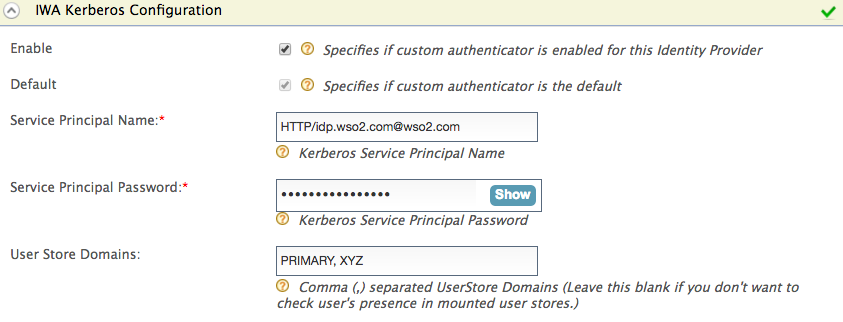
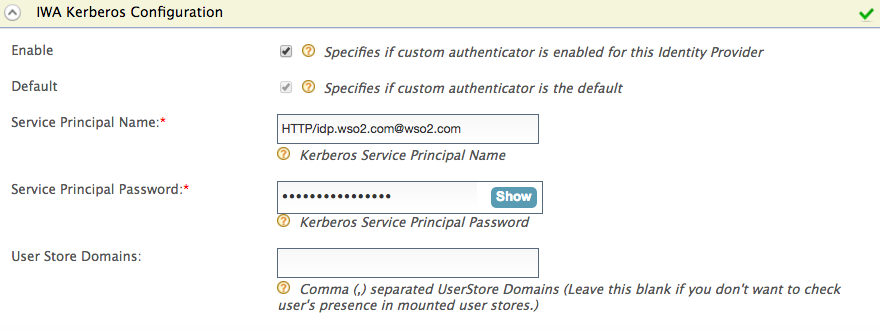
Expand the Federated Authenticators section, expand IWA Federated Configuration, and fill in the following values:
Field Description Sample Value Enable Enable this to enable a custom authenticator for the identity provider. Selected Server Principal Name The SPNName should be the SPN you registered in step 6 of Setting up IWA, with the Active Directory domain. The SPNName follows this format:
For example,
If the SPN is
HTTP/idp.wso2.com, whereHTTPis a service class (in this case,HTTPis not the standard protocol; it is the service class) andIS.wso2.comis the Active Directory domain, the SPNName will beHTTP/[email protected]HTTP/[email protected]Server Principal Password The SPNPassword should be the password of the service account associated with the SPN (the service account created in step 6 of Setting up IWA ). - User store domains [Mandatory only if you want to use IWA as a local authenticator]
The mounted user stores in which you want the user’s existence to be checked in.
- To configure IWA as a local authenticator , mount the user store domain names of the relevant user stores that you expect the user to be in.
- To configure IWA as a federated authenticator , leave this field blank.
PRIMARY -
IWA as a Local Authenticator
-
IWA as a Federated Authenticator
-
Configure your browser to support Kerberos and NTLM.
Firefox
1. Type
about:configin the address bar, ignore the warning and continue, this will display the advanced settings of Firefox. 2. In the search bar, search for the keynetwork.negotiate-auth.trusted-uris.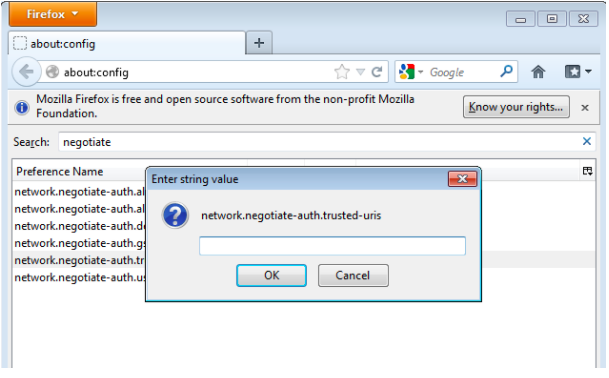
- Add the WSO2 Identity Server URL and click OK.

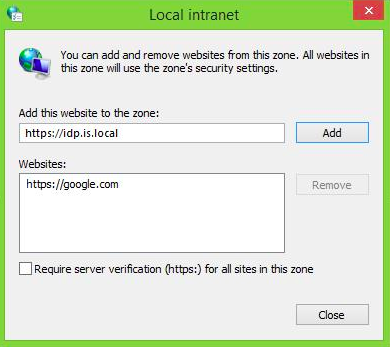
Internet Explorer/Chrome
1. Go to Tools ->Internet Options. 2. Go to the “security” tab and select local intranet.
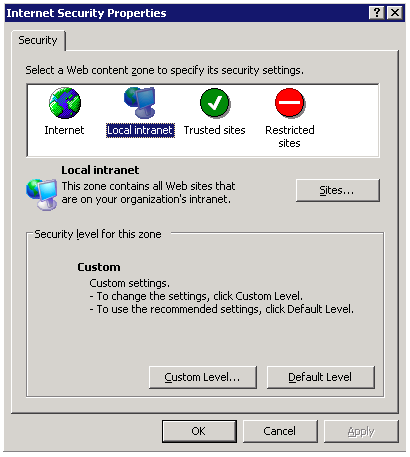
- Click Sites and add the URL of WSO2 Identity Server.
Chrome simply inherits the settings from Internet Explorer. Therefore, you don’t have to configure anything additional.
Try it out
- Configure the Travelocity sample app as a service provider in WSO2 Identity Server.
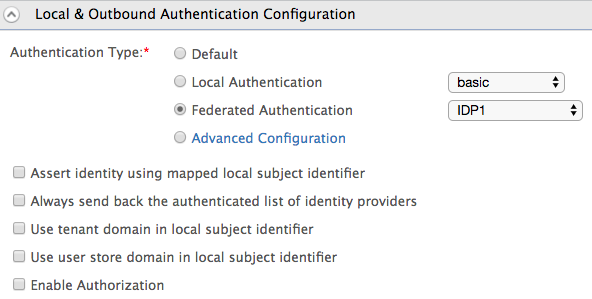
- Edit the service provider you created for the Travelocity sample, and expand the Local and Outbound Authentication section.
-
Select Federated Authentication as the Authentication Type and select the identity provider you created above.
-
Restart the Apache Tomcat server and run the Travelocity sample application from a Windows machine.
Troubleshooting tips
- Use hostnames only (no IP addresses).
- Check the configuration of the
jaas.conffile, particularly theisInitiator=falseproperty under theServersection (see the Set up IWA section). - Make sure that your service principal (IS) is associated with only one account.
- If you get an exception with an error message similar to “Checksum failed”, check whether you have given the correct password.