Configuring Fine-Grained Access Control with XACML
While authorization grants permission to access a resource, access control selectively restricts access to a resource. In this tutorial, we will learn how to enable fine-grained accesss control with eXtensible Access Control Markup Language (XACML) 3.0.
What's XACML?
XACML is a standard policy language that supports a standard way to write access control rules and evaluate access requests according to the rules defined in policies. It lets you form a query to ask whether the given action should be allowed or not, and interprets the result. To learn more about XACML, see Access control and Entitlement management.
Scenario
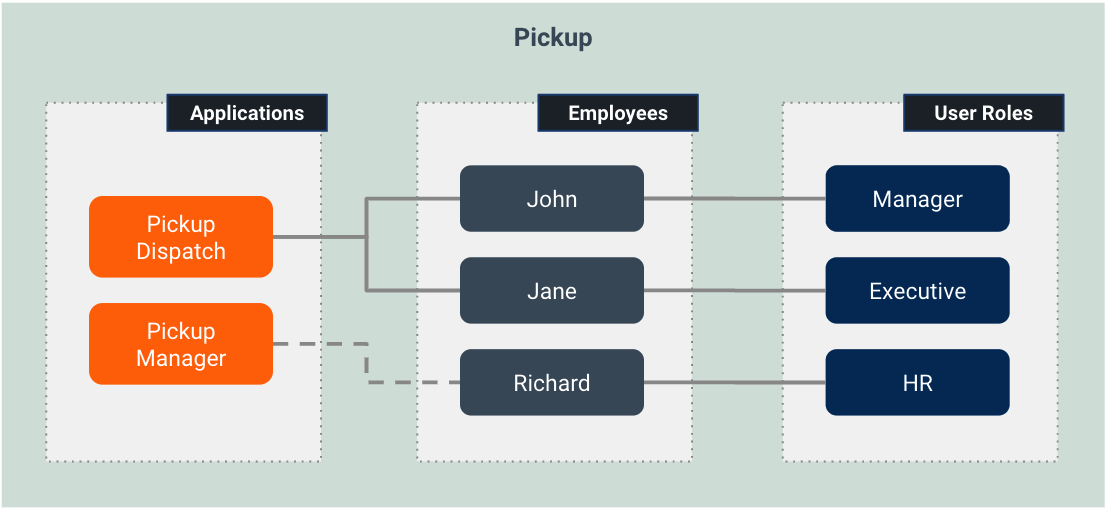
Pickup is a cab company that has many employees who use different credentials to sign in to different internal enterprise applications. Following are two such applications:
- Pickup Manager: This application helps manage the overall operations at Pickup.
- Pickup Dispatch: This application helps allocate vehicles to drivers.
Following are three Pickup employees:
- Larry: A manager who has permission to view old and current driver allocations via Pickup Dispatch.
- Sam: An executive officer who is responsible of allocating new vehicles to drivers via Pickup Dispatch. Sam also has permission to view old and current driver allocations.
- Kim: An HR manager who only has access to Pickup Manager.
Let's creat a XACML policy that controls access to Pickup Dispatch accordingly!
Set up
Follow the steps below to create a XACML policy that controls access of John, Jane, and Richard.
Before you begin
-
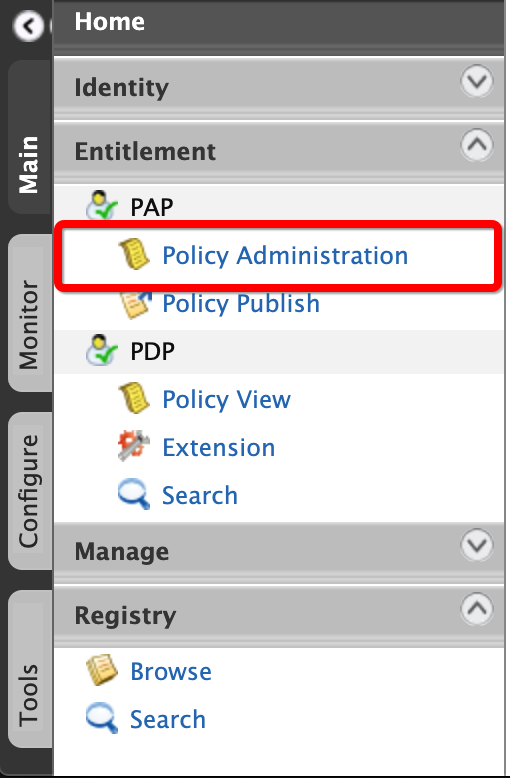
Sign in to the WSO2 Identity Server Management Console at
https://<SERVER_HOST>:9443/carbonas an administrator.
-
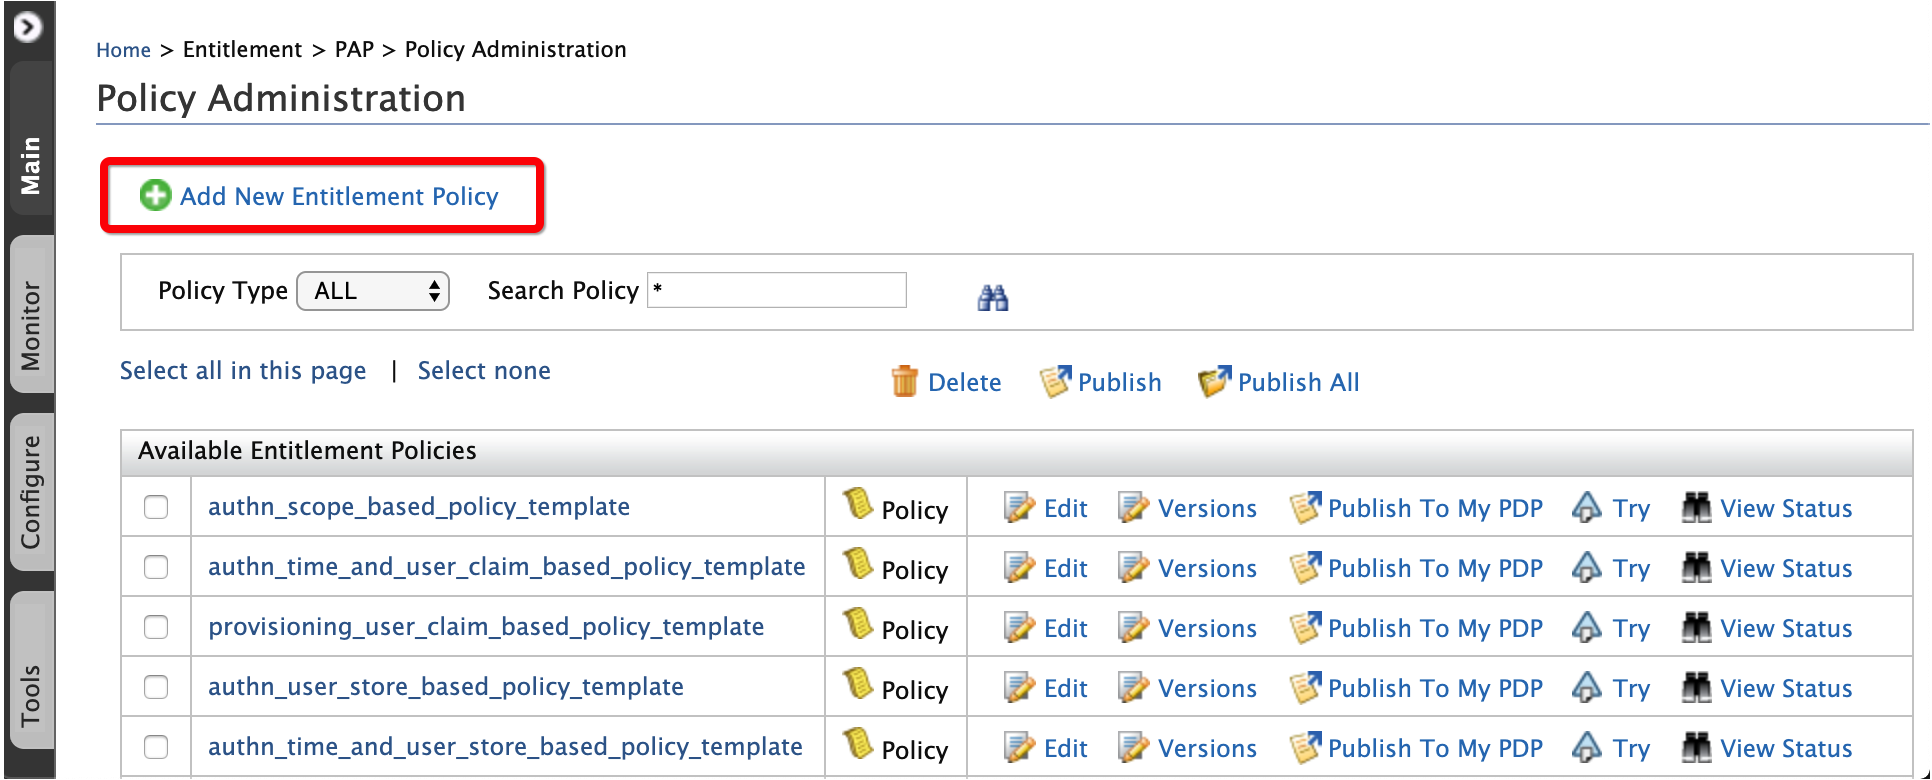
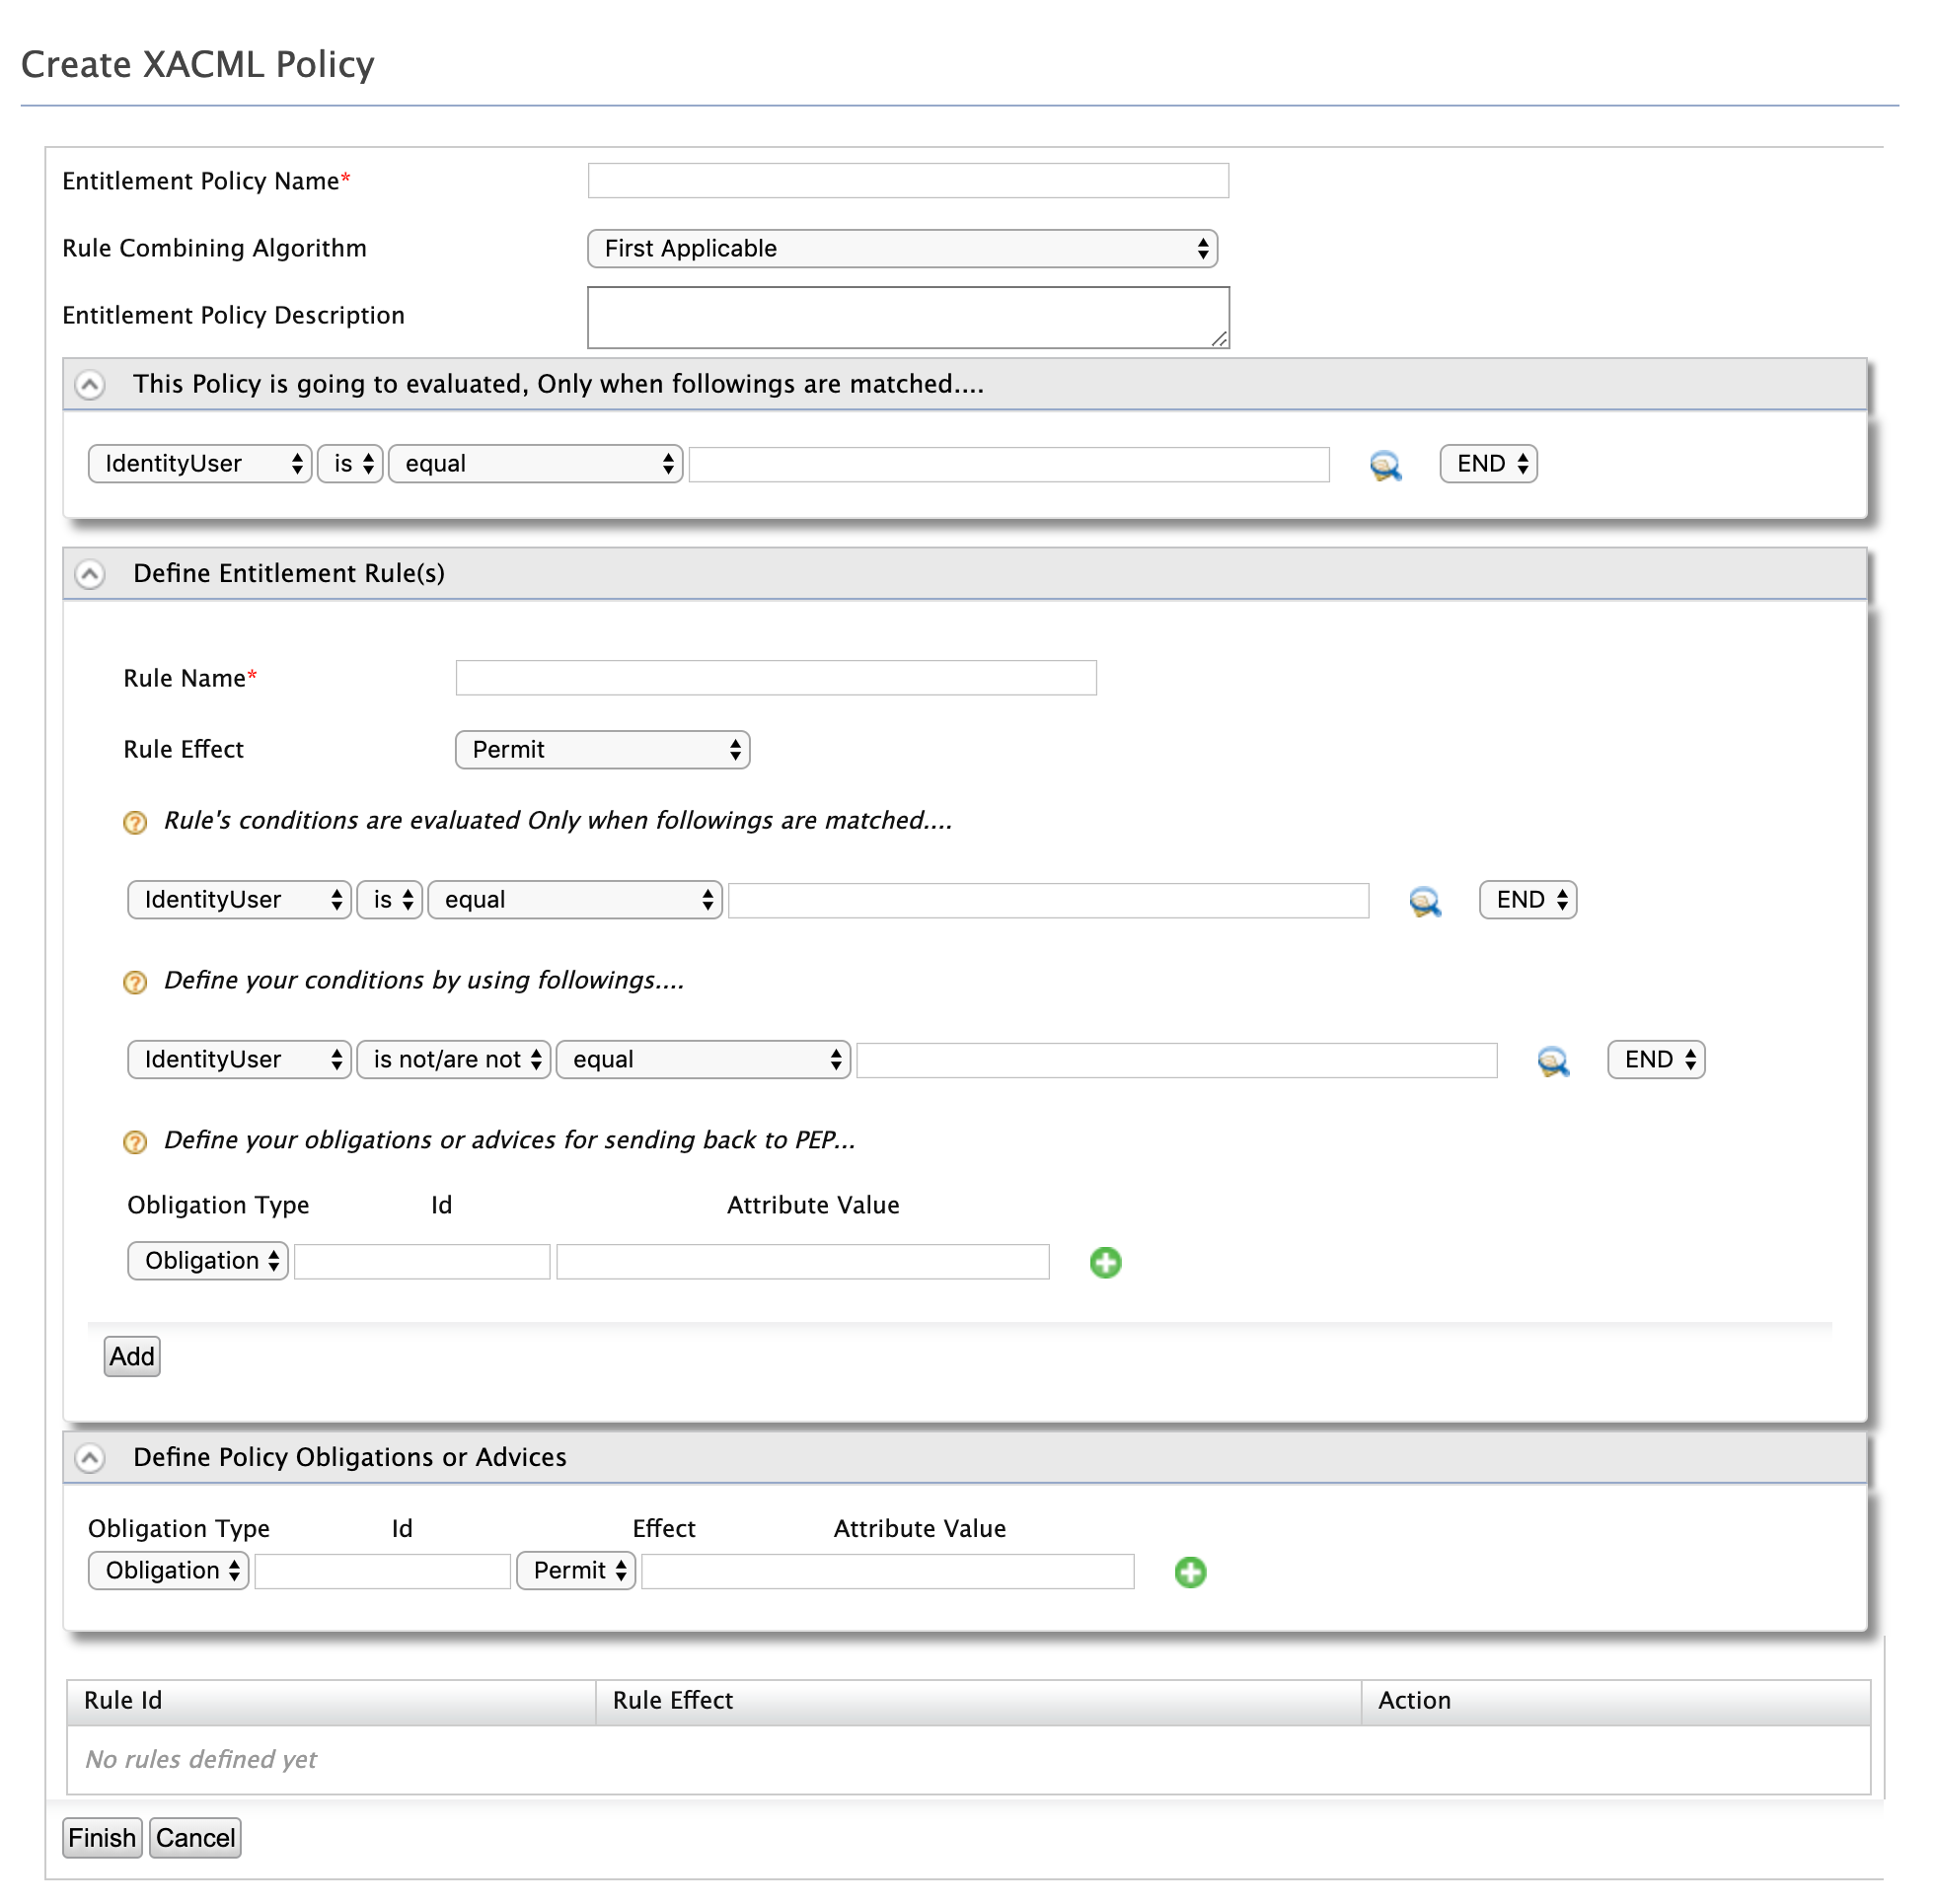
On the Main menu of the Management Console, click Entitlement > PAP > Policy Adminisration.
-
Click Add New Entitlement Policy.
-
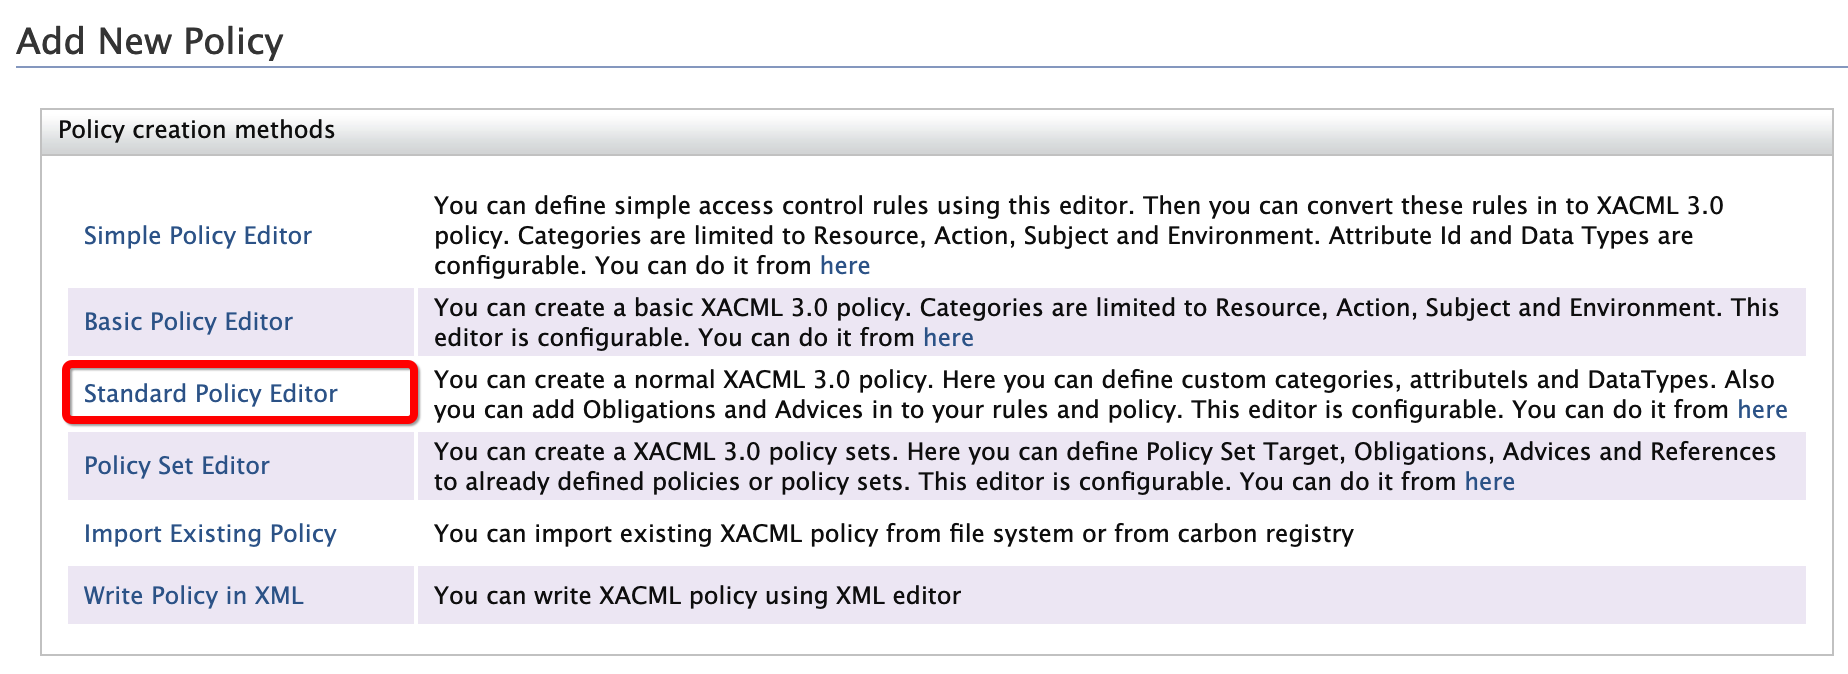
Click Standard Policy Editor.
-
Enter the required values as given below.
-
Entitlement Policy Name: This is the XACML policy name. Enter
Pickup_Access_Control. -
Policy evaluation criterial: This defines the entity based on which the policy will be evaluated. To evaluate the resources that match with the
/pickup-dispatch/.+regex pattern, enter the following.Resourceisequals-with-regex-match/pickup-dispatch/.+END -
Rules:
-
To grant view access to John and Jane, add the following rule element values.
-
Rule Name: This is the name of the XACML rule. Enter
View_Access. -
Rule Effect. This defines whether access is granted or permitted to the entities that match with the rule. Select
Permit. -
Rule Conditions: This defines the entity based on which the rule will be evaludated. To evaluate the resources that match with the
/pickup-dispatch/.+regex pattern, enter the following:Resourceisequals-with-regex-match/pickup-dispatch/.+END -
Your Conditions: This defines the criteria to pick entities that match with the rule. To grant permissions to either Johne or Jane, when they are sending a GET request, enter the following rule element values.
Subjectis/areAt-least-one-member-ofJohn,JaneANDNote that another rule element row appears. Enter the following.
Actionis/areequalGETENDClick Add. Note that the rule appears at the bottom of the screen.

-
-
Similarly, to grant edit access to Jane, add the following rule element values and click Add.
-
Rule Name:
Edit_Access -
Rule Effect:
Permit -
Rule Conditions:
Resourceisequals-with-regex-match/pickup-dispatch/.+END -
Your Conditiions:
Subjectis/areequalJaneANDActionis/areequalPOSTEND
-
-
To deny edit access for John and Richard, add the following rule element values and click Add.
-
Rule Name:
Deny_Edit_Access -
Rule Effect:
Deny -
Rule Conditions:
Resourceisequals-with-regex-match/pickup-dispatch/.+END -
Your Conditiions:
Subjectis/areat-least-one-memberJohn,RichardANDActionis/areequalPOSTEND
-
-
To deny view access for Richard, add the following rule element values and click Add.
-
Rule Name:
Deny_View_Access -
Rule Effect:
Deny -
Rule Conditions:
Resourceisequals-with-regex-match/pickup-dispatch/.+END -
Your Conditiions:
Subjectis/areequalRichardANDActionis/areequalGETEND
-
You have successfully created four access control rules for the XACML policy.
-
-
-
To save the XACML policy, click Finish.
Try out
Follow the steps below to test the XACML policy that you created above.
-
On the Policy Administration screen of the Management Console, locate the newly added XACML policy.
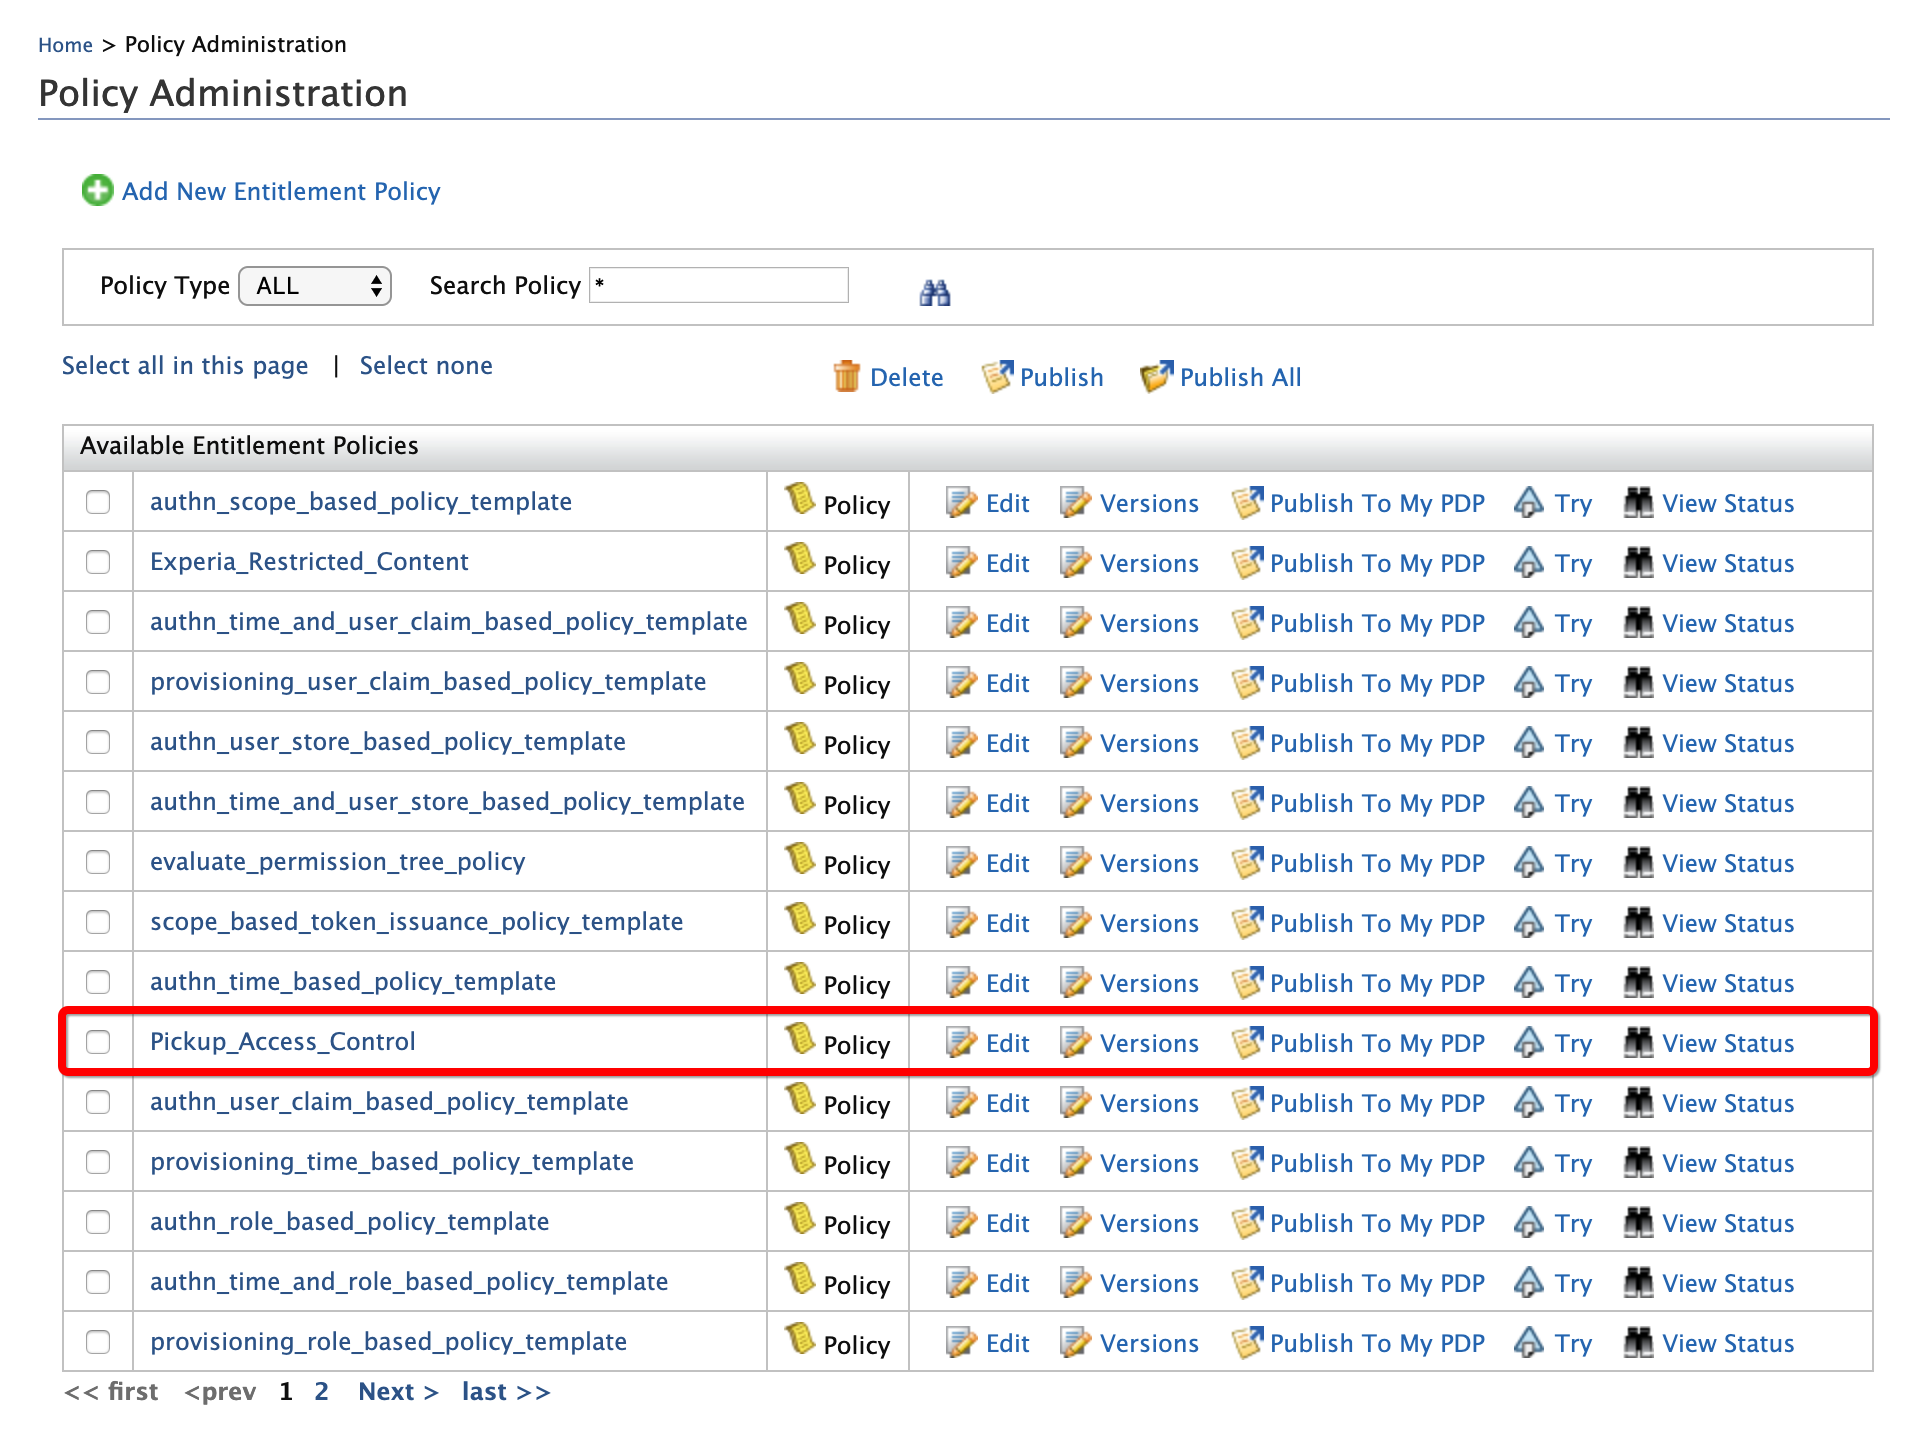
-
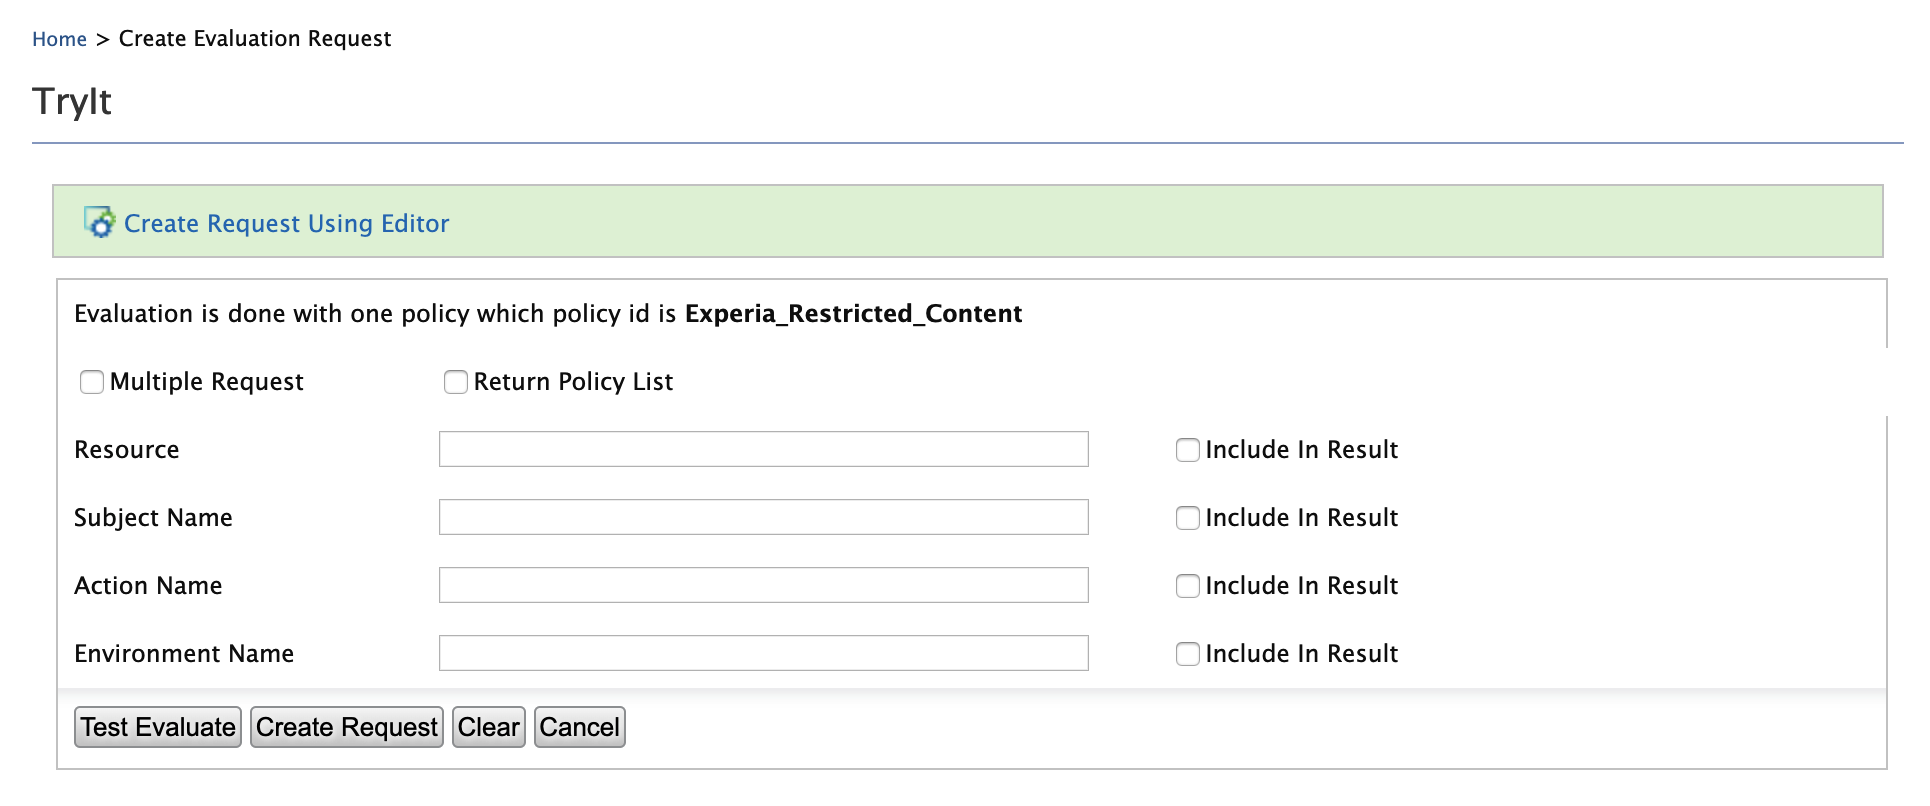
Click Try. Note that the TryIt screen appears.
-
To mimic a GET request to the
/pickup-dispatch/protected/index.jspresource by John,-
Enter the following request element values.
- Resource:
/pickup-dispatch/protected/index.jsp - Subject Name:
John - Action Name:
GET
- Resource:
-
Click Test Evaluate. A message indicating that John is permitted to perform the GET request to the given resource, appears.
-
-
To mimic a POST request to the
/pickup-dispatch/protected/index.jspresource by John, change the Action Name toPOSTand click Test Evaluate. -
To mimic a POST request by Jane to the same resource, change the Subject Name to
Janeand click Test Evaluate. A message indicating that Jane is permitted to send the POST request to the given resource, appears. -
To mimic a GET request by Richard, change the Subject Name back to
Richardand Action Name toGETand click Test Evaluate. A message indicating that Richard is not permitted to send the POST request to the given resource appears.