Create a new XACML Policy
The steps below explain how you can create a XACML policy using the management console of the WSO2 Identity Server.
- Log in to the management console using your username and password.
- Navigate to Main > Entitlement and under PAP, click Policy Administration.
-
Click Add New Entitlement Policy to open the Add New Policy page.
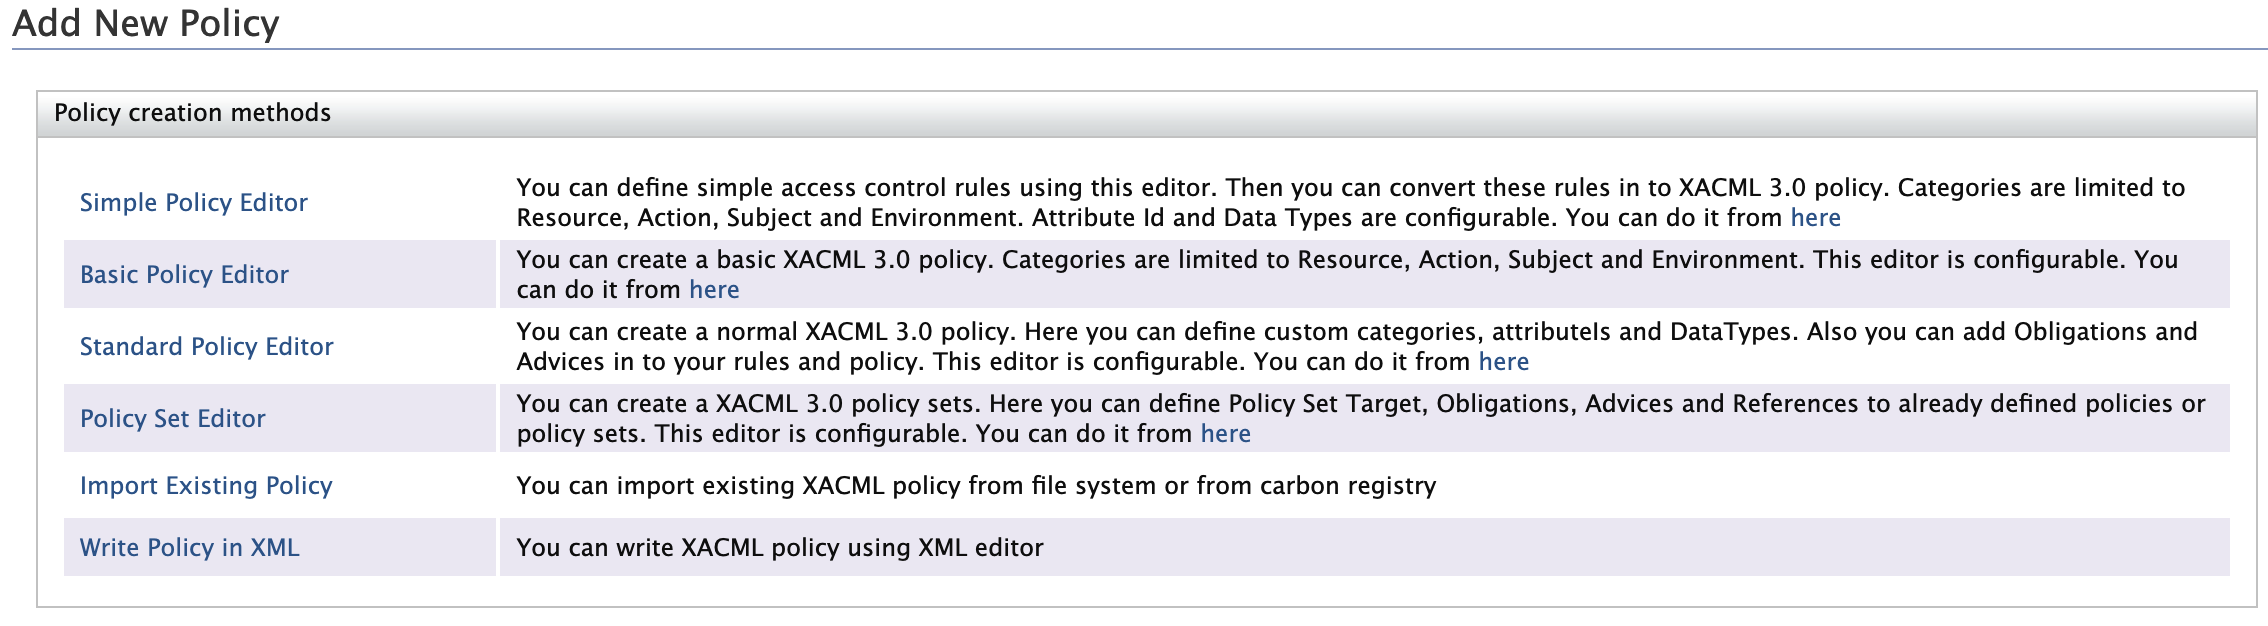
Policy Creation Methods
The Add New Policy page has six ways of creating a XACML 3.0 policy. Each of these methods are explained below.
Simple Policy Editor
This simple editor lets you create XACML 3.0 policies without any knowledge of XACML, provided that you have some familiarity with access control rules.
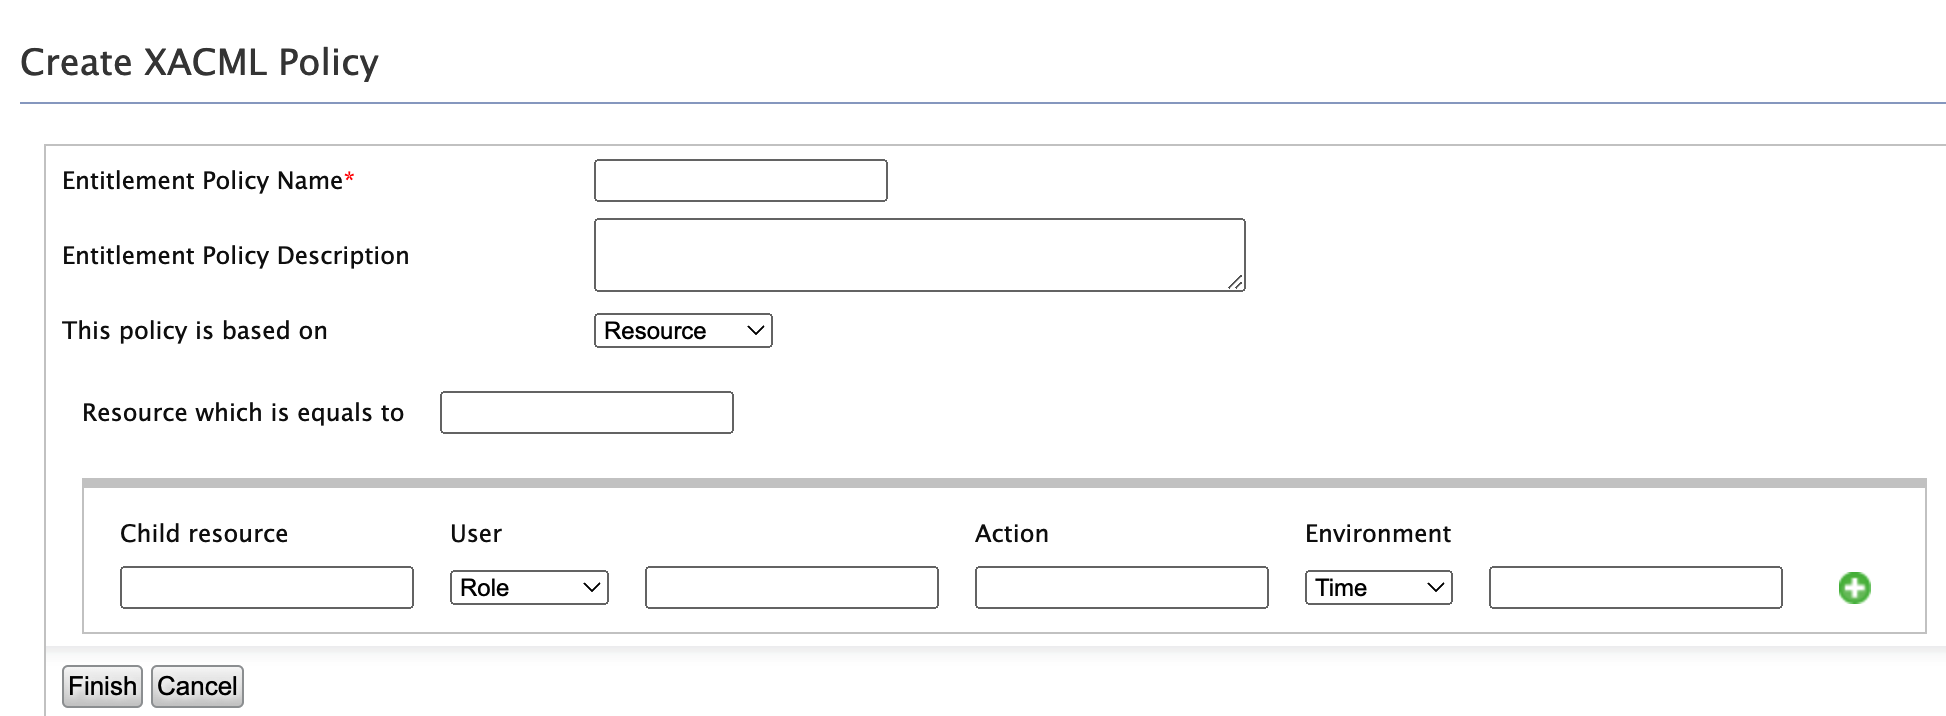
You can create a policy based on four categories.
-
Resource - Based on the resource to be protected.
-
Subject - Based on the user
-
Action - Based on the action to be performed
-
Environment - Based on the time, date or domain.
You can define multiple permit rules. Deny rule is automatically created as the final rule. Permitted rules are evaluated from top to bottom.
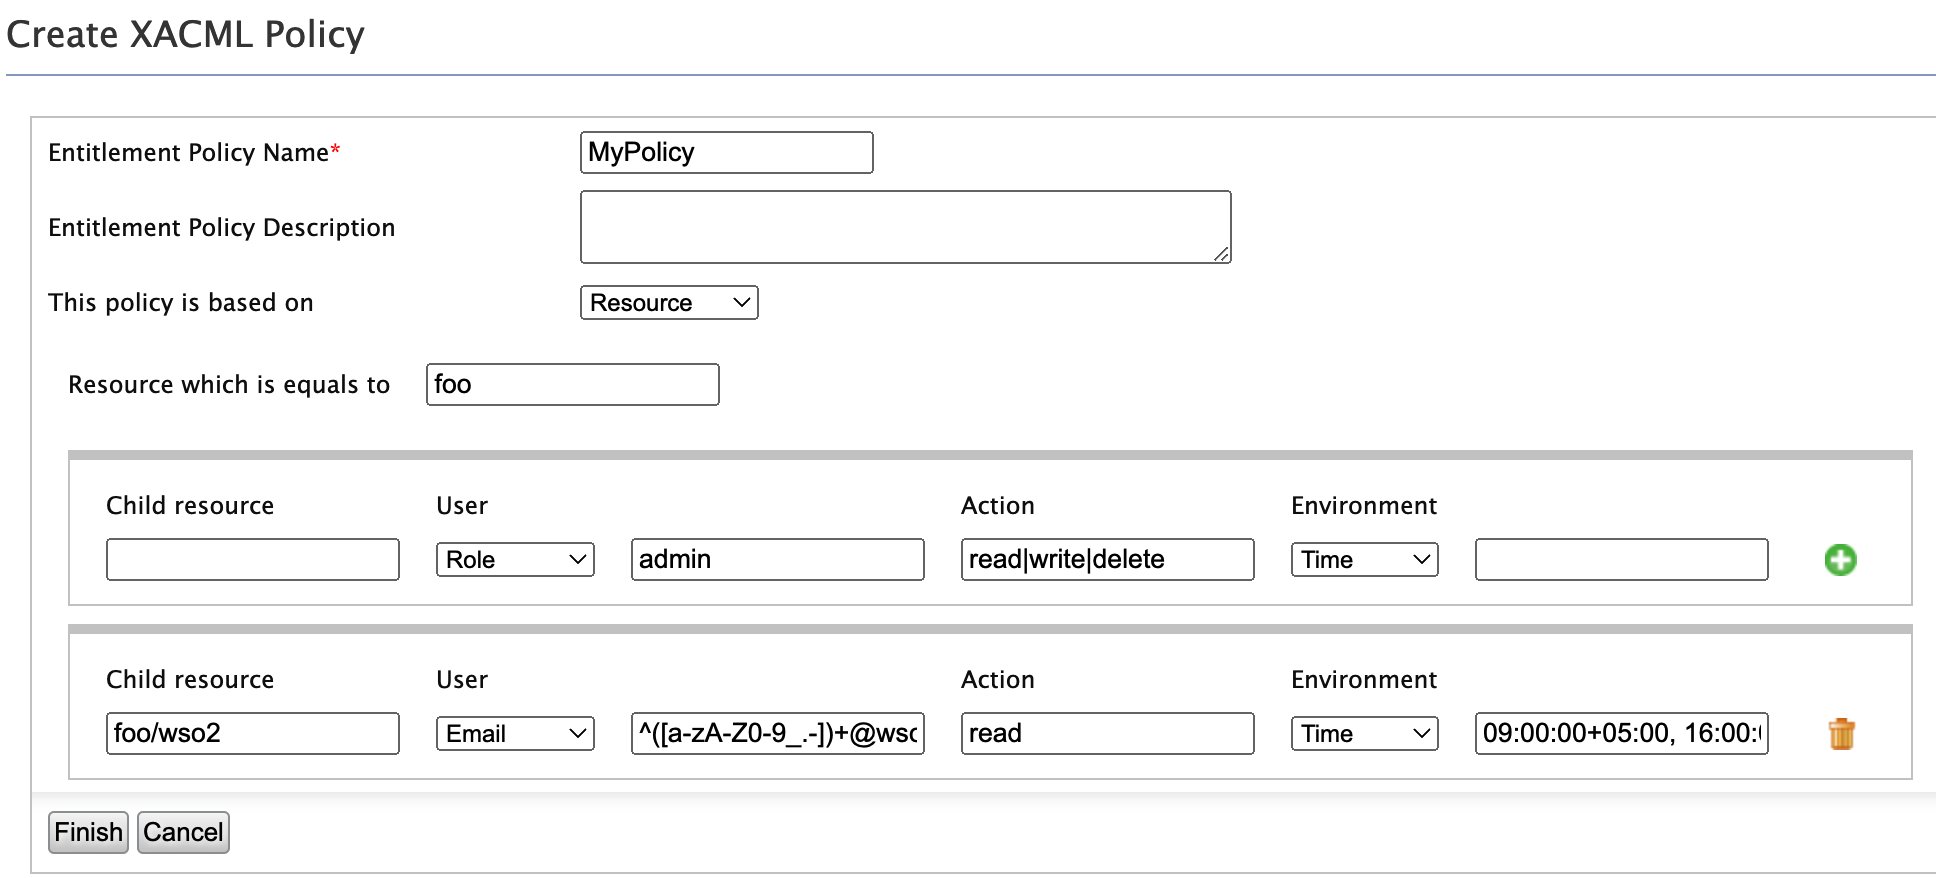
Sample Policy Example
Suppose you are to protect the “foo” resource with the following access control rules.
-
Rule 1: Resources under “foo” collection can be read, written, edited and deleted by the users belonging to the admin role.
-
Rule 2: Resources under “foo/wso2″ collection can be read only by the users in WSO2 (i.e whose email addresses match the regex ^([a-zA-Z0-9_.-])[email protected]) between 9.00am and 4.00pm ( 09:00:00+05:00, 16:00:00+05:00).
-
Rule 3: All other access requests to “foo” resource must be denied (This rule is applied automatically).
You can build the above policy example using the Simple Policy Editor as shown below.
Note
-
If you want to define values as java regexp, you need to embed the values within curly brackets “{ }”
- Ex : { ^([a-zA-Z0-9_.-])[email protected] }
-
If you want to define multiple values as OR or AND value sets, you can use “|” or “&” respectively.
-
Ex : read | write | delete
-
Ex : ReadRole & WriteRole
-
-
If you want to define values as greater than or lesser than, you can use "<” or “>” (">=" or "<=" are not supported)
- Ex : < 34
-
If you want to define a range, have the two comma-separated (",") values within square brackets “[ ]” or round brackets “( )”.
-
Ex : [09:00:00+05:00, 16:00:00+05:00] - time between 09.00am and 04.00 pm
-
Ex : (18, 30] - greater than 18 and less than or equal to 30
-
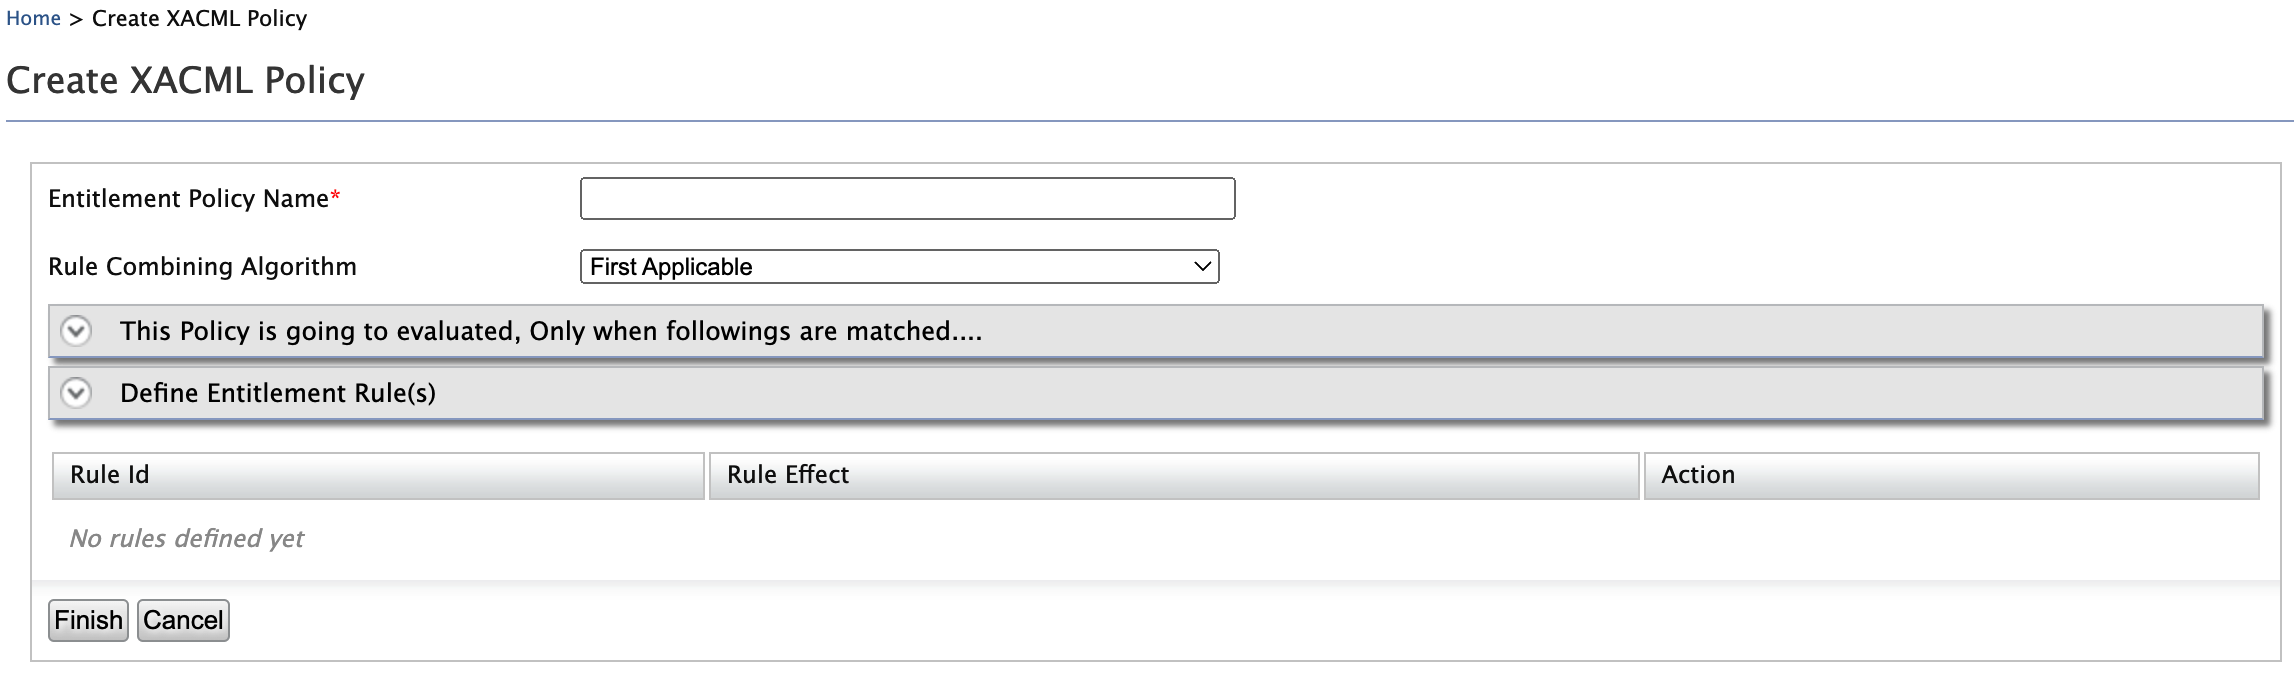
Basic Policy Editor
When setting a policy in the Basic Policy Editor, you can select attribute values from a connected attribute value source rather than filling the text boxes on your own.
Info
The following are the settings of the Basic Editor.
Entitlement Policy Name : Name of the policy.
Rule Combining Algorithm : Learn more about rule combining algorithms below.
The Policy is going to be evaluated, Only when followings are matched: Define for what attribute values, this policy is applied to. This is similar to defining the policy target element.
Define Entitlement Rule(s): Define rules which are evaluated evaluate after they are matched with above.
Click to view information about policy/rule combining algorithms
Policy Combining Algorithms are used by Policy Sets and Rule Combining Algorithms are used by Policies. Each of the algorithms mentioned below has its Policy Combining algorithm and its Rule Combining algorithm as follows:
-   Standard combining algorithms defined in XACML 3.0:
-   urn:oasis:names:tc<zero-width-space>:xacml:3.0:rule-combining-algorithm:deny-overrides
-   urn:oasis:names:tc<zero-width-space>:xacml:3.0:policy-combining-algorithm:deny-overrides
-   urn:oasis:names:tc<zero-width-space>:xacml:3.0:rule-combining-algorithm:permit-overrides
-   urn:oasis:names:tc<zero-width-space>:xacml:3.0:policy-combining-algorithm:permit-overrides
-   urn:oasis:names:tc<zero-width-space>:xacml:1.0:rule-combining-algorithm:first-applicable
-   urn:oasis:names:tc<zero-width-space>:xacml:1.0:policy-combining-algorithm:first-applicable
-   urn:oasis:names:tc<zero-width-space>:xacml:1.0:policy-combining-algorithm:only-one-applicable
-   urn:oasis:names:tc<zero-width-space>:xacml:3.0:rule-combining-algorithm:ordered-deny-overrides
-   urn:oasis:names:tc<zero-width-space>:xacml:3.0:policy-combining-algorithm:ordered-deny-overrides
-   urn:oasis:names:tc<zero-width-space>:xacml:3.0:rule-combining-algorithm:ordered-permit-overrides
-   urn:oasis:names:tc<zero-width-space>:xacml:3.0:policy-combining-algorithm:ordered-permit-overrides
-   urn:oasis:names:tc<zero-width-space>:xacml:3.0:rule-combining-algorithm:deny-unless-permit
-   urn:oasis:names:tc<zero-width-space>:xacml:3.0:rule-combining-algorithm:permit-unless-deny
-   urn:oasis:names:tc<zero-width-space>:xacml:3.0:policy-combining-algorithm:deny-unless-permit
-   urn:oasis:names:tc<zero-width-space>:xacml:3.0:policy-combining-algorithm:permit-unless-deny
These algorithms are explained in detail as follows:
-
Deny Overrides:
If any decision is a Deny, then that decision wins. Deny overrides is one of the safest combining algorithms since it favors a deny decision. -
Permit Overrides:
If any decision is a Permit, then that decision wins. At least one child must return a Permit for access to be granted regardless of restrictions.
One wants to return all the reasons why access is being denied. This is what one could call a “greedy deny overrides”.For instance, if the reason for not being able to view a resource is that (a) you are not the owner or (b) you are in the wrong department, then we could rework the previous example as follows. When any of the deny reason triggers, the response would be denied with all the applicable reasons for access being denied: - Policy Set (deny overrides): role==manager AND action==view AND resourceType==resource - Policy 1 (permit overrides) - Rule 1: deny if resourceOwner != userId + Advice(“you are not the owner of the resource”) - Rule 2: deny if rsourceDepartment != userDepartment+ Advice(“you are not in the same department as the resource) - Policy 2 - Rule 1: permit
-
First Applicable:
This combining algorithm combines decisions in such a way that the final decision returned is the first one produced either of Permit or Deny.
First applicable is useful to shortcut policy evaluation. For instance, if a policy set contains a long series of not applicable policies and one applicable policy which returns either of Permit or Deny, then if that policy comes first and does produce Permit or Deny, the PDP will stop there and not process the other siblings. -
Deny Unless Permit | Permit Unless Deny:
In XACML there are 4 possible decisions: Permit, Deny, NotApplicable, and Indeterminate. Sometimes, it is desirable to hide the NotApplicable and Indeterminate decisions to only allow for Permit or Deny. It makes the PEP logic potentially simpler. -
Only One Applicable: This combining algorithm exists only for policy sets to combine policy sets and policies. It cannot be used to combine rules. With this combining algorithm, in order for either of a Permit or Deny to be returned, then only one of the children must produce a valid decision – whether Deny or Permit.
-
Ordered Deny Overrides | Ordered Permit Overrides:
The ordered combining algorithms combine decisions in the same way as their (unordered) cousins. In, addition they bring the guarantee that policies, policy sets, and rules are considered in the order in which they are defined. The need to define an ordered combining algorithm stems from the fact the XACML specification does not specify whether order matters in the deny-overrides and permit-overrides combining algorithms.
By default, the available attribute value sources are WSO2 registry resources, roles of the underline user store and some pre-defined actions.
There are extension points that you can use to extend and bring more attribute values to the policy editor.
Sample Policy Requirement
-
This access control policy is written for the patient records of Medi Hospital. Patient records are stored in a location under “/patient/” directory. Therefore we are defining access control rules for “/patient/” directory.
-
Users can only access patient records from 09.00pm to 04.00pm.
-
Patient records can be created, deleted by users in MedAdminstrator role.
-
Patient records can be updated and read by users in MediStaff role.
-
All other access requests to patient records must be denied.
Let's implement this sample policy using Basic Policy Editor,
Step1: Define a name for the policy.
Step 2: This is similar to defining the policy target element. Configure it such as “policy is applied for resource attribute value /patient//* with reg-ex match”.
Step 3: Define the 1st rule. The rule is “Users can only access patient records from 09.00pm to 04.00pm”. It means that if the user tries to access records any other time, the user must be denied. Therefore, we are writing a deny rule for users who are not accessing patient records from 09.00pm to 04.00pm. Therefore first, let define a rule name and also define the rule effect as “Deny”. Then Select “Time” from the environment. Select functions as “is not” and “greater than and less than”. Write the time with GMT offset value. After defining you can add this rule to the policy.
Step 4: Define the 2nd rule. Rule name must be given. Then select “Role” as user’s attribute. You can select your “MedAdminstrator” role name from user attribute source. So just click on the icon.
Step 5: You can do a search for attributes values.
Step 6: Select only the “MediAdminstrator” role from the attribute source.
Step 7: You can see, the text box has been filled with the selected “MediAdminstrator” role name. Now let define actions. Here let us make the function name as “at-least-one”. Then this rule would be satisfied even when at least one action is going to perform. Finally, let us add this rule in to the policy
Step 8: Let's define the 3rd rule. Which allows “MediStaff” roles to access the resource with action read and edit. You can follow same steps 4, 5, 6, 7. Then finally, add this rule into the policy.
Step 9: Finally define the rule to deny all other access, as follows:
Step 10: We have defined the target and rules. Now it is time to define the rule-combining algorithm. Let select is as “first applicable”. Then rule effect of the 1st rule that is evaluated properly, would be the final result of the policy.
You can click on “finish” and finish policy creation.
Standard Policy Editor
-
The standard policy editor is similar to Basic Policy Editor. However, it is basically designed for creating XACML 3.0 policy rules. Because there are several improvements with Obligation in XACML 3.0 when compare to 2.0. In XACML 2.0, obligations can only be added to policies and policy sets. But with XACML 3.0, rules can also contain Obligations. Therefore, if you want to get details of the obligations after the policy evaluated, It is good to use the Standard Policy Editor.
-
As in Basic Policy Editor, there is a place to define the conditions which make the rules evaluated as The policy is evaluated only when following are matched and a place to define entitlement rules.
-
Advice is a newly introduced feature with XACML 3.0 which is similar to Obligations. But only different, when compared to Obligations, PEPs do not have to comply with advice statements. PEPs can consider or discard the statement. A common use case is to explain why something was denied. “User Alex is denied because Alex does not have a valid email”
-
Here the attribute, Define Policy Obligation or Advice is optional.
Sample Policy Requirement
-
This access control policy is written for the patient records of Medi Hospital. Patient records are stored in a location under “/patient/” directory. Therefore we are defining access control rules for “/patient/” directory.
-
Users can only access patient records from 09.00pm to 04.00pm.
-
Patient records can be created, deleted by users in MedAdminstrator role.
-
Patient records can be updated and read by users in MediStaff role.
-
All other access requests to patient records must be denied.
Since this editor is very similar to Basic Policy Editor we can use the same steps from Step 1 to Step 9 to configure the above requirement in Advance Policy Editor.
Step 10 : In advance, if you want to see the details of the obligation after the policy is evaluated, you can define a policy obligation or advice as follows:
Step 11: We have defined the target, rules, and obligation. Now it is time to define the rule-combining algorithm. Let select is as “first applicable”. Then rule effect of the 1st rule that is evaluated properly, would be the final result of the policy.
Click "Finish” and finish policy creation.
Policy Set Editor
When you want to create a set of policies to evaluate at one time, you can create a Policy Set. You can add policies as shown in the figure and Click "Finish" to create the policy set.
Import Existing Policy
You can add a policy by using a policy XML file.
Write a policy in an XML file and upload it.
Click Choose File and browse to the location of the policy in your local machine.
Write Policy in XML
Click Finish / Upload depending on the option you chose to create your policy.
Related Topics
To evaluate the policy you just created and see a sample request and response to it, see Evaluating a XACML Policy.