Outbound Provision with SCIM
This topic provides instructions on how to provision users to a trusted identity provider from the WSO2 Identity Server. A trusted identity provider is basically an identity provider that supports inbound provisioning. It can be Google, Salesforce, another Identity Server, etc.
Outbound Provisioning is supported via SCIM or SPML standards. There are outbound provisioning connectors for Google and Salesforce available by default in WSO2 Identity Server. If you need to plug any other custom connector, you can do it by writing an extension for that as described here. Outbound provisioning configurations can be found under identity provider configuration user interface of WSO2 Identity Server.
WSO2 Identity Server supports outbound provisioning with both SCIM 1.1 and SCIM 2.0 standards. This topic provides instructions on how to configure SCIM 1.1 or SCIM 2.0 connectors to provision users from the WSO2 IS.
Configure an identity provider
First, you must configure a trusted identity provider that has the ability to accept the provisioning request from WSO2 Identity Server.
Tip
When configuring the identity provider to provision users using SCIM, you must ensure that the trusted identity provider can accept SCIM requests. For the purpose of this example scenario, you can use another Identity Server as your identity provider. The configurations in this topic are done to reflect this.
The following steps provide instructions on how to create a new trusted identity provider in the Identity Server.
- Log in to the Management Console (
https://<IS_HOST>:<PORT>/carbon) using your username and password. - Navigate to the Main menu to access the Identity menu. Click Add under Identity Providers.
- Fill in the details in the Basic Information section.
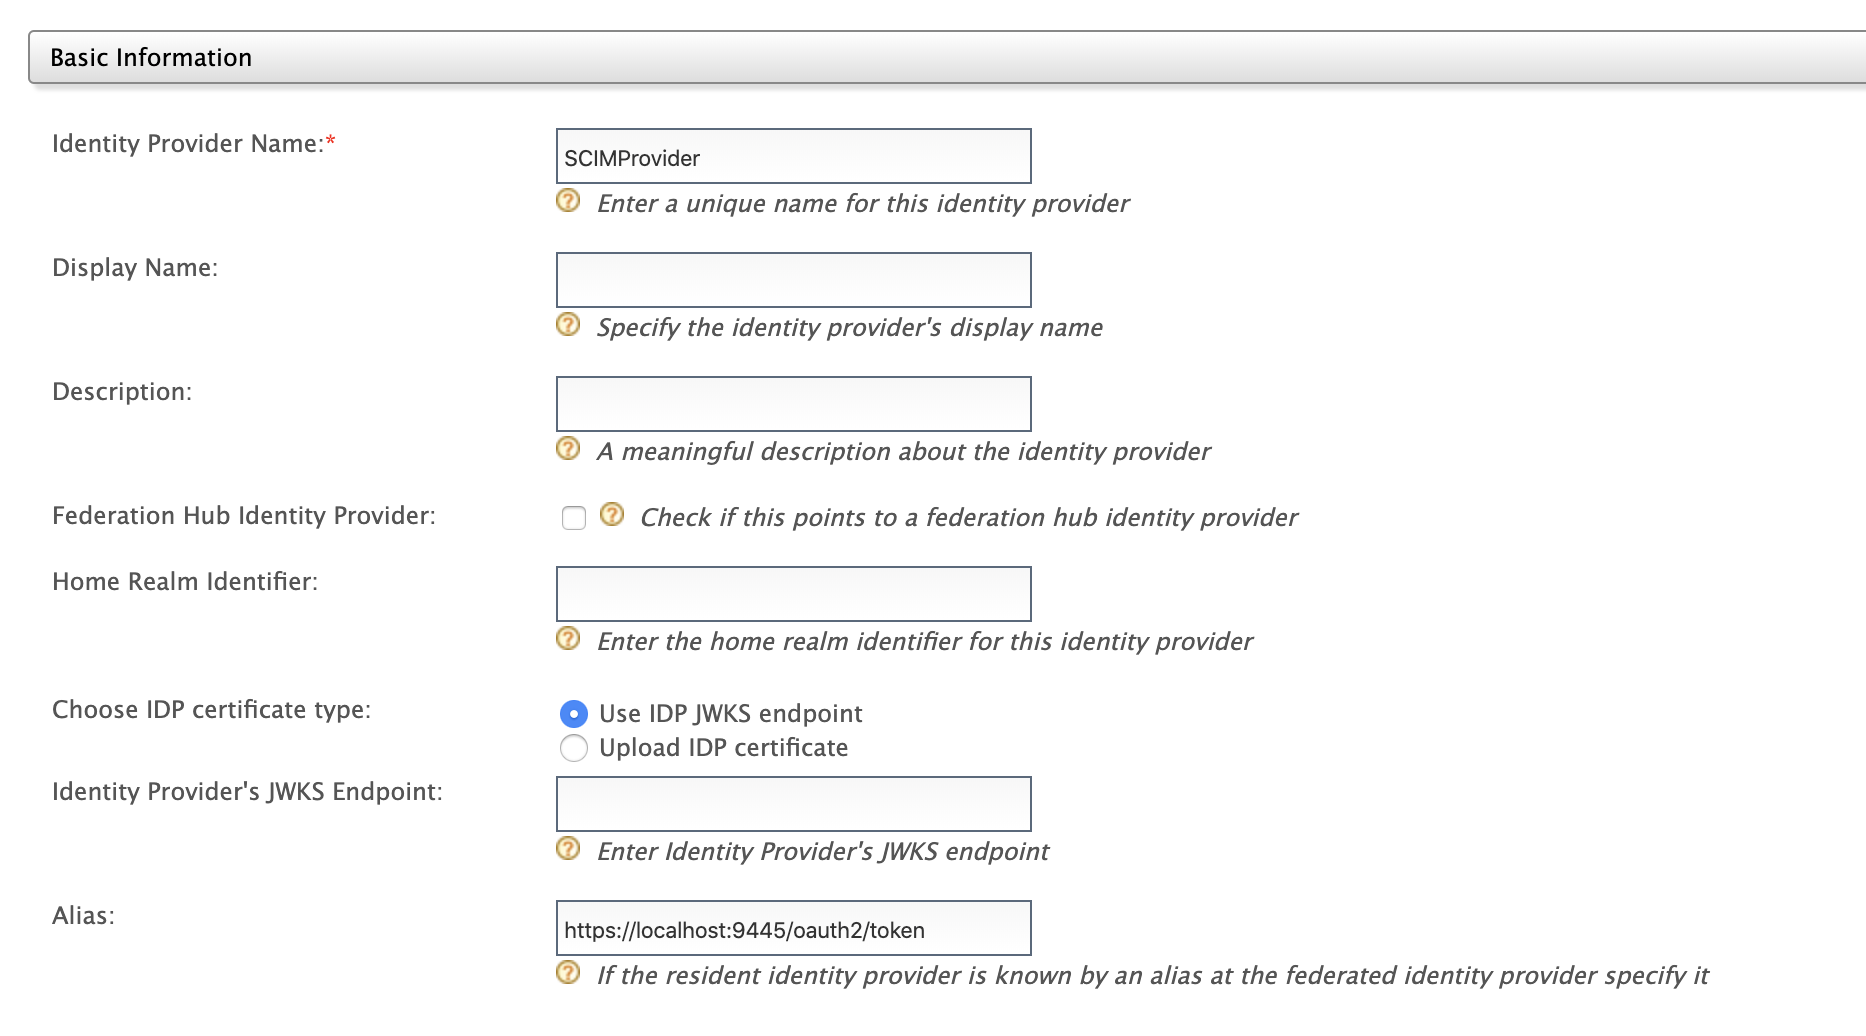
Note the following when filling the above form.- The Identity Provider Name should be unique.
- The Home Realm Identifier is a standard value which will come with the communication from the identity provider. This is used as an identifier.
- The Alias is the equivalent location specified in the identity provider.
- Expand the Outbound Provisioning Connectors section and select SCIM 1.1 Provisioning Configuration or SCIM 2.0 Provisioning Configuration based on the requirement.
-
Fill out the details in the form.
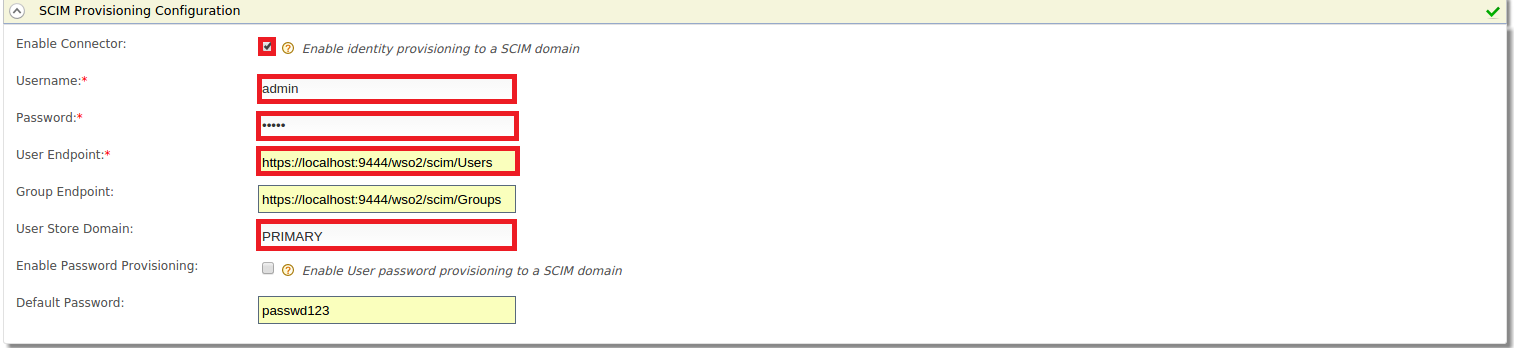
The following are the configurations in brief.-
Select Enable Connector to enable identity provisioning.
-
Enter the Username and Password used in the SCIM application.
-
Select the User Endpoint and Group Endpoint, which are SCIM endpoints.
- For SCIM 1.1
User Endpoint : https://localhost:9443/wso2/scim/Users Group Endpoint : https://localhost:9443/wso2/scim/Groups - For SCIM 2.0
User Endpoint : https://localhost:9443/scim2/Users
Group Endpoint : https://localhost:9443/scim2/Groups
- For SCIM 1.1
-
User Store Domain is the user store that you need to provision users to.
-
Enable Password Provisioning lets you send a default password with the SCIM request and Default Password lets you specify the password.
-
-
Click Register to save your changes.
Configure outbound provisioning
There are two options available to configure outbound provisioning in the Identity Server.
Configure a resident service provider
When configuring outbound provisioning for any user management operation done via the management console, SOAP API or the SCIM API, you must configure outbound provisioning identity providers against the resident service provider. So, based on the outbound configuration, users added from the management console can also be provisioned to external systems like Salesforce and Google Apps.
- Log in to the Management Console (
https://<IS_HOST>:<PORT>/carbon) using username and password. - In the Main menu under the Identity section, click Resident under Service Providers.
- In the resulting screen, expand the Outbound Provisioning Configuration section.
-
In the Outbound Provisioning Configuration section, do the following.
-
Select the identity provider you added from the drop-down menu available and click the following sign to add it. If you have not added an identity provider as yet, this step is not possible.


-
Once added, the identity provider is displayed as an entry in a list. Select scim for SCIM 1.1 and SCIM2 for SCIM 2.0 from the drop-down to ensure that the required SCIM operation is used for provisioning.
- The option Blocking, if enabled, it means that the outbound provisioning request must be blocked until the response is received. By default, the request would be non-blocking.
- The option Enable Rules, if enabled, it means outbound provisioning request will be executed along with the XACML rules enabled.
- Click Update to save your configurations.
-
Configure a service provider
You can configure a service provider instead of a resident service provider if your application supports OAuth.
- Enter your username and password to log in to the Management Console (
https://<IS_HOST>:<PORT>/carbon). - Navigate to the Main menu to access the Identity menu. Click Add under Service Providers.
- Fill in the Service Provider Name and provide a brief Description of the service provider. Only Service Provider Name is a required field.
- In the screen that appears, expand the Outbound Provisioning Configuration section.
-
In the Outbound Provisioning Configuration section, do the following.
-
Select the identity provider you added from the drop-down menu available and click the following sign to add it. If you have not added an identity provider as yet, this step is not possible.

-
Once added, the identity provider is displayed as an entry in a list. Select scim for SCIM 1.1 and SCIM2 for SCIM 2.0 from the drop-down to ensure that the required SCIM operation is used for provisioning.
- There is another option called Blocking. If enabled, it means that the outbound provisioning request must be blocked until the response is received. By default, the request would be not non-blocking.
- There is another option called Enable Rules. If enabled, it means outbound provisioning request will be executed along with the XACML rules enabled.
- You can also enable just-in-time provisioning by selecting the Enable JIT checkbox. Once you enable this, when a user is JIT provisioned to IS when authenticating from a federated authenticator, that user will be outbound provisioned to this identity provider as well.
- Click Update to save your configurations.
-