Ensure assurance with authentication context class reference (ACR) and authentication method reference (AMR)
This page guides you through enforcing additional assurance in the user authentication flow using Authentication Context Class Reference (ACR) and Authentication Method Reference (AMR).
This guide assumes you have your own application. If you wish to try out this flow with a sample application, click the button below.
Create a service provider
To register your application as a service provider in the WSO2 Identity Server:
-
Log in to the WSO2 Identity Server Management Console using administrator credentials.
-
Go to Main > Identity > Service Providers > Add.
-
Enter a Service Provider Name. Optionally, enter a Description.
-
Click Register.
Basic OAuth/OpenID Connect configuration
Make the following changes to the created service provider.
-
Expand Inbound Authentication Configuration > OAuth/OpenID Connect Configuration and click Configure.
-
Enter the Callback Url.
Note
The Callback Url is the exact location in the service provider's application to which an access token will be sent. This URL should be the URL of the page that the user is redirected to after successful authentication.
-
Click Add. Note the OAuth Client Key and OAuth Client Secret that appear.
Tip
To configure more advanced configurations, see OAuth/OpenID Connect Configurations.
Add the adaptive authentication script
-
Edit the same service provider you created previously to configure the ACR-Based authentication flow.
-
Expand Local and Outbound Configuration and click Advanced Configuration.
-
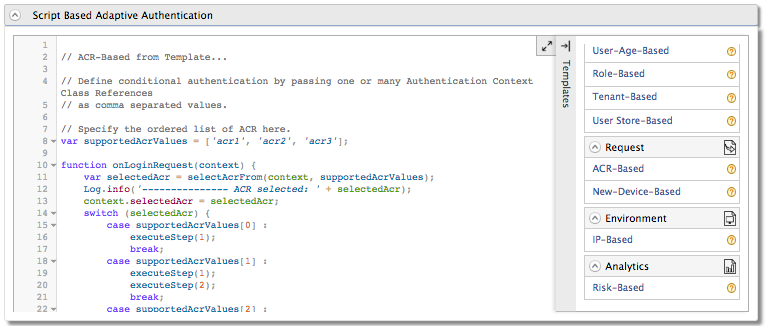
Click on Templates on the right side of the Script Based Conditional Authentication field and then click ACR-Based.
-
Replace the authentication script added from the template with the following.
var supportedAcrValues = ['LOA1', 'LOA2', 'LOA3'];
var onLoginRequest = function(context) {

Log.info("ACR : "+context.requestedAcr);
var acr_values = context.requestedAcr;
var needLevel1 = (acr_values.indexOf("LOA1") > -1);
var needLevel2 = (acr_values.indexOf("LOA2") > -1);
var needLevel3 = (acr_values.indexOf("LOA3") > -1);

executeStep(1);
if(needLevel1) {
  executeStep(2);
  context.selectedAcr="LOA1";  //Sets your ACR value to be returned
}
if(needLevel2) {
  executeStep(3);
  context.selectedAcr="LOA2";
}
if(needLevel3) {
  executeStep(4);
  context.selectedAcr="LOA3";
}
}
Note
When requesting the ACR values from the service provider, you can define an ordered list of ACR values that you will only accept. The following functions will be used to execute this:
- selectAcrFrom: This inbuilt function evaluates the best/strongest ACR from the received and configured ACR lists.
- context.selectedAcr: This function sets the ACR value that needs to be returned to the caller.
Try it out
Send the following requests via your application to connect your application to WSO2 IS.
-
To initiate the authentication flow, update the placeholders and send the following request to the authorization endpoint.
Request Format
https://<IS_HOST>:<IS_PORT>/oauth2/authorize?response_type=code&scope=openid&client_id=<CLIENT_ID>
&redirect_uri=<CALLBACK_URL>&acr_values=<ACR_VALUES>
Sample Request
https://localhost:9443/oauth2/authorize?response_type=code&scope=openid&client_id=Q7zSTBiNb3vwe8dWhUMEBh5sE4ka&redirect_uri=http://localhost:8080/playground2/oauth2client&acr_values=LOA1+LOA2+LOA3 -
Log in using
adminas the username and password. -
Provide your consent to share the necessary data. Note that you get redirected to a URL similar to the following.
Request Format
<CALLBACK_URL>?code=<<AUTHORIZATION_CODE>>
Sample Request
<CALLBACK_URL>?code=e1934548d0a0883dd5734e24412310 -
Copy the
AUTHORIZATION_CODEfor later use. -
To obtain the access token, replace the placeholders in the following command and execute it in a command prompt.
Info
The
CLIENT_SECRETandCALLBACK_URLare the client secret and callback URL of the service provider that you configured for the application in WSO2 Identity Server.Format
curl -v -X POST --basic -u <CLIENT_ID>:<CLIENT_SECRET> -H "Content-Type: application/x-www-form-urlencoded;charset=UTF-8" -k -d "client_id=<CLIENT_ID>&grant_type=authorization_code&code=<AUTHORIZATION_CODE>&redirect_uri=<CALLBACK_URL>" https://<IS_HOST>:<IS_PORT>/oauth2/token
Example
curl -v -X POST --basic -u 5vOQZVfoOHLmtXbNHJpYXc7ZLuca:O9LF9cMgKAoowYu4YQrHpmnjRBwa -H "Content-Type: application/x-www-form-urlencoded;charset=UTF-8" -k -d "client_id=Q7zSTBiNb3vwe8dWhUMEBh5sE4ka&grant_type=authorization_code&code=86650268-5637-311c-9a08-4066727d656f&redirect_uri=http://localhost:8080/playground2/oauth2client" https://localhost:9443/oauth2/tokenAn access token similar to the following appears.
Format
{
    "access_token":"1b87d316-a107-3174-a71d-ac438a54719b",
    "refresh_token":"60a66d57-0e48-3896-98e7-00213acee104",
    "scope":"openid",
    "id_token":"<ID_TOKEN>",
    "token_type":"Bearer",
    "expires_in":2554
}
Example
{ "access_token":"1b87d316-a107-3174-a71d-ac438a54719b", "refresh_token":"60a66d57-0e48-3896-98e7-00213acee104", "scope":"openid", "id_token":"eyJ4NXQiOiJNell4TW1Ga09HWXdNV0kwWldObU5EY3hOR1l3WW1NNFpUQTNNV0kyTkRBelpHUXpOR00wWkdSbE5qSmtPREZrWkRSaU9URmtNV0ZoTXpVMlpHVmxOZyIsImtpZCI6Ik16WXhNbUZrT0dZd01XSTBaV05tTkRjeE5HWXdZbU00WlRBM01XSTJOREF6WkdRek5HTTBaR1JsTmpKa09ERmtaRFJpT1RGa01XRmhNelUyWkdWbE5nX1JTMjU2IiwiYWxnIjoiUlMyNTYifQ.eyJhdF9oYXNoIjoiVFdlYWp5dE1TQU0zX1k3Q09mQm4yUSIsImF1ZCI6IjV2T1FaVmZvT0hMbXRYYk5ISnBZWGM3Wkx1Y2EiLCJhY3IiOiJhY3IyIiwiY19oYXNoIjoiVFN1b0Z2eHlybEdCZkxQZW1ZbEt3USIsInN1YiI6ImFkbWluIiwibmJmIjoxNTkxOTQ0ODk1LCJhenAiOiI1dk9RWlZmb09ITG10WGJOSEpwWVhjN1pMdWNhIiwiYW1yIjpbIkJhc2ljQXV0aGVudGljYXRvciJdLCJpc3MiOiJodHRwczpcL1wvbG9jYWxob3N0Ojk0NDNcL29hdXRoMlwvdG9rZW4iLCJleHAiOjE1OTE5NDg0OTUsImlhdCI6MTU5MTk0NDg5NSwic2lkIjoiMjBmODlmYzctNDRkZC00MjNkLTlkNDktZGRjMTVlNWVmNGRlIn0.d7WpY220UTZ10zCg-DBmKr-0f0k2tbYk00xqJoTmN2oNmP5u6x8_kUIASSeeP2p1LDeHuT6IQb045YCJDStsiSpwD0XUtTrFPJoRFUiIDgzXBQCBz8pzCjv2w-AMj8hJu965nSbwqCt-20OjKDPb187jiMyAxYMpU0o9Zk470whrkZQkC2SA16KhKdrIwpHHiiOI0pX-LdSsrZFzsw2ZWQmlzdRh4xoN6wTsLI9jhxz52mqs0Ghea9MlVFeVuIf6BeFN8ZpwzsnpVbSO9g4ZCZVYz3dtuiIaBQgoYy3E0SMG1QdxGgg7nYg0NQd-wfInYuhik0BSSrLKmJhff5YHaQ", "token_type":"Bearer", "expires_in":2554 } -
Copy the
ID_TOKENand decode with Base64. The decodedID_TOKENwill look similar to the following.Format
{
    "at_hash": "<Access token hash value>",
    "aud": "<Audience that the ID token is intended for>",
    "c_hash": "<Code hash value>",
    "sub": "<Subject>",
    "acr": "<ACR>",
    "nbf": <Epoch time before which the JWT must not be accepted for processing>,
    "azp": "<Authorized party>",
    "amr": [<Authentications Method Reference>],
    "iss": "<The token endpoint that issued the token>",
    "exp": <Epoch time of the token expiration date/time>,
    "iat": <Epoch time of the token issuance date/time>
}
Example
{
    "at_hash": "6OXwfxJaTWYC56RccEhSJg",
    "aud": "EUVvhKM28RkwTQL9A52kqXnfCj8a",
    "acr": "LOA2",
    "c_hash": "lDj9nihZGSUmgNmz_lxxXA",
    "sub": "admin",
    "nbf": 1548396413,
    "azp": "EUVvhKM28RkwTQL9A52kqXnfCj8a",
    "amr": [
            "DemoFaceIdAuthenticator",
            "BasicAuthenticator",
            "DemoFingerprintAuthenticator"
    ],
    "iss": "https://localhost:9443/oauth2/token",
    "exp": 1548400013,
    "iat": 1548396413
}
Note that the AMR values in this example are
DemoFaceIdAuthenticator,BasicAuthenticator, andDemoFingerprintAuthenticator. These are the authenticators that are used in the authentication process.
Note
Following is a sample SAML fragment that you can add to the SAML SSO request while initiating the SAML SSO flow.
<samlp:RequestedAuthnContext Comparison="exact">
<saml:AuthnContextClassRef>urn:federation:authentication:windows</saml:AuthnContextClassRef>
<saml:AuthnContextClassRef>pwd</saml:AuthnContextClassRef>
<saml:AuthnContextClassRef>LOA2</saml:AuthnContextClassRef>
</samlp:RequestedAuthnContext>
WSO2 Identity Server authentication script does not support the Comparison attribute in the RequestedAuthnContext element due to the following reasons:
-
Similar functionality is not supported in OAuth2.
-
The identity provider should decide the manner in which the ACR should be enforced. A client sending an exact,
minimum,maximum, orbettercomparison may not be an effective mechanism. The identity provider should use other internal rules to decide the effective ACR.
Related topics