Configuring Roles and Permissions
Roles contain permissions for users to manage the server. You can create different roles with various combinations of permissions and assign them to a user or a group of users. Through the Management Console, you can also edit and delete an existing user role.
WSO2 supports the role-based authentication model where privileges of a user are based on the role it is attached with. By default, WSO2 products come with the following roles:
- Admin - Provides full access to all features and controls. By default, the user "admin" is assigned to both the "Admin" and the "Everyone" roles. The Identity Server does not allow you to configure permissions assigned to the 'Admin' role.
- Everyone - Every new user is assigned to this role by default. It does not include any permissions.
- System - This role is not visible in the Management Console.
If a user has several assigned roles, their permissions are added together.
WSO2 products has two types of roles. External Roles and Internal Roles. Let say there are two user stores.
| Store-A | Store-B | |
|---|---|---|
| Users | user_A | user_B |
| Roles | role_A | role_B |
External Roles :
Store in user store itself. Only users in that user store can assign to
external roles in same user store.
Example : user_A can assign to role_A
user_B can't assign to role_A
In the user stores Users are assign to a Groups. Within the WSO2 servers we have Roles and directly map one Group to a Role then assign the permission for that role. There is a one to one mapping between Groups and Roles and same Group name is used to represent the Role in the server.
Internal Roles :
Store in Identity server database. User in all user stores can assign to these roles.
Example : both user_A and user_B can assign to same internal role
For internal Roles there are no mapped Groups in user stores. So we directly assign users to these roles (Do not support to assign Groups to these Roles)
Info
Internal/everyone : This is a conceptual role that is used to group all the users (across the user stores) together. When you create a new user, automatically the user belongs to the Internal/everyone role.
Application Role : is a special case of internal roles, these are created for a single service provider ( SP ) application and only users in this role canmange relevant SP application.
Adding a user role
Add role using management console
Follow the instructions below to add a user role.
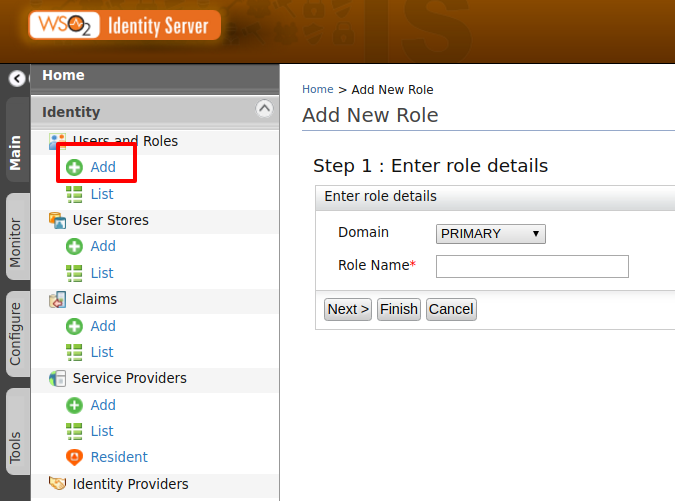
- On the Main tab in the Management Console, click Add under Users and Roles.
- Click Roles. This link is only visible to users with the Admin role.
- Click Add New Role.
- Do the following:
- In the Domain list, specify the user store where you want to create this role.
- Enter a unique name for this role.
- Click Next.

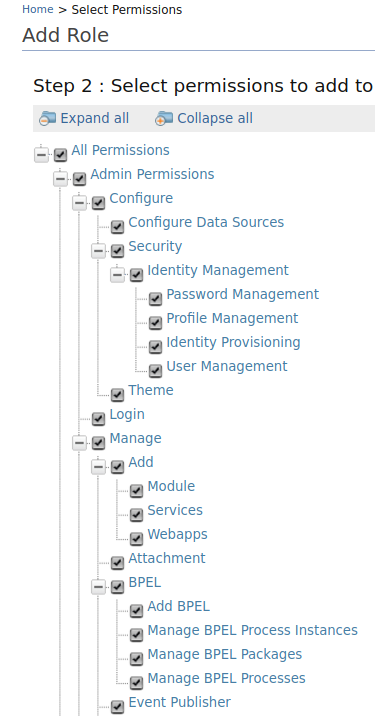
- Select the permissions you want users with this role to have. You
can also not assign permissions to a role. Note that when you assign
this role to a user, you can override the role's permissions and
customize them for the user.

- Select the existing users you want to have this role. You can also
assign this role to users later, but if you are creating this role
in an external user store that does not allow empty roles, you must
assign it to at least one user. You can search for a user by name(or
user role by role name), or view all users or roles by entering
*in the search field. - Click Finish.
The role is created and is listed on the Roles page. You can now edit the role as needed.
Add role using SCIM
-
In SCIM creating role means creating a group. Read more on SCIM.
Note
When creating a group with users, you need to have that user already exists in the user store and provide its unique id. Create a new group named: 'engineer' with the user 'hasinitg' as a member. The attributes you have to include in the cURL command are the userID, username:password.
Request
curl -v -k --user {IS_USERNAME}:{IS_PASSWORD} --data '{"displayName": {GROUP_NAME},"members": {MEMBERS_OF_THE_GROUP}}' --header "Content-Type:application/json" https://{IS_IP}:{IS_PORT}/scim2/GroupsRequest: Sample
curl -v -k --user admin:admin --data '{"displayName": "engineer","members": [{"value":"316214c0-dd7e-4dc3-bed8-e91227d32597","hasinitg": "hasinitg"}]}' --header "Content-Type:application/json" https://localhost:9443/scim2/GroupsYou receive a response with the payload as indicated below and a response status
201 CREATED:Response
{"id":"b4f9bccf-4f79-4288-be21-78e0d4500714","schemas":["urn:scim:schemas:core:1.0"],"displayName":"PRIMARY/engineer","members":[{"value":"0032fd29-55a9-4fb9-be82-b1c97c073f02","display":"hasinitg"}],"meta":{"lastModified":"2016-01-26T18:31:57","created":"2016-01-26T18:31:57","location":"https://localhost:9443/scim2/Groups/b4f9bccf-4f79-4288-be21-78e0d4500714"}}You can observe in the management console of IS, that the new group is listed under roles and user 'hasinitg' is listed under users of that group.
Add role using SOAP
A role can be created by calling the service
RemoteUserStoreManager . If you are new to admin
services, see Calling Admin Services.
-
Disable the hidden admin service property in the
<IS_HOME>/repository/conf/deployment.tomlfile.
By default, the admin services are disabled as it is not recommended to expose these URLs to users. However, this can be enabled by the administrators if it needs to be accessed.[admin_service.wsdl] enable = true -
Open the following Admin Service from SOAP UI: https://localhost:9443/services/RemoteUserStoreManagerService?wsdl
Info
If you have configured WSO2 IS to use an IP or hostname, replace
localhostwith your IP or hostname. -
Call the method
addRole()to create a role.SOAP Request
    <soapenv:Envelope xmlns:soapenv="http://schemas.xmlsoap.org/soap/envelope/" xmlns:ser="http://service.ws.um.carbon.wso2.org" xmlns:xsd="http://dao.service.ws.um.carbon.wso2.org/xsd">
       <soapenv:Header/>
       <soapenv:Body>
          <ser:addRole>
             <!--Optional:-->
             <ser:roleName>engineer</ser:roleName>
             <!--Zero or more repetitions:-->
             <ser:userList>hasinitg</ser:userList>
             <!--Zero or more repetitions:-->
          </ser:addRole>
       </soapenv:Body>
    </soapenv:Envelope>
The role is created and is listed on the Roles page. You can now edit the role as needed.
Updating role names
To make modifications to the role names, do one of the following:
Update before the first startup (recommended)
You can change the default role name before starting up the WSO2 Identity
Server. To do this, change the properties in the
<IS_HOME>/repository/conf/deployment.toml file as shown below.
-
Change the value of
admin_roletoNew role name.[super_admin] username = "admin" password = "admin" create_admin_account = true admin_role = "admin" [realm_manager] data_source = "jdbc/WSO2CarbonDB"Update after the product is used for sometime (advanced configuration)
If you have already updated the role names before the first startup of the product, these steps are not necessary. The following steps guide you through updating the role names after you have used the product for some time.
- Make the configuration changes indicated in the above section.
-
Do the following user store level changes for existing users:
-
If you are connected to the
JDBCUserStoreManager, update theUM_USER_ROLEtable with the existing users and the new role names that you defined in place of the 'admin' and 'everyone' roles. If you have changed the permissions of the 'everyone' role, update theUM_ROLE_PERMISSIONtable the permissions of the new role.Info
The schema can be located by referring to the data source defined in the deployment.toml file. The data source definition can also be found in the same file.
-
If you are connected to the
ReadWriteLdapUserStoreManager,populate the members of the previous admin role to the new role under Groups.
-
-
After the changes have been made, restart the server.
Searching for roles
Once you have added a role in the Identity Server, you can search for the role by doing the following.
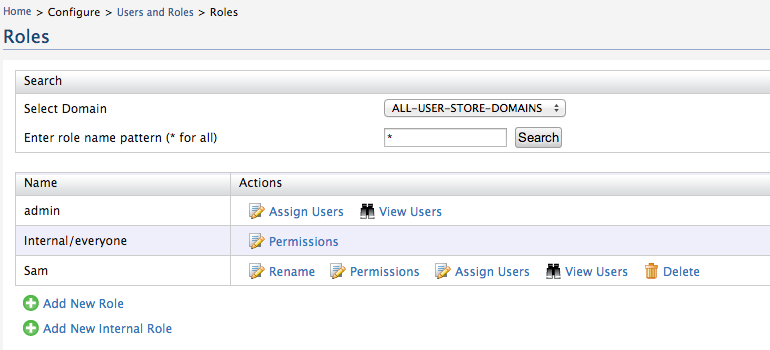
- On the Main tab in the Management Console, click List under Users and Roles.
- Click Roles. This link is only visible to users with the Admin
role. The following screen appears.

You can search for users by doing the following.- Select the user store that the role resides in using the Select Domain dropdown.
- Enter the role name of the role and click Search Roles. For roles to be listed, you must use the exact name of the role, or use a role name pattern by including * . For example, if you have a role named Manager, you can either search for this role by searching for "Manager", or you could search for "Ma*" to list out all the role with names beginning with "Ma".
- The role is displayed in the list.
Editing or deleting a role
Using management console
If you need to make modifications to a role, use the links in the Actions column on the Roles screen as follows:

- Rename the role
- Change the default permissions associated with this role
- Assign this role to users
- View the users who are assigned this role
- Delete the role if you no longer need it
Info
If the role is in an external user store to which you are connected in read-only mode, you will be able to view the existing roles but not edit or delete them. However, you can still create new editable roles.
Using SCIM
In SCIM roles are considered as groups. You can edit or delete a group using SCIM. Please read more about SCIM for further details.
Using SOAP
A role can be edited or deleted by calling the service
RemoteUserStoreManager . If you are new to admin
services, see Calling Admin
Services.
-
Disable the hidden admin service property in the
<IS_HOME>/repository/conf/deployment.tomlfile.
By default, the admin services are disabled as it is not recommended to expose these URLs to users. However, this can be enabled by the administrators if it needs to be accessed.[admin_service.wsdl] enable = false -
Open the following Admin Service from SOAP UI: https://localhost:9443/services/RemoteUserStoreManagerService?wsdl
Info
If you have configured WSO2 IS to use an IP or hostname, replace
localhostwith your IP or hostname. -
Call the method updateRoleName
()to rename a role and deleteRole() to delete a role.SOAP Request " Update Role name
<soap:Envelope xmlns:soap="http://www.w3.org/2003/05/soap-envelope" xmlns:ser="http://service.ws.um.carbon.wso2.org">
    <soap:Header/>
    <soap:Body>
        <ser:updateRoleName>
            <!--Optional:-->
            <ser:roleName>roleOld</ser:roleName>
            <!--Optional:-->
            <ser:newRoleName>roleNew</ser:newRoleName>
        </ser:updateRoleName>
    </soap:Body>
</soap:Envelope>
SOAP Request: Delete role
<soap:Envelope xmlns:soap="http://www.w3.org/2003/05/soap-envelope" xmlns:ser="http://service.ws.um.carbon.wso2.org">
    <soap:Header/>
    <soap:Body>
        <ser:deleteRole>
            <!--Optional:-->
            <ser:roleName>roleOld</ser:roleName>
        </ser:deleteRole>
    </soap:Body>
</soap:Envelope>
Related Links
- See Role-based Permissions for more information.
- See Permissions Required to Invoke Admin Services for a complete list of permissions required to invoke admin services.