Logging in to Salesforce with Facebook
This topic provides instructions on how to log into Salesforce using your Facebook credentials. In this use case Salesforce is the service provider while Facebook is the Identity Provider. If a user needs to log in to Salesforce, WSO2 Identity Server sends the user details to Facebook. Facebook authenticates the user credentials and if the user exits in Facebook, the user is allowed to log in to Salesforce.
Before you begin!
When you log into Salesforce, you normally use an email address. So, to integrate this with the Identity Server, you need to configure WSO2 IS to enable users to log in using their email addresses.
Click here to get the steps on how configure the email address as the username.
Note
Configuring the email address as the username in an already running Identity Server is not the production recommended way. Therefore, make sure to configure it before you begin working with WSO2 IS.
- Open the
<IS_HOME>/repository/conf/deployment.tomlfile. -
Add
enable_email_domainas shown below.[tenant_mgt] enable_email_domain= true -
Open the
<IS_HOME>/repository/conf/claim-config.xmlfile and configure theAttributeIDproperty of thehttp://wso2.org/claims/usernameclaim ID that is under<Dialect dialectURI=" http://wso2.org/claims ">tomail.Warning
This file is checked only when WSO2 IS is starting for the first time. Therefore, if you haven't configured this property at the time of starting up the server for the first time, you will get errors at the start up.
<Claim> <ClaimURI>http://wso2.org/claims/username</ClaimURI> <DisplayName>Username</DisplayName> <AttributeID>mail</AttributeID> <Description>Username</Description> </Claim> -
Open the
<IS_HOME>/repository/conf/identity/identity-mgt.propertiesfile and set the following property totrue.Info
This step is required due to a known issue that prevents the confirmation codes from being removed after they are used when email usernames are enabled. This occurs because the '@' character (and some special characters) are not allowed in the registry. To overcome this issue, enable hashed usernames when saving the confirmation codes by configuring the properties below.
UserInfoRecovery.UseHashedUserNames=trueOptionally, you can also configure the following property to determine which hash algorithm to use.
UserInfoRecovery.UsernameHashAlg=SHA-1 -
Configure the following set of parameters in the user store configuration, depending on the type of user store you are connected to (LDAP/Active Directory/ JDBC).
Parameter Description user_name_attribute
Set the mail attribute of the user. LDAP/Active Directory only
[user_store]
user_name_attribute = "mail"user_name_search_filterUse the mail attribute of the user instead of
cnoruid. LDAP/Active Directory only[user_store]
user_name_search_filter = "(&(objectClass=identityPerson)(mail=?))"user_name_list_filterUse the mail attribute of the user. LDAP/Active Directory only
[user_store]
user_name_list_filter = "(&(objectClass=identityPerson)(mail=*))"username_javas_cript_regexChange this property that is under the relevant user store manager tag as follows. This property allows you to add special characters like "@" in the username.
[user_store]
username_javas_cript_regex="^[a-zA-Z0-9._-]+@[a-zA-Z0-9.-]+.[a-zA-Z]{2,4}"username_java_regexThis is a regular expression to validate usernames. By default, strings have a length of 5 to 30. Only non-empty characters are allowed. You can provide ranges of alphabets, numbers and also ranges of ASCII values in the RegEx properties.
[user_store]
username_java_regex="^[a-zA-Z0-9._-]+@[a-zA-Z0-9.-]+.[a-zA-Z]{2,4}$"
Realm configurations The
super_adminusername must use the email attribute of the admin user.[super_admin]
username="[email protected]"
Password= "admin"Note
Before this configuration, the user having the username admin and password admin was considered the super administrator. The super administrator user cannot be deleted.
After this configuration, the user having the username
[email protected]is considered the super administrator. The user having the username admin is considered as a normal administrator.

Tips
If you changed the password of the admin user to something other than 'admin', start the WSO2 IS server using the -Dsetup parameter as shown in the command below.
sh wso2server.sh -Dsetup
Info
With these configuration users can log in to super tenant with both email user name ( [email protected] ) or non-email user names (alice). But for tenant only email user names allowed (tod@ gmail.com @ wso2.com )
Note
You can configure email user name without enabling
EnableEmailUserNameproperty, then users can login to both super tenant and tenant using email and non-email user names. But super tenant users should always use @carbon.super at the end of user names. -
Restart the server.
Related Topics
For more information on how to configure primary and secondary user stores, see Configuring User Stores.
Let's get started!
Configuring Salesforce
- Sign up as a Salesforce developer if you don't have an account. If
you already have an account, move on to step 2 and log in to
Salesforce.
- Fill out the relevant information found in the following URL: https://developer.salesforce.com/signup
- Click Sign me up.
- You will receive a security token by email to confirm your new account. If you did not receive the email successfully, you will be able to reset it by following the steps given here .
-
Log in with your new credentials as a Salesforce developer. Do this by clicking the Login link in the top right hand side of https://login.salesforce.com/ .
Note
This document is explained using the Salesforce lightning theme. If you are using the classic theme, follow the steps given below to switch to the lightning theme:
Click here to find the steps on how to switch from the classic to the lightning theme.
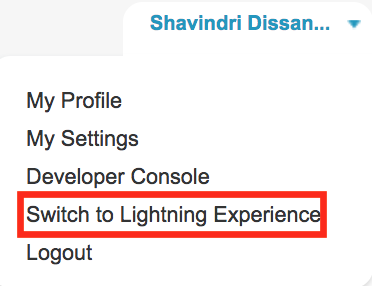
- Click your username to expand the drop down.
- Click Switch to Lightning Experience.
- Click the settings icon on the top-right-hand corner, and click
Set Up.
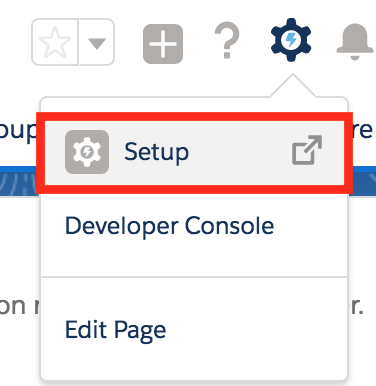
Now you are navigated to the lightening theme of Salesforce.
-
Click Allow to enable Salesforce to access your basic information.
-
Once you are logged in, create a new domain and access it.
To do this, do the following steps.
-
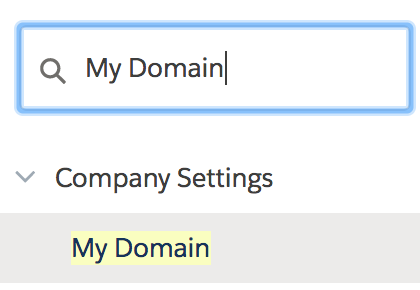
Search for My Domain in the search bar that is on the left navigation panel.
-
Click My Domain.
-
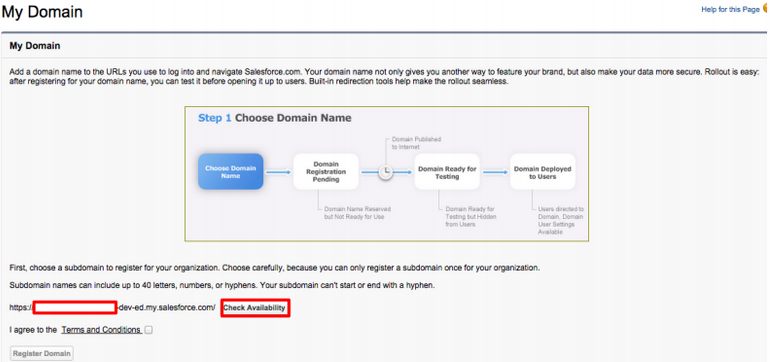
In the page that appears, come up with a name for your domain. You can check if the domain is available by clicking the Check Availability button.
Info
For the page given below to load on your browser, make sure that the Salesforce cookies are not blocked.
-
If the domain is available, select I agree to Terms and Conditions and click Register Domain to register your new domain.
-
Once the domain is registered to your account, click the Click here to login button to test this out.
-
-
On the left navigation menu, search for Single Sign-On Settings , and click it.
-
In the page that appears, click Edit and then select the SAML Enabled check box to enable federated single sign-on using SAML.

-
Click Save to save this configuration change.
-
Obtain the Salesforce certificate. You need to upload it to the Identity Server later on. Follow the steps given below to obtain the certificate.
About the Salesforce certificate
The validation request sent from Salesforce must be validated by the Identity Server. For this purpose, the Salesforce public certificate must be uploaded to the Identity Server and is used to validate the request.
-
On the left navigation menu, go to Security Controls and click Certificate and Key Management.
-
If you have not done so already, you must create the certificate first. Do the following steps to create this.
- Click Create Self-Signed Certificate.
- Enter the Label and a Unique Name, and click Save. The certificate is generated.
-
Click the Download Certificate button to download the certificate.
-
-
Click New under SAML Single Sign-On Settings. The following screen appears.
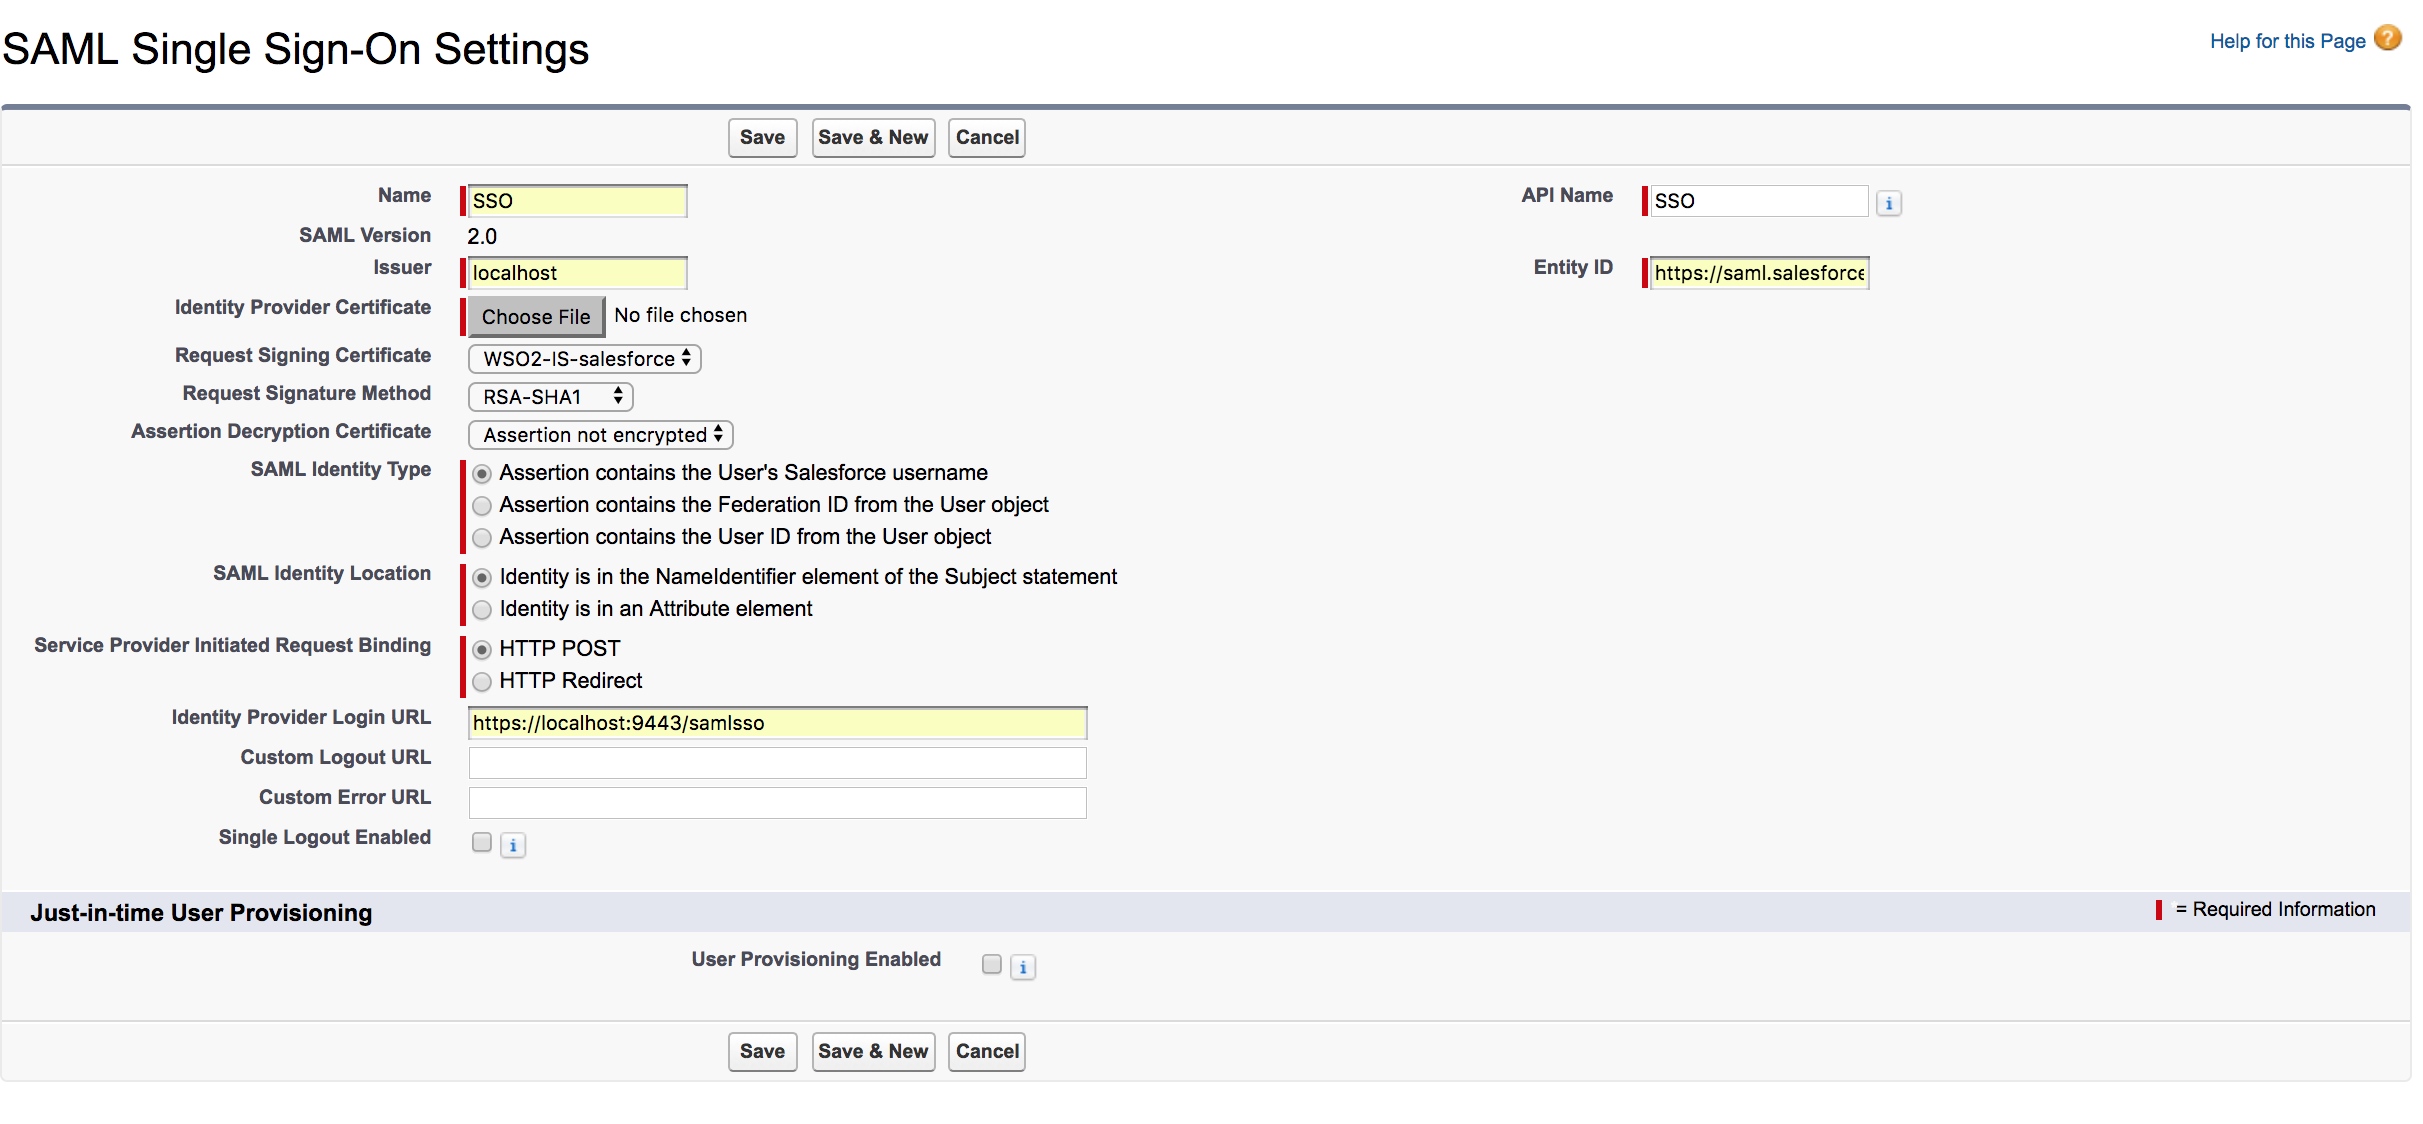
Ensure that you configure the following properties.
Tip
If you want to know more about the Salesforce SAML Single Sign-On settings configurations, see the Salesforce developer documentation
-
Click Save to save your configurations.
-
Search for My Domain in the search bar that is on the left navigation pane and click My Domain.
-
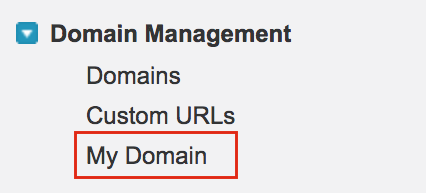
Go to Domain Management in the left navigation pane and click My Domain.
-
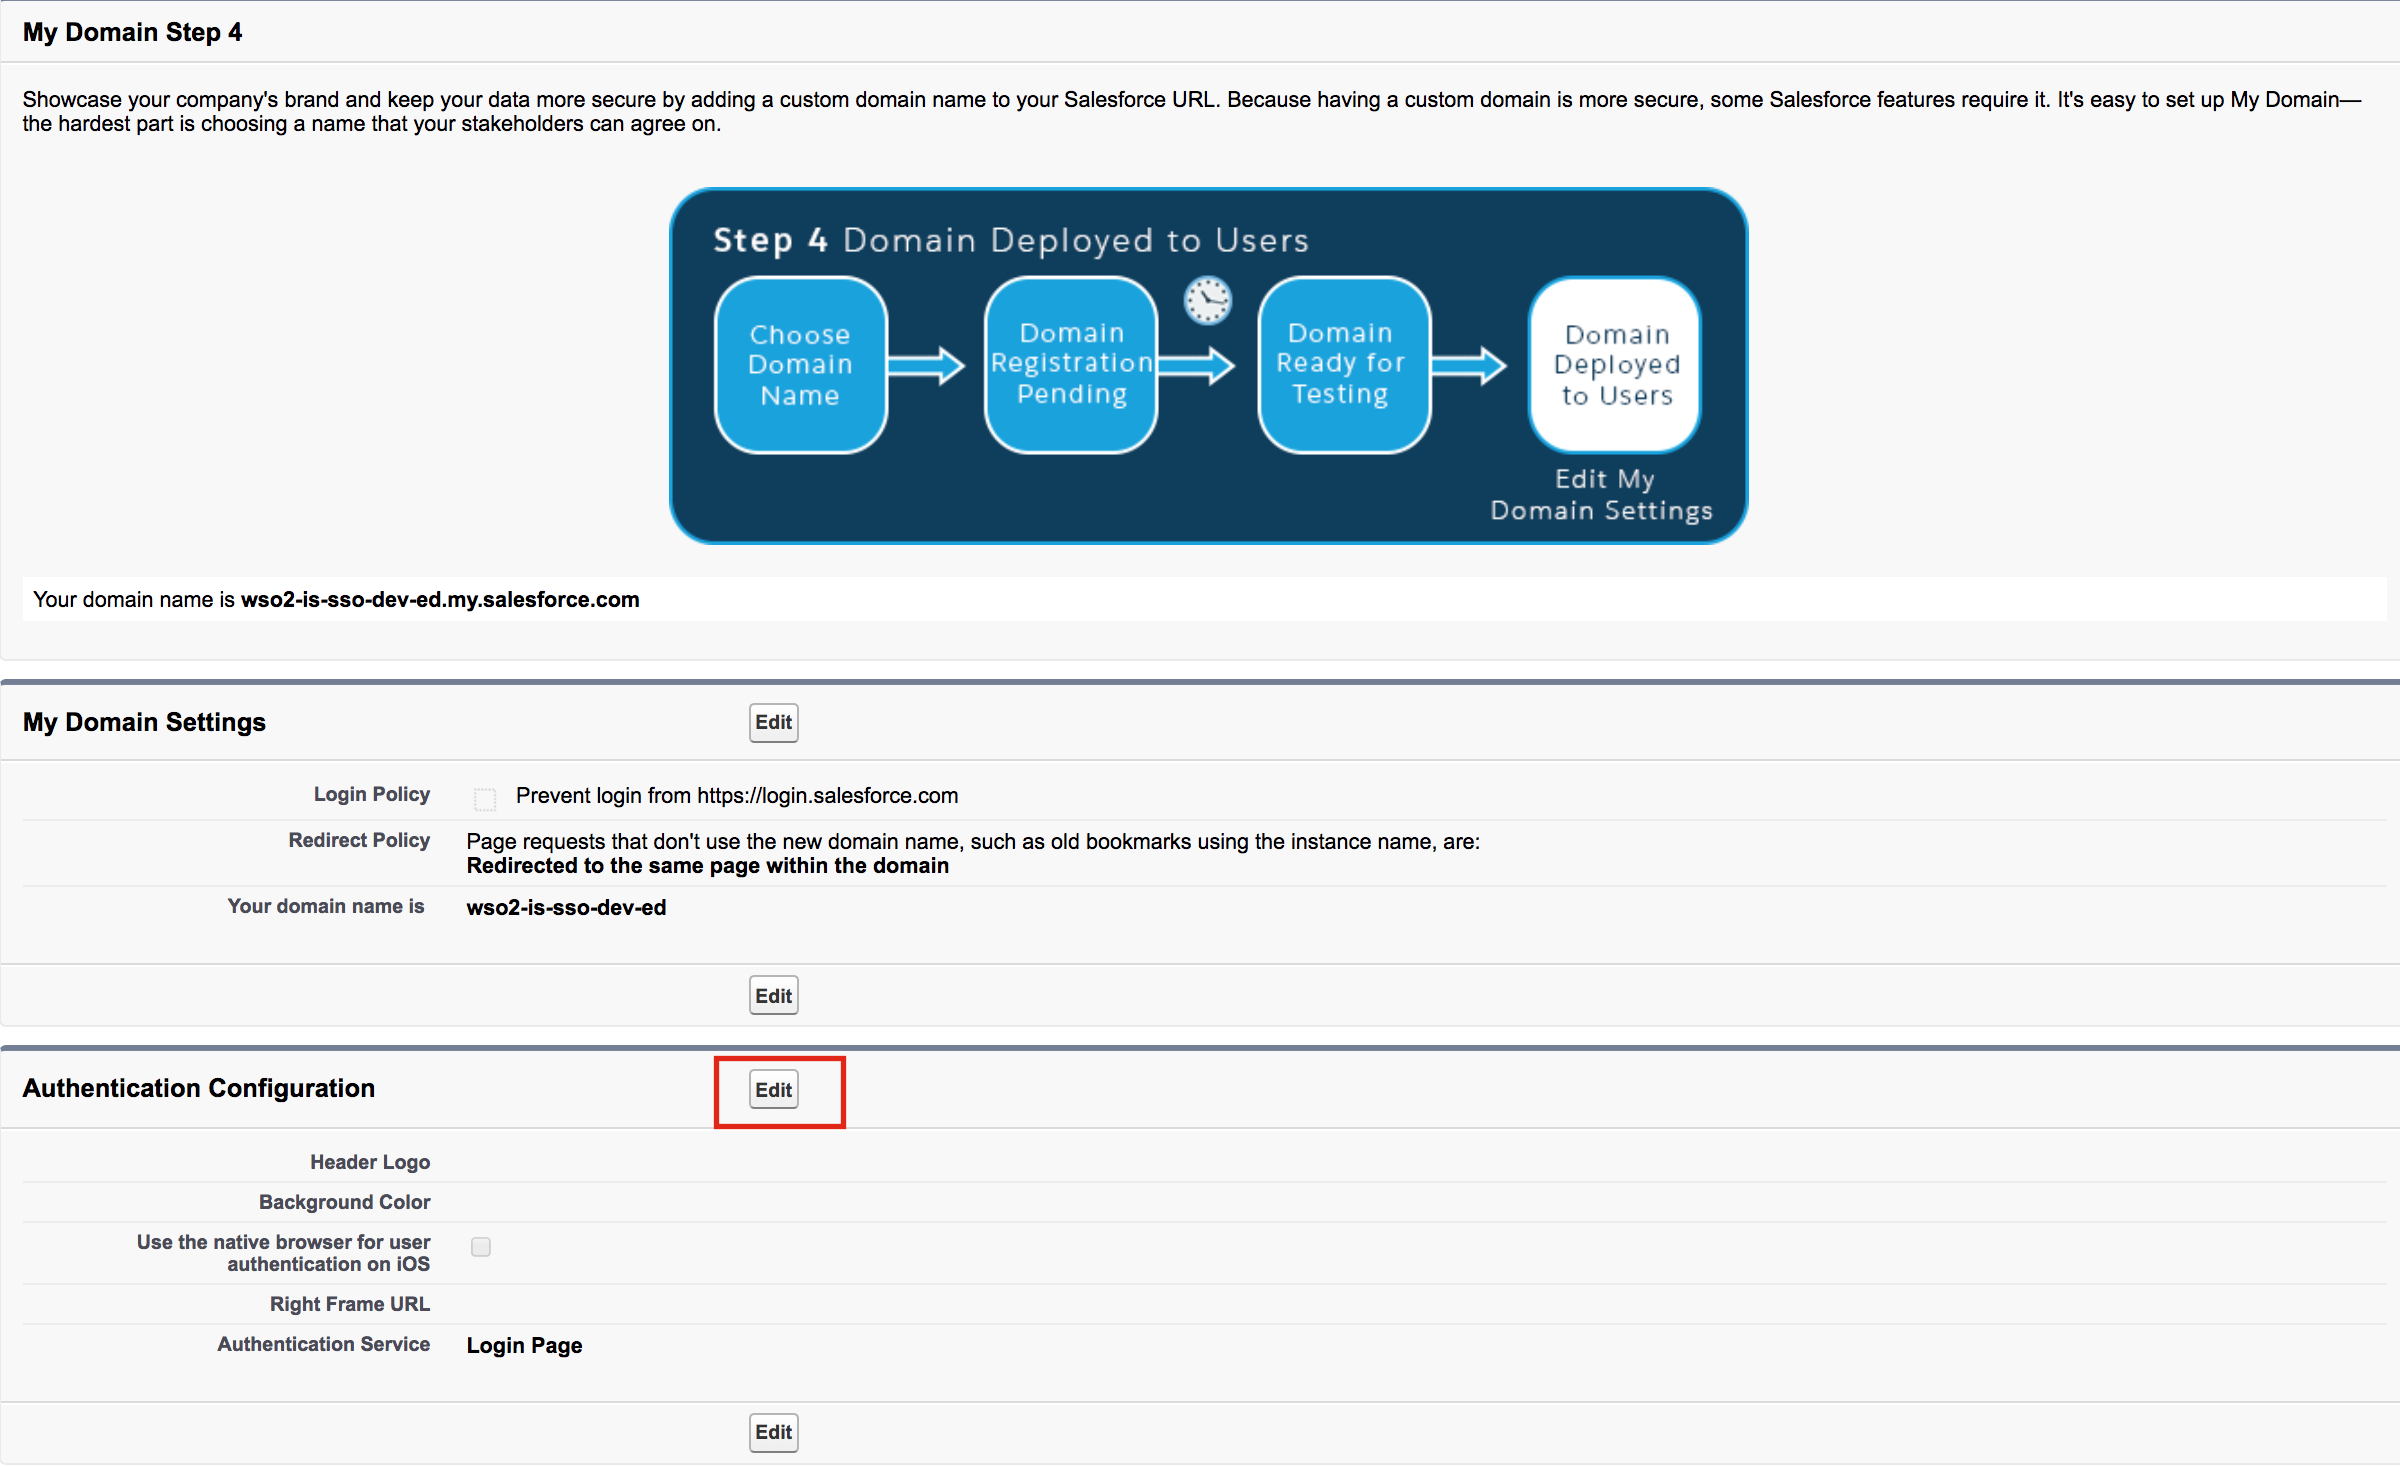
Click Deploy to Users. Click Ok to the confirmation message that appears.
-
In the page that appears, you must configure the Authentication Configuration section. Scroll down to this section and click Edit.
-
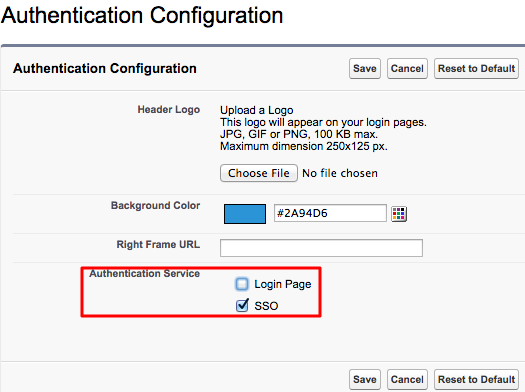
Under Authentication Service , select SSO and deselect Login Page.
Info
SSO is the SAML user authentication method you created in salesforce.com, in step 9 above. It is configured to direct users to WSO2 Identity server, which in turn direct the request to Facebook as Facebook acts as the IdP.
-
Click Save.
Configuring the service provider
- Sign in. Enter your username and password to log on to the management console .
-
Navigate to the Main menu to access the Identity menu. Click Add under Service Providers.
-
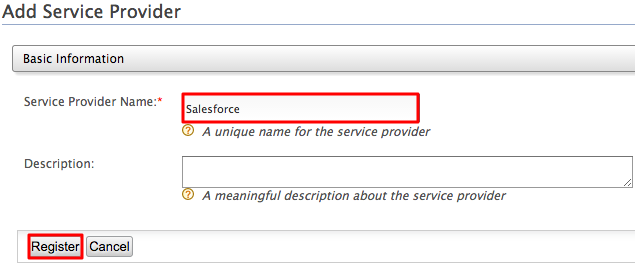
Fill in the Service Provider Name and provide a brief Description of the service provider. Only Service Provider Name is a required field and we use Salesforce as the name for this example.
-
Click Register.
-
Configuring claim mapping for Salesforce:
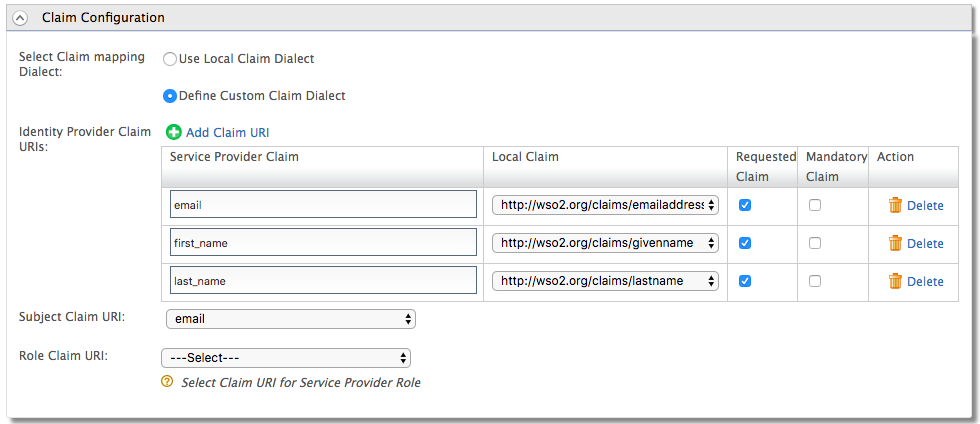
- Expand the Claim Configuration section.
- Select the Define Custom Claim Dialect option under Select Claim mapping Dialect.
-
Click Add Claim URI to add custom claim mappings as follows.
Add the following claim URIs.Service Provider Claim Local Claim email http://wso2.org/claims/emailaddressfirst_name http://wso2.org/claims/givennamelast_name http://wso2.org/claims/lastname -
Select all of these claims as Requested Claims.
Select email from the Subject Claim URI dropdown. The Subject Claim URI is important to define as it is the unique value used to identify the user. In cases where you have a user store connected to the Identity Server, this Subject Claim URI value is used to search for the user in the user store.
For more information about claim mapping, see Claim Management.
-
Expand the Inbound Authentication Configuration and the SAML2 Web SSO Configuration and click Configure.
-
In the form that appears, fill out the following configuration details required for single sign-on.
See the following table for details.Field Value Description Issuer https://saml.salesforce.comThis is the <saml:Issuer>element that contains the unique identifier of the service provider. This is the same value you entered as the Entity-ID when creating the salesforce application. This is also the issuer value specified in the SAML Authentication Request issued by the service provider. When configuring single-sign-on across Carbon servers, ensure that this value is equal to the service_provider_id value mentioned within [admin_console.authenticator.saml_sso_authenticator] in the<IS_HOME>/repository/conf/deployment.tomlfile.Assertion Consumer URL Click here and follow the steps to get the Assertion Consumer URL.
Follow the steps given below to get the Salesforce URL:
- Login to the Salesforce developer account: https://login.salesforce.com/.
- Search for My Domain in the search bar that is on the left navigation panel.
Click My Domain and you are navigated to the domain you created under the section Configuring Salesforce.
- Click Edit under Authentication Configurations and you are navigated to a new page having the following URl:
https://<DOMAIN_NAME>/domainname/EditLogin.apexp - On the left navigation menu, search for Single Sign-On Settings , and click it.
- Click on the name of the Single Sign-On Setting you created. In this use case click SSO.

- Copy the URL that is defined for Login URL to access Salesforce.
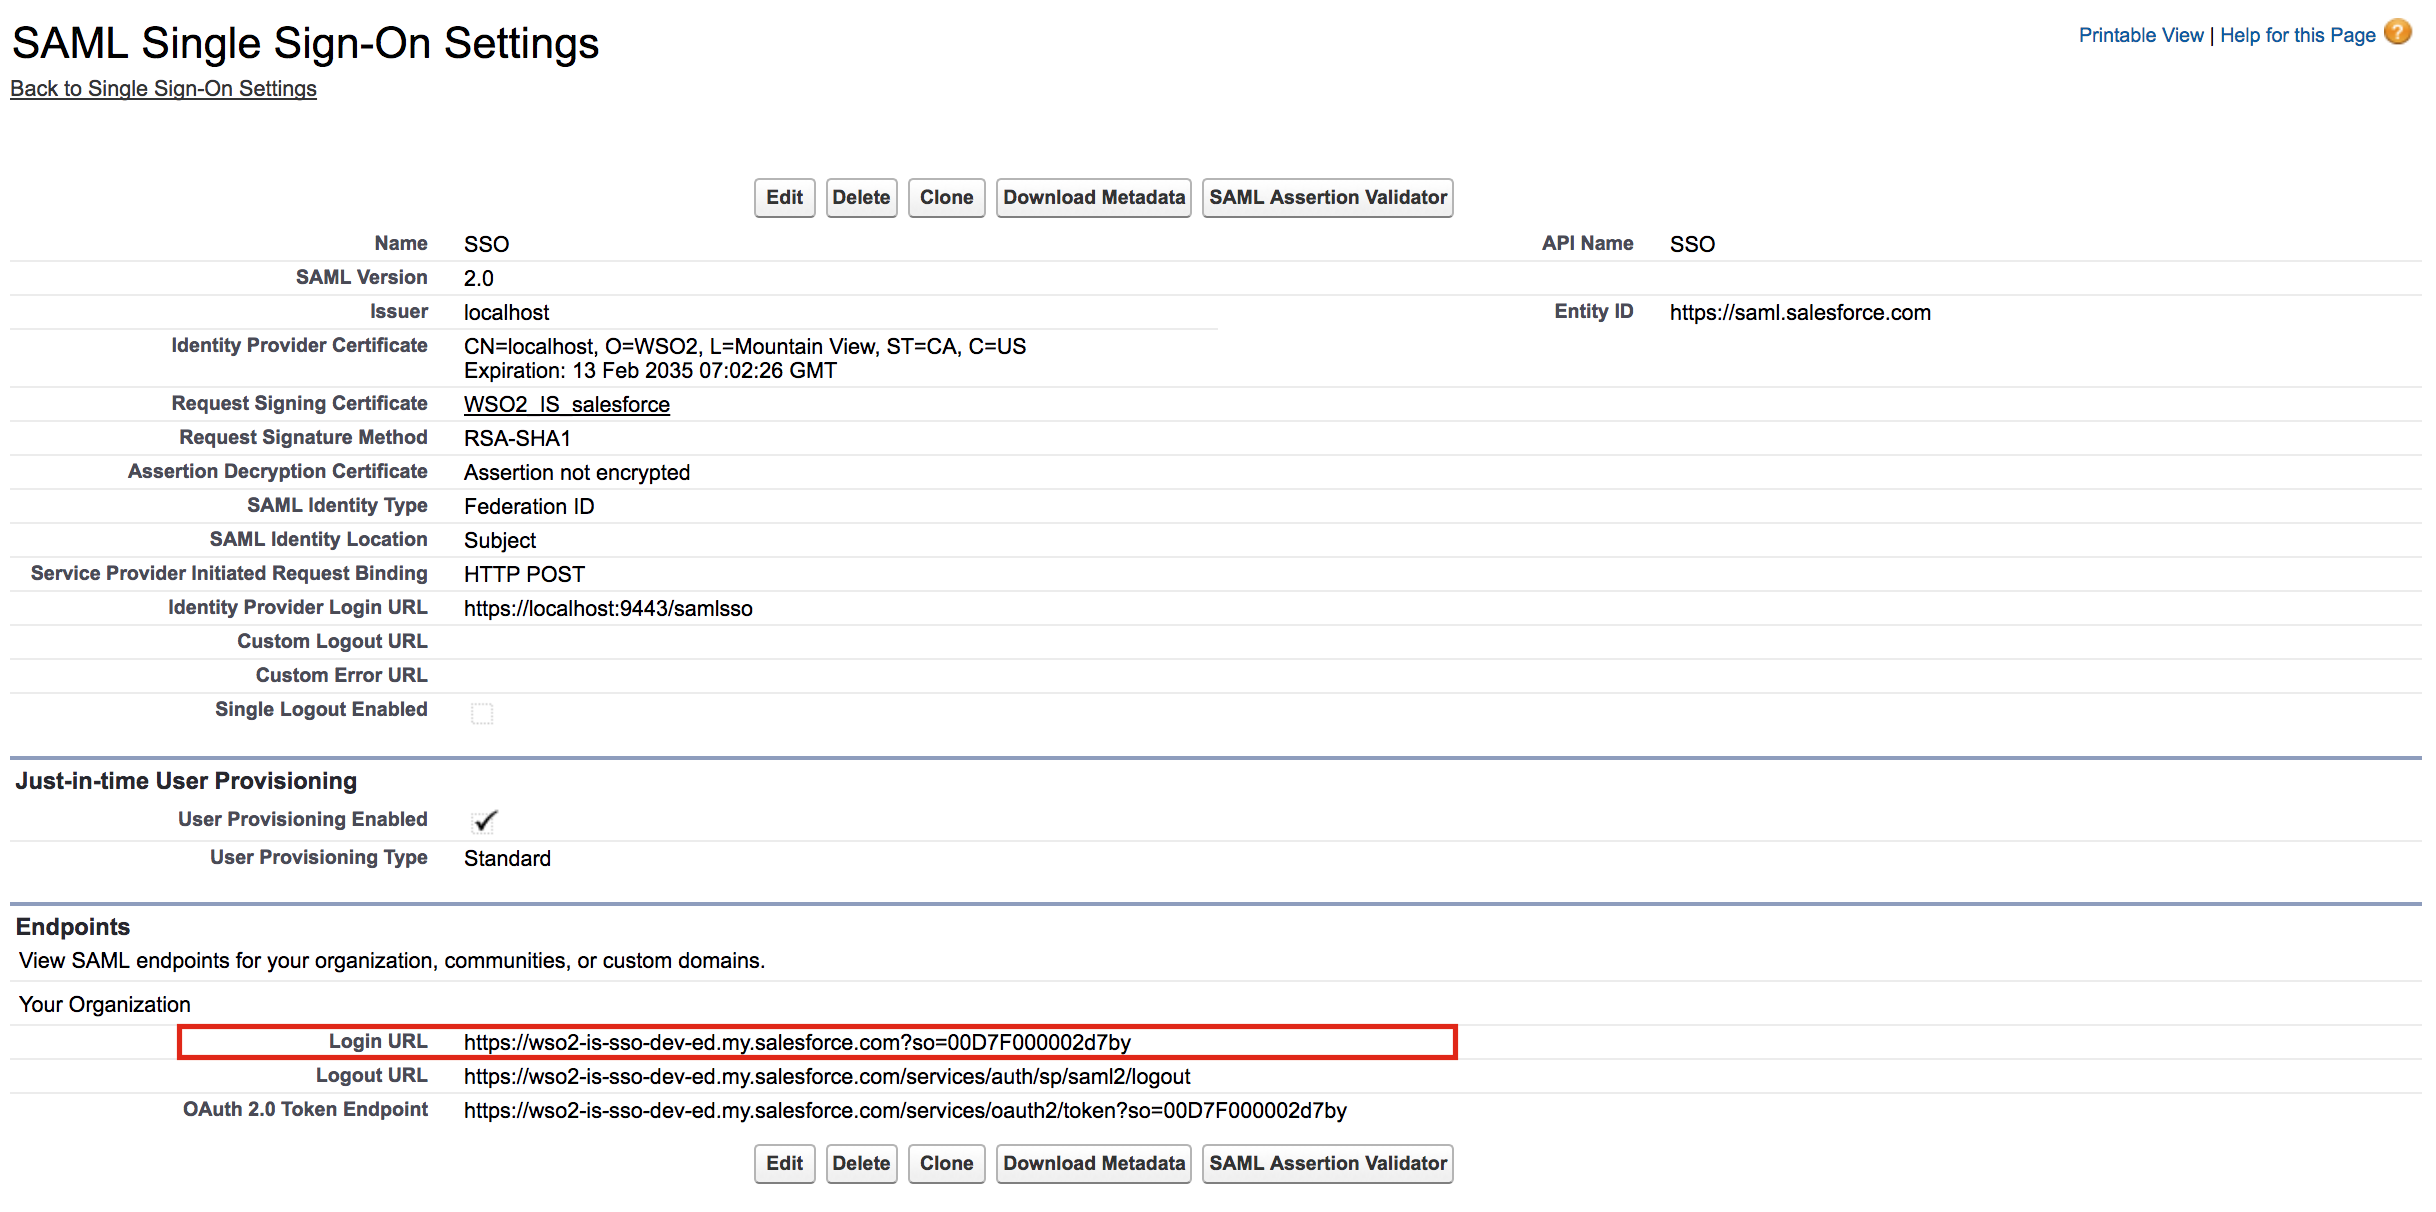
This is the URL to which the browser should be redirected to after the authentication is successful. This is the Assertion Consumer Service (ACS) URL of the service provider. The identity provider redirects the SAML2 response to this ACS URL. However, if the SAML2 request is signed and SAML2 request contains the ACS URL, the Identity Server will honor the ACS URL of the SAML2 request. In this case, you must use your Salesforce login URL. In Salesforce, click Security Controls on your left menu and then click Single Sign-On Settings. In the page that appears, click on the SSO settings that you created to view the details. Use the Salesforce Login URL listed there for this value. NameID Format The default value can be used here. This defines the name identifier formats supported by the identity provider. The service provider and identity provider usually communicate with each other regarding a specific subject. That subject should be identified through a Name-Identifier (NameID) , which should be in some format so that It is easy for the other party to identify it based on the format. Name identifiers are used to provide information regarding a user. Enable Response Signing Selected Select Enable Response Signing to sign the SAML2 Responses returned after the authentication process.
Enable Attribute Profile Selected Select Enable Attribute Profile to enable this and add a claim by entering the claim link and clicking the Add Claim button. The Identity Server provides support for a basic attribute profile where the identity provider can include the user’s attributes in the SAML Assertions as part of the attribute statement. Once you select the check box to Include Attributes in the Response Always , the identity provider always includes the attribute values related to the selected claims in the SAML attribute statement. -
Click Register to save your configurations.
Configuring the Facebook application
-
Go to https://developers.facebook.com/ and log in using your Facebook credentials.
-
Click on Create App.

-
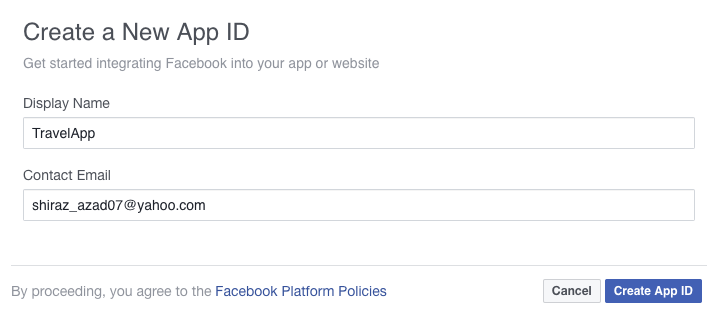
Enter a Display Name, Contact Email, and click Create App ID.
-
Enter code for security check, and click Submit.
-
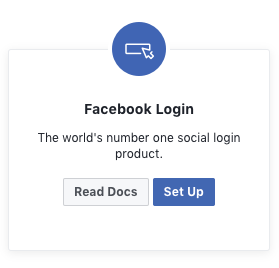
On Select product page, click Set up under Facebook Login .
-
Select Website as the platform for the app used in this sample.

-
Enter
https://localhost:9443/as the Site URL and click Save.Info
If you have configured WSO2 Identity Server to run using the IP or hostname , you need to provide the IP or hostname instead of
localhost.
-
Under Products on the left navigation panel, Click Facebook Login.
-
You can configure the Client OAuth Settings on the window that appears.
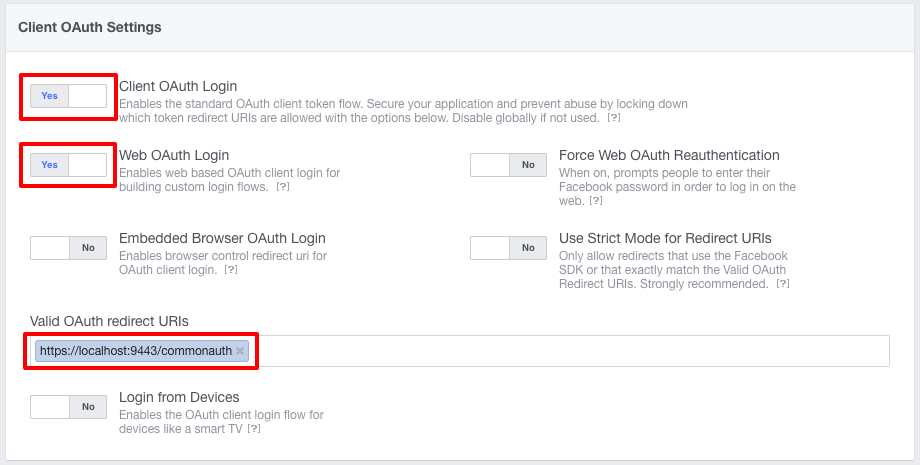
- Client OAuth Login should be set to Yes.
Client OAuth Login is the global on-off switch for using OAuth client token flows. It helps to secure your application and prevent abuse by locking down which token redirect URIs are allowed. - Web OAuth Login should be set to Yes.
Web OAuth Login settings enables any OAuth client token flows that use the Facebook web login dialog to return tokens to your own website. - Valid OAuth redirect URIs should be set to
https://localhost:9443/commonauth.
Enter the ACS URL (Assertion Consumer URL) which is the endpoint in WSO2 Identity Server which accepts the response sent by facebook.
- Client OAuth Login should be set to Yes.
-
Scroll down and click Save Changes button to save the changes.
-
Click on Dashboard. You can see the App ID and App Secret as shown in the image below. Click Show to view the App Secret.
Info
App ID is the Client ID and the App Secret is the Client Secret in OAuth terminology. The API Version is Facebook’s API that is used to create the application.

-
Click Settings on the left menu and navigate to the Basic tab. Add the App Domains (since WSO2 IS is running on localhost, you can add localhost as the App Domain)
-
Click Save Changes.
Now you have finished configuring Facebook as an Identity Provider.
About accessing the app
The app is not available to general public yet. To make to app available to every Facebook user, you have to submit the app for review. After a review, Facebook makes the app available to every Facebook user. You can find more information on the review process by clicking on App Review in the left navigation menu of your app's dashboard.
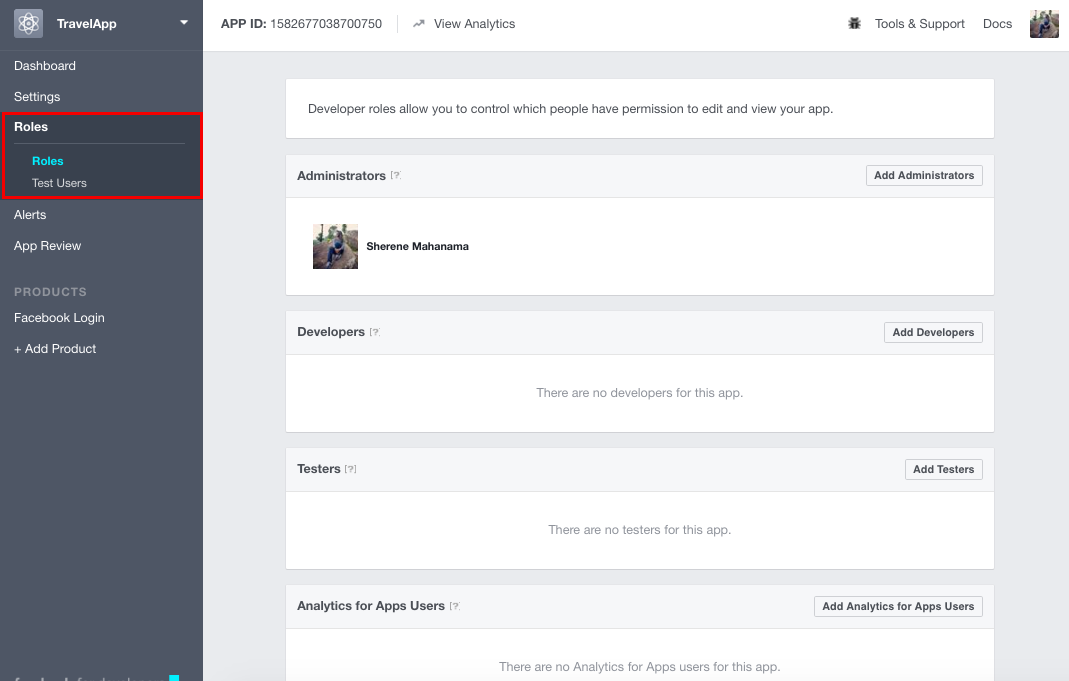
The review process may take some time, so for the purposes of this sample, you can specify some Facebook users as Developers or Testers. Only the users specified here can use this app to log in with Facebook until the app goes public. To do this, click on Roles in the left navigation menu of the dashboard and specify the required Facebook users as Developers or Testers.
Configuring the identity provider
Now you have to configure WSO2 Identity Server by adding Facebook as a new identity provider.
-
Log in to the management console as an administrator.
-
In the Identity section under the Main tab of the management console, click Add under Identity Providers.
-
Give a suitable name as the Identity Provider Name. In this case we can have Facebook as the identity provider name for clarity.
Info
For detailed information on the Identity Provider configurations, see Adding and Configuring an Identity Provider.
-
Choose the salesforce certificate you downloaded in step8 under Configuring Salesforce for Identity Provider Public Certificate.
-
Configuring claim mapping for Facebook:
- Expand Claim Configuration, go to Basic Claim Configuration.
- Select the Define Custom Claim Dialect option under Select Claim mapping Dialect.
-
Click Add Claim Mapping to add custom claim mappings as follows.

Do the following mappings as shown in the above image.
Identity Provider Claim URI Local Claim URI Description email http://wso2.org/claims/emailaddressHere we map the value in Facebook with the claim URI in the Identity Server. In this case it is a direct correlation of claims where the email attribute of Facebook users is mapped to the email attribute used in the Identity Server. first_name http://wso2.org/claims/givennameHere we map the value in Facebook with the claim URI in the Identity Server. In this case it is a direct correlation of claims where the first_name attribute of Facebook users is mapped to the givenname attribute used in the Identity Server. last_name http://wso2.org/claims/lastnameHere we map the value in Facebook with the claim URI in the Identity Server. In this case it is a direct correlation of claims where the last_name attribute of Facebook users is mapped to the lastname attribute used in the Identity Server. Note
The User ID Claim is important to define as it is the unique value used to identify the user. In cases where you have a user store connected to the Identity Server, this User ID Claim value is used to search for the user in the user store. You can define it when configuring the claims for the identity provider or when configuring the claims for the service provider. In this use case this is configured for the service provider by configuring the Subject Claim URI.
If WSO2 Identity server sends roles instead of users and if you want to use those roles to be JIT provisioned to the users of the local userstore, you need to configure Role Claim URI. This configuration is not required for this tutorial.
You can retrieve all the public information of the user and the email address. The following are some common attribute names.
- id
- name
- first_name
- last_name
- link
- gender
- locale
- age_range
More information is available from the following link: https://developers.facebook.com/docs/facebook-login/permissions/v2.0 . You can map these attributes to any Local Claim URI that is suitable.
For more information about claim mapping, see Claim Management.
-
Go to Facebook Configuration under Federated Authenticators.
-
Select both check-boxes to Enable Facebook Authenticator and make it the Default.
-
Enter the App ID and App Secret values from the Facebook app you created in the Client ID and Client Secret fields respectively.
Info
Navigate to the Facebook developer console and click on your app that is under the My App drop down.
Field Description Sample Value Client Id This refers to the App ID you received from the Facebook app you created. <Application ID of the Facebook App>

Client Secret This refers to the App Secret you received from the Facebook app you created. <App Secret of the Facebook App>
Scope Defines the permission to access particular information from a Facebook profile. See the Permissions Reference for a list of the different permission groups in Facebook APIs. email User Information Fields These are the claims related to the user account on Facebook. WSO2 Identity Server requests these fields from Facebook when a user is authenticated with Facebook through the IS. See public_profile permission for more information about these fields. id,email,first_name,last_name, Callback Url This is the URL to which the browser should be redirected after the authentication is successful. It should have this format: https://(host-name):(port)/acs. https://localhost:9443/commonauth 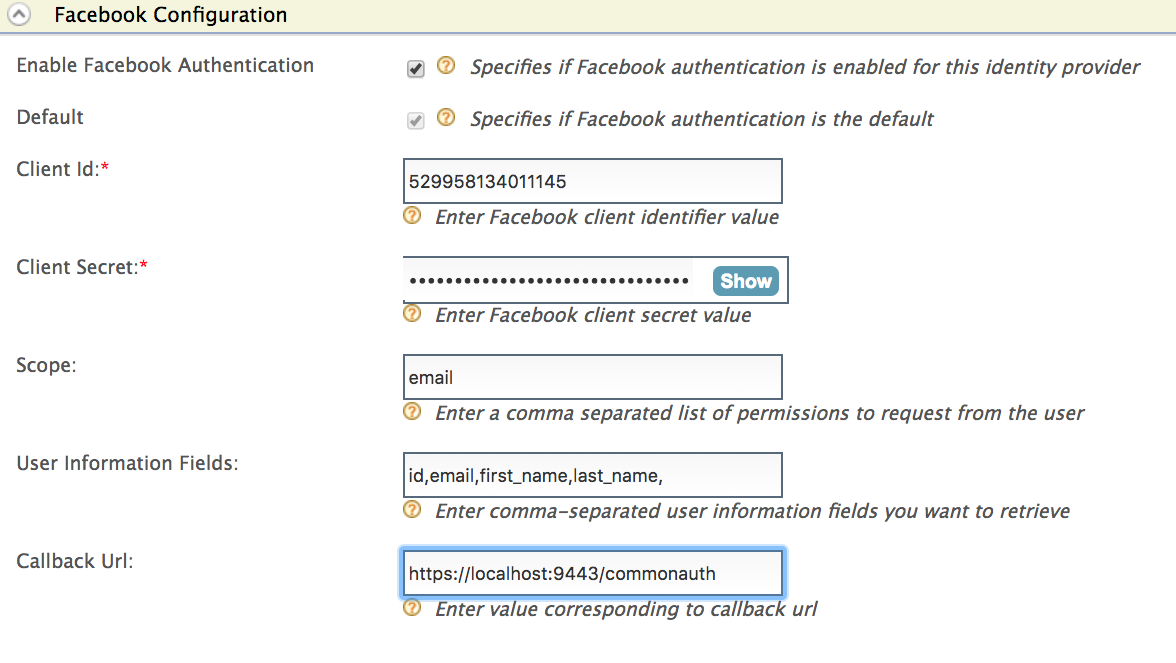
-
Click Register.
You have now added the identity provider.
Configuring the federated authenticator for the service provider
The next step is to configure the federated authenticator for the service provider. In this case, the service provider is Salesforce
-
Return to the management console.
-
In the Identity section under the Main tab, click List under Service Providers.
-
Go to the service provider that you created and click Edit.
-
Go to Local and Outbound Authentication Configuration section.
-
Select the Identity Provider you created from the dropdown list under Federated Authentication.
-
Ensure that the Federated Authentication radio button is selected and select Facebook from the dropdown. This is the name of the identity provider that you configured.

-
Click Update to save the changes.
You have now added the identity provider as the federated authenticator for Salesforce.
Testing the configurations
Do the following steps to test out the configurations for a new user in Salesforce and the Identity Server.
-
Create a user in Salesforce. This user should have the same email address as your Facebook account.
- Log in to the Salesforce developer account: https://login.salesforce.com/.
- On the left navigation pane, click Users under Manage Users.
- On the page that appears, click the New User button to create a new user.
-
Create a user with the same email address as the user on Facebook.
Note
- Define the User License as Salesforce for this tutorial. For more information on the Salesforce user license, see the Salesforce developer documentation .
- Define any profile type for the user. For more information on the Salesforce user profiles, see the Salesforce developer documentation.
-
Click Save to save your changes. An email will be sent to the email address you provided for the user.
-
Logout of Salesforce.
-
Access your Salesforce login URL on an incognito or private browser.
Info
The salesforce login URL is unique to your Salesforce application. Follow the steps given below to get this URL:
-
Search for My Domain in the search bar that is on the left navigation panel.
-
Click My Domain and you are navigated to the domain you created under the section Configuring Salesforce .
-
Click Edit under Authentication Configurations and you are navigated to a new page having the following URl:
https://<DOMAIN_NAME>/domainname/EditLogin.apexp -
On the left navigation menu, expand Security Controls , and click, Single Sign-On Settings.
-
Click on the name of the Single Sign-On Setting you created. In this use case click SSO.

-
Copy the URL that is defined for Login URL to access Salesforce.

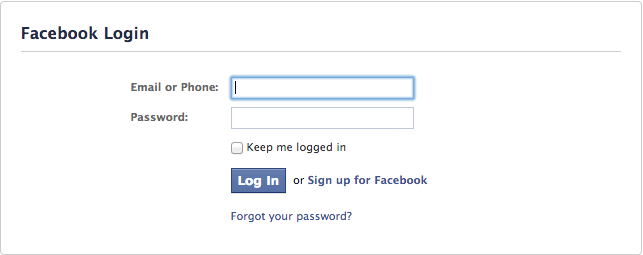
You are directed to the Facebook Login screen.
-
-
Log in using your Facebook credentials. You are then redirected back to Salesforce.
Remember to use the same email address as the user in the Salesforce account.
Now you have successfully configured WSO2 Identity server so you can login to Salesforce using Facebook as the Identity Provider.
Top