Deployment Patterns
This section provides high-level information on the recommended deployment pattern.
You can run multiple nodes of WSO2 Identity Server in a cluster mode to achieve two requirements.
- Handle requests seamlessly: If one node becomes unavailable or is experiencing high traffic, another node will seamlessly handle the requests.
- Balancing traffic handling: Multiple nodes can handle the traffic together so that cluster throughput is higher than the throughput of a single node.
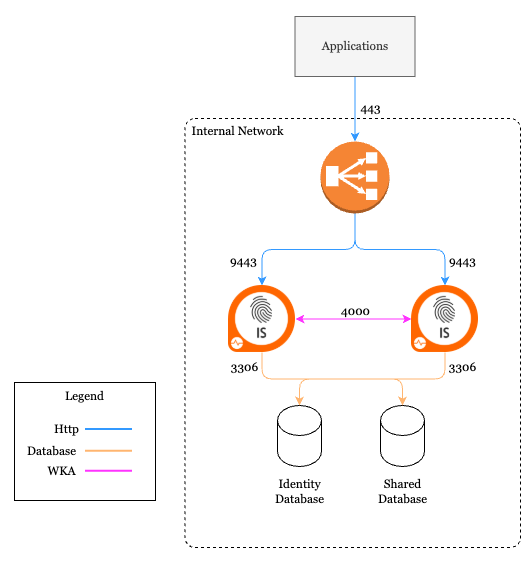
The following sections guide you through setting up the deployment pattern, which is a HA Clustered Deployment of two WSO2 Identity Server nodes.
Deployment prerequisites
As a first step in planning your deployment, ensure that you have the necessary system requirements and a compatible environment.
System requirements
|
The above recommendations can change based on the expected concurrency and performance.
Note
For more information on prerequisites, see Installation Prerequisites.
Environment compatibility
| Operating systems | For information on tested operating systems, see Tested Operating Systems and JDKs . |
|---|---|
| RDBMS | For information on tested DBMSs, see Tested DBMSs . |
| Directory services | Supports Directory Services implementing following LDAP Protocols:
For information on tested LDAPs, see Tested LDAPs . |
| Java | Open JDK 21 |
| Web browsers | For more information on tested web browsers, see Tested Web Browsers . |
Configure databases
In a clustered deployment, all WSO2 Identity Server nodes are pointed to the same databases to ensure the integrity of the data. Also, you can configure multiple logical databases if you require to keep your data logically separated in the environment. The following tutorial demonstrates deployment with an identity database (IDENTITY_DB) and a user database (UM_DB).
Note
Alternatively, you can create more databases to separate the data logically for each data type. This will not make a difference in performance and is not mandatory. Separating databases logically may help to have a different backup and scaling strategy when the deployment is large and complex. If you do wish to separate the data logically into separate databases, see Set Up Separate Databases for Clustering.
Tip
If you have configured the shared database correctly, the deployment.toml file in the <IS_HOME>/repository/conf directory should have the following configurations.
Following is a sample configuration. Therefore parameter values might be different.
The following diagram is a high-level component diagram showing how the system would look when two databases are used.
Mount the shared registry
WSO2 Identity Server comprises three different registry repositories.
-
Local Repository: Stores configuration and runtime data that is local to the server.
-
Configuration Repository: Stores product-specific configurations.
-
Governance Repository: This stores configuration and data that are shared across the whole platform. This typically includes services, service descriptions, endpoints, or data sources.
In this cluster setup, we use the default h2 database as the local registry in each node individually. The governance and configuration registries should be mounted to share across all nodes. In the WSO2 Identity Server, config and governance registries are mounted by default.
Note
The production recommendation is to set the <versionResourcesOnChange> property in the registry.xml file to false. This is because the automatic versioning of resources can be an extremely expensive operation.
Clustering-related configurations
WSO2 supports the following membership schemes for clustering
- Well Known Address (WKA)
- Multicast membership
- AWS membership
- AWS ECS membership
- Kubernetes membership
The following configurations need to be done in both the WSO2 Identity Server nodes to enable clustering between them.
-
Enable clustering on node one and node two by setting the membership scheme that fits your deployment by editing the
<IS_HOME>/repository/conf/deployment.tomlfile.The simplest is the well-known address (WKA) based clustering method. It only suites where all the nodes are deployed on machines having static IP addresses. Configurations for each membership scheme are listed below.
Edit the
<IS_HOME>/repository/conf/deployment.tomlfile to add the following configurations. Configure thelocalMemberHostandlocalMemberPortentries. Add the IP of the editing node itself.[clustering] membership_scheme = "wka" local_member_host = "192.168.2.1" local_member_port = "4000" members = ["192.168.2.1:4000", "192.168.2.2:4001"]Under the
memberssection, add thehostNameandportfor each WKA member. As we have only two nodes in our sample cluster configuration, we will configure both as WKA nodes.You can also use IP address ranges for the
hostName. For example,192.168.1.2-10. This should ensure that the cluster eventually recovers after failures. One shortcoming of doing this is that you can define a range only for the last portion of the IP address. You should also keep in mind that the smaller the range, the faster it discovers members since each node has to scan fewer potential members.AWS ECS supports two launch types: EC2 and Fargate. Choose the appropriate configuration based on your deployment preference.
-
Create a working AWS ECS Cluster with EC2 launch type. Note the following when creating a cluster.
- Select the
EC2 instancelaunch type. - Note the
nameandVPC CIDR blockof the cluster, as you will require them later for configurations. -
Ensure that the
Container instance IAM rolethat you assign to the ECS cluster has the following permission policy attached. -
Make sure that the security group of the cluster instances has an inbound rule to allow incoming traffic on the Hazelcast default port range
(5701 - 5708). It is advised to restrict access to instances in the same security group for this inbound rule.
- Select the
-
Create a
deployment.tomlfile in a preferred directory and add the following configurations.[clustering] membership_scheme = "aws-ecs" [clustering.properties] region = "us-east-1" clusterName = "ECS-IS-CLUSTER" hostHeader = "ec2" vpcCidrBlock = "10.0.*.*" tagValue = "a_tag_value"Under the
clustering.propertiessection, set theregion,clusterName,tagValueandvpcCidrBlockbased on the AWS ECS cluster you created in the previous step. ThetagValueis derived from the auto-generated tagaws:cloudformation:stack-namein the AWS cluster. If theaws:cloudformation:stack-nametag is not available in the cluster or you prefer to use a custom tag, make sure to specify both thetagKeyandtagValue.Note
As only the
hostnetwork mode is supported for EC2 launch type, thehostHeadervalue should be set to"ec2"in theclustering.propertiessection.Note
Once all the configurations are complete, build a docker image including the configurations. You can use this Docker image to create a
Task Definition, and make sure to set the network mode tohostin the definition. Then run a newServiceor aTaskon theAWS ECS clusteryou created.
-
Create a working AWS ECS Cluster with Fargate launch type. Note the following when creating a cluster.
- Select the
Fargatelaunch type. - Note the
nameandVPC CIDR blockof the cluster, as you will require them later for configurations. -
Ensure that the
Task execution rolehas the following permissions: -
Make sure that the security group of the cluster instances has an inbound rule to allow incoming traffic on the Hazelcast default port range
(5701 - 5708). It is advised to restrict access to instances in the same security group for this inbound rule.
- Select the
-
Create a
deployment.tomlfile in a preferred directory and add the following configurations.[clustering] membership_scheme = "aws-ecs" [clustering.properties] region = "us-east-1" clusterName = "ECS-IS-CLUSTER-FARGATE" hostHeader = "ecs" vpcCidrBlock = "10.0.*.*" tagKey = "a_tag_key" tagValue = "a_tag_value"Under the
clustering.propertiessection, set theregion,clusterName,tagKey,tagValueandvpcCidrBlockbased on the AWS ECS cluster you created in the previous step. Make sure to specify both thetagKeyandtagValueas Fargate tasks do not have theaws:cloudformation:stack-nametag by default.Note
For Fargate launch type, the
hostHeadervalue should be set to"ecs"in theclustering.propertiessection as Fargate usesawsvpcnetwork mode.Note
Once all the configurations are complete, build a docker image including the configurations. You can use this Docker image to create a
Task Definitionfor Fargate. The network mode will be automatically set toawsvpcfor Fargate tasks. Then run a newServiceon theAWS ECS clusteryou created.
When WSO2 products are deployed in clustered mode on Amazon EC2 instances, it is recommended to use the AWS clustering mode. Open the
deployment.tomlfile (stored in the<IS_HOME>/repository/conf/directory) and make the following changes.-
Apply the following configuration parameters and update the values for the server to enable AWS clustering.
[clustering]
membership_scheme = "aws"
domain = "wso2.carbon.domain"
local_member_host = "10.0.21.80"
local_member_port = "5701"
The port used for communicating cluster messages has to be any port number between 5701 and 5800. The local member host must be set to the IP address bound to the network interface used for communicating with other members in the group (private IP address of EC2 instance).
-
Apply the following parameters to update the values to configure clustering properties.
[clustering.properties]
accessKey = "***"
secretKey = "***"
securityGroup = "security_group_name"
region = "us-east-1"
tagKey = "a_tag_key"
tagValue = "a_tag_value"
It's recommended to add all the nodes to the same security group. The AWS credentials and security group depend on your configurations in the Amazon EC2 instance. The
tagKeyandtagValueare optional and the rest of the above parameters are mandatory. -
To provide specific permissions for creating an access key and secret key for only this AWS clustering attempt, use the custom policy block given below. See the AWS documentation for details on how to add the custom IAM policy.
-
Attach this to the user account that will operate AWS clustering in your WSO2 IS. The access key and secret key can only be used to list EC2 instance details in the AWS account.
When WSO2 Identity Server nodes are deployed in clustered mode on Kubernetes, the Kubernetes Membership Scheme enables the automatic discovery of these servers. The Kubernetes Membership Scheme supports finding the pod IP addresses using the Kubernetes API.
-
Configure the
<IS_HOME>/repository/conf/deployment.tomlfile with the following configurations.Parameter Description Example membershipSchemeThis is the membership scheme that will be used to manage the membership of nodes in a cluster. kuberneteslocal_member_portThis is the TCP port used by this member and through which other members will contact this member. 4000KUBERNETES_NAMESPACEThis is the Kubernetes Namespace in which the pods are deployed. wso2-isKUBERNETES_SERVICESThese are the Kubernetes Services that belong in the cluster. wso2is-service -
In order to retrieve the pod IP address information from the Kubernetes api server, the Kubernetes membership scheme uses the pod's service account. Hence, the pods need to be associated with a service account that has permission to read the "endpoints" resource. Make sure the role you bind has the following permissions.
-
Optionally, a Kubernetes token or basic authentication can be used to authenticate with the Kubernetes api server. The following properties can be set under
[clustering.properties]accordingly.KUBERNETES_API_SERVER: This is the Kubernetes API endpoint,e.g.,http://172.17.8.101:8080. Alternatively, an https endpoint can be set viaKUBERNETES_SERVICE_HOSTandKUBERNETES_SERVICE_PORT_HTTPS.KUBERNETES_SERVICE_HOST: This is the Kubernetes API hostname or IP address, e.g.,kuberneteshostname.KUBERNETES_SERVICE_PORT_HTTPS: This is the Kubernetes API https listening port. This must be an integer value.KUBERNETES_API_SERVER_TOKEN: This is the Kubernetes Master token for authentication (optional), e.g.,yourkubernetestoken.
-
-
Configure caching.
Note
Distributed caching is disabled, and it is not recommended to use this due to many practical issues related to configuring and running distributed caching properly. WSO2 Identity Server employs Hazelcast as the primary method of implementing cluster messages while using distributed caching in a simple setup.
About Caching
- Why cachingCaching is an additional layer on top of the databases. It enables keeping the recently used data fetched from the database in local memory so that for subsequent data requests, , the data can be served from the local memory instead of fetching from the database. You need to evaluate certain advantages and disadvantages when deciding on your caching strategy.
- Advantages
- The load on the underlying database or LDAP is reduced as data is served from already fetched data in memory.
- Improved performance due to the reduced number of database calls for repetitive data fetching
- Disadvantages
- Coherency problems may occur when the data change is not immediately reflected on cached data if one node or an external system updates the database.
- Data in memory can become stale yet be served, e.g., serving data from memory while its corresponding record in the database is deleted.
Caching in WSO2 Identity Server
Historically WSO2 Identity Server used distributed caching to utilize the advantages mentioned above and minimize the coherence problem. However, in newer deployment patterns where the network is not tightly controlled, distributed caching fails in unexpected ways. Hence, we no longer recommend using distributed caching. Instead, it is recommended to have local caches (if required) and cache invalidation messages (if required) by considering the information given below.
The ForceLocalCache property
When Hazelcast clustering is enabled, certain caches act as distributed caches. The
Cache invalidation uses Hazelcast messaging to distribute the invalidation message over the cluster and invalidate the caches properly. This is used to minimize the coherence problem in a multi-node setup.force_local_cacheproperty in the<IS_HOME>/repository/conf/deployment.tomldirectory marks that all the caches should act like local caches even in a clustered setup. (This is by default set totrue).Typical clustered deployment cache scenarios
Scenario Local
CachingDistributed
CachingHazelcast
ClusteringDistributed
InvalidationDescription 1. All caches are local with distributed cache invalidation Enabled Not
ApplicableEnabled Enabled - This is the recommended approach.
- Hazelcast messaging invalidates the caches.
2. All caches are local without distributed cache invalidation Enabled Not
ApplicableDisabled Disabled - Invalidation clears only the caches in specific nodes. Other caches are cleared at cache expiration.
- Hazelcast communication is not used.
- As the decisions take time to propagate over nodes (default cache timeout is 15 minutes), there is a security risk in this method. To reduce the risk, reduce the default cache timeout period. To learn how to reduce the default cache timeout period, see Configuring Cache Layers - timeout.
3. No caching Disabled Disabled Disabled Disabled - The data are directly acquired from the database.
- Eliminates the security risks caused due to not having cache invalidation.
- This method will create a performance degradation due to the lack of caching.
4. Certain caches are disabled while the remaining are local Enabled
for the
available local cachesNot
ApplicableEnabled Enabled - To reduce the security risk created in the second scenario and to improve performance in comparison with the third scenario, disable the security-related caches and sustain the performance-related caches as local caches.
- This requires identifying these caches depending on the use case.
5. Distributed caching enabled Disabled
- the
force_local_cacheis
set tofalse.Enabled Enabled Not
Applicable- This scenario is only recommended if the network has tight tolerance where the network infrastructure is capable of handling high bandwidth with very low latency.
- Typically, this applies only when you deploy all the nodes in a single server rack having fiber-optic cables. In any other environment, this implementation will cause cache losses. Thus, this implementation is not recommended for general use.
-
Go to the
<IS_HOME>/repository/conf/deployment.tomlfile and add the proxy port as443. The port 443 is the Load Balancer frontend port. -
You may change the
<IS_HOME>/repository/conf/deployment.tomlfile to access the servers using a hostname instead of the raw IP. This hostname is how the external applications try to look up WSO2 Identity Server endpoints. ThehostNameshould be resolved to the Load Balancer front-end IP address.Note
The WSO2 Identity Server cluster uses this hostname and therefore it must be specified in the
/etc/hostsfile in each node so that internal calls will not be routed through the Load Balancer.Example:
192.168.2.1 wso2.is
Enable artifact synchronization
You must have a shared file system to enable synchronization for runtime artifacts. You can use one of the following depending on your environment.
- Network File System (NFS): This is one of the most commonly known shared file systems and can be used in a Linux environment.
- Server Message Block (SMB) file system: This can be used in a Windows environment.
- Amazon EFS: This can be used in an AWS environment.
Once you have chosen a file system:
- Mount it in the nodes that are participating in the cluster.
- If the userstores need to be updated at runtime, create a directory called
Userstoresin the shared file system and create a symlink from the<IS_HOME>/repository/deployment/server/userstorespath to theUserstoresdirectory. - If multi-tenancy is required, create a directory called
Tenantsin the shared file system and create a symlink from the<IS_HOME>/repository/tenantspath to theTenantsdirectory.
Note
Instead of mounting the file system directly to the <IS_HOME>/repository/deployment/server/userstores and <IS_HOME>/repository/tenants paths, a symlink is created. Otherwise, if you delete the product to redeploy it, the file system will get mounted to a non-existing path.
Front with a load balancer
To access the two WSO2 Identity Server nodes, you need to front the system with a load balancer. You can use any load balancer that is available to your system.
Info
To learn how to front the two-node cluster with an Nginx load balance, see Set up WSO2 clusters with Nginx. If you’ve changed the hostnames of nodes, make sure to keep that in mind when you’re configuring your load balancer.
Run the cluster
- Start the load balancer and WSO2 Identity Server nodes.
- Access the WSO2 Identity Server Console. Depending on your load balancer, traffic will be served by one of the cluster nodes.
- Shut down cluster node one and observe that the traffic is served by node two.
- Start node one and shut down node two. Note that traffic will be served by node one.