App-native authentication
Applications usually depend on external web browsers for login. This means that users logging into an application are directed away from the application's environment to a web browser to complete the login process. This is not ideal if your priority is to implement a seamless login experience.
App-native authentication was introduced as a solution to this problem. By adopting an API-based approach, app-native authentication provides developers means to develop a secure login process within the application.
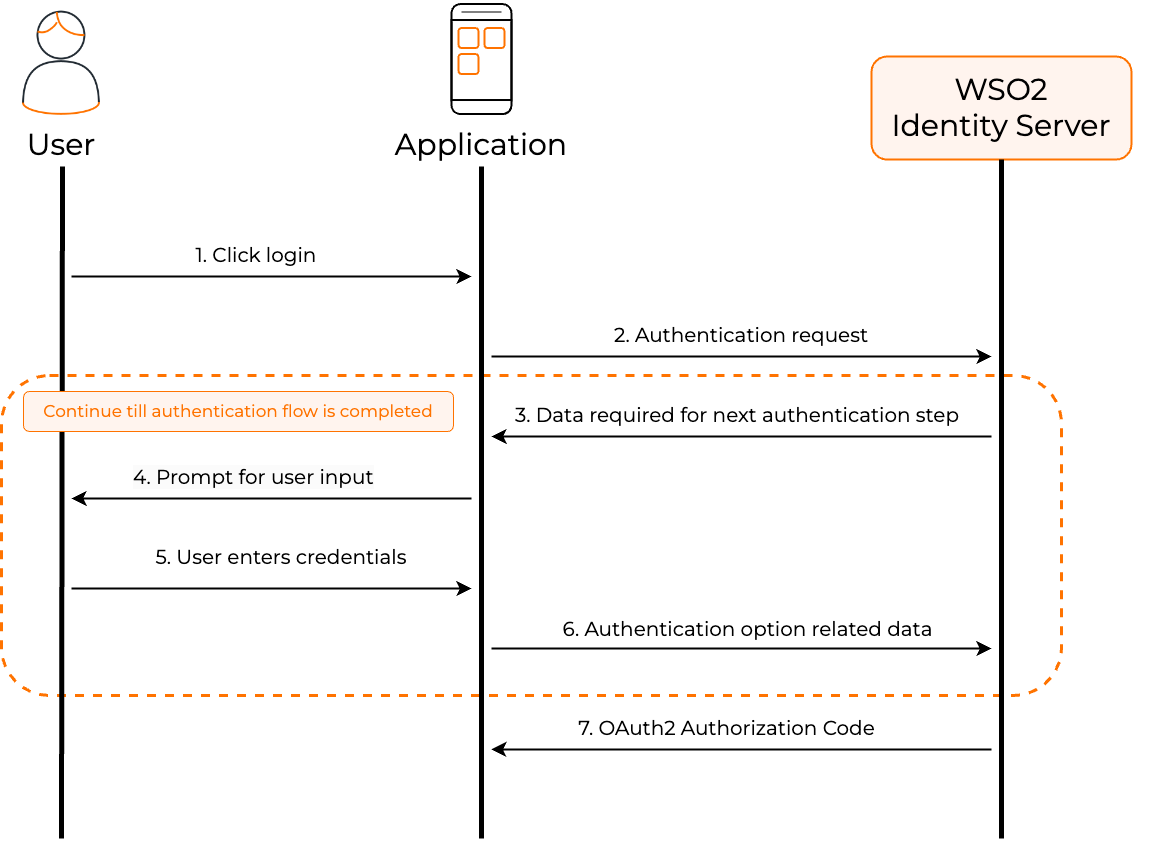
The following diagram illustrates the high-level steps involved with app-native authentication.
Note
Learn how to implement app-native authentication in WSO2 Identity Server
How does it work?
This section digs deep into the steps involved in app-native authentication and the associated API calls.
-
Applications initiate app-native authentication using an OAuth 2.0 authorization code request by setting the
response_modetodirectas shown below.curl --location 'https://localhost:9443/oauth2/authorize/' --header 'Accept: application/json' --header 'Content-Type: application/x-www-form-urlencoded' --data-urlencode 'client_id=<client_id>' --data-urlencode 'response_type=<response_type>' --data-urlencode 'redirect_uri=<redirect_url>' --data-urlencode 'state=<state>' --data-urlencode 'scope=<space separated scopes>' --data-urlencode 'response_mode=direct'curl --location 'https://localhost:9443/oauth2/authorize/' --header 'Accept: application/json' --header 'Content-Type: application/x-www-form-urlencoded' --data-urlencode 'client_id=VTs12Ie26wb8HebnWercWZiAhMMa' --data-urlencode 'response_type=code' --data-urlencode 'redirect_uri=https://example-app.com/redirect' --data-urlencode 'state=logpg' --data-urlencode 'scope=openid internal_login' --data-urlencode 'response_mode=direct'Note
Learn how to implement login using the authorization code flow.
-
The application receives the following response that contains key components like the flowId parameter that uniquely identifies the login flow and the authenticators array that contains the authentication options available for the first step.
{
  "flowId": "3bd1f207-e5b5-4b45-8a91-13b0acfb2151",
  "flowStatus": "INCOMPLETE",
  "flowType": "AUTHENTICATION",
  "nextStep": {
    "stepType": "AUTHENTICATOR_PROMPT",
    "authenticators": [
      {
        "authenticatorId": "QmFzaWNBdXRoZW50aWNhdG9yOkxPQ0FM",
        "authenticator": "Username & Password",
        "idp": "LOCAL",
        "metadata": {
          "i18nKey": "authenticator.basic",
          "promptType": "USER_PROMPT",
          "params": [
            {
              "param": "username",
              "type": "STRING",
              "isConfidential": false,
              "order": 1,
              "i18nKey": "param.username"
            }
          ]
        },
        "requiredParams": [
          "username",
          "password"
        ]
      }
    ],
    "acceptErrorParams": false,
    "messages": [
      {
        "type": "ERROR",
        "messageId": "msg_invalid_un_pw",
        "message": "Invalid username or password.",
        "i18nKey": "message.msg_invalid_un_pw",
        "context": [
          {
            "key": "remainingAttempts",
            "value": "2"
          }
        ]
      }
    ]
  },
  "links": [
    {
      "name": "authentication",
      "href": "/api/authenticate/v1",
      "method": "POST"
    }
  ]
}
Learn about the parameters
- flowId: A unique identifier for the entire authentication flow.
- flowStatus: Indicates the status of the authentication flow. Possible values are
INCOMPLETE,FAILED_INCOMPLETE, andSUCCESS_COMPLETED. - nextStep: Contains the details of the next step in the authentication flow.
- stepType: The type of the next step. Possible values are
MULTI_OPTIONS_PROMPTandAUTHENTICATOR_PROMPT. MULTI_OPTIONS_PROMPT indicates that the user has multiple options to choose from, while AUTHENTICATOR_PROMPT indicates that the user has to authenticate using a specific authentication option. - authenticators: The list of authentication options available for the next step. If the stepType is
AUTHENTICATOR_PROMPT, the list will only contain one authentication option. - authenticatorId: The unique identifier of the authenticator. This id is mutable and can change based on the authenticator configuration.
- authenticator: The name of the authenticator.
- idp: The Identity Provider of the authenticator. This will be
LOCALfor local authenticators and will contain the IDP name for federated authenticators. - metadata: The metadata related to the authentication option.
- promptType: The type of the prompt. Possible values are
USER_PROMPT,INTERNAL_PROMPT, andREDIRECTION_PROMPT. Authentication options that require user interaction will have the prompt type asUSER_PROMPT. Authentication options that require the application to perform an action will have the prompt type asINTERNAL_PROMPT. Authentication options that require the application to redirect the user to a different URL will have the prompt type asREDIRECTION_PROMPT. - params: When the prompt type is
USER_PROMPT, this will contain the list of input parameter metadata to render the UI. - additionalData: Additional data required to complete the authentication step. Ex: Redirect URL for federated authentication.
- requiredParams: The required parameters for the authentication option. These are the parameters that the application must send to the authentication API in the next request to complete the authentication step.
- messages: The info and error messages related to the authentication option.
- i18nKey: The internationalization key. This key will be available many places of the response and can be used where content localization is required.
-
The application then gathers the credentials for one of the presented authentication options from the user.
-
The application makes a POST request to the
/authnendpoint using the Authentication API. The payload of this request includes the flowId and the selectedAuthenticator object which contains credentials for the user-selected authentication option.Note
Explore the OpenAPI definition of the authentication API.
Learn about the parameters
- flowId: A unique identifier for the entire authentication flow. This is provided in the initial response forthe auth request.
- selectedAuthenticator: The authenticator selected by the user for authentication.
- authenticatorId: The unique identifier of the authenticator.
- params: The values entered by the user for the parameters required for authentication.
-
The authentication API responds with a similar payload as step 2 above. This response contains the authenticators array that contains the authentication options available for the next step.
-
Steps 3-5 repeats for all the steps of the login flow.
-
The authentication flow completes when the application receives an OAuth 2.0 authorization code with the relevant OAuth 2.0 artifacts in a json format as shown below.
-
After receiving the authorization code, the application exchanges it for an access token by making a POST request to the token endpoint.
curl --location 'https://localhost:9443/oauth2/token'
--header 'Content-Type: application/x-www-form-urlencoded'
--data-urlencode 'grant_type=authorization_code'
--data-urlencode 'code=<authorization_code>'
--data-urlencode 'redirect_uri=<redirect_uri>'
--data-urlencode 'client_id=<client_id>'
--data-urlencode 'client_secret=<client_secret>'
curl --location 'https://localhost:9443/oauth2/token' --header 'Content-Type: application/x-www-form-urlencoded' --data-urlencode 'grant_type=authorization_code' --data-urlencode 'code=6ff8b7e1-01fc-39b9-b56d-a1f5826e6d2a' --data-urlencode 'redirect_uri=https://example-app.com/redirect' --data-urlencode 'client_id=VTs12Ie26wb8HebnWercWZiAhMMa' --data-urlencode 'client_secret=your_client_secret'Note
The
redirect_urimust match the value used in the initial authorization request.The token endpoint responds with an access token and other OAuth 2.0 artifacts:
{
    "access_token": "54bd024f-5080-3db5-9422-785f5d610605",
    "refresh_token": "a6c7fc96-2fd0-3905-ae8f-d5419d0dd6a5",
    "scope": "openid internal_login",
    "id_token": "eyJ4NXQiOiJZemM1T1Rnd1pXSTNNR1F6TXpNd1pqUXpaVEU1TmpVMk1EWXpZemd3TldNMll...",
    "token_type": "Bearer",
    "expires_in": 3600
}
Learn about the parameters
- access_token: The token that can be used to access protected resources.
- refresh_token: The token that can be used to obtain new access tokens when the current one expires.
- scope: The scopes granted by the authorization server.
- id_token: A JSON Web Token (JWT) that contains user identity information.
- token_type: The type of token issued (typically "Bearer").
- expires_in: The lifetime of the access token in seconds.
Sample scenarios
The following are several sample scenarios in which users can be logged in using app-native authentication. Each scenario goes through a single or multiple interactions with the /authn endpoint based on the number of steps configured for the application.
Scenario 1: User logs in with a username & password
The application goes through the following steps to complete app-native authentication for a user logging in with username & password.
-
Step 1: Initiate the request with the
/authorizeendpoint.Note
The response contains information on the first authentication step (the only step for this flow).
curl --location 'https://localhost:9443/oauth2/authorize/'
--header 'Accept: application/json'
--header 'Content-Type: application/x-www-form-urlencoded'
--data-urlencode 'client_id=XWRkRNkJDeTiR5MwHdXROGiJka'
--data-urlencode 'response_type=code'
--data-urlencode 'redirect_uri=https://example.com/home'
--data-urlencode 'scope=openid profile'
--data-urlencode 'response_mode=direct'
{ "flowId": "bea32017-7124-4b7a-ab31-17633754d04d", "flowStatus": "INCOMPLETE", "flowType": "AUTHENTICATION", "nextStep": { "stepType": "AUTHENTICATOR_PROMPT", "authenticators": [ { "authenticatorId": "QmFzaWNBdXRoZW50aWNhdG9yOkxPQ0FM", "authenticator": "Username & Password", "idp": "LOCAL", "metadata": { "i18nKey": "authenticator.basic", "promptType": "USER_PROMPT", "params": [ { "param": "username", "type": "STRING", "order": 0, "i18nKey": "username.param", "displayName": "Username", "confidential": false }, { "param": "password", "type": "STRING", "order": 1, "i18nKey": "password.param", "displayName": "Password", "confidential": true } ] }, "requiredParams": [ "username", "password" ] } ] }, "links": [ { "name": "authentication", "href": "https://localhost:9443/oauth2/authn/", "method": "POST" } ] } -
Step 2: Carry the
flowIdreceived in the above response and request the/authnendpoint for username & password authentication.Note
As this is the only step configured for the application, the
/authnendpoint returns an authorization code, upon successful authentication.
Scenario 2: 2FA with username & password and TOTP
The application goes through the following steps to complete app-native authentication for a user logging in with username & password in the first step and TOTP in the second step.
-
Step 1: Initiate the request with the
/authorizeendpoint.Note
The response contains information on the first authentication step.
curl --location 'https://localhost:9443/oauth2/authorize/'
--header 'Accept: application/json'
--header 'Content-Type: application/x-www-form-urlencoded'
--data-urlencode 'client_id=XWRkRNkJDeTiR5MwHdXROGiJka'
--data-urlencode 'response_type=code'
--data-urlencode 'redirect_uri=https://example.com/home'
--data-urlencode 'scope=openid profile'
--data-urlencode 'response_mode=direct'
{ "flowId": "162b7547-e057-4c84-9237-1c7e69bdc122", "flowStatus": "INCOMPLETE", "flowType": "AUTHENTICATION", "nextStep": { "stepType": "AUTHENTICATOR_PROMPT", "authenticators": [ { "authenticatorId": "QmFzaWNBdXRoZW50aWNhdG9yOkxPQ0FM", "authenticator": "Username & Password", "idp": "LOCAL", "metadata": { "i18nKey": "authenticator.basic", "promptType": "USER_PROMPT", "params": [ { "param": "username", "type": "STRING", "order": 0, "i18nKey": "username.param", "displayName": "Username", "confidential": false }, { "param": "password", "type": "STRING", "order": 1, "i18nKey": "password.param", "displayName": "Password", "confidential": true } ] }, "requiredParams": [ "username", "password" ] } ] }, "links": [ { "name": "authentication", "href": "https://localhost:9443/oauth2/authn/", "method": "POST" } ] } -
Step 2: Carry the
flowIdreceived in the above response and request the/authnendpoint for username & password authentication.Note
Upon successful authentication, the
/authnendpoint returns information on the next authentication step.{ "flowId": "162b7547-e057-4c84-9237-1c7e69bdc122", "flowStatus": "INCOMPLETE", "flowType": "AUTHENTICATION", "nextStep": { "stepType": "AUTHENTICATOR_PROMPT", "authenticators": [ { "authenticatorId": "dG90cDpMT0NBTA", "authenticator": "TOTP", "idp": "LOCAL", "metadata": { "i18nKey": "authenticator.totp", "promptType": "USER_PROMPT", "params": [ { "param": "token", "type": "STRING", "order": 0, "i18nKey": "totp.authenticator", "displayName": "Token", "confidential": false } ] }, "requiredParams": [ "token" ] } ] }, "links": [ { "name": "authentication", "href": "https://localhost:9443/oauth2/authn/", "method": "POST" } ] } -
Step 3: Carry the same
flowIdand request the/authnendpoint for TOTP authentication.Note
As this is the final step configured for the application, the
/authnendpoint returns an authorization code upon successful authentication.
Scenario 3: User selects passkey login out of multiple options
If a login step has multiple login options, the application goes through the following steps to complete passkey login with app-native authentication.
Before you begin
To implement app-native authentication with passkeys on a mobile application, you must facilitate the relevant platform (iOS or Android) to validate your mobile application. Refer to the Passkeys documentation for instructions.
-
Step 1: Initiate the request with the
/authorizeendpoint.Note
The response contains information on the first authentication step (the only step for this flow).
curl --location 'https://localhost:9443/oauth2/authorize/'
--header 'Accept: application/json'
--header 'Content-Type: application/x-www-form-urlencoded'
--data-urlencode 'client_id=XWRkRNkJDeTiR5MwHdXROGiJka'
--data-urlencode 'response_type=code'
--data-urlencode 'redirect_uri=https://example.com/home'
--data-urlencode 'scope=openid profile'
--data-urlencode 'response_mode=direct'
{ "flowId": "59b40c8b-4d2f-426f-a3fa-62d4ed28a169", "flowStatus": "INCOMPLETE", "flowType": "AUTHENTICATION", "nextStep": { "stepType": "MULTI_OPTIONS_PROMPT", "authenticators": [ { "authenticatorId": "QmFzaWNBdXRoZW50aWNhdG9yOkxPQ0FM", "authenticator": "Username & Password", "idp": "LOCAL", "metadata": { "i18nKey": "authenticator.basic", "promptType": "USER_PROMPT", "params": [ { "param": "username", "type": "STRING", "order": 0, "i18nKey": "username.param", "displayName": "Username", "confidential": false }, { "param": "password", "type": "STRING", "order": 1, "i18nKey": "password.param", "displayName": "Password", "confidential": true } ] }, "requiredParams": [ "username", "password" ] }, { "authenticatorId": "RklET0F1dGhlbnRpY2F0b3I6TE9DQUw", "authenticator": "Passkey", "idp": "LOCAL", "metadata": { "i18nKey": "authenticator.Fido" } } ] }, "links": [ { "name": "authentication", "href": "https://localhost:9443/oauth2/authn/", "method": "POST" } ] }Tip
Response for a multi-option login step has some key differences compared to that of a single-option step.
-
stepType parameter returns MULTI_OPTIONS_PROMPT to indicate the availability of multiple login options.
-
For login options that require some form of user initiation (such as email/sms OTP, passkey), the authenticators array contains only the ID of the authenticator and not the required metadata.
-
-
Step 2: The response in this example, returns two login options for the step. i.e. Username & password and passkey. Let's look at how each option works.
-
Username & Password: As this option does not need user initiation, the response from step 1 already contains the required metadata. Hence, if the user chooses to enter the username and password, the flow continues similar to as it does in Scenario 1.
-
Passkey: If a user initiates passkey login, the application needs to make an additional request to the
/authnendpoint to initiate the passkey flow and receive the related metadata.
As the user continues with the passkey flow, the application makes a request to the
/authnendpoint to initiate the passkey flow along with theflowIdand theauthenticatorIdof the passkey authenticator as follows.{ "flowId": "59b40c8b-4d2f-426f-a3fa-62d4ed28a169", "flowStatus": "INCOMPLETE", "flowType": "AUTHENTICATION", "nextStep": { "stepType": "AUTHENTICATOR_PROMPT", "authenticators": [ { "authenticatorId": "RklET0F1dGhlbnRpY2F0b3I6TE9DQUw", "authenticator": "Passkey", "idp": "LOCAL", "metadata": { "i18nKey": "authenticator.Fido", "promptType": "INTERNAL_PROMPT", "additionalData": { "challengeData": "eyJyZXF1ZXN0SWQiOiJ1b2hBYnRpSE9TaWJKbjN1Y0ZqdzZ4bFJxT zBqSlZ6NWtPdS1oWHRyb3JJIiwicHVibGljS2V5Q3JlZGVudGlhbFJ lcXVlc3RPcHRpb25zIjp7ImNoYWxsZW5nZSI6IjkxTGhoSWFBUFVzb TNERGllRXJpbDBJN2txdnFINVJldzhKcDctaGd3cEEiLCJycElkIjo ibG9jYWxob3N0IiwiZXh0ZW5zaW9ucyI6e319fQ" } }, "requiredParams": [ "tokenResponse" ] } ] }, "links": [ { "name": "authentication", "href": "https://localhost:9443/oauth2/authn/", "method": "POST" } ] } -
-
Step 3 - The application goes through the following steps to process passkey authentication.
- First, it extracts the
challengeDatavalue from the response and base64 decodes it to obtain the json-based challenge payload. - Then, it invokes the platform APIs with the decoded challenge data.
- The user interacts with the application and presents a passkey.
- Upon successful authentication, the application receives the server response.
- First, it extracts the
-
Step 4 - The application base64 encodes the response and includes it as the tokenResponse in the request to the
/authnendpoint.Note
As this is the only step configured for the application, the
/authnendpoint returns an authorization code, upon successful authentication.curl --location 'https://localhost:9443/oauth2/authn/' --header 'Content-Type: application/json' --data '{ "flowId": "59b40c8b-4d2f-426f-a3fa-62d4ed28a169", "selectedAuthenticator": { "authenticatorId": "RklET0F1dGhlbnRpY2F0b3I6TE9DQUw", "params": { "tokenResponse": "eyJyZXF1ZXN0SWQiOiJ1b2hBYnRpSE9TaWJKbjN1Y0ZqdzZ4bFJxTzBqSlZ6NWtPdS1oWHRyb 3JJIiwiY3JlZGVudGlhbCI6eyJpZCI6Imc2OGF6eHhWeDZxUnhxQWllbEVwRHotaHVTZyIsInJ lc3BvbnNlIjp7ImF1dGhlbnRpY2F0b3JEYXRhIjoiU1pZTjVZZ09qR2gwTkJjUFpIWmdXNF9rc nJtaWhqTEhtVnp6dW9NZGwyTWRBQUFBQUEiLCJjbGllbnREYXRhSlNPTiI6ImV5SjBlWEJsSWp vaWQyVmlZWFYwYUc0dVoyVjBJaXdpWTJoaGJHeGxibWRsSWpvaU9URk1hR2hKWVVGUVZYTnRNM FJFYVdWRmNtbHNNRWszYTNGMmNVZzFVbVYzT0Vwd055MW9aM2R3UVNJc0ltOXlhV2RwYmlJNkl taDBkSEJ6T2k4dmJHOWpZV3hvYjNOME9qZzBORE1pTENKamNtOXpjMDl5YVdkcGJpSTZabUZzY zJVc0ltOTBhR1Z5WDJ0bGVYTmZZMkZ1WDJKbFgyRmtaR1ZrWDJobGNtVWlPaUprYnlCdWIzUWd ZMjl0Y0dGeVpTQmpiR2xsYm5SRVlYUmhTbE5QVGlCaFoyRnBibk4wSUdFZ2RHVnRjR3hoZEdVd UlGTmxaU0JvZEhSd2N6b3ZMMmR2Ynk1bmJDOTVZV0pRWlhnaWZRIiwic2lnbmF0dXJlIjoiTUV VQ0lRQ0xWSGF2c1FkZHhDVElfQkxFS053WG5rUDZpb3AwcldzRjlEMHJyVFRNdkFJZ0hqM1JhM W55UmU5ckdWVWcxd3NhbThudExobW5QbWpLbFRJLTZhaDJzSmMiLCJ1c2VySGFuZGxlIjoiTnp EeU5tOWE0NEFmUktjeXJCQVR6M1RtQVFLaHAwNEQwd3B3Y01iYlE3MCJ9LCJjbGllbnRFeHRlb nNpb25SZXN1bHRzIjp7fSwidHlwZSI6InB1YmxpYy1rZXkifX0" } } }'
Scenario 4 : User selects federated authentication (Native mode)
The application goes through the following steps to complete app-native authentication for a federated authentication flow configured in the native mode. For this example, let's assume that the user logs in with Google.
-
Step 1: Initiate the request with the
/authorizeendpoint.Note
The response contains information on the first authentication step (the only step for this flow).
curl --location 'https://localhost:9443/oauth2/authorize/'
--header 'Accept: application/json'
--header 'Content-Type: application/x-www-form-urlencoded'
--data-urlencode 'client_id=XWRkRNkJDeTiR5MwHdXROGiJka'
--data-urlencode 'response_type=code'
--data-urlencode 'redirect_uri=https://example.com/home'
--data-urlencode 'scope=openid profile'
--data-urlencode 'response_mode=direct'
{ "flowId": "f7cab9e5-7a3b-41a9-8e0c-e45d13f22a69", "flowStatus": "INCOMPLETE", "flowType": "AUTHENTICATION", "nextStep": { "stepType": "AUTHENTICATOR_PROMPT", "authenticators": [ { "authenticatorId": "R29vZ2xlT0lEQ0F1dGhlbnRpY2F0b3I6R29vZ2xlTmF0aXZl", "authenticator": "Google", "idp": "GoogleNative", "metadata": { "i18nKey": "authenticator.google", "promptType": "INTERNAL_PROMPT", "additionalData": { "clientId": "237235402223-d8sedg6c3b68kb1j8.apps.googleusercontent.com", "nonce": "bbe1a9a4-729d-4293-abb0-6825580efb97", "scope": "openid email profile" } }, "requiredParams": [ "accessToken", "idToken" ] } ] }, "links": [ { "name": "authentication", "href": "https://localhost:9443/oauth2/authn/", "method": "POST" } ] } -
Step 2: The application should interact with Google, usually through the Google SDK, and authenticate the user. Upon successful authentication, the application receives an access token and an ID token from Google.
Important
- Pass the scopes received in the initial response to the authorization request made to Google. WSO2 Identity Server expects the attributes provided by these scopes from Google.
- The application should include the
noncevalue received from the initial response in the authentication request made to Google. WSO2 Identity Server uses this value to validate the tokens received from Google.
-
Step 3: The application does the following when making the authentication request to the
/authnendpoint.- Carry the
flowIdreceived in the initial response to uniquely identify the login flow. - Use the
clientIdfound in the initial response to identify the relevant Google connector. - Include the ID token and the access token received from Google's response.
Note
As this is the only step configured for the application, the
/authnendpoint returns an authorization code, upon successful authentication.curl --location 'https://localhost:9443/oauth2/authn/' \ --header 'Content-Type: application/json' \ --data '{ "flowId": "f7cab9e5-7a3b-41a9-8e0c-e45d13f22a69", "selectedAuthenticator": { "authenticatorId": "R29vZ2xlT0lEQ0F1dGhlbnRpY2F0b3I6R29vZ2xlTmF0aXZl", "params": { "accessToken": "ya29.a0wedf9e3_Mbj1U3JiGTDmJMbfeaYKdGZbxy-G-MAwefjJiScaJHpZ9kSAC0w X1F5Lhg269dssQtV1kv1LsedzvweasvJgAulsAV8_qFss-fEcCoGqJAVwesdvfQnrQ0171", "idToken": "eyJhbGciOiJSUzI1NiIsImtpZCI6ImUxYjkzYzY0MDE0NGI4NGJkMDViZjI5NmQ2NzI2MmI 2YmM2MWE0ODciLCJ0eXAiOiJKV1QifQ.sdgn023ewklsxm calsdkalskfnmcoakslasjlkxncoealksnfcolaksnfcmoiasklnfcmoalksdfnvcmeoasdlk fjcmoeaskdfjcmoieaskfjcmieaskfmasfje09wr230ewfnmio23jewr0f92p3oewurjf0239e owrjf.T-vCBKhQbGC8-5ig3_9g3MoRvqHsOYRbSxXD3XLMtwuKw0pzkK9OW3vyV1m79SBvXLU5Z6ZvXp ml_3NjTgqJTAUvIV-Dw7HTjkjabdnfc98oi23khwnrfwdss5gsifH_VDIk_-ub7nbYfkP11UBoKFtah 9eK8aUnaa4ZFG9-gYS0tgUeDNUm-8X4a6S_577tOlPekvE19oUVgBLZD1w7t7HMmHuBGMzPkfPEDmY2 0UVo3GdoKXB4r0tXwRHUQ3rbqhMMf_HqByNnx40w" } } }' - Carry the
Scenario 5: User selects federated authentication (Redirect mode)
The application goes through the following steps to complete app-native authentication for a federated authentication flow configured in the redirect mode. For this example, let's assume that the user logs in with Google.
-
Step 1: Initiate the request with the
/authorizeendpoint.Note
The response contains information on the first authentication step (the only step for this flow).
curl --location 'https://localhost:9443/oauth2/authorize/'
--header 'Accept: application/json'
--header 'Content-Type: application/x-www-form-urlencoded'
--data-urlencode 'client_id=XWRkRNkJDeTiR5MwHdXROGiJka'
--data-urlencode 'response_type=code'
--data-urlencode 'redirect_uri=https://example.com/home'
--data-urlencode 'scope=openid profile'
--data-urlencode 'response_mode=direct'
{ "flowId": "0ad36d10-56c3-496b-a326-2e3ba4ff5cd1", "flowStatus": "INCOMPLETE", "flowType": "AUTHENTICATION", "nextStep": { "stepType": "AUTHENTICATOR_PROMPT", "authenticators": [ { "authenticatorId": "R29vZ2xlT0lEQ0F1dGhlbnRpY2F0b3I6R29vZ2xl", "authenticator": "Google", "idp": "Google", "metadata": { "i18nKey": "authenticator.google", "promptType": "REDIRECTION_PROMPT", "additionalData": { "state": "b4764a2c-a445-4d52-a2eb-609991fe5b84,OIDC", "redirectUrl": "https://accounts.google.com/o/oauth2/auth?response_type=code& redirect_uri=https%3A%2F%2Fexample-app.com%2Fredirect&state=b4764a2c-a445-4d52-a2eb-609991fe5b84%2COIDC&nonce=ad656495-011c-4fc5-9928-7e5207d869cd&client_id=230622702223-d86c3b0ahu68kg74as23592jtvomb1j8.apps.googleusercontent.com&scope=email+openid+profile" } }, "requiredParams": [ "code", "state" ] } ] }, "links": [ { "name": "authentication", "href": "https://localhost:9443/oauth2/authn/", "method": "POST" } ] } -
Step 2: The application redirects the user to the URL received in the
redirectUrlparameter of the response. The user will then interact with Google to complete the authentication. After it's complete, Google redirects the user back to the application.Tip
The app can make use of the
stateparameter received in the initial response to correlate Google's response coming back to the app. -
Step 3: Carry the
flowIdandstateparameters received in the initial response and thecodeparameter received in Google's response and request the/authnendpoint for authentication.Note
As this is the only step configured for the application, the
/authnendpoint returns an authorization code, upon successful authentication.curl --location 'https://localhost:9443/oauth2/authn/' --header 'Content-Type: application/json' --data '{ "flowId": "0ad36d10-56c3-496b-a326-2e3ba4ff5cd1", "selectedAuthenticator": { "authenticatorId": "R29vZ2xlT0lEQ0F1dGhlbnRpY2F0b3I6R29vZ2xl", "params": { "code": "4/0cZFSWx-2d0MReJMLIt8EQW4kor8d53ZQNMX3eLWtwog", "state": "b4764a2c-a445-4d52-a2eb-609991fe5b84,OIDC" } } }'
Scenario 6: 2FA with username & password and Push Notification
The application goes through the following steps to complete app-native authentication for a user logging in with username & password in the first step and Push Notification in the second step.
-
Step 1: Initiate the request with the
/authorizeendpoint.Note
The response contains information on the first authentication step.
curl --location 'https://localhost:9443/oauth2/authorize/'
--header 'Accept: application/json'
--header 'Content-Type: application/x-www-form-urlencoded'
--data-urlencode 'client_id=XWRkRNkJDeTiR5MwHdXROGiJka'
--data-urlencode 'response_type=code'
--data-urlencode 'redirect_uri=https://example.com/home'
--data-urlencode 'scope=openid profile'
--data-urlencode 'response_mode=direct'
{ "flowId": "162b7547-e057-4c84-9237-1c7e69bdc122", "flowStatus": "INCOMPLETE", "flowType": "AUTHENTICATION", "nextStep": { "stepType": "AUTHENTICATOR_PROMPT", "authenticators": [ { "authenticatorId": "QmFzaWNBdXRoZW50aWNhdG9yOkxPQ0FM", "authenticator": "Username & Password", "idp": "LOCAL", "metadata": { "i18nKey": "authenticator.basic", "promptType": "USER_PROMPT", "params": [ { "param": "username", "type": "STRING", "order": 0, "i18nKey": "username.param", "displayName": "Username", "confidential": false }, { "param": "password", "type": "STRING", "order": 1, "i18nKey": "password.param", "displayName": "Password", "confidential": true } ] }, "requiredParams": [ "username", "password" ] } ] }, "links": [ { "name": "authentication", "href": "https://localhost:9443/oauth2/authn/", "method": "POST" } ] } -
Step 2: Carry the
flowIdreceived in the above response and request the/authnendpoint for username & password authentication.Note
Upon successful authentication, the
/authnendpoint returns information on the next authentication step.{ "flowId": "162b7547-e057-4c84-9237-1c7e69bdc122", "flowStatus": "INCOMPLETE", "flowType": "AUTHENTICATION", "nextStep": { "stepType": "AUTHENTICATOR_PROMPT", "authenticators": [ { "authenticatorId": "cHVzaC1ub3RpZmljYXRpb24tYXV0aGVudGljYXRvcg", "authenticator": "Push Notification Authenticator", "idp": "LOCAL", "metadata": { "i18nKey": "authenticator.push.notification", "promptType": "INTERNAL_PROMPT", "additionalData": { "statusEndpoint": "https://localhost:3000/push-auth/check-status?pushAuthId=2dbcf154-dcc0-4497-a087-6db477ff818e" } }, "requiredParams": [ "scenario" ] } ] }, "links": [ { "name": "authentication", "href": "https://localhost:9443/oauth2/authn/", "method": "POST" } ] }Important
Push notification based authentication does not require any user input like other authenticators do. If the user has a device registered to receive push notifications, the notification will be sent during the execution of the authenticator. Hence, If you are getting the above response for the first step, it means that the push authenticator has been executed and the notification has been already sent.
-
Step 3: Ping to the status endpoint to check the status of the ongoing push authentication request.
To complete push-based authentication, the authentication response must be sent from the registered device. The registered device will initiate a push authentication request directly to WSO2 Identity Server.
To verify the status of the push authentication request, poll the status endpoint provided in the previous response. The possible status values are:
- PENDING: The push authentication request has not yet been initiated by the registered device.
- COMPLETED: The push authentication request has been received and successfully processed by WSO2 Identity Server.
Note
This step is only applicable for the push notification based authenticator and not part of the default app native authentication flow.
Once the status changes to COMPLETED, proceed with the next /authn request as outlined in the subsequent step.
-
Step 4: Carry the same
flowIdand request the/authnendpoint for Push Notification authentication.In order to continue the push notification based authentication flow, the
scenariohas to be set to PROCEED_PUSH_AUTHENTICATION as shown in the request below.Note
As this is the final step configured for the application, the
/authnendpoint returns an authorization code upon successful authentication.curl --location 'https://localhost:9443/oauth2/authn/' --header 'Content-Type: application/json' --data '{ "flowId": "162b7547-e057-4c84-9237-1c7e69bdc122", "selectedAuthenticator": { "authenticatorId": "cHVzaC1ub3RpZmljYXRpb24tYXV0aGVudGljYXRvcg", "params": { "scenario": "PROCEED_PUSH_AUTHENTICATION" } } }'
Scenario 7: Application is configured with concurrent-sessions based access control
The application goes through the following steps to complete app-native authentication for a user logging in with username & password in the first step and engages the Active Sessions Limited in the second step.
-
Step 1: Initiate the request with the
/authorizeendpoint.Note
The response contains information on the first authentication step.
curl --location 'https://localhost:9443/oauth2/authorize/'
--header 'Accept: application/json'
--header 'Content-Type: application/x-www-form-urlencoded'
--data-urlencode 'client_id=XWRkRNkJDeTiR5MwHdXROGiJka'
--data-urlencode 'response_type=code'
--data-urlencode 'redirect_uri=https://example.com/home'
--data-urlencode 'scope=openid profile'
--data-urlencode 'response_mode=direct'
{ "flowId": "162b7547-e057-4c84-9237-1c7e69bdc122", "flowStatus": "INCOMPLETE", "flowType": "AUTHENTICATION", "nextStep": { "stepType": "AUTHENTICATOR_PROMPT", "authenticators": [ { "authenticatorId": "QmFzaWNBdXRoZW50aWNhdG9yOkxPQ0FM", "authenticator": "Username & Password", "idp": "LOCAL", "metadata": { "i18nKey": "authenticator.basic", "promptType": "USER_PROMPT", "params": [ { "param": "username", "type": "STRING", "order": 0, "i18nKey": "username.param", "displayName": "Username", "confidential": false }, { "param": "password", "type": "STRING", "order": 1, "i18nKey": "password.param", "displayName": "Password", "confidential": true } ] }, "requiredParams": [ "username", "password" ] } ] }, "links": [ { "name": "authentication", "href": "https://localhost:9443/oauth2/authn/", "method": "POST" } ] } -
Step 2: Carry the
flowIdreceived in the above response and request the/authnendpoint for username & password authentication.Note
Upon successful authentication, the
/authnendpoint returns information on the next authentication step.{ "flowId": "e4d31f92-1ffe-4dea-80ac-8a1b665bb399", "flowStatus": "INCOMPLETE", "flowType": "AUTHENTICATION", "nextStep": { "stepType": "AUTHENTICATOR_PROMPT", "authenticators": [ { "authenticatorId": "U2Vzc2lvbkV4ZWN1dG9yOkxPQ0FM", "authenticator": "Active Sessions Limit", "idp": "LOCAL", "metadata": { "promptType": "USER_PROMPT", "params": [ { "param": "promptResp", "type": "STRING", "order": 1, "i18nKey": "promptResp.param", "displayName": "Prompt Response", "confidential": false }, { "param": "promptId", "type": "STRING", "order": 2, "i18nKey": "promptId.param", "displayName": "Prompt ID", "confidential": false }, { "param": "ActiveSessionsLimitAction", "type": "STRING", "order": 3, "i18nKey": "activeSessionsLimitAction.param", "displayName": "Active Sessions Limit Action", "confidential": false }, { "param": "sessionsToTerminate", "type": "MULTI_VALUED", "order": 4, "i18nKey": "sessionsToTerminate.param", "displayName": "Sessions to Terminate", "confidential": false } ], "additionalData": { "sessions": "[{\"lastAccessTime\":\"1741513176234\",\"browser\":\"PostmanRuntime\",\"sessionId\":\"027b638ed0388c49d1d943b914d9e1833ffb5af0a83116f225903cc91fb43727\",\"device\":\"Other\",\"platform\":\"Other\"},{\"lastAccessTime\":\"1741513261190\",\"browser\":\"Firefox\",\"sessionId\":\"2d932c1ac04c0c365ab929bb30397f64a850c1acc37db87bb24c2a686b8b9b1b\",\"device\":\"Mac\",\"platform\":\"Mac OS X\"},{\"lastAccessTime\":\"1741513275913\",\"browser\":\"Chrome\",\"sessionId\":\"d2ce34b45408e14b57578d36852bda7d5e275b1eaf3a600677d19c8e034f6fdd\",\"device\":\"Mac\",\"platform\":\"Mac OS X\"}]", "MaxSessionCount": "1", "promptId": "e4d31f92-1ffe-4dea-80ac-8a1b665bb399" } }, "requiredParams": [ "promptResp", "promptId", "ActiveSessionsLimitAction" ] } ] }, "links": [ { "name": "authentication", "href": "https://localhost:9443/oauth2/authn/", "method": "POST" } ] } -
Step 3: Carry the same
flowIdand request the/authnendpoint for active sessions limiting.Note
As this is the final step configured for the application, the
/authnendpoint returns an authorization code upon successful authentication.Variable Description Sample values promptRespThe response to the prompt yespromptIdThe ID of the prompt. This can be retrieved from Step 2 response. e4d31f92-1ffe-4dea-80ac-8a1b665bb399ActiveSessionsLimitActionThe action to be taken when the active sessions limit is reached. denyLimitActiveSessionsAction,refreshActiveSessionsAction,terminateActiveSessionsActionsessionsToTerminateThe session IDs to be terminated. This parameter needs to be sent when terminateActiveSessionsActionis selected forActiveSessionsLimitAction["027b638ed0388c49d1d943b914d9e1833ffb5af0a83116f225903cc91fb43727", "d2ce34b45408e14b57578d36852bda7d5e275b1eaf3a600677d19c8e034f6fdd"]curl --location 'https://localhost:9443/oauth2/authn/' --header 'Content-Type: application/json' --data '{ "flowId": "e4d31f92-1ffe-4dea-80ac-8a1b665bb399", "selectedAuthenticator": { "authenticatorId": "U2Vzc2lvbkV4ZWN1dG9yOkxPQ0FM", "params": { "promptResp": "yes", "promptId": "e4d31f92-1ffe-4dea-80ac-8a1b665bb399", "ActiveSessionsLimitAction": "terminateActiveSessionsAction", "sessionsToTerminate": ["027b638ed0388c49d1d943b914d9e1833ffb5af0a83116f225903cc91fb43727", "d2ce34b45408e14b57578d36852bda7d5e275b1eaf3a600677d19c8e034f6fdd", "2d932c1ac04c0c365ab929bb30397f64a850c1acc37db87bb24c2a686b8b9b1b"]}] } } }'
Scenario 8: Device authorization flow
The application goes through the following steps to complete app-native authentication using the device authorization flow.
-
Step 1: Get the required codes.
The app initiates a login request to the device authorization endpoint.
Note
The response contains the
user_codeanddevice_coderequired for the client device.{ "user_code": "s2DqSNK", "device_code": "d3fe0db1-2334-48fa-b7d9-821ecfad10d5", "interval": 5, "verification_uri": "https://localhost:9443/oauth2/authenticationendpoint/device.do", "verification_uri_complete": "https://localhost:9443/oauth2/authenticationendpoint/device.do?user_code=s2DqSNK", "expires_in": 600 } -
Step 2: Authorize the client device.
The app on the client device calls the device endpoint with the
user_codeto initiate authentication.Note
Set
response_mode=directto initiate app-native authentication.{ "flowId": "95339089-72d1-4825-80fe-ab7864f4943b", "flowStatus": "INCOMPLETE", "flowType": "AUTHENTICATION", "nextStep": { "stepType": "AUTHENTICATOR_PROMPT", "authenticators": [ { "authenticatorId": "QmFzaWNBdXRoZW50aWNhdG9yOkxPQ0FM", "authenticator": "Username & Password", "idp": "LOCAL", "metadata": { "i18nKey": "authenticator.basic", "promptType": "USER_PROMPT", "params": [ { "param": "username", "type": "STRING", "order": 0, "i18nKey": "username.param", "displayName": "Username", "confidential": false }, { "param": "password", "type": "STRING", "order": 1, "i18nKey": "password.param", "displayName": "Password", "confidential": true } ] }, "requiredParams": [ "username", "password" ] } ] }, "links": [ { "name": "authentication", "href": "https://localhost:9443/oauth2/authn/", "method": "POST" } ] } -
Step 3: Carry the
flowIdreceived in the above response and request the/authnendpoint for username & password authentication.curl --location 'https://localhost:9443/oauth2/authn/' --header 'Content-Type: application/json' --data '{ "flowId": "95339089-72d1-4825-80fe-ab7864f4943b", "selectedAuthenticator": { "authenticatorId": "QmFzaWNBdXRoZW50aWNhdG9yOkxPQ0FM", "params": { "username": "username", "password": "password" } } }' -
Step 4: Once the user completes authentication, the app on the client device polls the token endpoint with the
device_codeto obtain the access token.curl --location 'https://localhost:9443/oauth2/token/' --header 'Content-Type: application/x-www-form-urlencoded' --data-urlencode 'grant_type=urn:ietf:params:oauth:grant-type:device_code' --data-urlencode 'device_code=d3fe0db1-2334-48fa-b7d9-821ecfad10d5' --data-urlencode 'client_id=XWRkRNkJDeTiR5MwHdXROGiJka'
Scenario 9: User logs in with service based custom authentication
Note
Learn more about custom authentication
The application goes through the following steps to complete app-native authentication for a user logging in with service based custom authentication.
-
Step 1: Initiate the request with the
/authorizeendpoint.Note
The response contains information on the first authentication step (the only step for this flow).
curl --location 'https://localhost:9443/oauth2/authorize/'
--header 'Accept: application/json'
--header 'Content-Type: application/x-www-form-urlencoded'
--data-urlencode 'client_id=XWRkRNkJDeTiR5MwHdXROGiJka'
--data-urlencode 'response_type=code'
--data-urlencode 'redirect_uri=https://example.com/home'
--data-urlencode 'scope=openid profile'
--data-urlencode 'response_mode=direct'
{ "flowId": "162b7547-e057-4c84-9237-1c7e69bdc122", "flowStatus": "INCOMPLETE", "flowType": "AUTHENTICATION", "nextStep": { "stepType": "AUTHENTICATOR_PROMPT", "authenticators": [ { "authenticatorId": "Y3VzdG9tLWFiY19hdXRoZW50aWNhdG9y", "authenticator": "custom-abc_authenticator", "idp": "ABC Authenticator", "metadata": { "i18nKey": "AbstractAuthenticatorAdapter", "promptType": "INTERNAL_PROMPT", "additionalData": { "endpointUrl": "https://externalservice/authentication/userinput", "state": "ec159061-2a93-415d-8786-652d4f344241" } } } ] }, "links": [ { "name": "authentication", "href": "https://localhost:9443/oauth2/authn/", "method": "POST" } ] }- Step 2: The application should interact with the external service, and authenticate the user. After it's complete, proceed with the next /authn request as outlined in the subsequent step.
Important
Service-based custom authentication is categorized under the
INTERNAL_PROMPTprompt type authenticator, which requires the application to explicitly trigger the authentication option for the user. The application is responsible for handling and processing the data received and invoking the external authenticator accordingly. -
Step 3: Carry the same
flowIdand request the/authnendpoint for custom authentication.Note
The application is not required to return the state or parameters with the /authn request.
Note
As this is the only step configured for the application, the
/authnendpoint returns an authorization code, upon successful authentication.