Add login with a SAML identity provider
You can add standard SAML login to your applications using an external SAML Identity Provider (IdP) and enable users to log in with their external identities.
Follow this guide to register a SAML IdP in WSO2 Identity Server and add it to the login flow of your application.
Register WSO2 Identity Server in the IdP
You need to register WSO2 Identity Server as a SAML application in the external identity provider. Follow the identity provider's documentation to know how to register a SAML application.
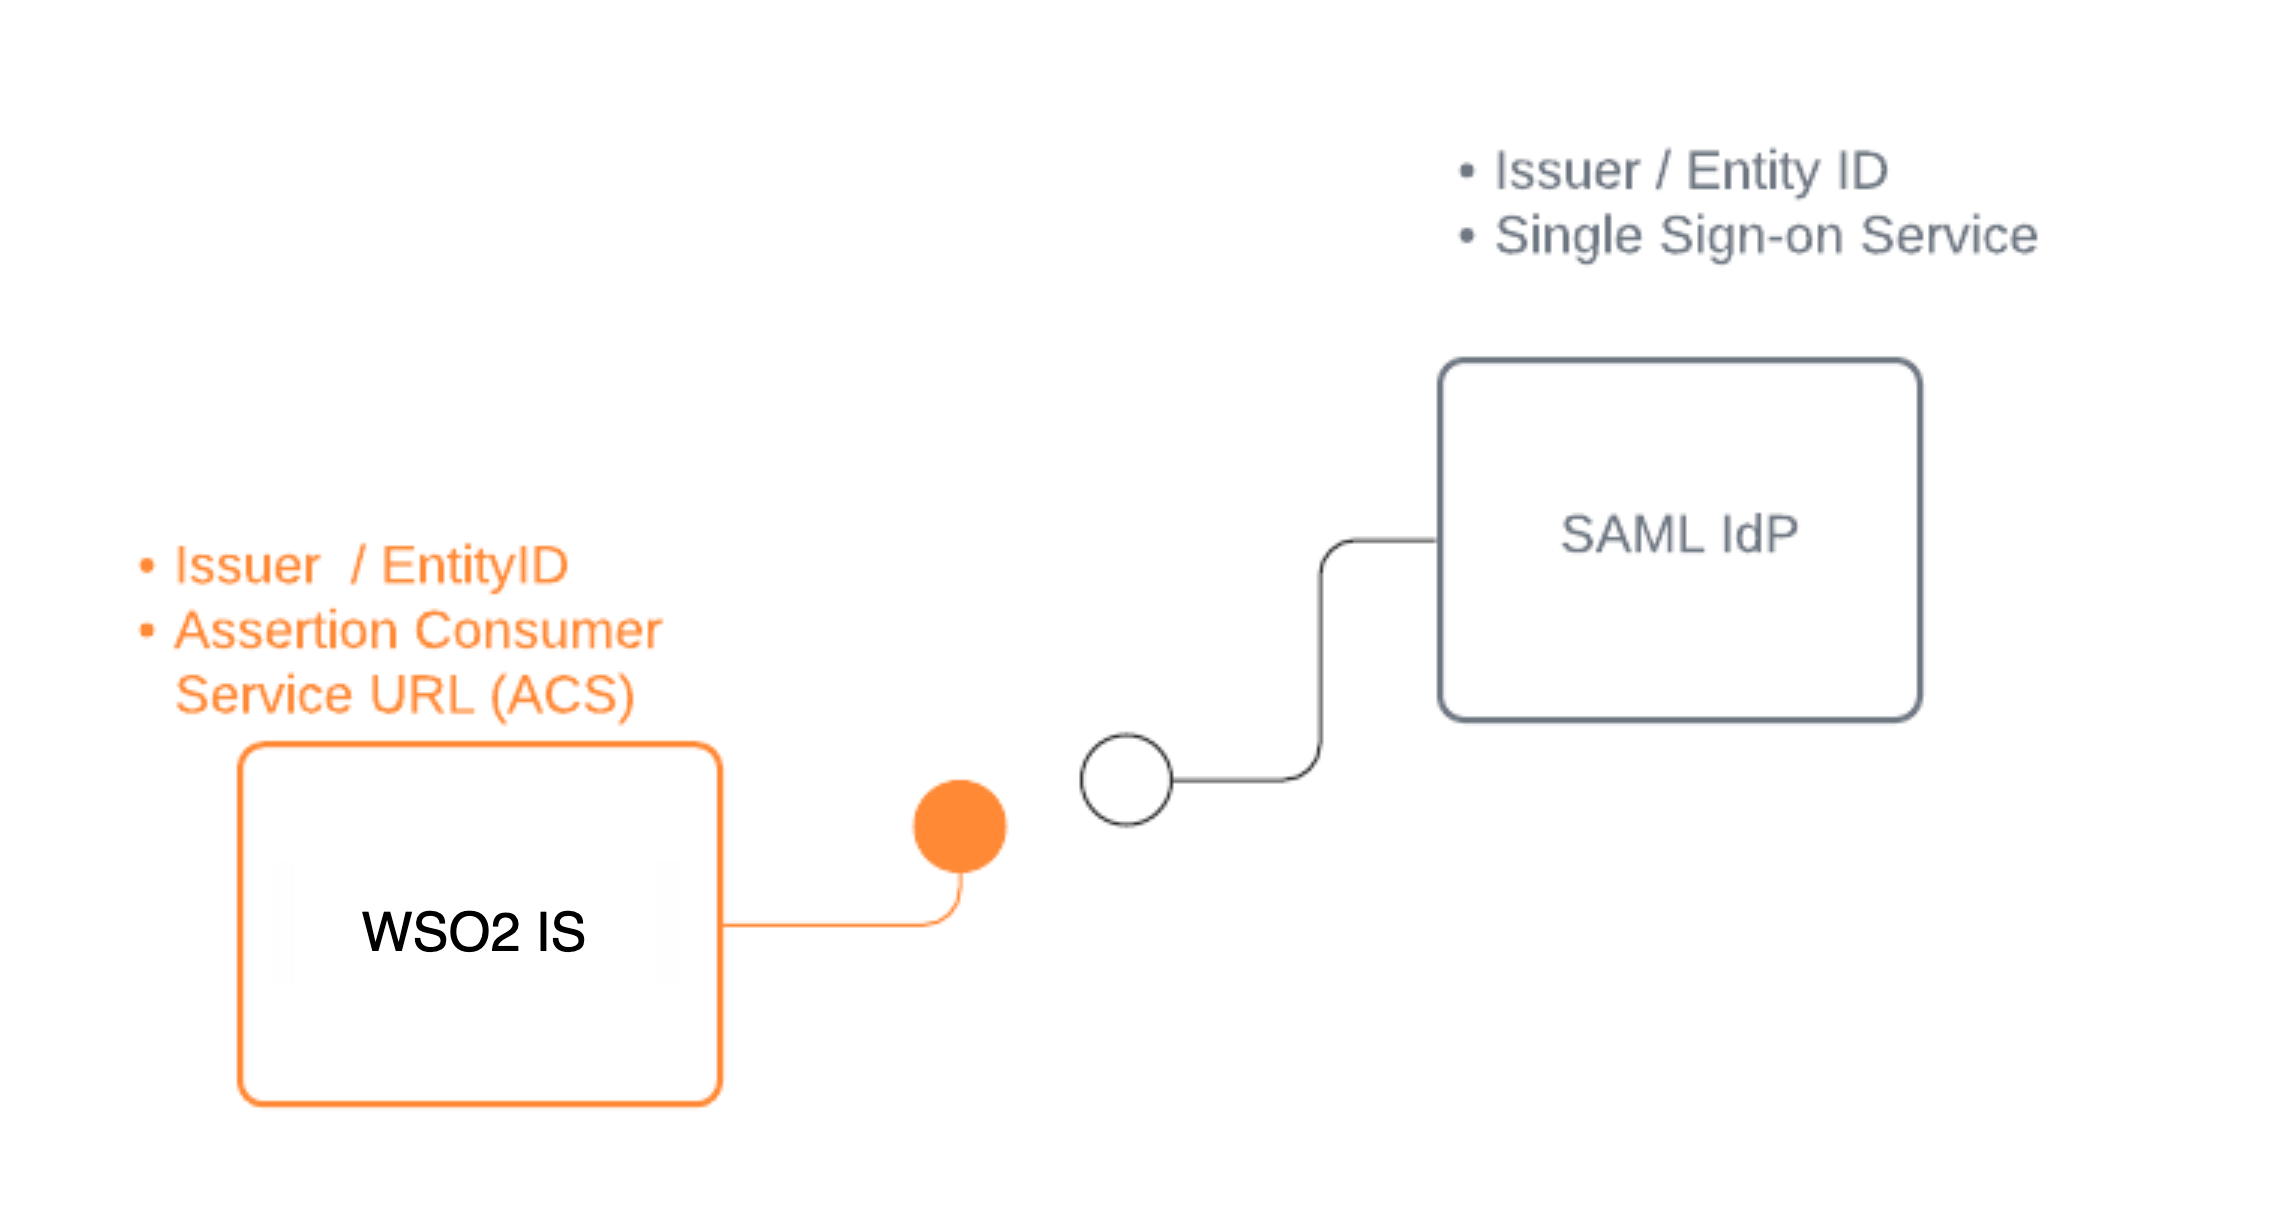
You can use the following URL as the Assertion Consumer Service URL (also known as callback URL/ redirect URL/ ACS URL) in the application that represents WSO2 Identity Server.
After you register the app, you should get the required configurations, as explained below.
-
If you are manually applying the IdP configurations to WSO2 Identity Server, you need the following configurations:
- Issuer (also known as entityId)
- Single sign on URL of the identity provider (also known as login URL)
- Identity Provider Certificate
-
If you are using metadata to apply the IdP configurations to WSO2 Identity Server, you need the following:
- SAML IdP metadata file of the identity provider
- Identity Provider Certificate
Register the SAML IdP
Now, let's register the SAML IdP in WSO2 Identity Server.
- On the WSO2 Identity Server Console, click Connections.
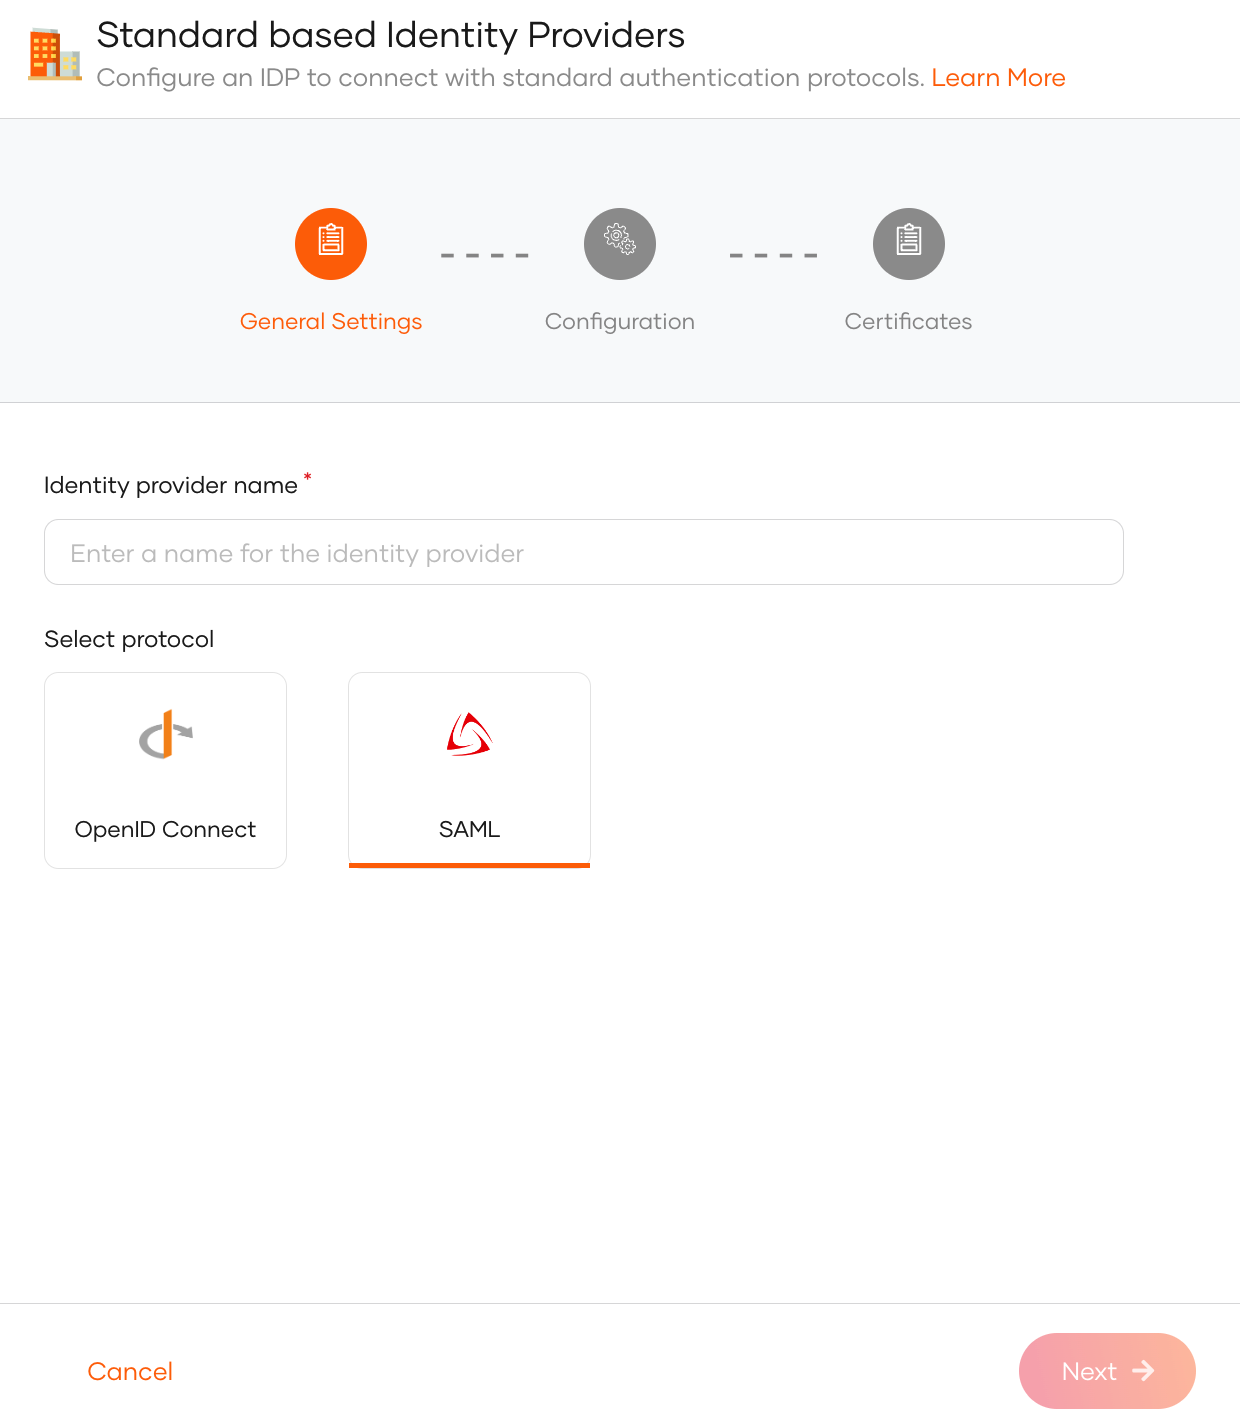
- Click New Connections and select Standard-Based IdP.
-
Provide a unique identity provider name, select SAML, and click Next.
-
Select one of the following methods and add the SAML configurations:
File Based Configuration Upload a SAML metadata file with the required configurations.
See Use a SAML metadata file.Manual Configuration Use this option to manually specify the required SAML configurations.
See Add SAML configs manually.
Add SAML configs manually
If you selected Manual Configuration in the previous step, follow the steps given below.
-
Enter the following details and click Next.
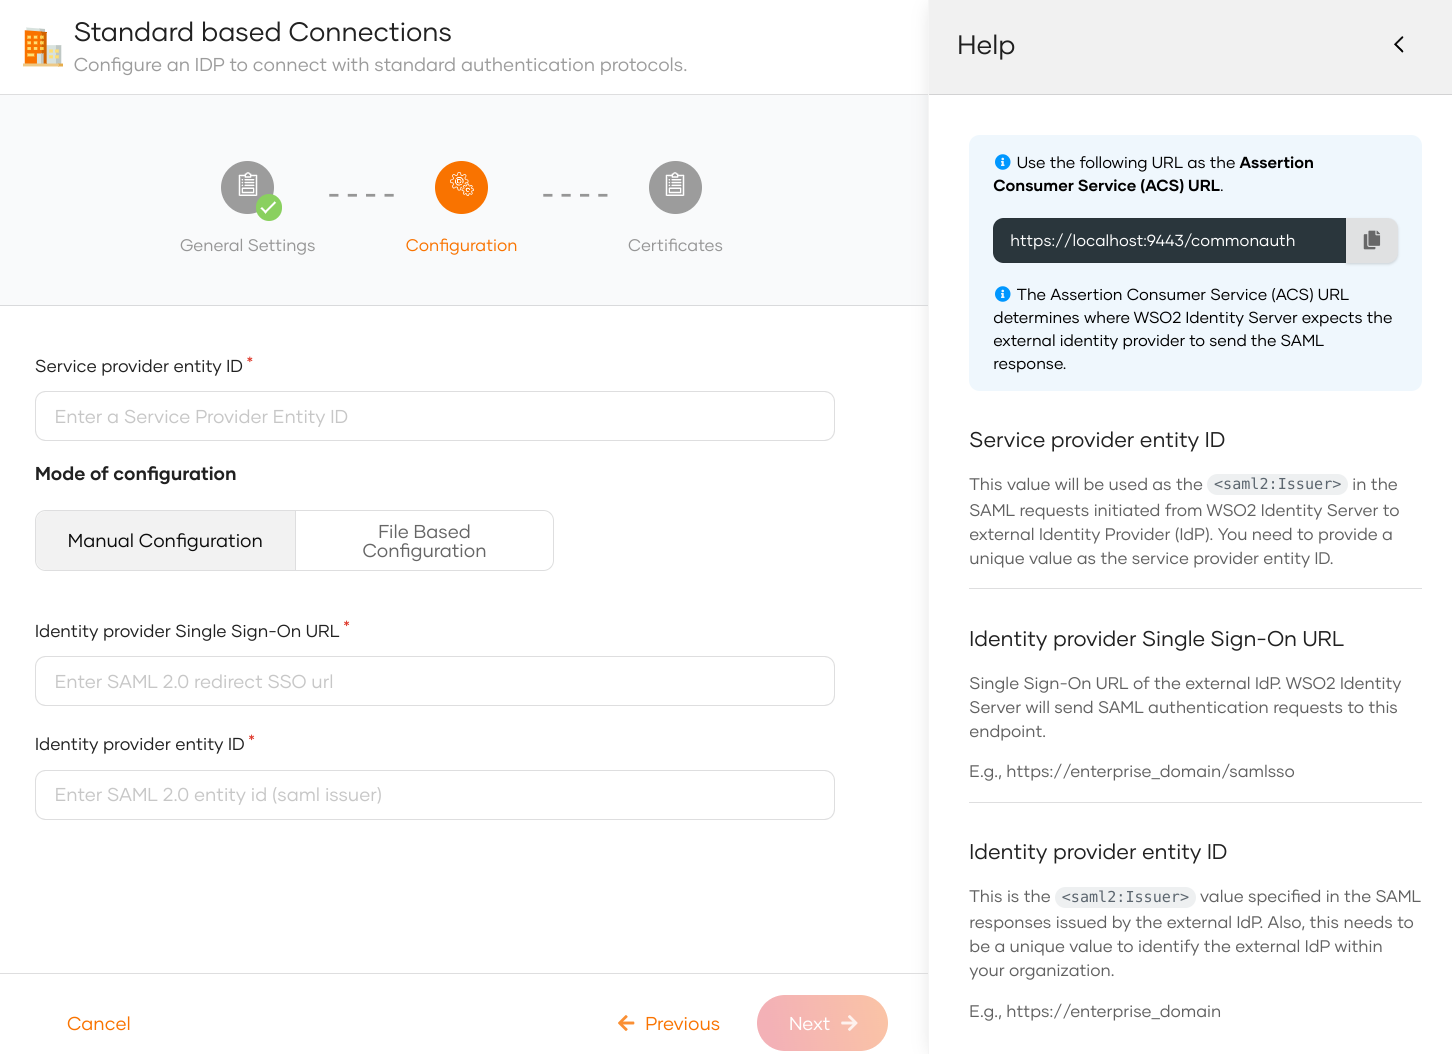
Parameter Description Service provider entity ID This value will be used as the saml2:Issuerin the SAML requests initiated from WSO2 Identity Server to the external identity provider (IdP).Identity provider Single Sign-On URL This value specifies the single sign-on URL of the external IdP. This is where WSO2 Identity Server will send its authentication requests. You need to get this value from the external IdP. Identity provider entity ID This is the saml2:Issuervalue specified in the SAML responses issued by the external IdP. You need to get this value from the external IdP. -
(Optional) Provide the mode of certificate configuration.
Note
You can either configure a SAML metadata endpoint URL or upload a PEM certificate. WSO2 Identity Server uses the certificate to validate SAML response signatures and federated IdP-initiated logout request signatures.
- SAML metadata endpoint: Enter the metadata endpoint URL of the external identity provider. WSO2 Identity Server fetches and caches the signing certificate from this URL. Learn more about certificate validation with the SAML metadata endpoint.
-
Use PEM certificate: Upload or paste the public certificate of the external identity provider. The certificate should be in PEM format.
If you have a certificate in other formats such as
.crt,.ceror.der, expand here to see how you can convert them to PEM format using OpenSSLConvert CRT to PEM
Convert CER to PEM:Convert DER to PEM:
-
Click Finish to complete the registration.
Use a SAML metadata file
If you selected File Based Configuration in the previous step, follow the steps given below.
Note
A SAML IdP metadata file contains the following:
- IdP identifiers (entityID or Issuer)
- Endpoints (single sign-on URLs, single logout URLs, etc.)
- Supported bindings
-
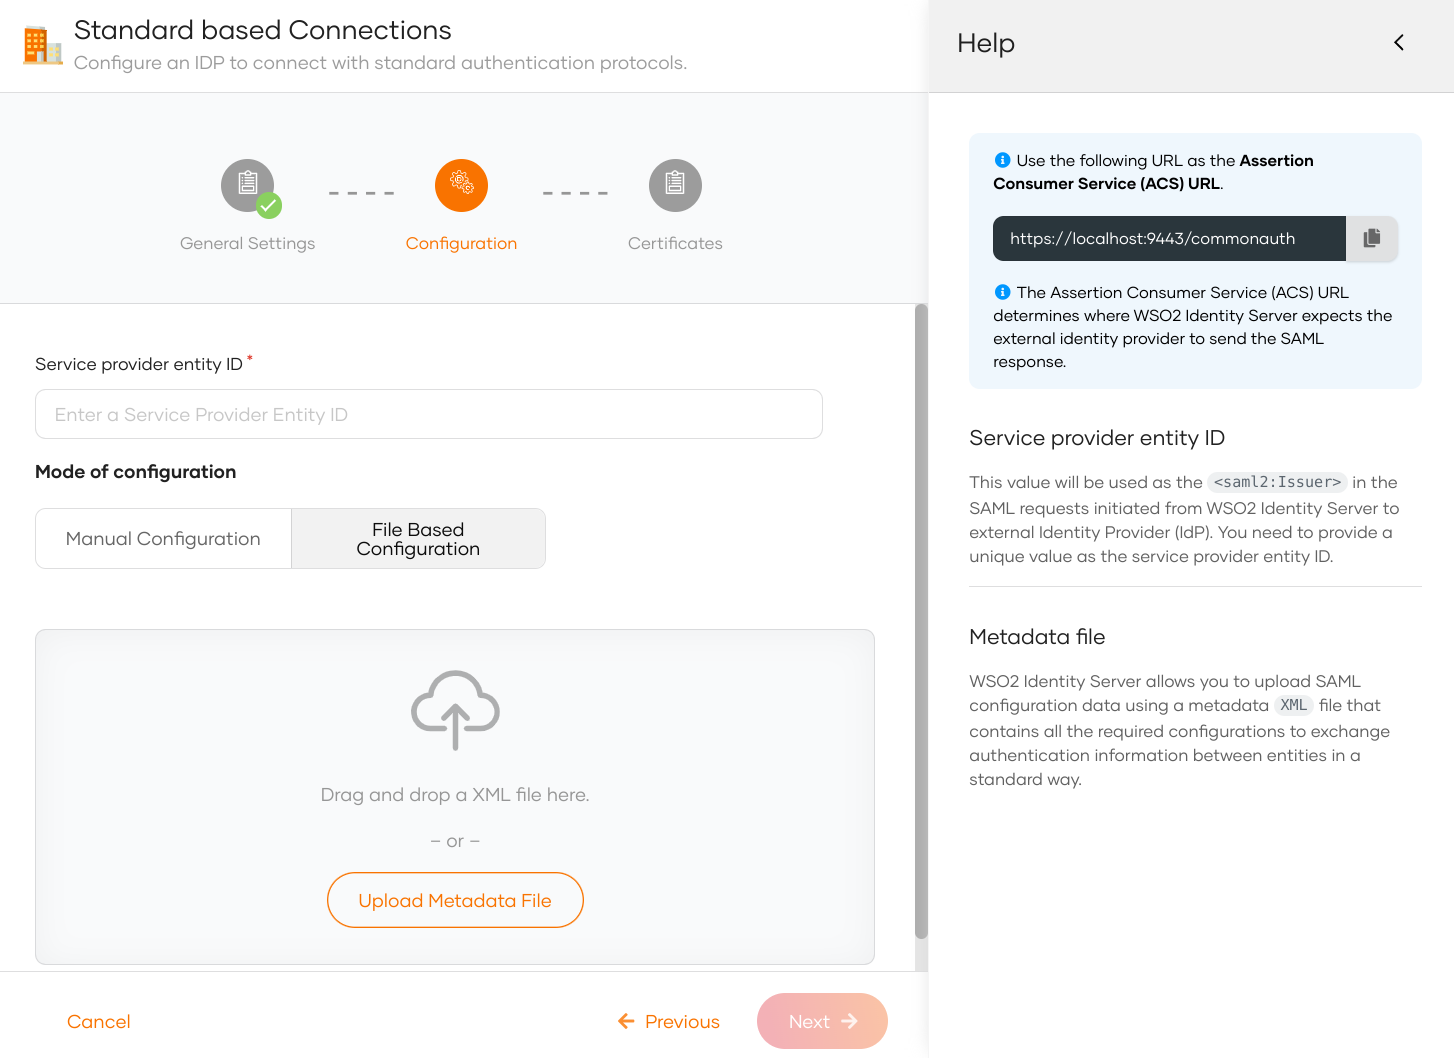
Specify the service provider entity ID.
Note
This value will be used as the
saml2:Issuerin the SAML requests initiated from WSO2 Identity Server to the external identity provider (IdP). -
Upload the IdP metadata file and click Next.
-
(Optional) Provide the mode of certificate configuration.
Note
You can either configure a SAML metadata endpoint URL or upload a PEM certificate. WSO2 Identity Server uses the certificate to validate SAML response signatures and federated IdP-initiated logout request signatures.
- SAML metadata endpoint: Enter the metadata endpoint URL of the external identity provider. WSO2 Identity Server fetches and caches the signing certificate from this URL. Learn more about certificate validation with the SAML metadata endpoint.
-
Use PEM certificate: Upload or paste the public certificate of the external identity provider. The certificate should be in PEM format.
If you have a certificate in other formats such as
.crt,.ceror.der, expand here to see how you can convert them to PEM format using OpenSSLConvert CRT to PEM
Convert CER to PEM:Convert DER to PEM:
-
Click Finish to complete the registration.
Note
Once the SAML identity provider is created, you can configure additional SAML settings from the Settings tab.
Certificate validation with the SAML metadata endpoint
When you configure a SAML metadata endpoint, WSO2 Identity Server fetches and caches the signing certificate from that URL to validate SAML response signatures and federated IdP-initiated logout request signatures.
Certificate cache invalidation
WSO2 Identity Server honors the validUntil and cacheDuration properties defined at the EntityDescriptor or IDPSSODescriptor level in the SAML metadata to determine when to invalidate the cached certificate:
validUntil: The absolute expiry timestamp of the metadata. WSO2 Identity Server invalidates the cached certificate when this timestamp is reached.cacheDuration: The duration for which the metadata is considered valid. WSO2 Identity Server invalidates the cached certificate after this duration.
If neither validUntil nor cacheDuration is defined, a default maximum cache lifetime of 24 hours applies.
You can change this default in deployment.toml:
Automatic certificate refresh for key rotation
If signature validation fails, WSO2 Identity Server automatically fetches fresh certificates from the metadata endpoint to support key rotation scenarios where the external IdP replaces its signing certificate.
WSO2 Identity Server applies a default 5-minute block period between consecutive refresh attempts to prevent excessive metadata refresh requests.
You can configure this duration in deployment.toml:
HTTP client configuration
The following parameters configure the HTTP client that fetches the SAML metadata. The values shown are the defaults:
[authentication.authenticator.saml.parameters]
RemoteCertificateClientConnectionTimeout = "1s"
RemoteCertificateClientReadTimeout = "1s"
RemoteCertificateClientConnectionRequestTimeout = "1s"
RemoteCertificateClientConnectionPoolSize = "20"
RemoteCertificateClientMaxConnectionPerRoute = "3"
RemoteCertificateRetryCount = "0"
RemoteCertificateClientResponseLimit = "512000"
| Parameter | Description |
|---|---|
RemoteCertificateClientConnectionTimeout |
Maximum time to wait to establish a connection to the metadata endpoint. |
RemoteCertificateClientReadTimeout |
Maximum time to wait to read data after a connection is established. |
RemoteCertificateClientConnectionRequestTimeout |
Maximum time to wait to obtain a connection from the connection pool. |
RemoteCertificateClientConnectionPoolSize |
Total number of connections maintained in the pool. |
RemoteCertificateClientMaxConnectionPerRoute |
Maximum connections maintained per route. |
RemoteCertificateRetryCount |
Number of retry attempts on a failed metadata fetch. |
RemoteCertificateClientResponseLimit |
Maximum response size in bytes accepted from the metadata endpoint. |
Metadata certificate cache configuration
WSO2 Identity Server caches the signing certificates fetched from the metadata endpoint. Configure the cache using the following settings in deployment.toml. The values shown are the defaults:
| Parameter | Description | Default |
|---|---|---|
enable |
Enables or disables the metadata certificate cache. | true |
timeout |
Cache entry expiration time in seconds. | 900 (15 minutes) |
capacity |
Maximum number of cache entries. | 100 |
Enable the SAML IdP for login
Before you begin
You need to register an application with WSO2 Identity Server. You can register your own application or use one of the sample applications provided.
- On the WSO2 Identity Server Console, click Applications.
-
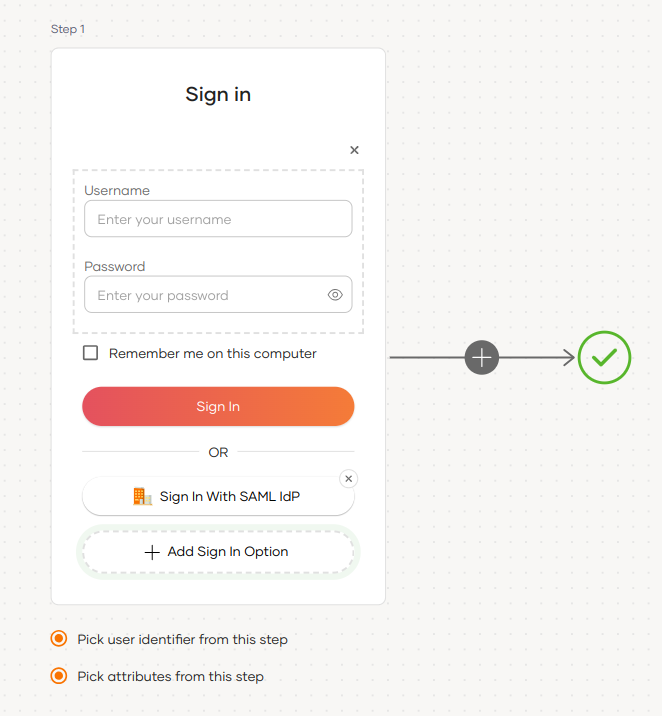
Select your application, go to the Login Flow tab and add SAML identity provider from your preferred editor:
Recommendations
WSO2 Identity Server recommends adding your social and enterprise connections to the first authentication step, as they are used for identifying the user.
-
Click Add Sign In Option to add a new authenticator to the first step.
-
Select the SAML IdP connection.
-
Click Confirm to add login with an SAML IdP to the sign-in flow.
Recommendations
It is recommended to add your social and enterprise connections to the first authentication step as they are used for identifying the user.
-
-
Click Update to save your changes.
Configuring attributes for an Identity Provider (IdP) involves mapping the attributes available in the external IdP to local attributes. This is done so that WSO2 Identity Server can identify the user attributes in the response sent from the external IdP.
To do so,
-
On the WSO2 Identity Server Console, click Connections.
-
Select the relevant IdP connection from the list and click Set up.
-
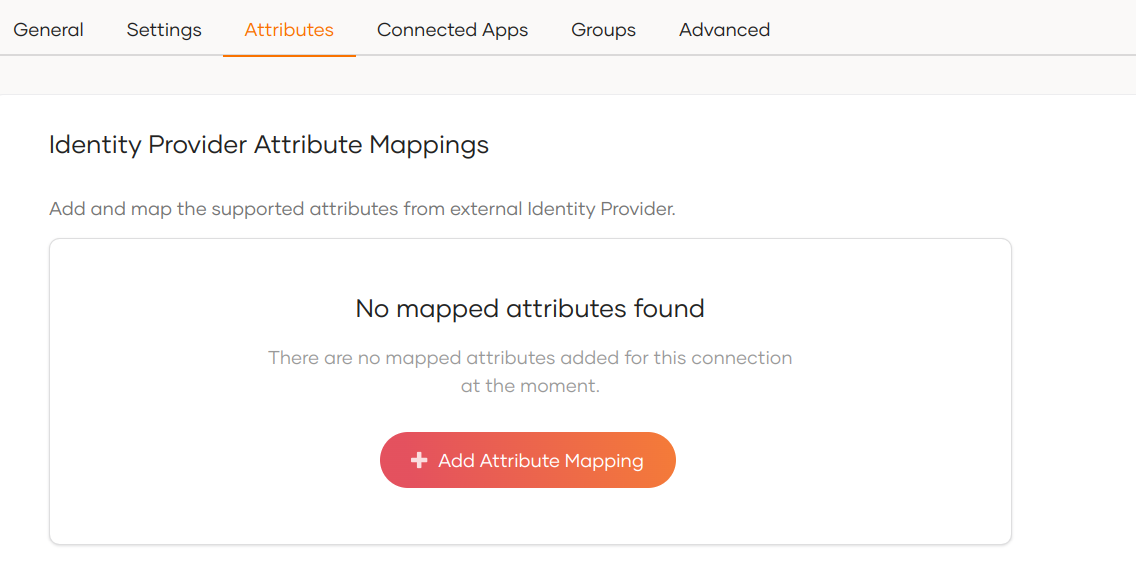
Go to the Attributes tab and under Identity Provider Attribute Mappings, click Add Attribute Mapping.
-
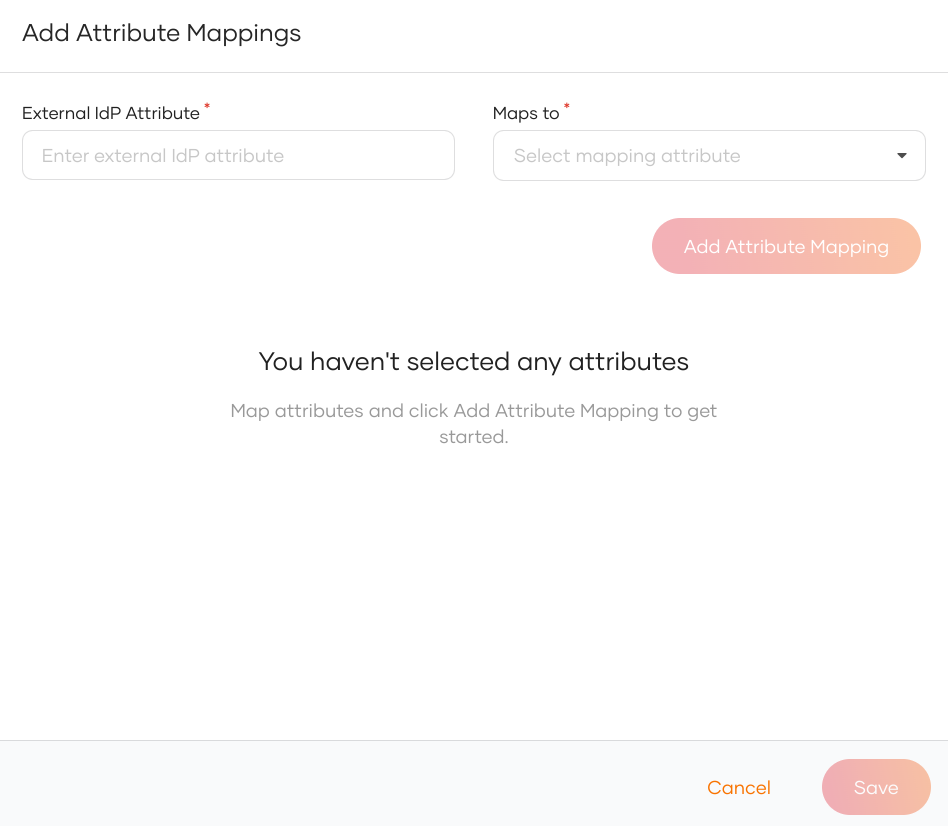
Enter the external attribute, select the corresponding local attribute to which it maps and click Add Attribute Mapping.
-
Click Save to save the entries.
-
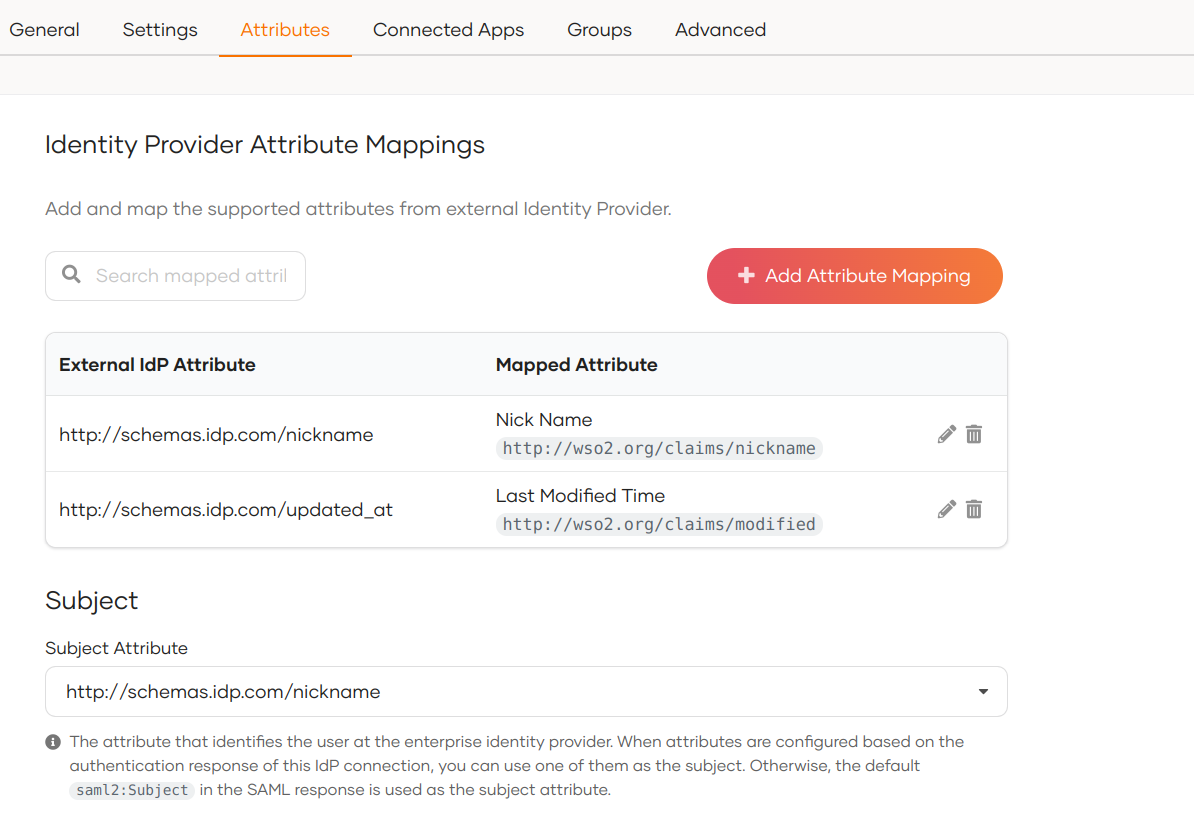
Under Subject, select a Subject Attribute that will be used to uniquely identify the user.
-
Under Provisioning Attributes Selection, select the required attributes that needs to be sent in the response to provision the user in WSO2 Identity Server.
-
Click Update to save the changes.
Note
By default, WSO2 Identity Server uses the subject attribute sent by the external SAML IdP as the subject identifier. To configure a different attribute as the subject, enable the Find user ID from requests from the Settings tab of the SAML IdP.
How it works
Consider a scenario where a SAML IdP returns the authenticated user's nickname and profile updated time to WSO2 Identity Server in the SAML authentication response as follows:
- http://schemas.idp.com/nickname : nickname
- http://schemas.idp.com/updated_at : profile updated time
You may want to convert them to the local attribute URI so that the application can receive them in the local attribute URI. If you don't do that mapping, the application will receive the attributes as sent by the external IdP.
A sample IdP attribute mapping done from the WSO2 Identity Server Console:
Sample attributes in the SAML assertion of the integrated SAML app:
<saml2:AttributeStatement>
    <saml2:Attribute Name="http://wso2.org/claims/modified"
                        NameFormat="urn:oasis:names:tc:SAML:2.0:attrname-format:basic"
                        >
        <saml2:AttributeValue xmlns:xsi="http://www.w3.org/2001/XMLSchema-instance"
                                xsi:type="xsd:string"
                                >Mon Aug 30 2021 07:26:40 GMT+0000 (Coordinated Universal Time)</saml2:AttributeValue>
    </saml2:Attribute>
    <saml2:Attribute Name="http://wso2.org/claims/nickname"
                        NameFormat="urn:oasis:names:tc:SAML:2.0:attrname-format:basic"
                        >
        <saml2:AttributeValue xmlns:xsi="http://www.w3.org/2001/XMLSchema-instance"
                                xsi:type="xsd:string"
                                >John</saml2:AttributeValue>
    </saml2:Attribute>
</saml2:AttributeStatement>
Sample subject attribute in the assertion looks as shown below:
<saml2:Subject>
    <saml2:NameID Format="urn:oasis:names:tc:SAML:1.1:nameid-format:emailAddress">John</saml2:NameID>
    <saml2:SubjectConfirmation Method="urn:oasis:names:tc:SAML:2.0:cm:bearer">
        <saml2:SubjectConfirmationData InResponseTo="jimhbeljflkppacldhnjcfjkhoobkddhngnkamom"
                                        NotOnOrAfter="2021-08-30T09:49:21.336Z"
                                        Recipient="http://localhost:8081/sample-app/home.jsp"
                                        />
    </saml2:SubjectConfirmation>
</saml2:Subject>
Configure connection
-
To learn more about other configurations available for the connection, refer to the add federated login documentation.
-
To learn more about SAML settings available for the IdP, refer to the SAML settings documentation.