Onboard organization administrators
You can onboard organization administrators using any of the following approaches:
Sales-led approach
In this approach, the admin of the organization (root) creates the organization and adds a user as an admin of the created organization. This method is typically used when the organization (root) should regulate the creation of organizations, and the administrator's supervision is required to ensure proper setup.
Follow the steps below to onboard organization administrators using the WSO2 Identity Server Console.
Prerequisites
You need to:
- register your B2B application in the organization (root).
- create an administrator role required for your B2B application and associate it to the application.
- create an organization and switch to the created organization.
- share the B2B application with required organizations.
Note
The organization creator, invited parent organization users who have user management and role management permissions can onboard administrators for the organization switching to the organization on the WSO2 Identity Server Console.
Step 1: Create a user
To create a new organization user:
-
Switch to the organization on the WSO2 Identity Server Console.
-
Go to User Management > Users and click Add User.
-
Enter the following details:
| Username | A unique identifier to identify the user. |
|---|---|
| First Name | First name of the user. You can change this later. |
| Last Name | Last name of the user. You can change this later. |
| Email Address | An email address of the user. You can change this later |
-
You can either set a password on the user's behalf or request the user to set the password.
-
Set a temporary password for the user: If this option is selected, the administrator can set a temporary password for the user.
-
Invite user to set their own password: If this option is selected, an email with a confirmation link will be sent to the provided email address for the user to set their own password.
-
-
Click Finish to add the new user.
Step 2: Assign the user to the admin role of B2B application
If you have created an admin role in the organization (root) and associated it with the shared B2B application, the B2B application's admin role is available in the organization by default. To assign the created user to this role:
-
Switch to the organization on the WSO2 Identity Server Console.
-
Go to User Management > Roles.
-
Select the admin role of the B2B application and go to the Users tab.
-
Select the user from drop-down.
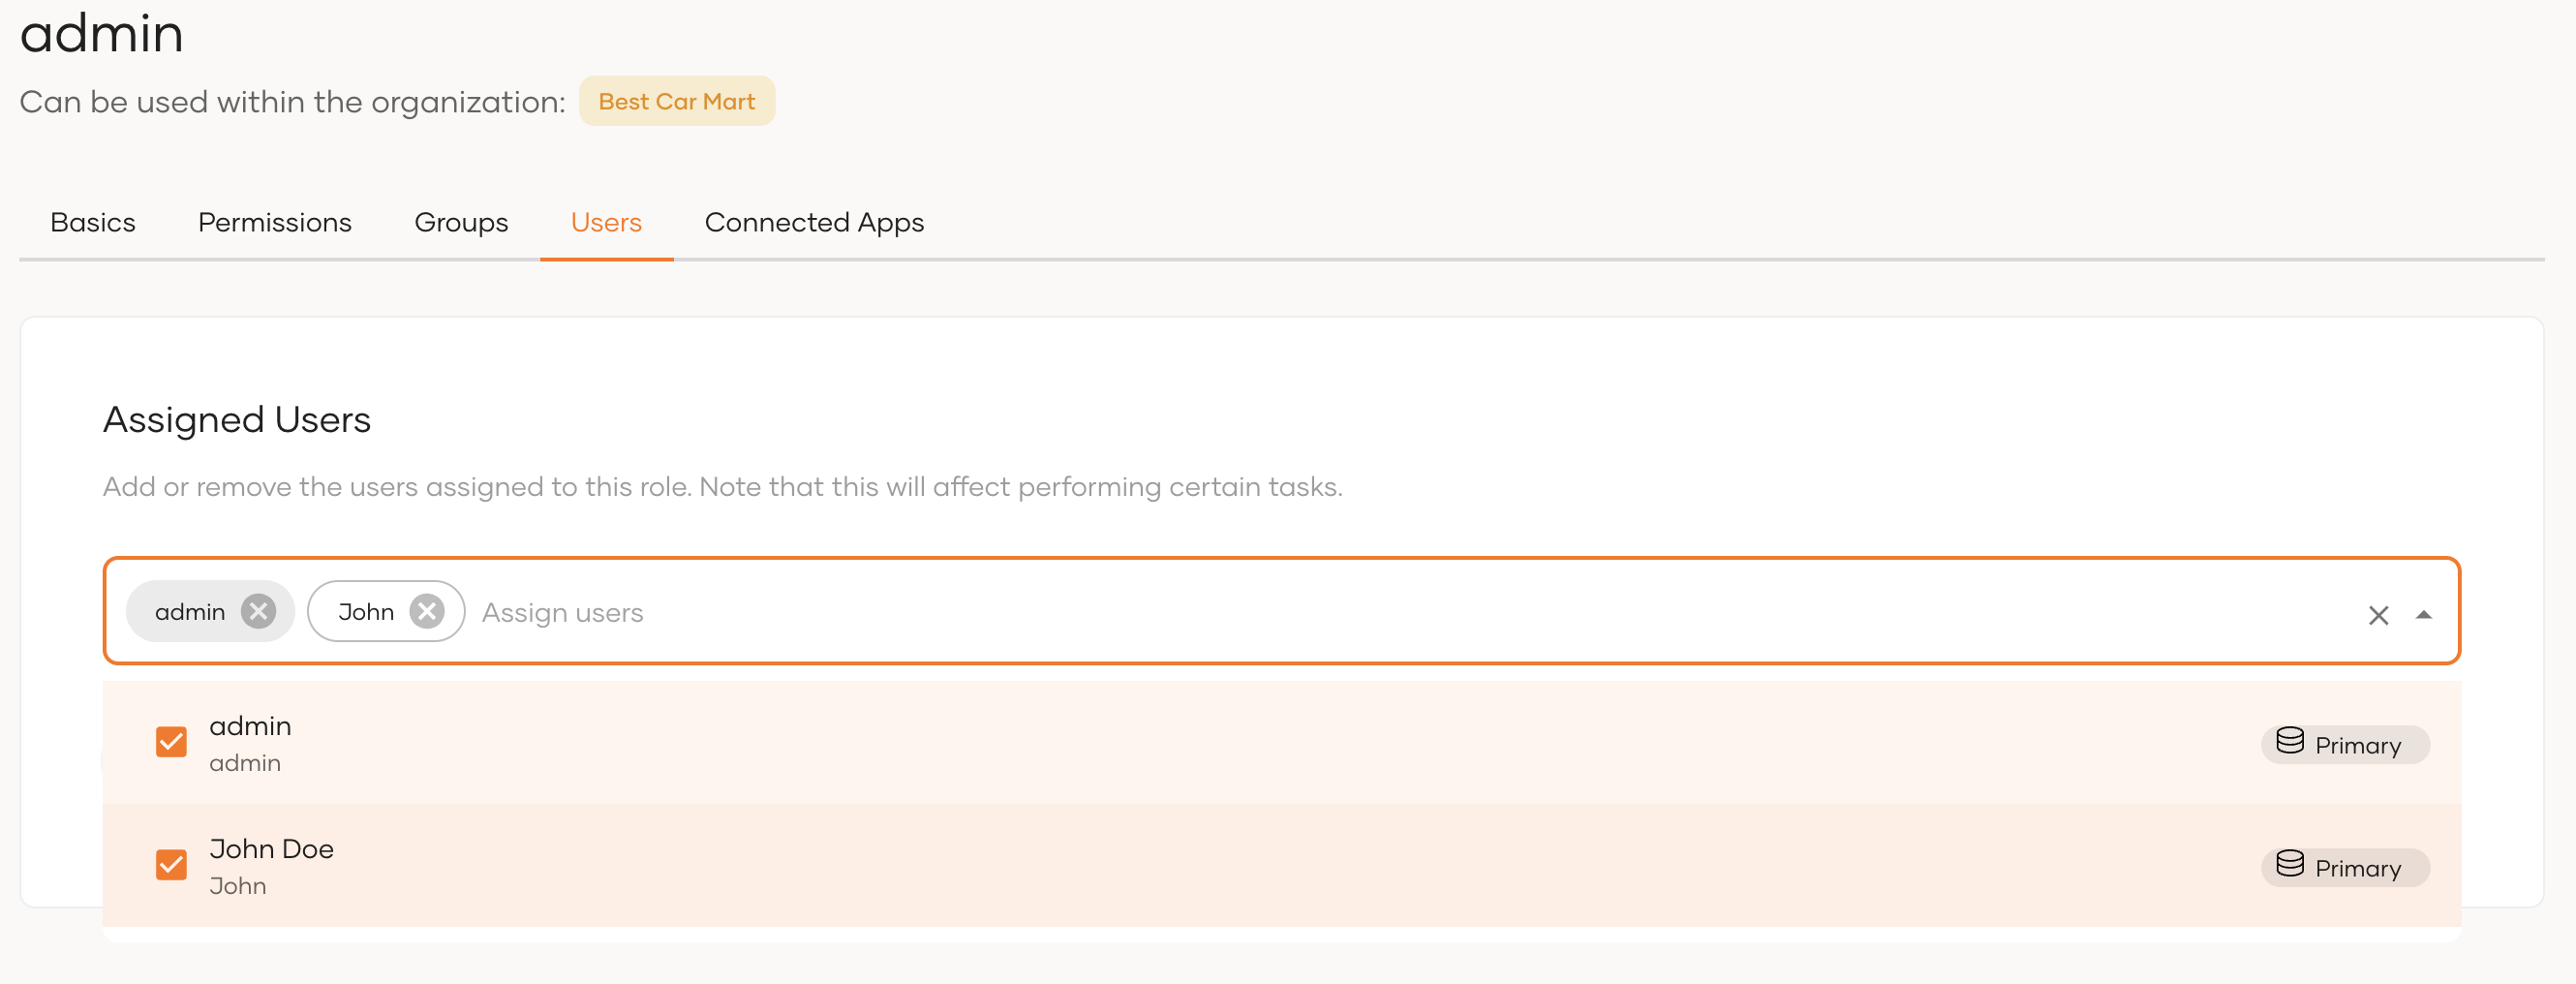
-
Click Update.
You have now onboarded an administrator to the organization. From thereon, the organization administrator can manage that organization's identity and access management requirements through the B2B administration portal.
Self-service approach
In this approach, organization users can self-subscribe to the B2B application and easily create their own organizations. This method empowers organization users to take control of the onboarding process, making it quick and convenient. B2B service providing organization has to build their portal to support the self organization onboarding service by consuming the WSO2 Identity Server APIs.
Using the self-service approach, the organization users can maintain their administrators either in the organization itself or the organization (root). The selection of the creation place depends on the organization's business requirements.
- Maintain admins in the organization: You can create the user in the organization if the user needs to be isolated into one organization.
- Maintain admins in the organization (root): You can create the user in the organization (root) if the same user can manage multiple organizations.
Prerequisites
You need to:
- register your B2B application in the organization (root).
- create an administrator role required for your B2B application and associate it to the application.
Initial setup: Get access tokens
Before creating admins using the APIs, you need to obtain the required access tokens and enable self-service. Follow the steps below to set up the initial requirements to create organization admins.
- If your B2B application is OAuth2.0/OpenID Connect supported web application, you can use the same application. Otherwise, create a standard based application selecting OAuth2.0/OpenID Connect as the protocol.
- Share the application with all organizations by enabling
share with all organizations. -
Go to the Protocol tab of the application and enable the following grant types, and click Update.
- Client Credential
- Organization Switch
Note
Take note of the application's Client ID and Client Secret, as it will be required in the next steps.
-
Go to the API Authorization tab of the application and authorize the following APIs including the mentioned scopes.
API Category API Scopes Management API Organization Management API /api/server/v1/organizations- Create Organizations - View Organizations Organization API SCIM2 Roles API /o/scim2/Roles- Update Role - View Role Organization API Application Management API /o/api/server/v1/applications- View Application Organization API SCIM2 Users API /o/scim2/Users(If you want to manage the user at the created organization level)- Create User - List Users Management API SCIM2 Users API /scim2/Users(If you want to manage the user at the root organization)
- Create User - View User -
Get an access token for the created application using the following cURL.
curl -X POST \
https://localhost:9443/oauth2/token \
-u  '<client_id>:<client_secret>' \
-H 'Content-Type: application/x-www-form-urlencoded' \
-d 'grant_type=client_credentials&scope=internal_org_role_mgt_view internal_org_role_mgt_update internal_org_user_mgt_create internal_org_user_mgt_list internal_org_application_mgt_view internal_organization_view internal_organization_create internal_user_mgt_view internal_user_mgt_create'
The access token expiration time is set to 3600 seconds by default. If you wish to modify this duration, you can do so via the console. Go to the application's protocol section and update the User access token expiry time.
Maintain admins in the organization
This approach is suitable when you want organizations to govern themselves with minimal interaction from the organization (root). Additionally, if you have a B2C user, this approach will help you to separate them from B2B users easily.
Warning
If a user wants to create multiple organizations, they will need to register a new account for each organization. Thus they will have separate identities in each organization.
To create and maintain admins in the organization:
-
Use the following cURL to check if the name of the organization you wish to create is available.
curl --location 'https://localhost:9443/api/server/v1/organizations/check-name' \
--header 'Authorization: Bearer { access token }'
--header 'Content-Type: application/json' \
--data '{
    "name": "{organization name}"
}'
Note
If the organization name is available for use, the response will be
"available": true, else it will be"available": false. -
If the required organization name is available for use, use the following cURL to create the organization.
curl --location 'https://localhost:9443/api/server/v1/organizations' \
--header 'Authorization: Bearer { access token }' \
--header 'Content-Type: application/json' \
--data '{
    "name": "{organization name}"
}'
Note
Take note of the
idparameter in the response. This is the organization-id of the newly created organization and you will need it in the following steps. -
Get an access token for the created organization by exchanging the access token obtained for the root organization. Use credentials of the shared oauth2 application to execute the cURL.
curl -X POST \ https://localhost:9443/oauth2/token \ -u '<client_id>:<client_secret>' \ -H 'Content-Type: application/x-www-form-urlencoded' \ -d 'grant_type=organization_switch&token=<access token obtained for root organization>&switching_organization=<created organization id>&scope=internal_org_role_mgt_view internal_org_role_mgt_update internal_org_user_mgt_create internal_org_user_mgt_list internal_org_application_mgt_view' -
Create a user in the organization using the following cURL.
curl --location 'https://localhost:9443/o/scim2/Users' \
--header 'Content-Type: application/json' \
--header 'Authorization: Bearer {token obtained in step 3}' \
--data-raw '{
    "emails": [
        {
            "primary": true,
            "value": "{customer-email}"
        }
    ],
    "name": {
        "familyName": "{customer-family-name}",
        "givenName": "{customer-given-name}"
    },
    "userName": "{customer-username}",
    "urn:ietf:params:scim:schemas:extension:enterprise:2.0:User": {
        "askPassword" : "true"
    }
}'
Note
Take note of the
user-idreturned in the response of the above cURL. -
Use the following cURL to obtain the
idof the administrator role defined for your B2B application.Note
Share the B2B application in organization(root) enabling
share with all organizationsor share the application to the created organization before the role operation. The roles associated to the B2B application will be shared with the organization only if the application is shared to the organization.curl --location 'https://localhost:9443/o/scim2/v2/Roles?filter=displayName%20eq%20{ admin-role-name }%20and%20audience.value%20eq%20{ role-audience-value }' ' \ --header 'Accept: application/json' \ --header 'Authorization: Bearer {access-token-obtained-for-the-organization}'Note
Refer following details to get your B2B application's administrator role:
admin-role-name Name of the administrator role associated to your B2B application. role-audience-value If your B2B application has associated to application audience roles give the id of the shared application in organization. Otherwise, created organization id.curl --location 'https://localhost:9443/o/api/server/v1/applications?filter=name%20eq%20{B2B-application-name}' \ --header 'Authorization: Bearer {access-token-obtained-for-the-organization}'Assign the user created in step 4 to the administrator role of your B2B application by using the following cURL.
curl --location --request PATCH 'https://localhost:9443/o/scim2/v2/Roles/{admin-role-id}' \
--header 'Authorization: Bearer {access-token-obtained-for-the-organization}' \
--header 'Content-Type: application/json' \
--data '{
    "Operations": [
        {
            "op": "add",
            "path": "users",
            "value": [
                {
                    "value": "{user-id obtained from step 4}"
                }
            ]
        }
    ]
}'
Maintain admins in the organization (root)
This approach is particularly suitable when an organization user prefers to maintain a single identity linked to multiple organizations. Under this approach, organization users are treated as business users (B2C users) within the organization (root).
Warning
Separating B2C and B2B users will be more complicated.
To create and maintain admins in the organization (root):
-
Create a user in the organization (root) using WSO2 Identity Server's SCIM APIs.
curl --location 'https://localhost:9443/scim2/Users' \
--header 'Content-Type: application/json' \
--header 'Authorization: Bearer { access token }' \
--data-raw '{
    "emails": [
        {
            "primary": true,
            "value": "{customer-email}"
        }
    ],
    "name": {
        "familyName": "{customer-family-name}",
        "givenName": "{customer-given-name}"
    },
    "userName": "{customer-username}",
    "urn:ietf:params:scim:schemas:extension:enterprise:2.0:User": {
        "askPassword" : "true"
    }
}'
Note
Take note of the
user-idreceived in the response of the above cURL. -
Use the following cURL to check if the name of the organization you wish to create is available.
curl --location 'https://localhost:9443/api/server/v1/organizations/check-name' \
--header 'Authorization: Bearer { access token }'
--header 'Content-Type: application/json' \
--data '{
    "name": "{organization name}"
}'
Note
If the organization name is available for use, the response will be
"available": true, else it will be"available": false. -
If the required organization name is available for use, use the following cURL to create the organization and assign the user created in step 1 as the organization's admin.
curl --location 'https://localhost:9443/api/server/v1/organizations' \ --header 'Authorization: Bearer { access token }' \ --header 'Content-Type: application/json' \ --data-raw '{ "name": "{organization name}", "attributes": [ { "key": "creator.id", "value": "{user-id obtained from step 1}" }, { "key": "creator.username", "value": "{username of the user created in step 1}" } ] }' -
Get an access token for the created organization by exchanging the access token obtained for the root organization. Use credentials of the shared oauth2 application to execute the cURL.
curl -X POST \ https://localhost:9443/oauth2/token \ -u '<client_id>:<client_secret>' \ -H 'Content-Type: application/x-www-form-urlencoded' \ -d 'grant_type=organization_switch&token=<access token obtained for root organization>&switching_organization=<created organization id>&scope=internal_org_role_mgt_view internal_org_role_mgt_update internal_org_user_mgt_create internal_org_user_mgt_list internal_org_application_mgt_view' -
A shadow user account should have been created in the new organization for the organization creator in the organization (root). Get the shadow account's user id using the following cURL.
curl --location 'https://localhost:9443/o/scim2/Users?filter=userName%20eq%20{username of the user created in step 1}' \ --header 'Authorization: Bearer {access-token-obtained-for-the-organization}' \ --header 'Content-Type: application/json' -
Use the following cURL to obtain the
idof the administrator role defined for your B2B application.Note
Share the B2B application in organization(root) enabling
share with all organizationsor share the application to the created organization before the role operation. The roles associated to the B2B application will be shared with the organization only if the application is shared to the organization.curl --location 'https://localhost:9443/o/scim2/v2/Roles?filter=displayName%20eq%20{ admin-role-name }%20and%20audience.value%20eq%20{ role-audience-value }' ' \ --header 'Accept: application/json' \ --header 'Authorization: Bearer {access-token-obtained-for-the-organization}'Note
Refer following details to get your B2B application's administrator role:
admin-role-name Name of the administrator role associated to your B2B application. role-audience-value If your B2B application has associated to application audience roles give the id of the shared application in organization. Otherwise, created organization id.curl --location 'https://localhost:9443/o/api/server/v1/applications?filter=name%20eq%20{B2B-application-name}' \ --header 'Authorization: Bearer {access-token-obtained-for-the-organization}'
-
To give B2B application's administrative privileges of new onboarded organization to the organization creator, assign the shadow account to the administrator role of your B2B application by using the following cURL.
curl --location --request PATCH 'https://localhost:9443/o/scim2/v2/Roles/{admin-role-id}' \
--header 'Authorization: Bearer {access-token-obtained-for-the-organization}' \
--header 'Content-Type: application/json' \
--data '{
    "Operations": [
        {
            "op": "add",
            "path": "users",
            "value": [
                {
                    "value": "{user-id obtained from step 4}"
                }
            ]
        }
    ]
}'