Configuring the Identity Server
This section provides you with detailed information on how to configure the WSO2 Identity Server from the start. The following diagram depicts the normal flow of events you would follow.
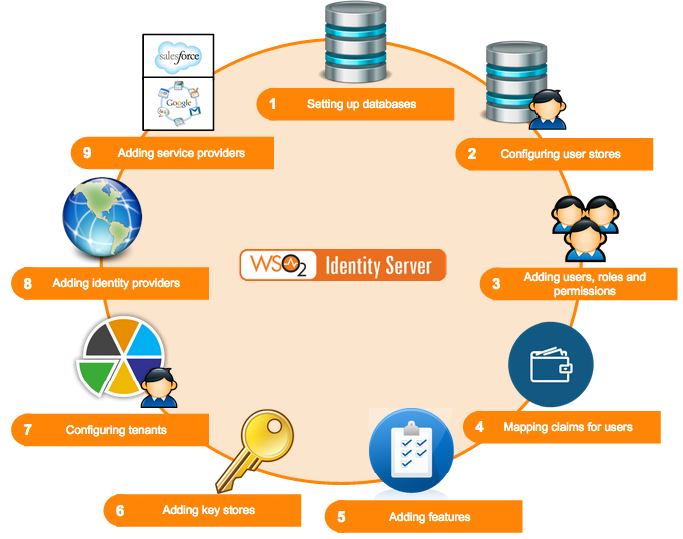
As per the above diagram, when setting up WSO2 Identity Server, you would configure the following in the order mentioned.
-
Databases
When configuring WSO2 Identity Server, the first step to do is to set up the databases. This includes creating the database and populating it with the various tables that are required. Once you have set up the databases, configure the datasources to point to the databases created. See Setting up the Physical Database for information on setting up the database with its tables and configuring the datasources. -
User stores
The next step is to configure user stores. These can be either primary or secondary user stores. Instead of using the user store that comes inbuilt with the product, you can configure your own user store with the Identity Server. See Configuring User Stores or information on user store configurations. -
Users, roles and permissions
You can now add users and assign roles to the user stores. Each role can have specific permissions. See Configuring Users, Roles and Permissions for more information on working with users, roles and permissions. -
Claims
You can map a set of attributes from the underlying user store to a set of defined claims. See Claim Management to work with claim dialects and provide mapping instructions. -
Setting up Keystores
Create and add a keystore to manage keys that are stored in the database. This is very useful in WS-Security scenarios. See Using Asymmetric Encryption in the WSO2 Product Administration Guide for more information. -
Tenants
Add and view tenants. This feature enables users to have a customized experience. See Creating and Managing Tenants for more information. Also see Email Templates for more information on customizing automated emails for users configured under specific tenants. -
Management console
Once you have configured the user stores, you can configure various tools available to you in the management console. See Using WSO2 Identity Server for information on working with the features in the Main menu. -
Identity providers
Once everything else is configured, you can add an identity provider. You can link this to the user store you configured and also specify which protocols you wish to use to configure your IdP. See the architecture of the Identity Server to see how the identity provider configurations are used in the bigger picture. - Service providers
Finally, configure the service provider to integrate with the identity provider and the Identity Server. You can link this to the user store you configured and also specify which protocols you wish to use to configure your SP. See the architecture of the Identity Server to see how the service provider configurations are used in the bigger picture.