Validating the Scope of OAuth Access Tokens using XACML Policies
WSO2 Identity Server (WSO2 IS) allows you to validate the scope of an OAuth access token using XACML policies to provide fine-grained access control to APIs.
If you want the XACML scope validator to execute after checking the validity of the access token in an OAuth access token validation flow, you can select the scope validator as XACML when you configure a service provider. This provides fine-grained access control to APIs.
The following sections walk you through the basic steps you need to follow to validate the scope of OAuth access tokens using XACML policies:
Configure the service provider
Follow the steps below to configure a service provider in WSO2 Identity Server so that the authentication happens as expected. For more information on how the service provider fits into the WSO2 IS architecture, see Architecture.
-
Start WSO2 Identity Server and access the Management Console via https://localhost:9443/carbon/ .
-
On the Main tab, navigate to Service Providers> Add under the Identity menu, and enter a name for the service provider.
-
Click Register. This adds a new service provider.
-
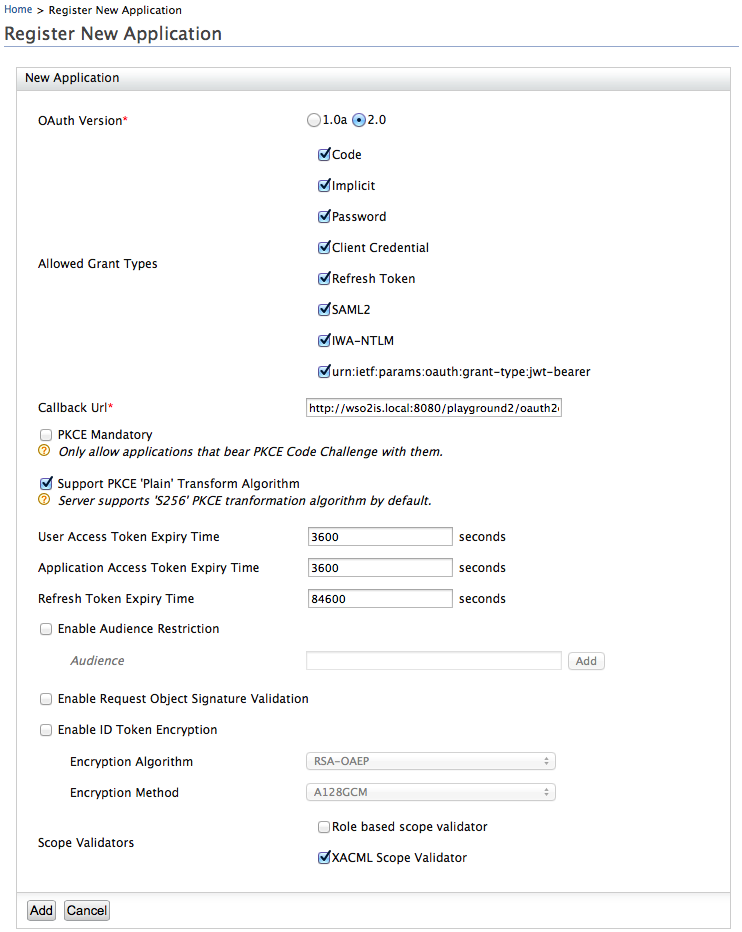
Expand the Inbound Authentication Configuration section, then expand the OAuth2/OpenID Connect Configuration, and then click Configure. This displays the Register New Application screen.
-
Specify required values for the fields. When you specify values, be sure to select XACML Scope Validator as the scope validator.
-
Click Add. This registers the new application.
-
Click Update. This updates the service provider with details of the OAuth/OpenID connect configurations that you specified.
Now that you have configured the service provider, the next step is to configure the XACML policy to validate the XACML scope during OAuth token validation.
Set up the policy
Follow the instructions below to publish a policy using a XACML policy template that is available by default with WSO2 IS:
-
In the Main tab of the Management Console, navigate to PAP > Policy Administration under the Entitlement menu. For more information on Policy Administration Point (PAP), see Configuring the Policy Administration Point.
-
Select the
scope_based_token_validation_policy_templatepolicy, and click Edit to view the selected policy in the policy editor.Info
XACML template policies provide a pre-configured template with place holders to customize the policy depending on your requirement.
-
Edit the policy to customize it depending on your requirement. You can change the values of attributes and rules.
-
Click Save Policy to save the changes. You can see the policy that you created on the policy list (the original policy template remains unchanged)
-
Click the link Publish to My PDP corresponding to the new policy.
-
On the UI that appears, leave the default values as they are and click Publish.
Note
For more information on Publishing a XACML policy, see here.
To ensure that the policy has been published successfully, click on Policy View under the Entitlement > PDP section on the Main tab of the management consol, and check if the created policy is listed.
Now that you have created the policy and enforced it using the policy template, you can test the policy to evaluate whether XACML scope is validated at the time of OAuth token validation.
Try it out
Follow the steps below to try out the policy using the XACML TryIt tool:
Tip
The XACML TryIt tool allows you to test policies easily without having to create and send authorization requests to WSO2 IS. It is a tool through which authorization requests can be created and evaluated against available policies. You can write simple XACML 3.0 requests in XML format and try them using the web UI of the TryIt tool
-
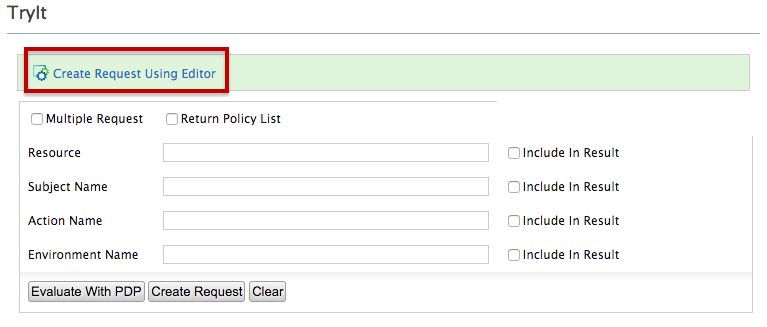
On the Management Console, click Tools, and then click TryIt under the XACML section.
-
Click Create Request Using Editor.
-
Specify the following as the sample request:
<Request xmlns="urn:oasis:names:tc:xacml:3.0:core:schema:wd-17" CombinedDecision="false" ReturnPolicyIdList="false"> <Attributes Category="http://wso2.org/identity/identity-action"> <Attribute AttributeId="http://wso2.org/identity/identity-action/action-name" IncludeInResult="false"> <AttributeValue DataType="http://www.w3.org/2001/XMLSchema#string">token_validation</AttributeValue> </Attribute> </Attributes> <Attributes Category="http://wso2.org/identity/sp"> <Attribute AttributeId="http://wso2.org/identity/sp/sp-name" IncludeInResult="false"> <AttributeValue DataType="http://www.w3.org/2001/XMLSchema#string">test_server</AttributeValue> </Attribute> </Attributes> <Attributes Category="http://wso2.org/identity/oauth-scope"> <Attribute AttributeId="http://wso2.org/identity/oauth-scope/scope-name" IncludeInResult="true"> <AttributeValue DataType="http://www.w3.org/2001/XMLSchema#string">SCOPE_1</AttributeValue> </Attribute> </Attributes> </Request> -
Click Evaluate With PDP. You will see a response message that says either
PermitorDenydepending on whether the XACML scope is validated or not at the time of OAuth token validation.
Related Topics
For detailed instructions on how to add and configure a service provider, see Adding and Configuring a Service Provider.
For a tutorial on how to configure an access control policy for a service provider, see Configuring Access Control Policy for a Service Provider.