Enabling SSO for Management Console using OpenSSO as the IDP
This page includes the information about enabling single sign-on for management console using OpenSSO as the IDP.
Prerequisites
-
Download and install OpenAM/OpenSSO. (Download the .war file from here )
Installing OpenAM
See here for instructions on how to install OpenAM.
WSO2 Identity Server comes with SAML web-SSO authenticators. This page focuses on the steps necessary for its configuration.
Info
It is not necessary to introduce third party .jars into the server environment as WSO2 Identity Server has all the necessary .jars that deal with SAML token parsing.
Setting up the Environment
Configuring OpenSSO
OpenSSO provides two options to register a service provider:
- Creating an SP fedlet.
- Setting up an SP using a meta file called sp.xml.
This section focuses on the latter approach. Use the following steps to configure OpenSSO:
-
Create sp.xml file.
Sample sp.xml
<EntityDescriptor entityID="https://localhost:9443/acs" xmlns="urn:oasis:names:tc:SAML:2.0:metadata">
    <SPSSODescriptor AuthnRequestsSigned="false" WantAssertionsSigned="false"  protocolSupportEnumeration="urn:oasis:names:tc:SAML:2.0:protocol">
        <SingleLogoutService Binding="urn:oasis:names:tc:SAML:2.0:bindings:HTTP-Redirect"
                            Location="https://localhost:9443/acs/fedletSloRedirect"
                            ResponseLocation="https://localhost:9443/acs/fedletSloRedirect"/>
        <SingleLogoutService Binding="urn:oasis:names:tc:SAML:2.0:bindings:HTTP-POST"
                            Location="https://localhost:9443/acs/fedletSloPOST"
                            ResponseLocation="https://localhost:9443/acs/fedletSloPOST"/>
        <SingleLogoutService Binding="urn:oasis:names:tc:SAML:2.0:bindings:SOAP"
                            Location="https://localhost:9443/acs/fedletSloSoap"/>
        <NameIDFormat>urn:oasis:names:tc:SAML:2.0:nameid-format:transient</NameIDFormat>
        <AssertionConsumerService isDefault="true" index="0" Binding="urn:oasis:names:tc:SAML:2.0:bindings:HTTP-POST"
                                Location="https://localhost:9443/acs"/>
        <AssertionConsumerService index="1" Binding="urn:oasis:names:tc:SAML:2.0:bindings:HTTP-Artifact"
                                Location="https://localhost:9443/acs"/>
    </SPSSODescriptor>
    <RoleDescriptor xmlns:xsi="http://www.w3.org/2001/XMLSchema-instance"
                    xmlns:query="urn:oasis:names:tc:SAML:metadata:ext:query"
                    xsi:type="query:AttributeQueryDescriptorType"
                    protocolSupportEnumeration="urn:oasis:names:tc:SAML:2.0:protocol"></RoleDescriptor>
    <XACMLAuthzDecisionQueryDescriptor WantAssertionsSigned="false"
                    protocolSupportEnumeration="urn:oasis:names:tc:SAML:2.0:protocol"></XACMLAuthzDecisionQueryDescriptor>
</EntityDescriptor>
Note
- The given sp.xml sample file uses
https://localhost:9443/acsas the redirection URL. Configure it according to your environment:https://<carbonserverhot:port>/acs. - The
EntityIDelement of the sp.xml should match the corresponding value ofservice_provider_idin thedeployment.tomlfile. - The same values are used in single logout related parameters. However this is not tested in the single logout feature with OpenSSO at the time of writing.
- The given sp.xml sample file uses
-
Go to Common Tasks > Register Remote Service Provider and upload the file.
- Select sp.xml as the file to upload.
- Select a Circle of Trust configuration in the remote service provider.
- Go to Federation > Entity Providers in the OpenSSO management console and select the newly registered service provider.
-
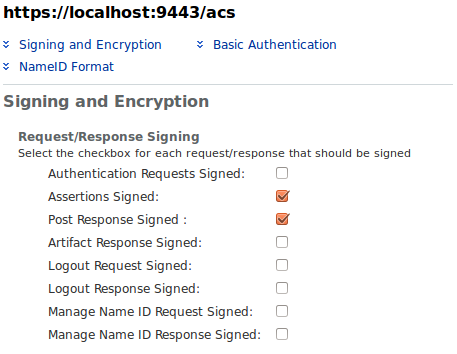
Select the response signing attribute.
-
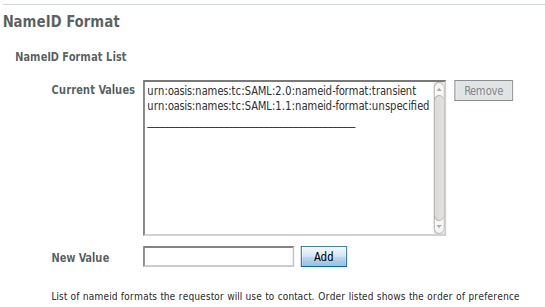
Under the NameID Format list, make sure you specify the ‘ transient ’ and ‘ unspecified ’ Name ID Formats.
Setting up the WSO2 product
-
Open the
<IS_HOME>/repository/conf/deployment.tomlfile and add the following configuration.[admin_console.authenticator.saml_sso_authenticator] enable=true service_provider_id = "" identity_provider_sso_service_url = "" idp_cert_alias = ""Change the following parameters accordingly:
-
service_provider_id: This can be any identifier and does not have to be a URL. However, the configured value should be equal to the value configured in the sp.xml file.
-
identity_provider_sso_service_url: This is the URL of your IDP.
-
idp_cert_alias: This is the certificate that gets used during response validation from the IDP. OpenSSO servers’ public key should be imported to the Carbon servers keystore with the alias name ‘opensso’.
-
Exporting/Importing certificates
Add the public key of the selected circle of trust in to the Carbon
keystore ( wso2carbon.jks ) found under
<IS_HOME>/resources/security/wso2carbon.jks.
You can use Java keytool to do that.
Exporting a public key
Here we use the default shipped OpenSSO keystore certificate. It has the
alias name of ‘ test ’ and typically located in
/home/opensso/opensso/keystore.jks . The default
password is ‘ changeit ’. To export the public key of ‘ test ’,
use the following command:
keytool -export -keystore keystore.jks -alias test -file test.cerThe public key is stored in the ‘ test.cer ’ file. You can view the certificate content with the following command:
keytool -printcert -file test.cerImporting a public key
Now import the ‘ test.cer ’ into Carbon key stores found under
<IS_HOME>/repository/resources/security/wso2carbon.jks
. The following command does this:
keytool -import -alias opensso -file test.cer -keystore wso2carbon.jksView the imported certificate using the following command:
keytool -list -alias opensso -keystore wso2carbon.jks -storepass wso2carbonTesting the environment
Try accessing the Carbon management console (e.g.,
https://localhost:9443/carbon ).
This redirects you to the IDP (OpenSSO login page). Enter your username
and password in the OpenSSO login page. Once you are properly
authenticated, you are redirected back to the WSO2 Carbon product home
page as a logged in user.
The authenticated user has to be in the Carbon servers’ user-store for authorization (permission) purposes. Since the above described test environment does not share the same user store between IDP (OpenSSO server) and SP (Carbon server), create a user with the same name in the Carbon server user store. Otherwise there is an authorization failure during the server login.
Top