Using WSO2 Identity Server Analytics for Adaptive Authentication
WSO2 Identity Server Analytics (WSO2 IS Analytics) is a lightweight, lean, streaming SQL-based stream processing platform that allows you to collect events, analyze them in real-time, identify patterns, map their impacts, and communicate the results within milliseconds. It is powered by Siddhi to be extremely high performing.
This tutorial demonstrates using WSO2 IS Analytics to publish transactional data and assess an end user's risk score based on the user's transaction history in an adaptive authentication scenario. Consider a business use case where a bank wants to prompt an additional authentication step when a user attempts to log in to the system after a doing a transaction of over $10,000.This usecase can be achieved by creating a Siddhi application in WSO2 IS Analytics and configuring a conditional authentication script in the service provider configuration of the WSO2 Identity Server (WSO2 IS).
WSO2 IS Analytics has 4 main runtimes. This tutorial demonstrates the use of the Editor runtime to create a Siddhi application and the Worker runtime to run the script. Follow the instructions given in the sections below to create and deploy a Siddhi application that can be used with WSO2 Identity Server for risk-based login.
Creating a Siddhi application
- Download the latest version of WSO2 IS Analytics.
- Extract the downloaded zip and navigate to the
<ISANALYTICS_HOME>/bindirectory (<ISANALYTICS_HOME>is the extracted directory). - Issue one of the following commands to start the WSO2 IS Analytics Editor (WSO2 Stream Processor Studio).
- For Windows:
editor.bat - For Linux: ./
editor.sh
- For Windows:
-
Access the WSO2 IS Analytics Editor through the following URL: http://\<HOST_NAME>:\<EDITOR_PORT>/editor.
Info
The default URL is: http://localhost:9390/editor.
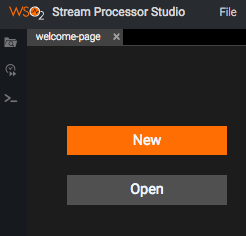
The WSO2 IS Analytics Editor opens as shown below.
-
Click New to start creating a new Siddhi application.
-
Enter a name for your Siddhi application. In this scenario, let's name the application
IS_ANALYTICS_RiskBasedLoginas shown below.@App:name("IS_ANALYTICS_RiskBasedLogin")
-
Add the following HTTP source to the Siddhi application.
Info
Siddhi sources are usually asynchronous, which means you will receive an acknowledgement with a
200 OKresponse when you publish an event to a source. The code block given below shows the sample HTTP source used in this tutorial. For more information, see HTTP sources.Sample HTTP Source
@Source(type = 'http', receiver.url="http://localhost:8281/IS_ANALYTICS_RiskBasedLogin/TransactionInputStream", basic.auth.enabled='false', @map(type='json', @attributes(username='$.event.username', transaction='$.event.transaction')))
define stream TransactionInputStream (transaction:double, username:string);
Click to see more information about streams, sources, and sinks
Streams
A logical series of events ordered in time with a uniquely identifiable name, and a set of defined attributes with specific data types defining its schema.
Sources
A contract that consumes data from external sources (such as TCP, Kafka, HTTP, etc.,) in the form of events, then converts each event (which can be in XML, JSON, binary, etc. format) to a Siddhi event, and passes that to a Stream for processing.
Sink
A contract that takes events arriving at a stream, maps them to a predefined data format (such as XML, JSON, binary, etc), and publishes them to external endpoints (such as E-mail, TCP, Kafka, HTTP, etc).

In this tutorial, the source you just created is considered as the stream used to publish events about the transaction that a user has made.
-
Click on File>Save to save the application.
-
Click Run or the play button
 to run the script using the
editor. If the application starts successfully, you will see the
following log in the Stream Processor Studio console.
-
Run the following cURL command on a new terminal window to test the source.
Tip
Replace the \<username> tag in the cURL command given below with the username of the user you have added in WSO2 Identity Server.
curl -kv -X POST -u admin:admin \
  http://localhost:8281/IS_ANALYTICS_RiskBasedLogin/TransactionInputStream \
  -H 'Accept: application/json' \
  -H 'Content-Type: application/json' \
  -d '{
    "event": {
        "username": "<username>",
        "transaction": 12000
    }
}'
You will receive a response similar to the response shown below.
< HTTP/1.1 200 OK
< content-length: 0
< server: wso2-http-transport
< date: Wed, 6 Jun 2018 14:20:53 +0530
Info
Since all sources in Siddhi are asynchronous, the client does not receive any data from events that are published to the source streams (i.e., the only response to the client is a
200 OKmessage). In this tutorial, the user's risk score needs to be calculated based on transactions that the user has made over the last five minutes. To achieve this, you must use an HTTP-request source and an HTTP-response sink. The HTTP-request source and HTTP-response sink always comes in pairs.The difference between the normal HTTP source and an HTTP-request source is that the HTTP-request source sends a response event to the request using the matching HTTP-response sink.
-
Add the following HTTP-request source and HTTP-response sink.
HTTP-request source
@Source(type = 'http-request', source.id='testsource', basic.auth.enabled='true', parameters="'ciphers:TLS_ECDHE_RSA_WITH_AES_128_CBC_SHA256', 'sslEnabledProtocols:TLSv1.1,TLSv1.2'", receiver.url="https://localhost:8280/IS_ANALYTICS_RiskBasedLogin/InputStream", @map(type='json', @attributes(messageId='trp:messageId',username='$.event.username')))
define stream InputStream (messageId string, username string);
HTTP-response sink
@sink(type='http-response', source.id='testsource', message.id='{{messageId}}', @map(type='json'))
define stream OutputStream (messageId string, username string, riskScore int)
Tip
Note the following in the HTTP-request source and HTTP-response sink code blocks.
-
The
source.idin the source stream and the sink stream is used to bridge one input stream to one output stream, and should be matching and unique in pair. -
In the source, you must have an attribute similiar to the
messageIdshown in the code blocks above (the name of the attribute can be different). The attribute must be of type string and the value should be selected fromtrp:messageId. -
Maintain the
messageIdattribute throughout the whole flow. ThemessageIdattribute should also be available in the sink stream. -
The HTTP-response type sink should have the option
message.idand the value should be the above mentionedmessageId.
-
-
Add the following Siddhi query that is used to pass data from the source to the sink.
define stream TempStream (messageId string, username string, sumTransactions double); from TransactionInputStream#window.time(5 min) right outer join InputStream#window.length(1) unidirectional on TransactionInputStream.username == InputStream.username select InputStream.messageId, InputStream.username, sum(transaction) as sumTransactions group by messageId, InputStream.username insert into TempStream; from TempStream select messageId, username, ifThenElse(sumTransactions > 10000, 1, 0) as riskScore insert into OutputStream; -
The final Siddhi application is as follows.
@App:name("IS_ANALYTICS_RiskBasedLogin")
@App:description("Description of the plan")

@Source(type = 'http', receiver.url="http://localhost:8281/IS_ANALYTICS_RiskBasedLogin/TransactionInputStream", basic.auth.enabled='false', @map(type='json', @attributes(username='$.event.username', transaction='$.event.transaction')))
define stream TransactionInputStream (transaction:double, username:string);

@Source(type = 'http-request', source.id='testsource', basic.auth.enabled='true', parameters="'ciphers:TLS_ECDHE_RSA_WITH_AES_128_CBC_SHA256', 'sslEnabledProtocols:TLSv1.1,TLSv1.2'", receiver.url="https://localhost:8280/IS_ANALYTICS_RiskBasedLogin/InputStream", @map(type='json', @attributes(messageId='trp:messageId',username='$.event.username')))
define stream InputStream (messageId string, username string);

@sink(type='http-response', source.id='testsource', message.id='{{messageId}}', @map(type='json'))
define stream OutputStream (messageId string, username string, riskScore int);

define stream TempStream (messageId string, username string, sumTransactions double);

from TransactionInputStream#window.time(5 min)
right outer join InputStream#window.length(1) unidirectional
on TransactionInputStream.username == InputStream.username
select InputStream.messageId, InputStream.username, sum(transaction) as sumTransactions
group by messageId, InputStream.username
insert into TempStream;

from TempStream
select messageId, username, ifThenElse(sumTransactions > 10000, 1, 0) as riskScore
insert into OutputStream;
You have successfully created the Siddhi application. Use the instructions given in the next section to test it out.
Testing the Siddhi application
-
Run the Siddhi application from the Editor.
-
Execute the following cURL command on a terminal window to calculate the user's risk score.
curl -X POST  https://localhost:8280/IS_ANALYTICS_RiskBasedLogin/InputStream -H 'Accept: application/json' -H 'Content-Type: application/json' -d '{
    "event": {
        "username": "admin"
    }
}' -kv -u admin:admin
You will see a response similar to the response given below.
{"event":{"messageId":"6ec82e38-8c8a-47dd-b5e2-da3c55975766","username":"admin","riskScore":0} -
Execute the following cURL command to send an event about a transaction made by the user.
curl -kv -X POST http://localhost:8281/IS_ANALYTICS_RiskBasedLogin/TransactionInputStream -H 'Accept: application/json' -H 'Content-Type: application/json' -d '{ "event": { "username": "admin", "transaction": 12000 } }' -
Next, execute the same cURL command you executed in step 1 to re-evaluate the risk score after a new transaction was added.
curl -X POST  https://localhost:8280/IS_ANALYTICS_RiskBasedLogin/InputStream -H 'Accept: application/json' -H 'Content-Type: application/json'   -d '{
    "event": {
        "username": "admin"
    }
}' -kv -u admin:admin
You will receive a response similar to the response given below.
"event":{"messageId":"6ec82e38-8c8a-47dd-b5e2-da3c55975766","username":"admin","riskScore":1}}Note that the user's risk score has now changed to 1.
Configuring the analytics engine in WSO2 IS
This section demonstrates how to configure the analytics engine in WSO2 Identity Server that establishes the connection between WSO2 Identity Server and WSO2 IS Analytics.
- Start the WSO2 Identity Server and log in to the management console using admin/admin credentials.
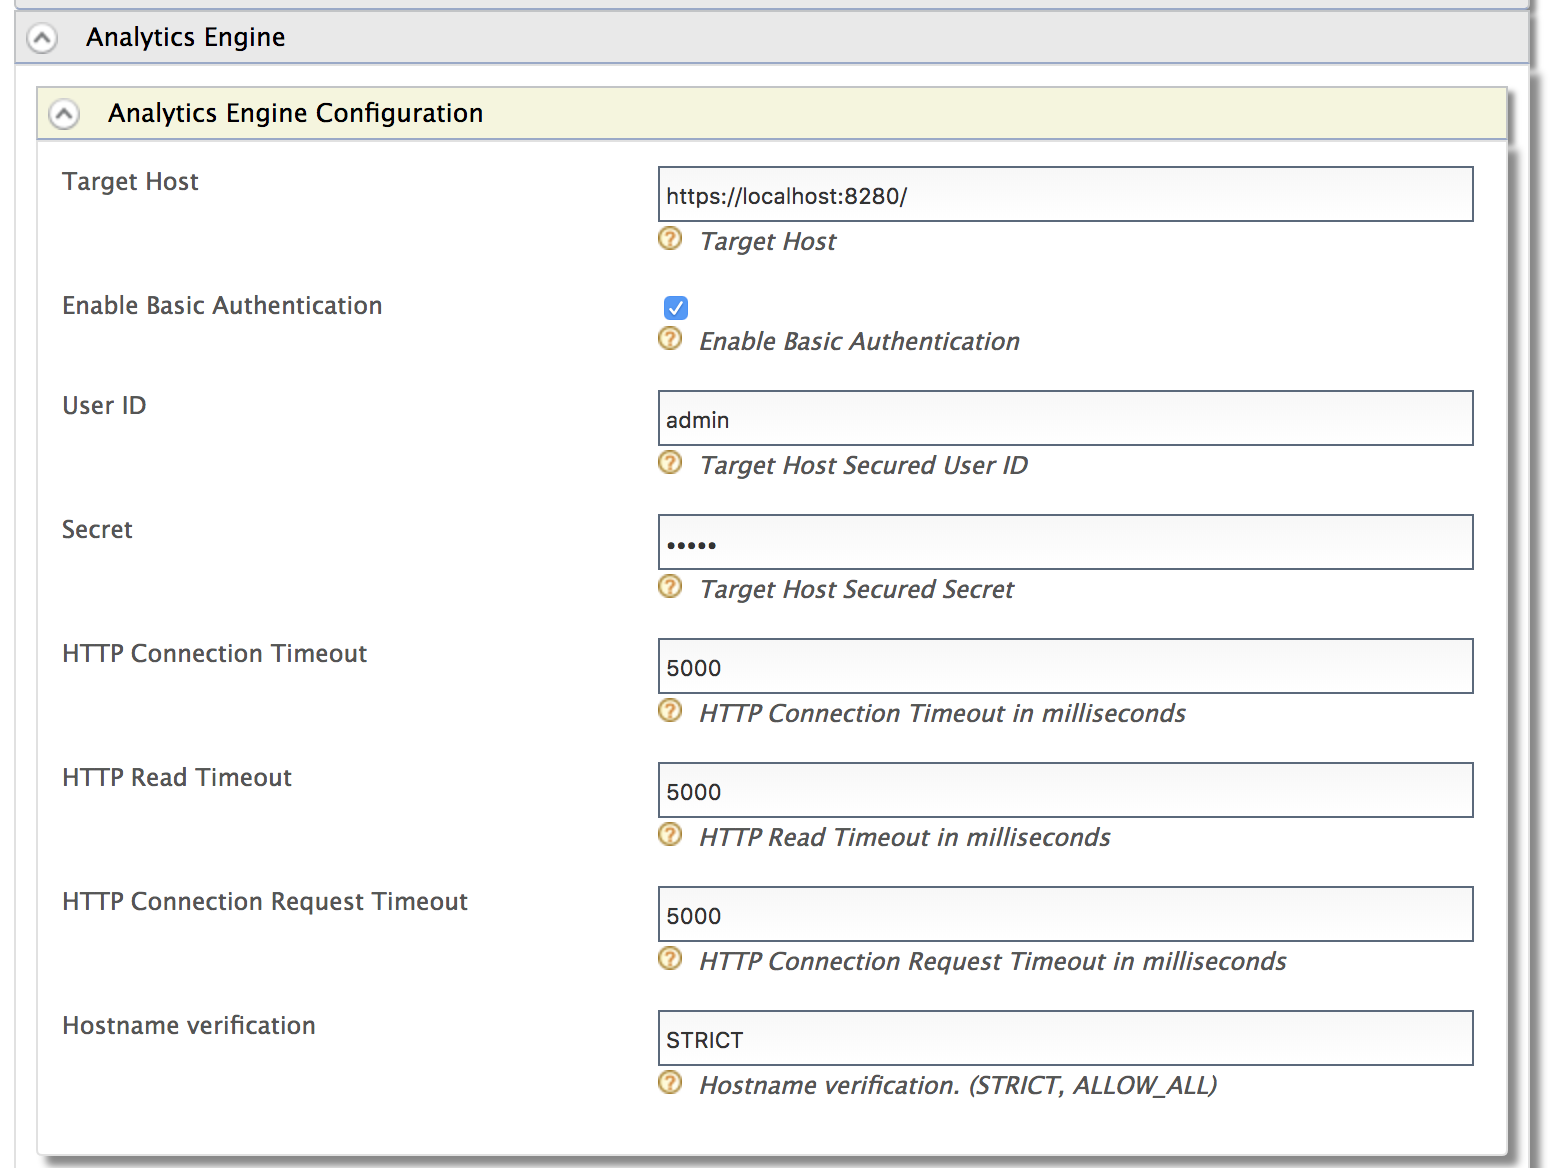
- Click Resident under Identity Providers and expand Analytics Engine > Analytics Engine Configuration.
-
Configure the following properties accordingly. For this tutorial scenario, you can change the User ID to a value like
adminand leave the rest of the default configurations as they are.

Property Description Target Host The target hostname and target port for the WSO2 IS Analytics endpoint. Enable Basic Authentication Select to enable authentication with username and password credentials. User ID The username of the WSO2 IS Analytics admin. Secret The password of the WSO2 IS Analytics admin. HTTP Connection Timeout The connection timeout interval in milliseconds. If the endpoint does not respond within this time, the connection attempt has failed. HTTP Read Timeout The timeout interval in milliseconds for each call of read()on theInputStream. If the server does not respond with data within this time, the connection is terminated.HTTP Connection Request Timeout The timeout interval in milliseconds for requesting a connection with WSO2 IS Analytics. Hostname Verification Possible values are: STRICT or ALLOW_ALL.
STRICT - When this mode is enabled, hostnames will be strictly verified against the hostname specified in the product's SSL certificate. For example, if "*. foo.com " is specified as the hostname in the certificate, only this specific hostname is authorized by the server. That is, subdomains such as " a.b.foo.com " or ip addresses such as "127.10.11.1" will not be authorized. ALLOW_ALL - This option turns off hostname verification for the server. Note that this is not recommended in a production setup and should only be used for demonstrations and testing. -
An HTTP connection is used to communicate between WSO2 IS and WSO2 IS Analytics. Therefore, you must add the certificate of WSO2 IS Analytics to WSO2 IS. Follow the steps given below to import the certificate from WSO2 IS Analytics to WSO2 IS. This example uses the default keystores and certificates.
-
Navigate to the
<ISANALYTICS_HOME>/resources/securitydirectory on a new terminal window and run the following command. The default keystore password iswso2carbon.keytool -export -alias wso2carbon -keystore wso2carbon.jks -file sp.pem -
Navigate to the
<ISANALYTICS_HOME>/repository/resources/securitydirectory and run the following command.Info
Replace the
<ISANALTICS_HOME>placeholder in the command with the filepath location of your<ISANALYTICS_HOME>folder.keytool -import -alias certalias -file <ISANALYTICS_HOME>/resources/security/sp.pem -keystore client-truststore.jks -storepass wso2carbon
-
Deploying the Siddhi application
You have successfully created the Siddhi application and tested the functionality using the Editor. The Editor is useful for testing purposes however, you must deploy the application properly in WSO2 IS Analytics to use it in production. Follow these instructions to deploy the application.
- On the Editor, click File>Export File.
-
A file named
IS_ANALYTICS_RiskBasedLogin.siddhiis downloaded onto your machine. Place it in the<ISANALYTICS_HOME>/deployment/siddhi-filesdirectory. -
Stop the Editor and start WSO2 Stream Processor in a Worker profile.
- For Windows:
worker.bat - For Linux: ./
worker.sh
- For Windows:
What's Next?
Now that you have successfully deployed a Siddhi application for risk based login, you can configure WSO2 Identity Server to receive data from this Siddhi application and set up rules for adaptive authentication. Follow the Configuring Risk-Based Adaptive Authentication tutorial to set this up.
Top