JWT Bearer Grant
About JWT
The JSON Web Token (JWT) is simply a JSON string containing claim values that will be evaluated and validated by the JWT Bearer Grant Handler at the Authorization Server before issuing an access token.
JWT contains a header, payload, and signature that are separated by periods (.). Let's learn more about them!
Header
The header contains the algorithm that is used to generate the signature as well as the type of the token, i.e., JWT.
Sample header
{
    "alg": "RS256",
    "Type": "JWT"
}
Payload
The payload contains the following claims.
| Claim | Definition | Usage | Description |
|---|---|---|---|
| iss | Issuer | Mandatory | This uniquely identifies the identity provider that issued the JWT. |
| sub | Subject | Mandatory | This is the identity provider that vouches that the JWT was issued by the identity proivder that is indicated in the `iss` claim. |
| aud | Audience | Mandatory | This is the audience to which the JWT is intended to. This should be the token endpoint of the authorization server. |
| exp | Expiration Time | Mandatory | This is epoch time of the JWT expiry time until which the JWT can be used. |
| nbf | Not before | Optional | This defines the epoch time after which the JWT can be used. |
| iat | Issued at | Optional | This the epoch time at which the JWT was issued. |
| jti | JSON Web Token Id | Optional | This is the JSON web token ID, which uniquely identifies the JWT. |
| Custom claims | N/A | Optional | This is the extension point of the JWT specification. |
Sample Payload
{
   "sub":"admin",
   "aud":[
      "https://localhost:9443/oauth2/token"
   ],
   "nbf":1507546100,
   "iss":"jwtIDP",
   "exp":1507606100,
   "iat":1507546100,
   "jti":"Token56756"
}
Signature
To generate the signature:
-
Encode
headerandpayloadusing the base64 scheme and concatenate them with a period (.).tab="Signature Structure" sign(encodeBase64(header) + '.' + encodeBase64(payload)) -
Sign it.
Assertion
To generate the JWT assertion, encode the signature using the base64 scheme and concatenate header, payload, and signature with a period (.).
tab="Assertion Structure"
encodeBase64(header) + '.' + encodeBase64(payload) + '.' +  encodeBase64(s ignature)
Sample Assertion
eyJhbGciOiJSUzI1NiJ9.eyJzdWIiOiJhZG1pbiIsImF1ZCI6WyJodHRwczpcL1wvbG9jYWxob3N0Ojk0NDNcL29hdXRoMlwvdG9rZW4iXSwibmJmIjoxNTA3NTQ2MTAwLCJpc3MiOiJqd3RJRFAiLCJleHAiOjE1MDc2MDYxMDAsImlhdCI6MTUwNzU0NjEwMCwianRpIjoiVG9rZW41Njc1NiJ9.iGMhjibB0W2QFQlM27gnHp6z47Eybv8cAHk2o2i-xqo2S4uJ_1VppFI4CCJXTj4qzV9vmkJ5HKNAayiTa6wOMXGL4XnwYwpOAoKXvboznlEDNRpw3htW34nLvyUu6PjHbdvAPVjh8kPRwf7esRr2p-luecGvC21mjWdhyGzM4hE
Recommended use
WSO2 Identity Server as an OAuth 2.0 Authorization Server can accept JWT assertions from OAuth 2.0 clients as a means of resource owner authentication and authorization. Additionally, it can exchange it with OAuth 2.0 access tokens in order to access protected resources on behalf of the resource owner.
JWT Brearer Grant in WSO2 Identity Server
The JWT Bearer Grant is enabled by default in WSO2 Identity Server with the following configurations in the deployment.toml file in the <IS_HOME>/repository/conf/ directory.
toml
[oauth.grant_type.jwt_bearer]
enable = true
grant_handler = "org.wso2.carbon.identity.oauth2.grant.jwt.JWTBearerGrantHandler"
grant_validator = "org.wso2.carbon.identity.oauth2.grant.jwt.JWTGrantValidator"
The flow
When an entity initates a request to gain access to an application:
-
The client application (registered as a service provider in WSO2 Identity Server) sends an access request to the identity provider (trusted by WSO2 Identity Server).
-
The identity provider creates a
JWT assertionwith the correspondingclaimsand sends it back to the service provider. -
The service provider forwards the access request to the token endpoint in WSO2 Identity Server with the following:
JWT bearer grant typeJWT assertionthat is created by the identity provider- Service provider's
client keyandclient secret
-
The token endpoint in turn reads and identifies it to be a JWT bearer and triggers the JWT bearer grant handler of WSO2 Identity Server.
-
The JWT bearer grant handler checks for the identity provider that issued the JWT token in the JWT assertion.
Note
For this verification to work, the identity provider should have been registered as a trusted identity provider in WSO2 Identity Server. The
Identity Provider Nameor theIdentity Provider's Issuer Nameproperty in the Identity Provider configuration should match the value in theissclaim of the JWT assertion. -
Once the identity provider is identified, WSO2 Identity Server retrieves the corresponding identity provider configurations containing the identity provider's
public certificate. -
WSO2 Identity Server validates the JWT's signature using the identity provider's public certificate.
-
Once the JWT is validated, WSO2 Identity Server creates an
OAuth2.0 access tokenthat can be used by the identity provider to grant access to the application holding the givenclient keyandclient secret.
Configurations
Follow the steps below to configure the trusted identity provider and service provider in WSO2 Identity Server.
Before you begin
Access the WSO2 Identity Server Management Console.
Trusted identity provider
To configure the trusted identity provider:
-
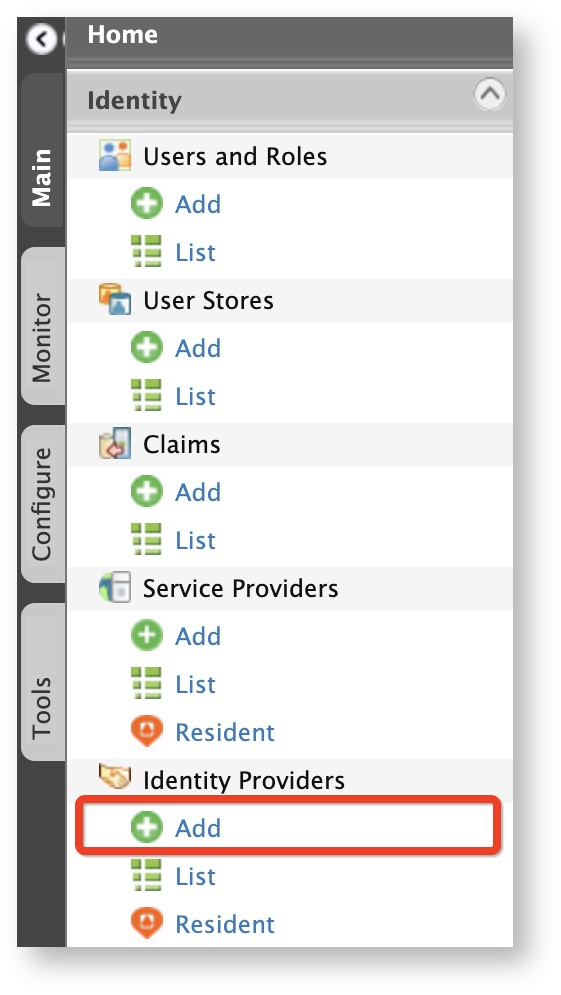
On the Main menu of the Management Console, click Identity > Identity Providers > Add.
-
Enter the following information.
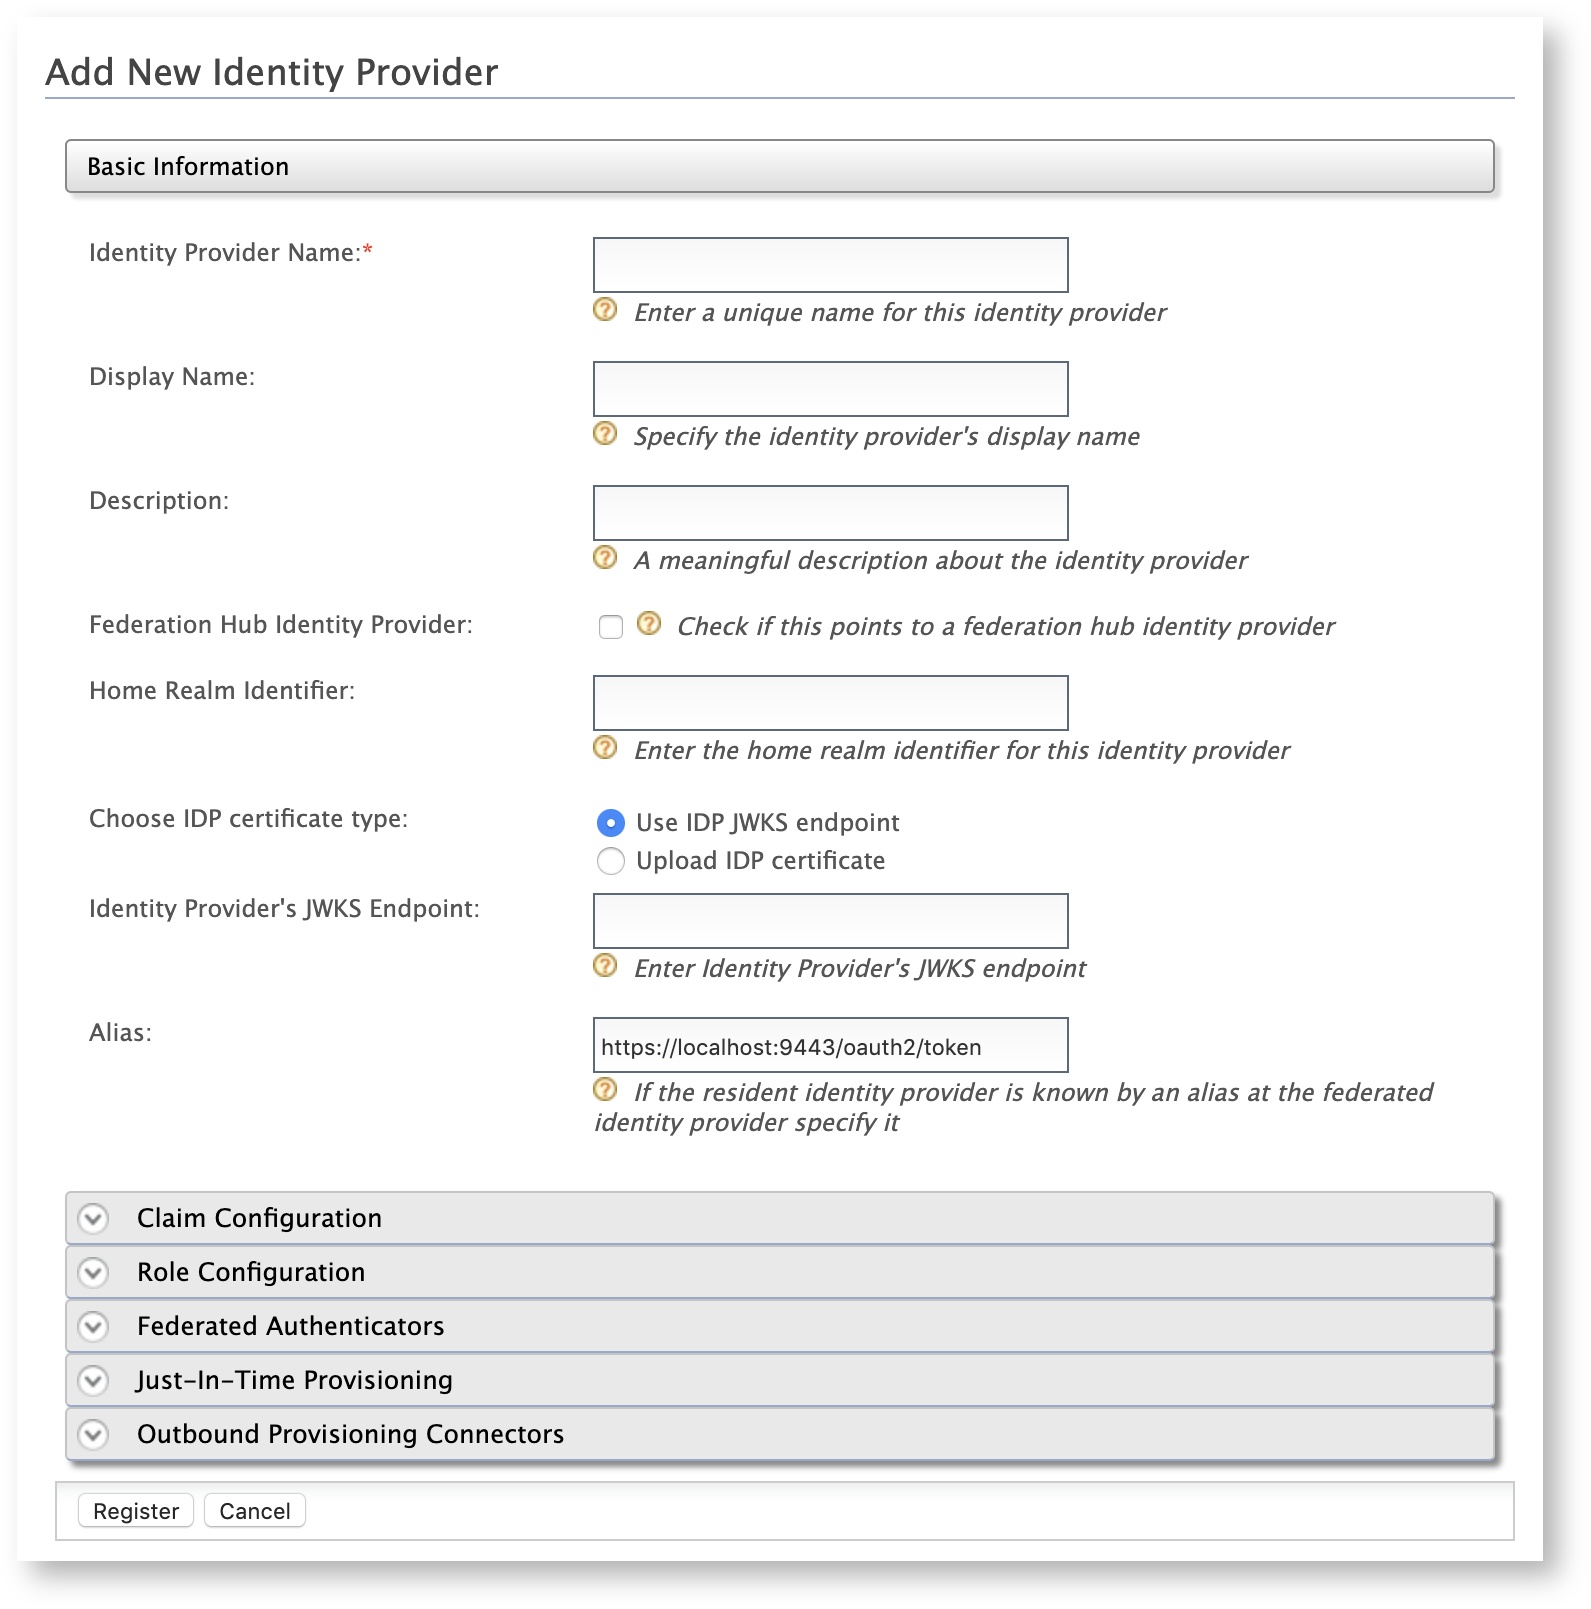
Field Description Sample Value Identity Provider Name This is is the name of the identity provider that issues the JWT. Choose IDP certificate type This is to specify whether the JWT will be validated using a JWKS endpoint or a public certificate. Use IDP JWKS endpointUpload IDP certificate
Identity Provider's JWKS Endpoint This is to define the particular JWKS endpoint using which the JWT will be validated.
This field is enabled when theUse IDP JWKS endpointoption is selected for Choose IDP certificate type.Identity Provider Public Certificate This is the public certificate that is used to sign the JWT assertion.
This field is enabled when theUpload IDP certificateoption is selected for Choose IDP certificate type.Alias This is the alias of the token endpoint. https://localhost:9443/oauth2/tokenInfo
For more information on identity providers, see Adding an Configuring an Identity Provider.
-
Click Register.
You have successfully added the identity provider. Next, you will configure the application as a service provider.
Service provider
To add the application as a service provider in WSO2 Identity Server:
-
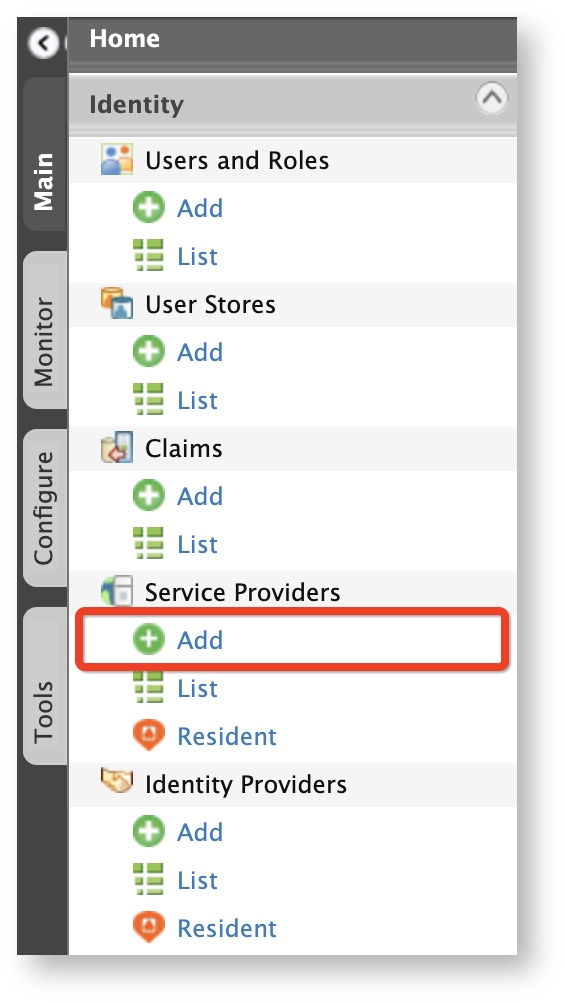
On the Main menu, click Identity > Service Providers > Add.
-
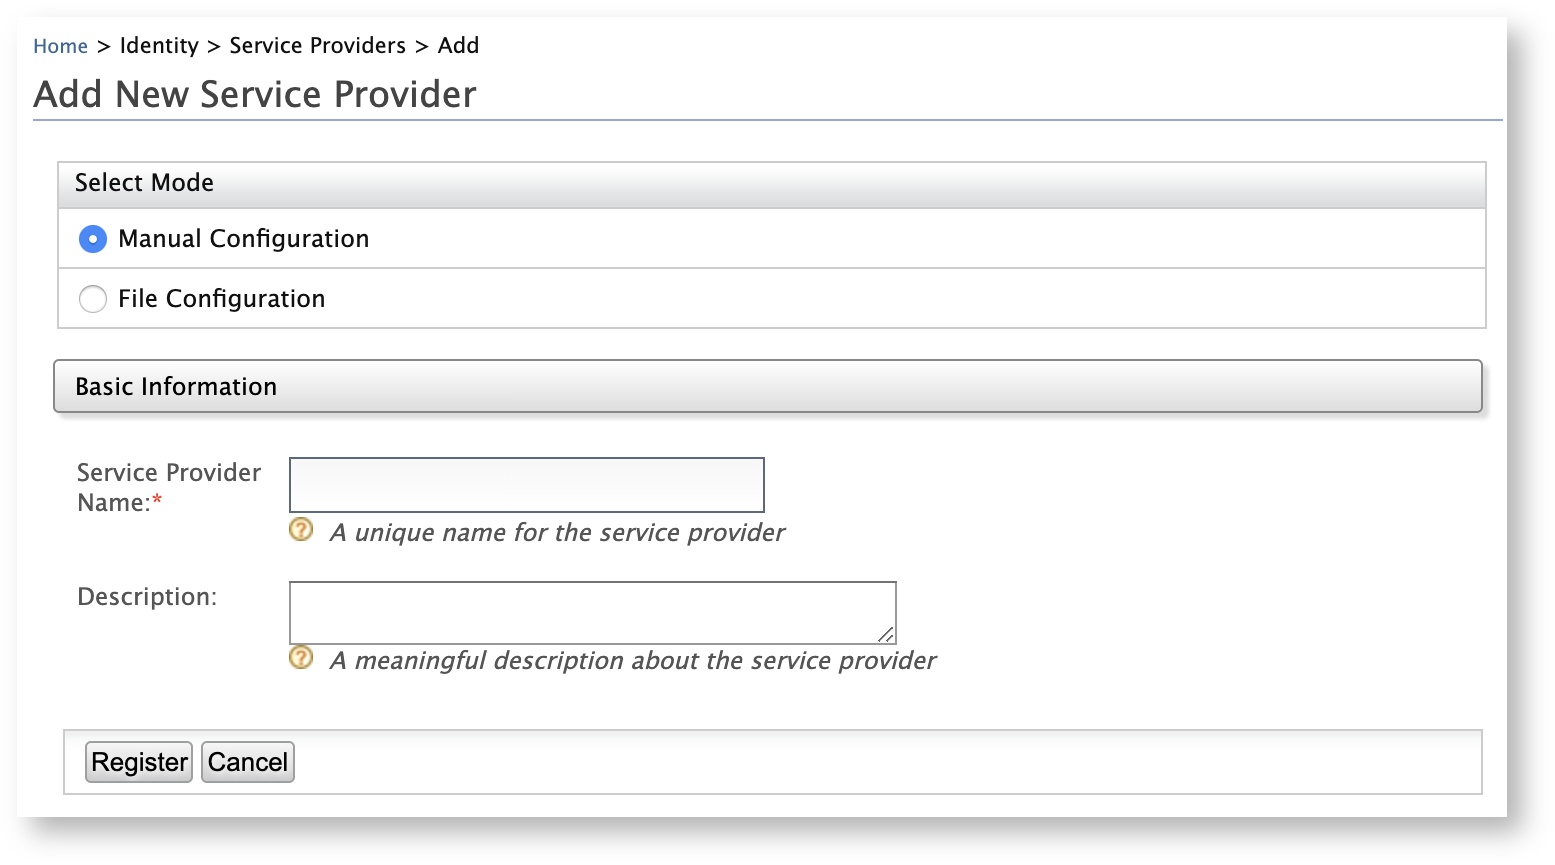
Enter a name for the service provider in the Service Provider Name text box and click Register.
-
In the Inbound Authentication Configuration section, click OAuth/OpenID Connect Configuration > Configure.
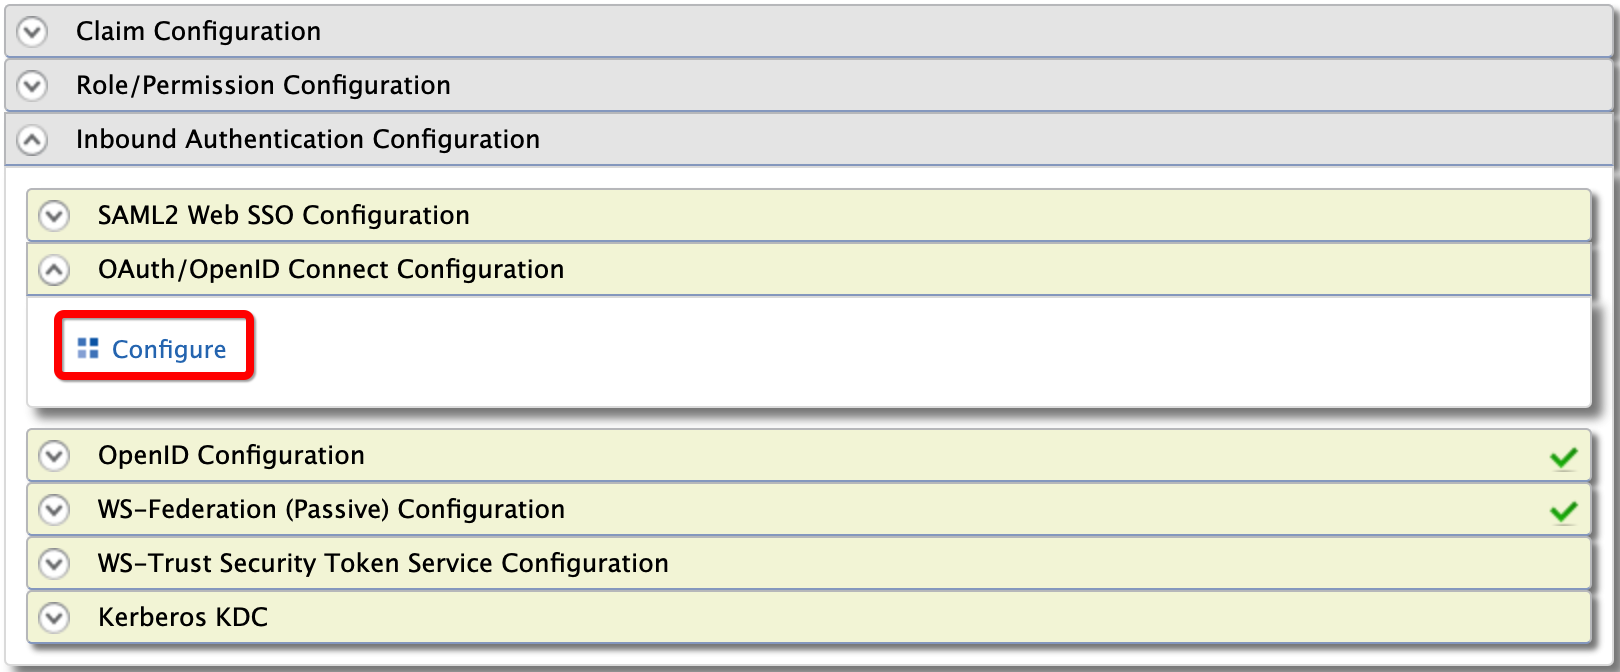
-
Enter the following configurations and click Add.
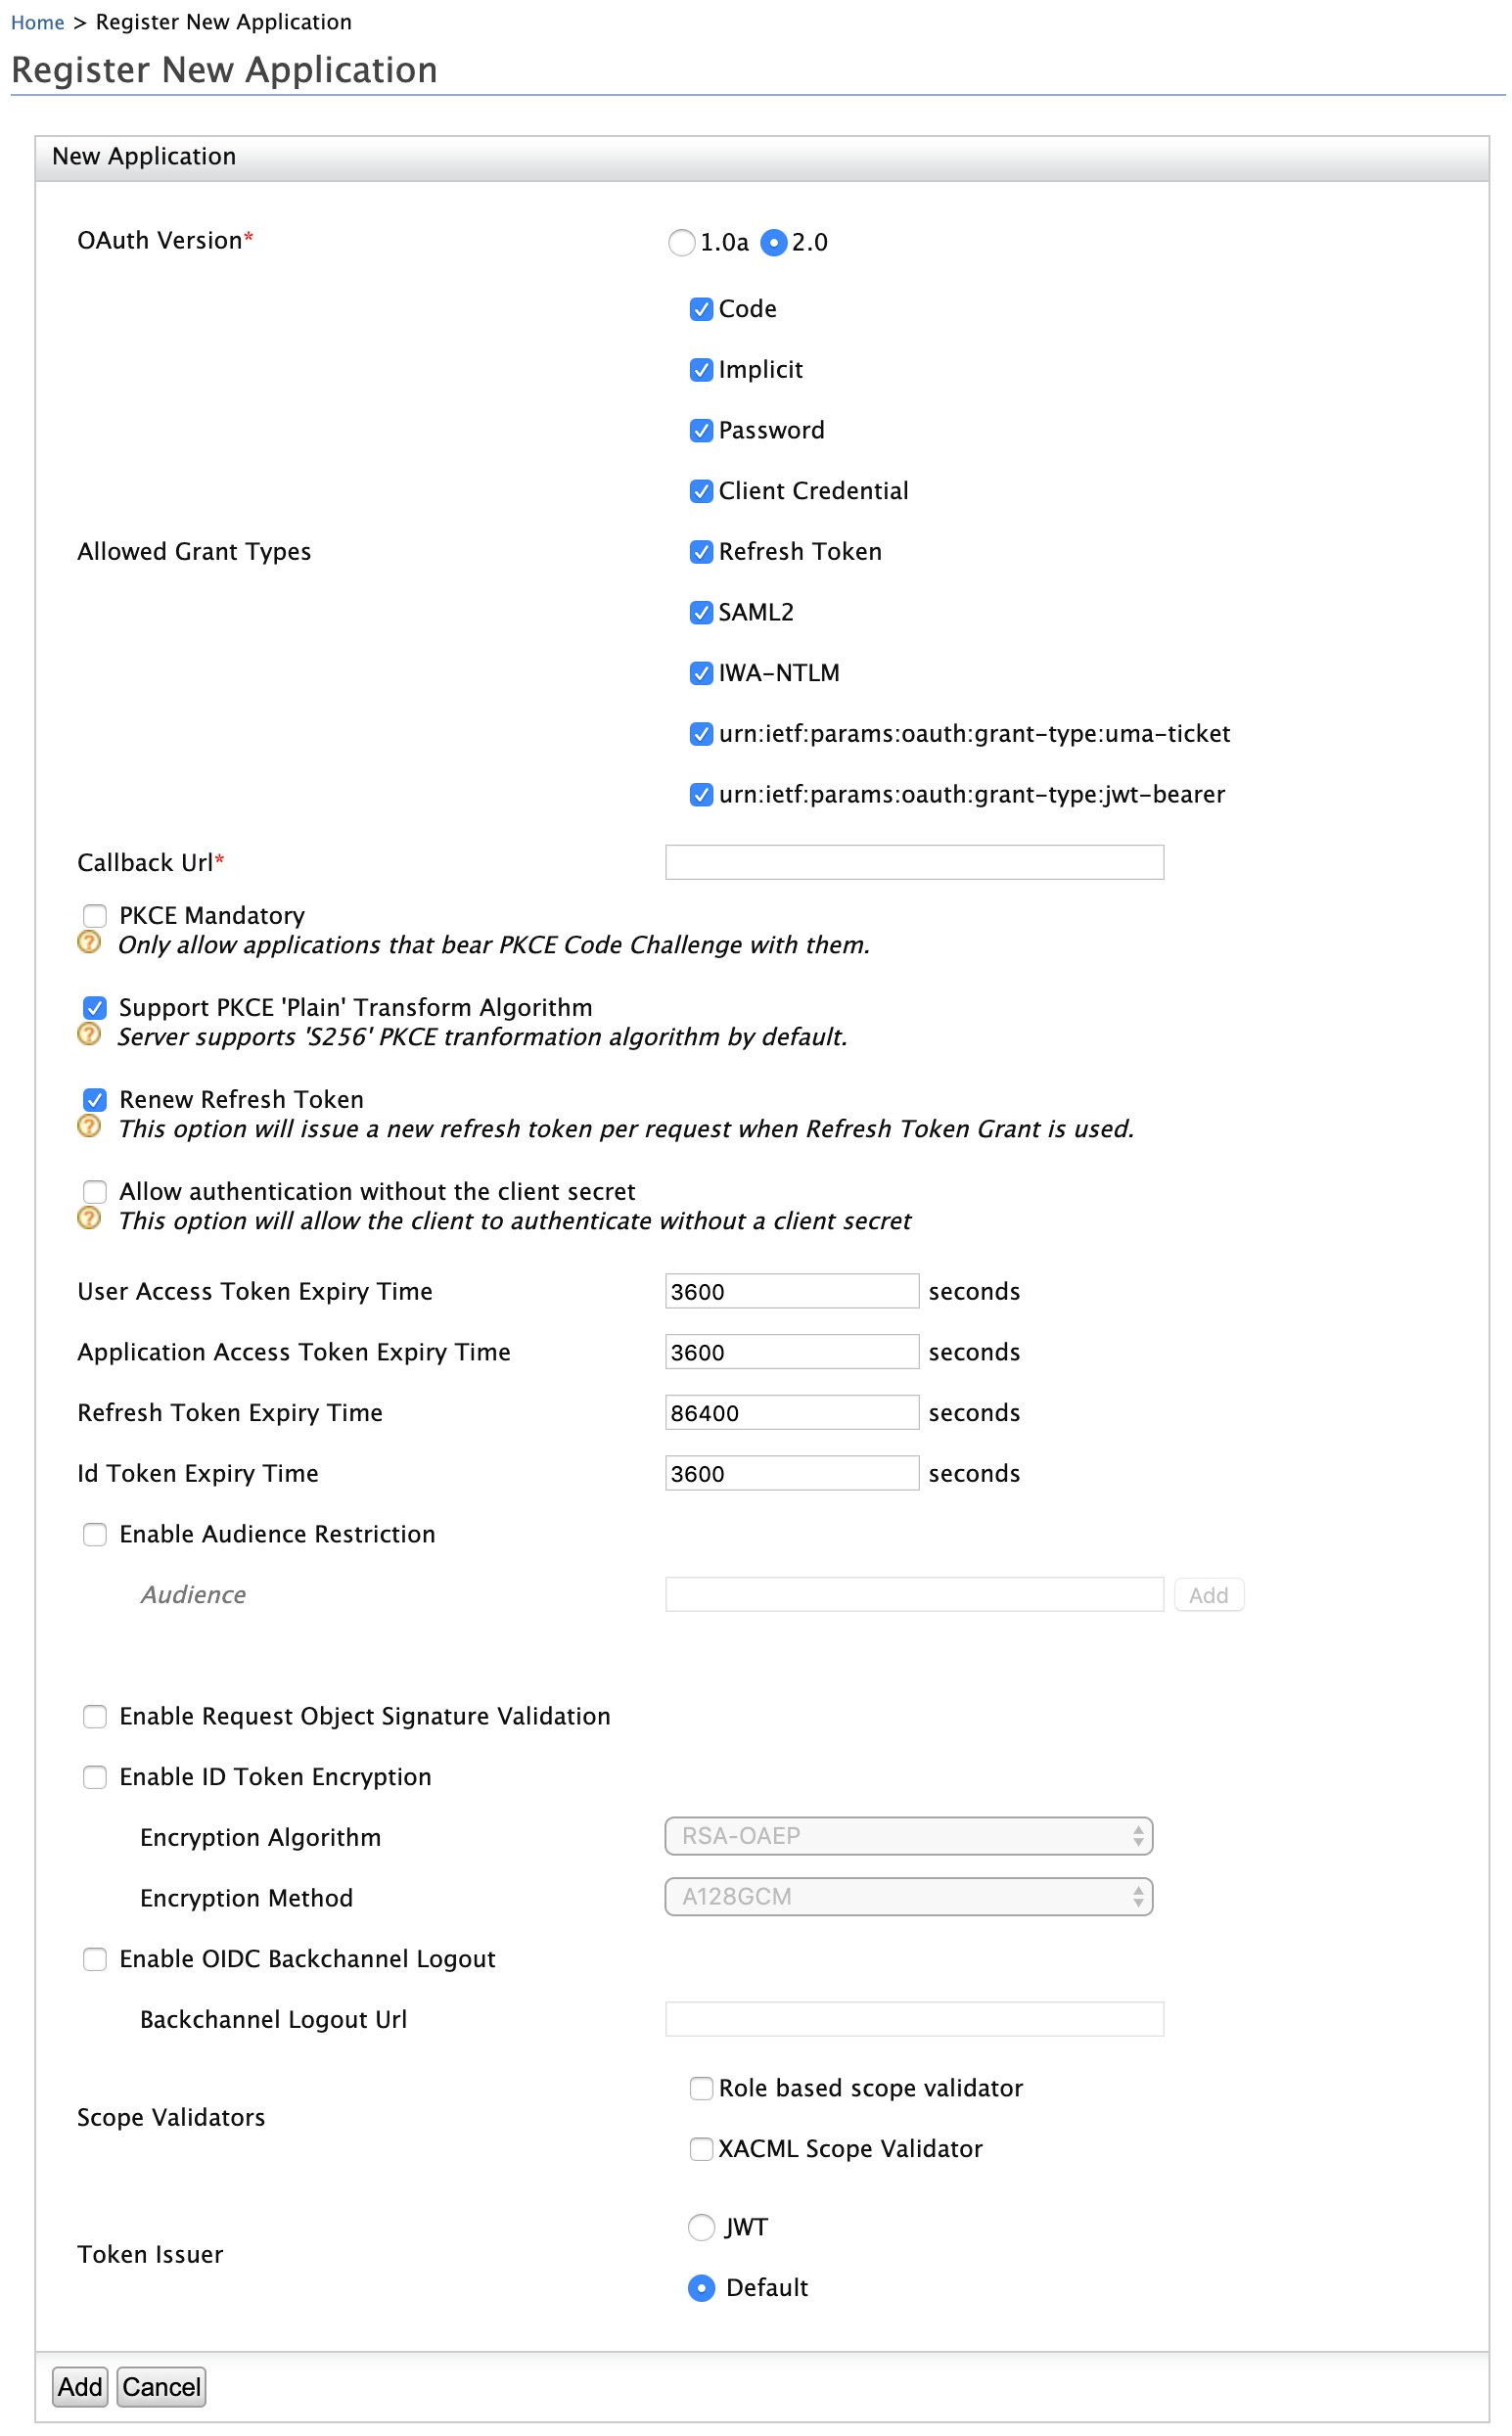
Field Description Sample Value Callaback URL This is the service provider's URL to which the access token will be sent. http://localhost:8080/playground2/oauth2clientEnable Audience Restriction This is to define whether the token will be sent to specific entities or not.
If this is not selected, theclient keyof the service provider will be sent in theAudelement of the JWT.Selected Audience This is to define audiences for this service provider to which the token will be intended to.
Tip
To define audiences for all the service providers that are registered in WSO2 Identity Server globally:
- Open the
deployment.tomlfile in the<IS_HOME>/repository/conf/directory. - Add the audiences using the following configuration.
toml [oauth.oidc.id_token] audiences=[] - Restart WSO2 Identity Server and sign in to the Management Console.
https://localhost:9443/oauth2/tokenNote that the
client keyandclient secretare generated.
Note
While configuring the JWT bearer grant type, the iat validating time period can also be configured in the
deployment.tomlfile in the<IS_HOME>/repository/confas shown below. The default value is 30 minutes.toml [oauth.grant_type.jwt] enable_iat_validation="true" iat_validity_period=30 - Open the
Try out
-
Generate a request object (JWT) using the following.
- iss: This is the
client keythat was generated under step 3.d under Configurations above. - sub: This is the
client keythat was generated under step 3.d under Configurations above. - aud:
https://localhost:9443/oauth2/token - iat: This is the epoch of the token issuance time, e.g.,
1575024942. - jit: This is the epoch of the token expiry time, e.g.,
1575107914.
```json tab="Example" { "alg": "RS256", "type": "JWT" }
{ "iss": "NCkZofT51NVKK2UuQSvxPJhQOWwa", "sub": "NCkZofT51NVKK2UuQSvxPJhQOWwa", "aud": "https://localhost:9443/oauth2/token" "iat": "1575024942", "jit": "1575107914" }
{
} ``` - iss: This is the
-
To retrieve the
access tokenandrefresh token, execute the following command in a command prompt.- CLIENT_KEY: This is the client key that was generated under step 3.d under Configurations above.
- ClIENT_SECRET: This is the client secret that was generated under step 3.d under Configurations above.
- JWT: This is the signed base64 encoded JWT. This must contain a single JWT.
Tip
If you have configured the service provider and identity provider in a tenant, add the tenant domain as a query parameter to the access token endpoint, e.g., if the tenant domain is
wso2.com, the access token endpoint should behttps://localhost:9443/oauth2/token?tenantDomain=wso2.com.curl tab="Request Format" curl -i -X POST -u <CLIENT_ID>:<Client_SECRET> -k -d 'grant_type=urn:ietf:params:oauth:grant-type:jwt-bearer&assertion=<JWT>' -H 'Content-Type: application/x-www-form-urlencoded' https://localhost:9443/oauth2/tokencURL tab="Sample Request" curl -i -X POST -H 'Content-Type: application/x-www-form-urlencoded' -u bBhEoE2wIpU1zB8HA3GfvZz8xxAa:RKgXUC3pTRQg9xPpNwyuTPGtnSQa -k -d 'grant_type=urn:ietf:params:oauth:grant-type:jwt-bearer&assertion=eyJhbGciOiJSUzI1NiJ9.eyJleHAiOjE0NTgxNjY5ODUsInN1YiI6ImFkbWluIiwibmJmIjoxNDU4MTA2OTg1LCJhdWQiOlsiaHR0cHM6XC9cL2xvY2FsaG9zdDo5NDQzXC9vYXV0aDJcL3Rva2VuIiwid3NvMi1JUyJdLCJpc3MiOiJqd3RJRFAiLCJqdGkiOiJUb2tlbjU2NzU2IiwiaWF0IjoxNDU4MTA2OTg1fQ.ZcxdoTVEsWoil80ne42QzmsfelMWyjRZJEjUK1c2vMZJjjtrZnsWExyCA5tN6iXYFAXC_7rkFuuNSgOlBi51MNLPZw3WcgGI52j6apGEW92V2tib9zRRWOeLQLAdo8ae8KzLp7kuKZ2XunfQ2WYU9TvvLDm_vp5ruuYz3ZZrJOc' https://localhost:9443/oauth2/tokenNote that a refresh token and access token get generated.
cURL tab="Sample Response"
{"token_type":"Bearer","expires_in":3600,"refresh_token":"b1b4b78e2b0ef4956acb90f2e38a8833","access_token":"615ebcc943be052cf6dc27c6ec578816"}