Handling Custom Claims with the JWT Bearer Grant Type
WSO2 Identity Server (WSO2 IS) allows you to handle custom claims in a self contained access token with the JWT bearer grant type.
Tip
Following are a few important points to keep in mind when you want to use WSO2 Identity Server to handle custom claims in a self contained access token with the JWT bearer grant type:
- Both
enable_oidc_dialectandenable_unmapped_user_attributesare elements that are configured under the[oauth.oidc.claims]group in thedeployment.tomlfile, and are considered to befalseby default. - When the
enable_oidc_dialectelement is set tofalsein thedeployment.tomlfile or is not configured in thedeployment.tomlfile at all, this means that all custom claims coming with a JWT assertion are copied to the self contained access token. - When the
enable_oidc_dialectelement is set totruein thedeployment.tomlfile, claims are handled in the default OIDC flow. This means that claims are converted to OIDC dialect depending on service provider and Identity provider level claim mappings, and also based on claims configured in OIDC Scopes. Only the claims that are specified in theopenidscope are copied to the self contained access token.
-
If you want to copy the attributes that do not have a mapping, you need to add the
enable_unmapped_user_attributeselement as follows under the[oauth.oidc.claims]group in thedeployment.tomlfile:[oauth.oidc.claims] enable_oidc_dialect= true enable_unmapped_user_attributes= true
Let's take a look at how you can use WSO2 Identity Server to handle custom claims in a self contained access token with the JWT bearer grant type depending on the server level configurations at the time of calling the token endpoint with the JWT bearer grant type. For this, let's use two instances of WSO2 Identity Server, where one instance acts as a federated identity provider, and the other acts as the service provider. Let’s call the WSO2 Identity Server instance that acts as the identity provider as IS-IP, and the other instance as IS-SP.
Before you begin
Follow the steps below to set up the two WSO2 Identity Server instances:
- Download and install two Identity Server instances.
-
Add the following configuration to the
<IS-IP_HOME>/repository/conf/deployment.tomlfile and set the value to 1. This is done to increment the port value of IS-IP so that there is no port conflict with IS-SP.[server] offset = "1"
Now that you have set up the Identity Server instances, you can proceed with the configuration steps.
Configuring IS-IP and IS-SP
-
Follow the steps below to configure IS-IP to generate a JWT token by using the password grant type and passing the scope as openid.
-
Open the
<IS-IP_HOME>/repository/conf/deployment.tomlfile and add the following entry.[oauth.token_generation] access_token_type= "self_contained" -
Restart IS-IP.
- Configure an OAuth service provider.
-
Initiate an access token request to IS-IP over a known grant type. The following cURL command illustrates the syntax of an access token request that can be initiated using the Resource Owner Password Credential grant type, and specifying the scope as openid. For more information, see Configuring WSO2 Identity Server to issue self-contained access tokens .
- Navigate to your service provider, expand Inbound Authentication Configurations, and then expand OAuth/OpenID Connect Configuration .
- Copy the OAuth Client Key as the value for
<CLIENT_ID>. - Copy the OAuth Client Secret as the value for
<CLIENT_SECRET>.
- Copy the OAuth Client Key as the value for
- Enter the user name and password of the user you want to get the token as the value for
<USERNAME>and<PASSWORD>respectively. - By default,
<IS_HOST>islocalhost.However, if you are using a public IP, the respective IP address or domain needs to be specified. - By default,
<IS_HTTPS_PORT>has been set to 9443. However, in this scenario since the port offset for IS-IP is incremented by1, the default port value needs to be incremented by1.
Let's assume that the request sent is as follows:
curl -u q4h7UhUyt0wC8A2Awu_kfmxEpr0a:vlTwUeCAyYPRzkeayJpmdW0xfxAa -k -d "grant_type=password&username=megala&password=megala" -H "Content-Type:application/x-www-form-urlencoded" https://localhost:9444/oauth2/token?scope=openidThen the self contained JWT access token that returns in response to the request would be as follows:
eyJ4NXQiOiJOVEF4Wm1NeE5ETXlaRGczTVRVMVpHTTBNekV6T0RKaFpXSTRORE5sWkRVMU9HRmtOakZpTVEiLCJraWQiOiJOVEF4Wm1NeE5ETXlaRGczTVRVMVpHTTBNekV6T0RKaFpXSTRORE5sWkRVMU9HRmtOakZpTVEiLCJhbGciOiJSUzI1NiJ9.eyJjb3VudHJ5IjoiU3JpIExhbmthIiwic3ViIjoibWVnYWxhQGNhcmJvbi5zdXBlciIsImF1ZCI6WyJxNGg3VWhVeXQwd0M4QTJBd3Vfa2ZteEVwcjBhIl0sImF6cCI6InE0aDdVaFV5dDB3QzhBMkF3dV9rZm14RXByMGEiLCJzY29wZSI6Im9wZW5pZCIsImlzcyI6Imh0dHBzOlwvXC9sb2NhbGhvc3Q6OTQ0NFwvb2F1dGgyXC90b2tlbiIsImV4cCI6MTUyODA5ODE1OCwiaWF0IjoxNTI4MDk0NTU4LCJlbWFpbCI6Im1lZ2FsYUB3c28yLmNvbSIsImp0aSI6IjIyMjMyNDZhLWI5MmUtNDMwNC1iYmY1LTE3MzExNTU3Y2FmNSJ9.c-WKt87FL24WAy24E2mp2uusPJAR2aDZDujqKkVlM5yDjUQ9hYvDX96KTo4ew1j9LGIb8cN9npX5NK-DtLeNHNuR1ypKhcyQ9Gwsqp42wEswH_IMHVRxERv5X0giz8rH-z7LGo2IGmGjLjhfGXP9C-_1r00krtkCTZpWPmUTW1BneFEEVF-WLaNmjC28CUdTcVealZOD9ByA44WTiA-nUmAp2j1zWb7K-rDm0cMaJ_ucYsnObmDovKyT-7y02zutBNm5plfn2cQbsLo0cAzWmTtdpX5gXmqtJHANRXwM8LriVJMTG7nDU5zDcU4GRYz5aWPQn3RgTA4donzpPvPYQwWhen you use a JWT decoder to decode the access token, you can see the following payload:
{
  "country": "Sri Lanka",
  "sub": "[email protected]",
  "aud": [
    "q4h7UhUyt0wC8A2Awu_kfmxEpr0a"
  ],
  "azp": "q4h7UhUyt0wC8A2Awu_kfmxEpr0a",
  "scope": "openid",
  "iss": "https://localhost:9444/oauth2/token",
  "exp": 1528098158,
  "iat": 1528094558,
  "email": "[email protected]",
  "jti": "2223246a-b92e-4304-bbf5-17311557caf5"
}
Here, the
countryandemailare custom claims related to the user. - Navigate to your service provider, expand Inbound Authentication Configurations, and then expand OAuth/OpenID Connect Configuration .
-
-
Follow the steps below to configure IS-IP as the identity provider in IS-SP.
- Sign in to the management console of IS-SP. For detailed instructions on starting the management console, see Getting Started with the Management Console.
- On the Main tab, go to Identity -> Identity Providers, and click Add.
- Provide appropriate values to configure IS-IP as the identity provider. For detailed instructions on how to add a new identity provider, see Adding and Configuring an Identity Provider.
- Click Register.
Now that you have configured IS-IP and IS-SP, let's take a look at how WSO2 Identity Server handles custom claims with the JWT bearer grant type depending on the server level configurations at the time of calling the token endpoint with the JWT bearer grant type.
Calling the token endpoint with JWT bearer grant type
Scenario 1
First, let's take a look at how WSO2 Identity Server handles custom
claims with the JWT bearer grant type when the
enable_oidc_dialect element is set to
false in the deployment.toml file.
-
Send the following sample request to call the token endpoint:
curl -i -X POST -u EcvBCz8CDWFdALzavlakTTKkSPUa:LpElcqthcTOqilN1K_zAHf48fL4a -k -d 'grant_type=urn:ietf:params:oauth:grant-type:jwt-bearer&assertion=<jwt_assertion>' -H 'Content-Type: application/x-www-form-urlencoded' https://localhost:9443/oauth2/token?scope=openidYou will see the following payload when you use a JWT decoder and decode the JWT token:
{
  "country": "Sri Lanka",
  "sub": "[email protected]",
  "aud": [
    "EcvBCz8CDWFdALzavlakTTKkSPUa"
  ],
  "azp": "EcvBCz8CDWFdALzavlakTTKkSPUa",
  "scope": "openid",
  "iss": "https://localhost:9443/oauth2/token",
  "exp": 1528098158,
  "iat": 1528096102,
  "email": "[email protected]",
  "jti": "243702fe-8087-49c2-a439-f6dc7258021a"
}
You will see that the
countryandemailare directly copied to the generated JWT token.
Here, the country and email are
directly copied to the generated JWT token because the
enable_oidc_dialect element is set to
false, which results in all custom claims coming
from incoming JWT assertions being directly copied to the generated JWT
token.
Scenario 2
Now, let's take a look at how WSO2 Identity Server handles custom claims
with the JWT bearer grant type when the
enable_oidc_dialect= true element is set to
true and the
enable_unmapped_user_attributes element is set to
false in the deployment.toml file.
-
Sub-scenario 1 : In this scenario, if we consider a sub-scenario assuming that identity provider claim mappings and service provider requested claims are empty. You will see the following payload when you use a JWT decoder and decode the JWT token:
{
  "country": "Sri Lanka",
  "sub": "[email protected]",
  "aud": [
    "q4h7UhUyt0wC8A2Awu_kfmxEpr0a"
  ],
  "azp": "q4h7UhUyt0wC8A2Awu_kfmxEpr0a",
  "scope": "openid",
  "iss": "https://localhost:9444/oauth2/token",
  "exp": 1528100688,
  "iat": 1528097088,
  "email": "[email protected]",
  "jti": "d90bb7f4-25ce-466c-8ea8-8eb6f6624992"
}
You will see that this is similar to scenario 1. This means that when there are missing claim mappings in the identity provider level and service provider level, all custom claims are directly copied to the generated JWT token.
-
Sub-scenario 2 : If we consider a sub-scenario assuming that an identity provider claim mapping exists, whereas a service provider requested claim mapping does not exist. Then you will see the following payload when you use a JWT decoder and decode the JWT token:
{
  "sub": "[email protected]",
  "aud": [
    "EcvBCz8CDWFdALzavlakTTKkSPUa"
  ],
  "azp": "EcvBCz8CDWFdALzavlakTTKkSPUa",
  "scope": "openid",
  "iss": "https://localhost:9443/oauth2/token",
  "exp": 1528100688,
  "iat": 1528097449,
  "jti": "528dd371-df53-46a5-8276-62271eae53d4"
}
This scenario is considered as a user configuration error from WSO2 Identity Server point of view. In such a scenario, none of the custom claims are passed with the self contained access token.
-
Sub-scenario 3 : If we consider a sub-scenario assuming that identity provider claim mappings and service provider requested claim mappings exist. For example, assume you do the following in your local set up:
-
- Map the
http://wso2.org/claims/countrylocal claim tocustomclaimin the OIDC dialect.
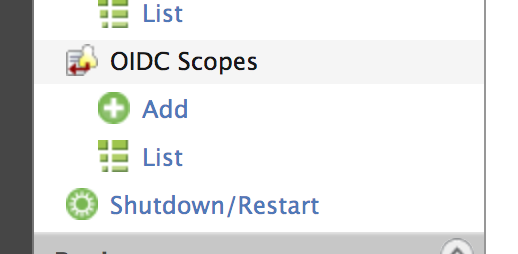
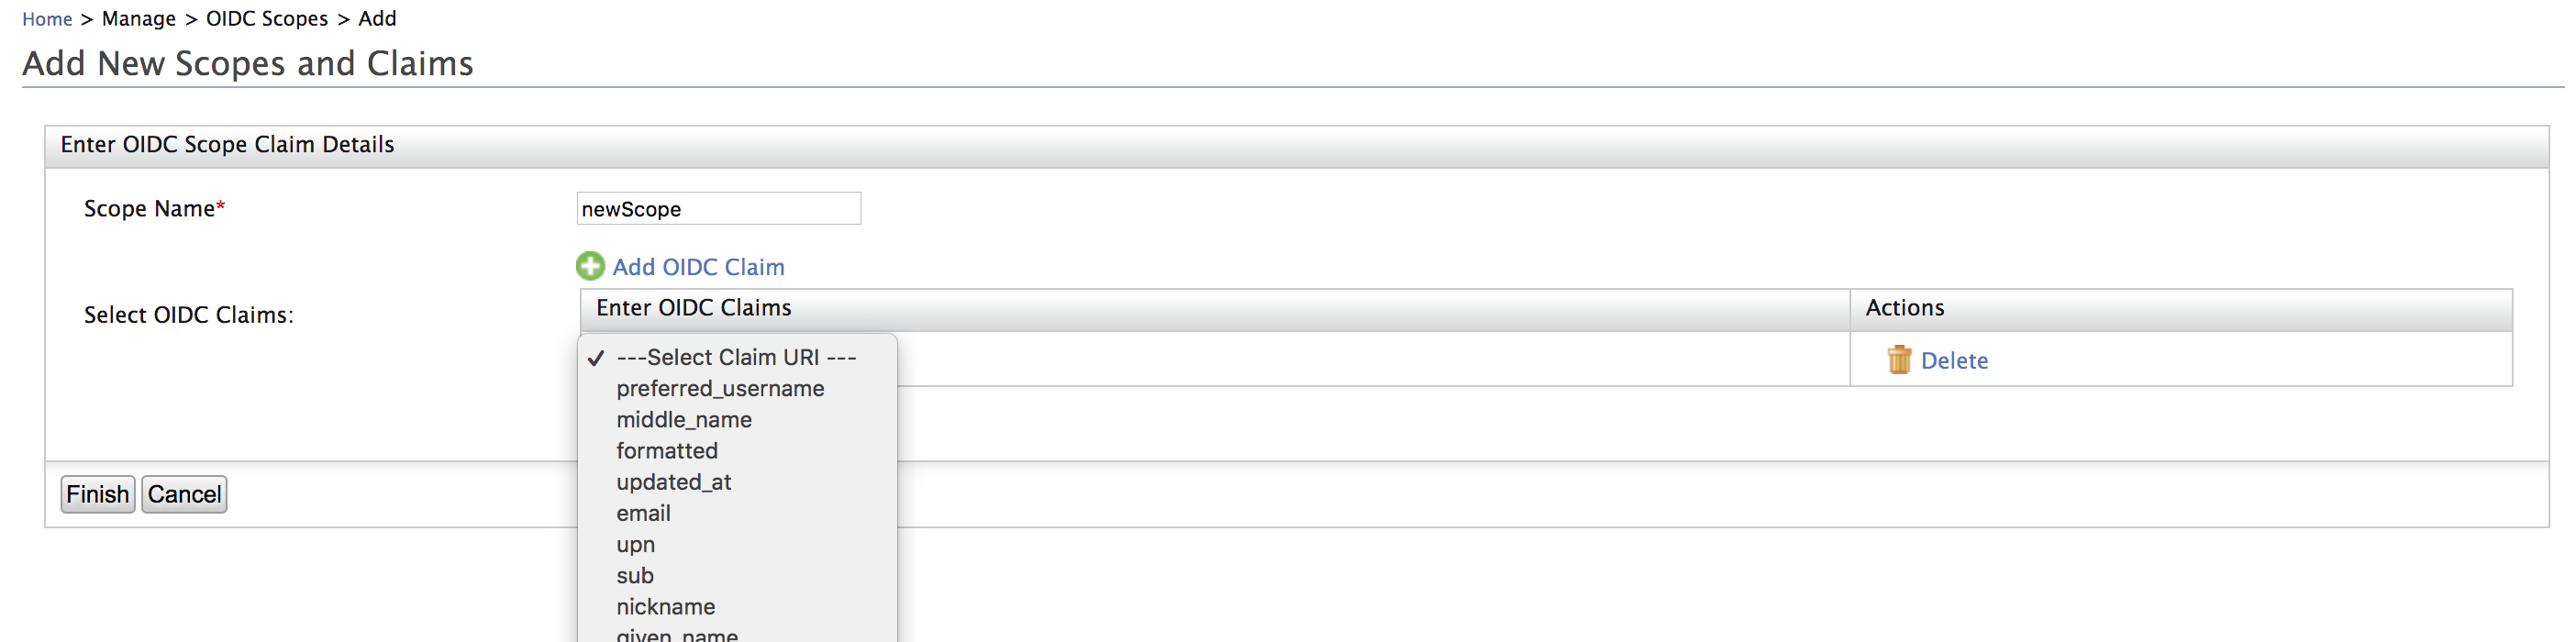
- Add the
customclaimto the openid scope.
- Add the following identity provider mapping.
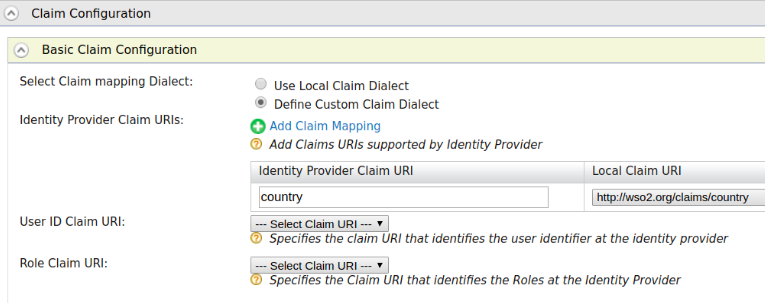
- Add following service provider requested claim.
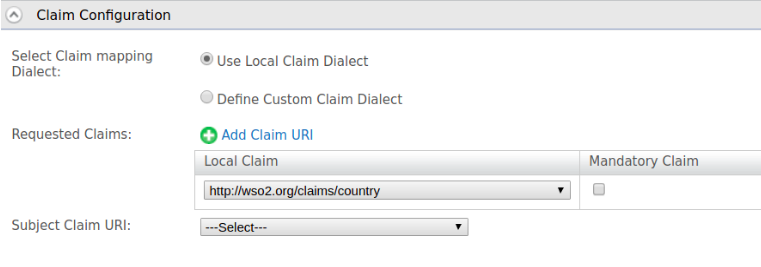
- Map the
Then you will see the following payload when you use a JWT decoder and decode the JWT token:
{
  "sub": "[email protected]",
  "aud": [
    "EcvBCz8CDWFdALzavlakTTKkSPUa"
  ],
  "azp": "EcvBCz8CDWFdALzavlakTTKkSPUa",
  "scope": "openid",
  "iss": "https://localhost:9443/oauth2/token",
  "customclaim": "Sri Lanka",
  "exp": 1528100688,
  "iat": 1528098298,
  "jti": "2e355311-f96d-4028-ae8a-edec5bfdf7a8"
}
Here, you can see that customclaim is added to the
generated token. This is added based on the claim mapping in the
identity provider and service provider level, and the OIDC claim mapping
configuration. Since the email does not have any
claim mapping in the identity provider level, it is not added to the
generated token.
In this scenario, all incoming claims go through the mapping process and are filtered according to the scope.Then the relevant claims are sent back with the self contained token.
Scenario 3
Let's take a look at how WSO2 Identity Server handles custom claims with
the JWT bearer grant type when both
enable_oidc_dialect and
enable_unmapped_user_attributes elements are set to
true in the deployment.toml file.
You will see the following payload when you use a JWT decoder and decode the JWT token:
{
  "sub": "[email protected]",
  "aud": [
    "EcvBCz8CDWFdALzavlakTTKkSPUa"
  ],
  "azp": "EcvBCz8CDWFdALzavlakTTKkSPUa",
  "scope": "openid",
  "iss": "https://localhost:9443/oauth2/token",
  "customclaim": "Sri Lanka",
  "exp": 1528102874,
  "iat": 1528099309,
  "email": "[email protected]",
  "jti": "031902cd-a624-4d11-ba70-335bc9edbcb2"
}
You will see that the incoming JWT contains the
country as a customclaim and that
email is directly copied.
Here, country is converted to
customclaim because it has claim mappings.
email does not have any claim mapping, hence it is
directly copied to the generated token .