Adding and Configuring an Identity Provider
Introduction
An Identity Provider (IdP) is responsible for authenticating users and issuing identification information by using security tokens like SAML 2.0, OpenID Connect, OAuth 2.0 and WS-Trust. This is a favourable alternative to explicitly authenticating a user within a security realm.
The responsibility of the identity provider configuration is to represent external identity providers. These external identity providers can be Facebook, Yahoo, Google, Salesforce, Microsoft login, etc. If you want to authenticate users against these identity providers, then you must associate one or more federated authenticators with the WSO2 Identity Server. These identity providers support for different authentication protocols. For example, if you want to authenticate users against Salesforce, then you must associate the SAML 2.0 authenticator with the Salesforce identity provider, if you want to authenticate users against Yahoo, then you must associate the OpenID Connect authenticator with it. To make this process much easier, the WSO2 Identity Server also comes with a set of more specific federated authenticators. For example, if you want to authenticate against Facebook, you do not need to configure OAuth 2.0 authenticator. Instead, you can directly use the Facebook federated authenticator.
Each identity provider configuration can also maintain a claim mapping. This is to map the identity provider's own set of claims to WSO2 Identity Server's claims. When the response from an external identity provider is received by the response processor component of the federated authenticator, before it hands over the control to the authentication framework, the response processor will create a name/value pair of user claims received in the response from the identity provider. These claims are specific to the external identity provider. Then it is the responsibility of the authentication framework to read the claim mapping configuration from the identity provider component and do the conversion. So, while inside the framework, all the user claim values will be in a common format.
So, in short, WSO2 Identity Server allows you to add identity providers and specify various details that help you to link the identity provider to WSO2 Identity Server. Therefore, you must specify all information required to send the authentication requests and get a response back from the identity provider. This topic contains the following sections.
Adding an identity provider
Follow the instructions below to add a new identity provider.
- Access the WSO2 Identity Server Management Console and sign in as an admin user.
-
On the Main tab, click Identity > Identity Providers > Add .
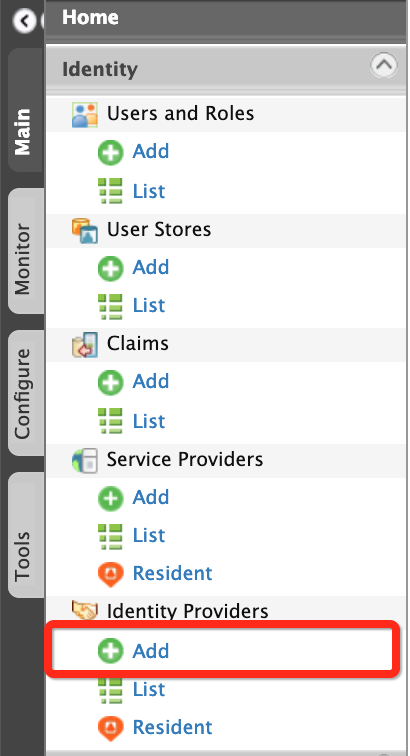
-
Fill in the details in the Basic Information section.
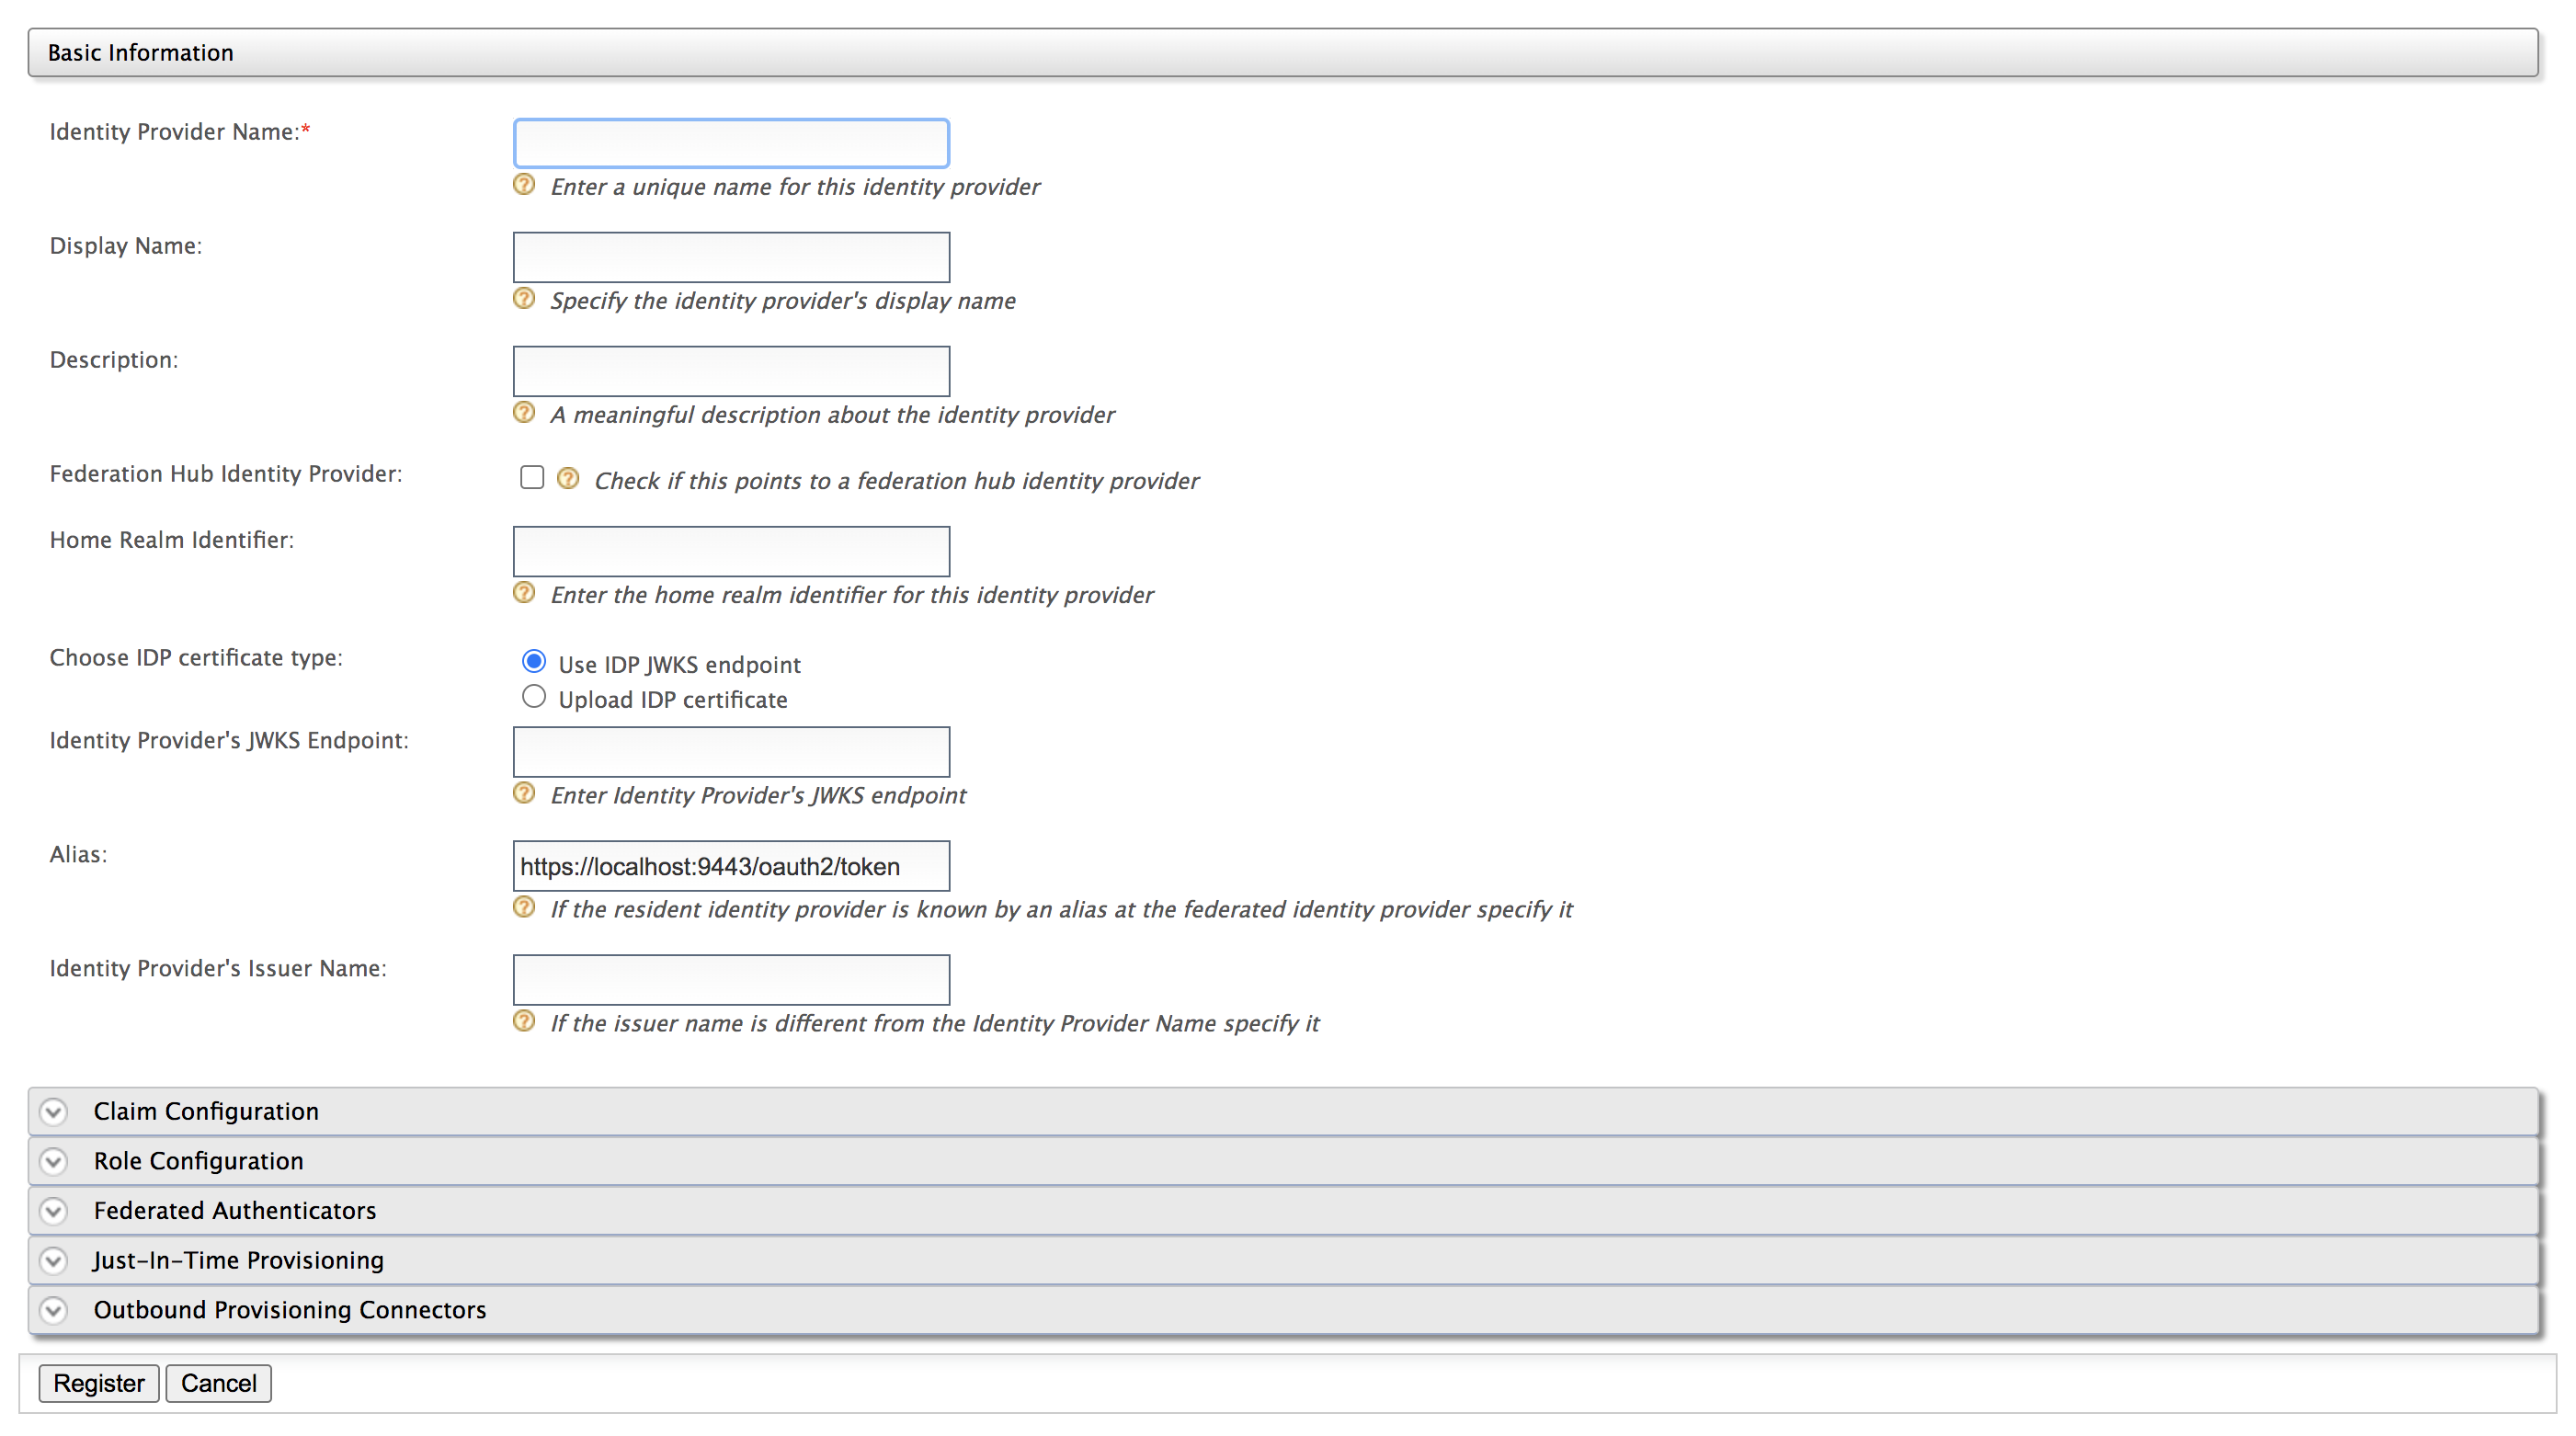
Note the following when filling the above form.Field Description Sample Value Identity Provider Name The Identity Provider Name must be unique as it is used as the primary identifier of the identity provider.
FacebookIdPDisplay Name The Display Name is used to identify the identity provider. If this is left blank, the Identity Provider Name is used. This is used in the login page when selecting the identity provider that you want to use to log in to the service provider.
FacebookDescription The Description is added in the list of identity providers to provide more information on what the identity provider is. This is particularly useful in situations where there are many identity providers configured and a description is required to differentiate and identify them. This is the identity provider configuration for Facebook.Federation Hub Identity Provider Select the Federation Hub Identity Provider check-box to indicate if this points to an identity provider that acts as a federation hub. A federation hub is an identity provider that has multiple identity providers configured to it and can redirect users to the correct identity provider depending on their Home Realm identifier or their Identity Provider Name. When we have this check-box selected additional window will pop-up in the multi-option page in the first identity server to get the home realm identifier for the desired identity provider in the identity provider hub.
Selected Home Realm Identifier The Home Realm Identifier value can be specified in each federated IDP and can send the Home Realm Identifier value as the “fidp” query parameter (e.g., fidp=googleIdp) in the authentication request by the service provider. Then WSO2 Identity Server finds the IDP related to the “fidp” value and redirects the end user to the IDP directly rather than showing the SSO login page. By using this, you can avoid multi-option, in a multi-option scenario without redirecting to the multi-option page.
FBIdentity Provider Public Certificate
The Identity Provider Public Certificate is the public certificate of the identity provider. Uploading this is necessary to authenticate responses from the identity provider.
If necessary, you can upload multiple certificates for an identity provider. This is useful in scenarios where one certificate is expired, but the second can be used for certificate validation.For example, consider a scenario where a third party IDP needs to change its certificate in one week, but cannot specify the exact time that the certificate would change. In such a scenario, it is useful to be able to upload a secondary certificate to the IDP so that during SAML assertion validation if certificate validation fails with the first certificate, the second certificate can be used for certificate validation.
Note
To create the identity provider certificate, navigate to the
<IS_HOME>/repository/resources/security/directory in a command prompt and execute the following command:Note that the
wso2.crtfile is generated. This file is located in the<IS_HOME>/repository/resources/security/directory.Click Choose File and navigate to this location to obtain and the file so that you can upload the file.
See Using Asymmetric Encryption in the WSO2 Product Administration Guide for more information.Tip
If you are adding an identity provider using a configuration file, and you want to specify multiple certificates for the identity provider, use the following sample configuration:
<Certificate>
        -----BEGIN CERTIFICATE-----
        MIIDUTCCAjmgAwIBAgIEXvHuADANBgkqhkiG9w0BAQsFADBZMQswCQYDVQQGEwJMSzELMAkGA1UE
        CBMCV1MxCzAJBgNVBAcTAlNMMQ0wCwYDVQQKEwRIb21lMQ0wCwYDVQQLEwRIb21lMRIwEAYDVQQD
        -----END CERTIFICATE-----
        -----BEGIN CERTIFICATE-----
        MIIDUTCCAjmgAwIBAgIEXvHuADANBgkqhkiG9w0BAQsFADBZMQswCQYDVQQGEwJMSzELMAkGA1UE
        CBMCV1MxCzAJBgNVBAcTAlNMMQ0wCwYDVQQKEwRIb21lMQ0wCwYDVQQLEwRIb21lMRIwEAYDVQQD
        -----END CERTIFICATE-----
        -----BEGIN CERTIFICATE-----
        MIIDUTCCAjmgAwIBAgIEHMcPtzANBgkqhkiG9w0BAQsFADBZMQswCQYDVQQGEwJM
        SzELMAkGA1UECBMCV1MxCzAJBgNVBAcTAlNMMQ0wCwYDVQQKEwRIb21lMQ0wCwYD
        -----END CERTIFICATE-----
        </Certificate>
See Using Asymmetric Encryption in the WSO2 Product Administration Guide for information on how public keys work, and how to get the keys signed by a certification authority.
This can be any certificate. If the identity provider is another Identity Server, this can be a wso2.crt file.
Alias The Alias is a value that has an equivalent value specified in the identity provider that we are configuring. This is required for authentication in some scenarios.
http://localhost:9443/oauth2/tokenIdentity Provider's Issuer Name The Identity Provider's Issuer Name is a optional property that can be used to define the issuer name of the Identity Provider if it is different from the Identity Provider Name.
http://is.wso2.comClick here for more information on the federation hub and the home realm identifier
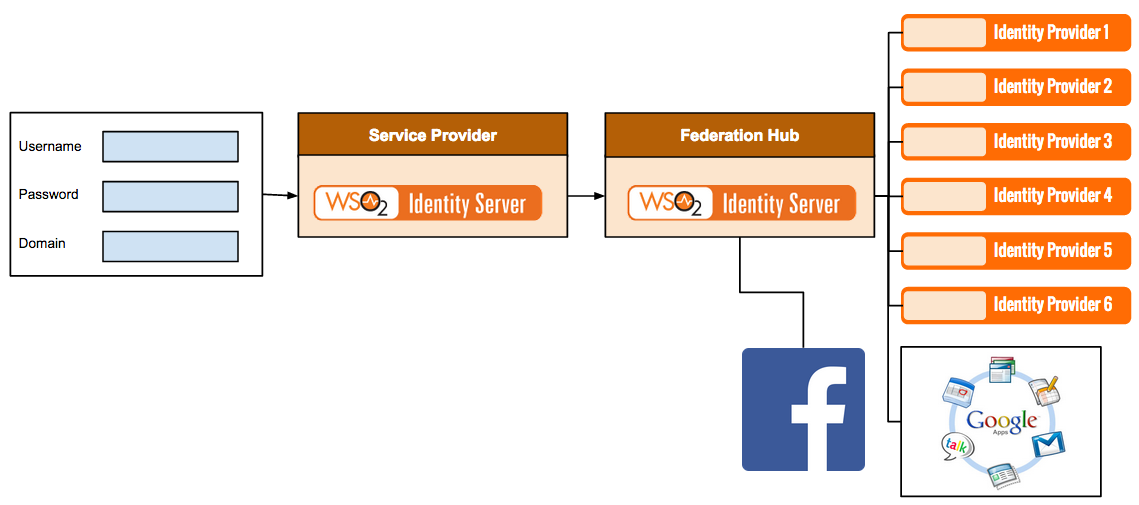
About the federation hub and the home realm identifier
The federation hub has multiple identity providers configured to it. In a typical federation hub with multiple identity providers, each identity provider can have a unique home realm identifier that can be used to identify the identity provider you are logging into.
So when a user tries to log in to a service provider following flow will happen,
- The Identity Server which this service provider is configured on will find the required federated authenticator from the service provider configuration
- If this Identity Provider configured as a federation hub, the user can specify the preferred identity provider in the federation hub using the multi-option page of the first Identity Server.
- This information will pass with the authentication request to the federation hub.
- When the request comes to the federation hub, it is sent to the identity provider that the user specifies from the first identity server. For instance, if the users prefer to use their Facebook credentials to log in, and Facebook is one of the identity providers configured in the federation hub, the user simply has to specify Facebook as the domain in the login screen of first Identity Server.
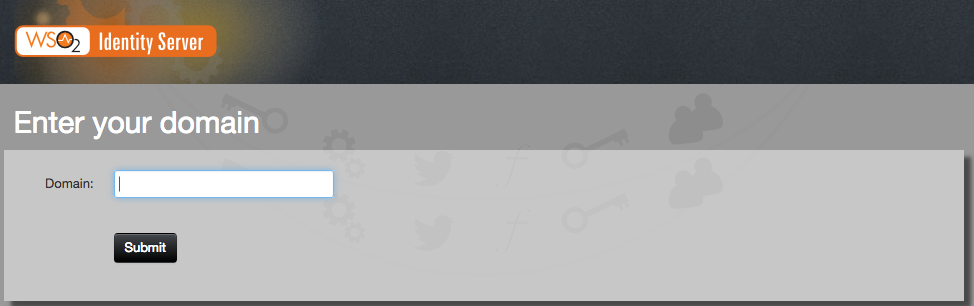
When the Home Realm Identifier is not specified, you can either select the domain name from a dropdown in the login page, or you have to enter the domain value in a separate page prior to logging in (as shown below).
The
proxy_modeconfiguration allows the framework to operate in eithersmartmode ordumbmode.In
smartmode, both local and federated authentication is supported, while indumbmode, only federated authentication is supported. Ifdumbmode is configured here, you must provide the Home Realm Identifier, or you have to display a separate screen to the user to get it.If smart mode is configured, the default behavior applies, where you can enter a local username and password, or use federated authenticators for authentication.
To configure the
proxy_mode, open thedeployment.tomlfile in the<IS_HOME>/repository/confdirectory and add the following configuration.[authentication] proxy_mode="smart"Click here for more information on the Alias
About the Alias
The Alias is used in the following authentication scenario.
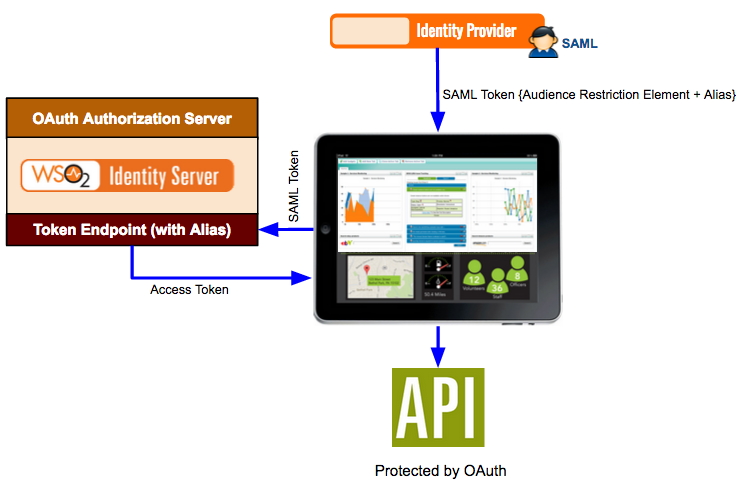
Here a SAML identity provider sends a SAML token to a web application for authentication. The SAML token has an audience restriction element that controls access and has a reference to the web application in order to access it. Using this token, the authentication takes place. Now, if the web application needs to access an API that is protected by OAuth 2.0, the same SAML token is sent to the token endpoint of the Identity Server. The Alias value you configure in the Identity Server is associated with this token endpoint. This alias value must be added to the audience restriction element of the SAML token. When this SAML token is sent to the Identity Server, you obtain an access token, which is used to access the API.
So in order to configure this, you must add the SAML identity provider as an identity provider in the Identity Server using the instructions in this topic. When configuring this in the Identity Server, you must specify the token alias for this scenario to work. This indicates that any token coming from the SAML identity provider must have this alias value in the audience restriction element.
-
Enter the Identity Provider Name and provide a brief Description of the identity provider. Only Identity Provider Name is a required field.
-
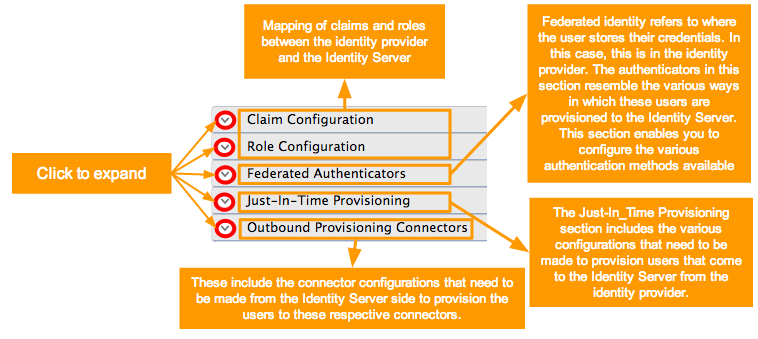
Fill in the remaining details where applicable. Click the arrow buttons to expand the forms available to update.
-
See here for details on how to configure claims.
-
See here for details on how to configure roles.
-
See here for details on how to configure federated authenticators.
-
See here for details on how to configure just-in-time provisioning.
-
See here for details on how to configure outbound provisioning connectors.
-
-
Click Register to add the Identity Provider.
Configuring a resident identity provider
Apart from mediating authentication requests between service providers and identity providers, WSO2 Identity Server can act as a service provider and an identity provider. When WSO2 Identity Server acts as an identity provider, it is called the resident identity provider.
Note
The resident identity provider configuration is helps service providers to send authentication or provisioning requests to WSO2 Identity Server via SAML, OpenID Connect, SCIM, or WS-Trust. For an example on how a resident identity provider is used to implement a security token service, see Configuring WS-Trust Security Token Service. The Resident identity provider configuration is a one-time configuration for a given tenant. It shows WSO2 Identity Server's metadata, e.g., endpoints. The resident identity provider configurations can be used to secure the WS-Trust endpoint with a security policy.
Follow the instructions below to configure a resident identity provider:
- Access the WSO2 Identity Server Management Console.
- Sign in as an admin user.
-
On the Main tab, click Identity > Identity Providers > Resident.
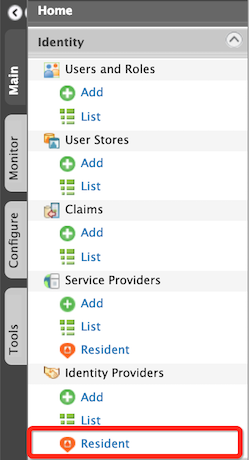
The Resident Identity Provider page appears.
-
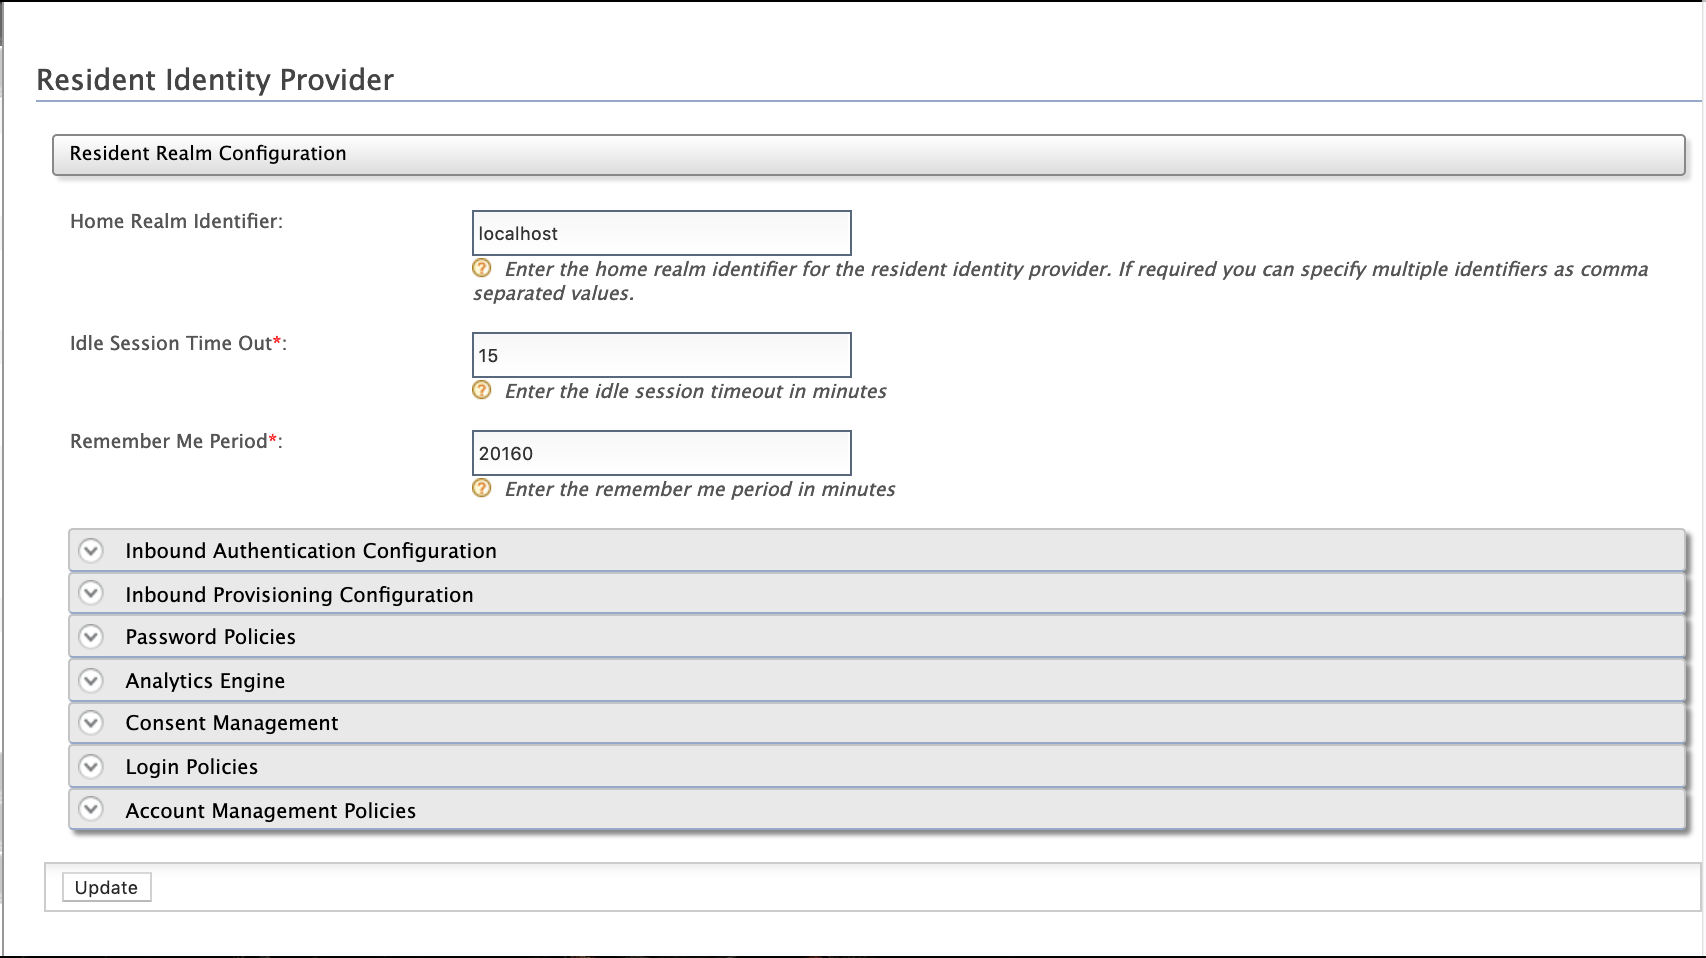
Enter the required values as given below.
Field Description Sample Value Home Realm Identifier This is the domain name of the identity provider. If you do not enter a value here, when an authentication request comes to WSO2 Identity Server, a user will be prompted to specify a domain. You can enter multiple identifiers as a comma-separated list. localhostIdle Session Time Out This is the duration in minutes for which an SSO session can be idle for. If WSO2 Identity Server does not receive any SSO authentication requests for the given duration, a session time out occurs. The default value is 15.15Remember Me Period This is the duration in weeks for which WSO2 Identity Server should remember an SSO session given that you have selected the Remember Me option in the WSO2 Identity Server login screen.
The default value is
2weeks.2 -
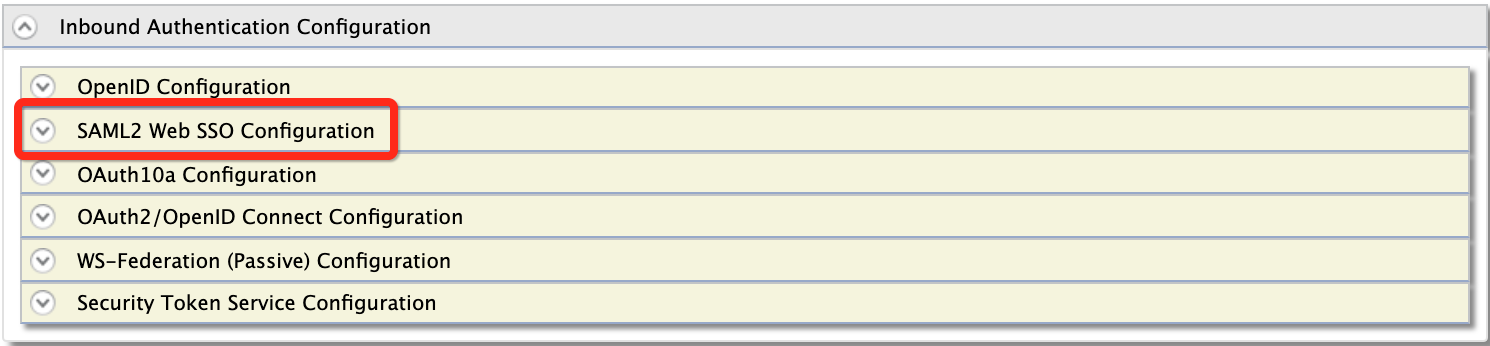
You may configure inbound authentication by expanding the Inbound Authentication Configuration section.
-
To configure SAML2 configurations:
- Click SAML2 Web SSO Configuration.
The SAML2 Web SSO Configuration form appears.
-
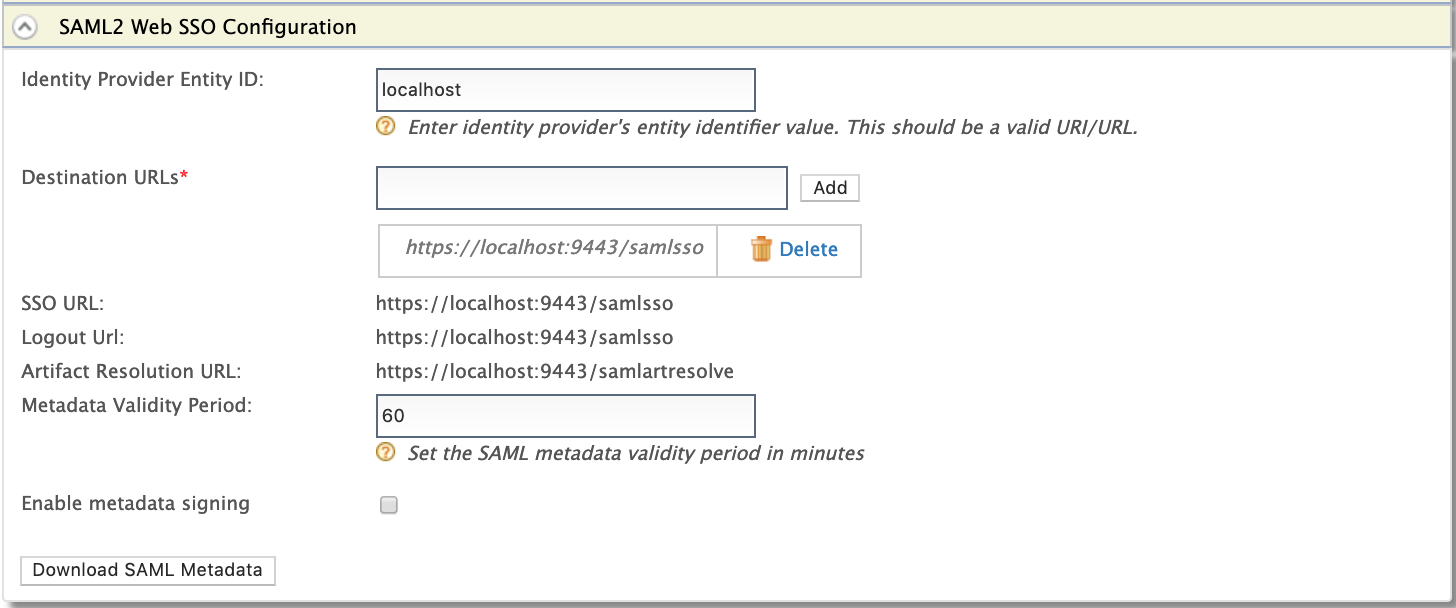
Enter the required values and learn the fixed values as given below.
Field Description Sample/Fixed Value Identity Provider Entity ID This is for tenant identification. The users who are provisioned through this tenant can be identified using this ID. localhostDestination URLs This defines the destination URL of the identity provider. This helps the service providers that connect to WSO2 Identity Server through a proxy server to locate WSO2 Identity Server. https://localhost:9443/samlssoSSO URL This is the SAML SSO endpoint of the identity provider. https://localhost:9443/samlssoLogout Url This is the identity provider's end point that accepts SAML logout requests. https://localhost:9443/samlssoArtifact Resolution URL This is the identity provider's endpoint that resolves SAML artifacts. https://localhost:9443/samlartresolveMetadata Validity Period This is the duration for which the metadata will be valid for. 60Enable metadata signing This facilitates to enable or disable metadata signing false
- Click SAML2 Web SSO Configuration.
-
To configure OAuth2 or OIDC, click OAuth2/OpenID Connect Configuration.

Field Description Sample/Fixed Value Identity Provider Entity ID This is for tenant identification. The users who are provisioned through this tenant can be identified using this ID. localhostAuthorization Endpoint URL This is the identity provider's OAuth2/OpenID Connect authorization endpoint URL. https://localhost:9443/oauth2/authorizeToken Endpoint URL This is the identity provider's token endpoint URL. https://localhost:9443/oauth2/tokenToken Revocation Endpoint URL This is the URL of the endpoint at which access tokens and refresh token are revoked. https://localhost:9443/oauth2/revokeToken Introspection Endpoint URL This is the URL of the endpoint at which OAuth tokens are validated. https://localhost:9443/oauth2/introspectUser Info Endpoint URL This the URL of the endpoint through which user information can be retrieved. The information is gathered by passing an access token. https://localhost:9443/oauth2/userinfoSession iFrame Endpoint URL This the URL of the endpoint that provides an iframe to synchronize the session states between the client and the identity provider. https://localhost:9443/oidc/checksessionLogout Endpoint URL This is the identity provider's endpoint that accepts SAML logout requests. https://localhost:9443/oidc/logoutWeb finger Endpoint URL This is the URL of the OpenID Connect token discovery endpoint at which WSO2 Identity Server's meta data are retrieved from. https://localhost:9443/.well-known/webfingerDiscovery Endpoint URL This is the URL of the endpoint that is used to discover the end user's OpenID provider and obtain the information required to interact with the OpenID provider, e.g., OAuth 2 endpoint locations. https://localhost:9443/oauth2/oidcdiscoveryDynamic Client Registration Endpoint URL This is the URL of the endpoint at which OpenID Connect dynamic client registration takes places. https://localhost:9443/api/identity/oauth2/dcr/v1.1/registerJWKS Endpoint URL This is the URL of the endpoint that returns WSO2 Identity Server's public key set in JSON Web Key Set (JWKS) format. https://localhost:9443/oauth2/jwks -
To secure the WS-Trust endpoint with a security policy, click Security Token Service Configuration section.

For more information on security token service (STS), see Configuring WS-Trust Security Token Service.
-
-
You may view the inbound provisioning configurations by clicking Inbound Provisioning Configuration section.

Field Description Sample Value SCIM User Endpoint This is the identity provider's endpoint for SCIM user operations, e.g., creating and managing users. https://localhost:9443/wso2/scim/UsersSCIM Group Endpoint This is the identity provider's endpoint for the SCIM user role operations, e.g., creating user roles, assigning user roles to users, and managing user roles. https://localhost:9443/wso2/scim/Groups -
Click Update.
Note
To modify the host name of the above-above mentioned URLs,
-
open the
deployment.tomlfile in the<IS_HOME>/repository/confdirectory and add the following configuration.[server] hostname = "localhost" -
Open the
deployment.tomlfile in the<IS_HOME>/repository/confand add the following configuration.[sts.endpoint] idp="https://localhost:9443/samlsso"To ensure the client application is communicating with the right identity provider, WSO2 Identity Server compares the destination value in the SAML request with the URL in the above configuration.
Exporting SAML2 metadata of the resident IdP
To configure WSO2 Identity Server as a trusted identity provider in a service provider application, export the SAML2 metadata of the resident identity provider of WSO2 IS and import the metadata to the relevant service provider.
Tip
Use one of the following approaches to do this.
- Start the server and download the SAML2 metadata by accessing this URL: https://localhost:9443/identity/metadata/saml2.
- Alternatively, access the management console and follow the steps given below to download the metadata.
- Expand the Inbound Authentication Configuration section and then expand SAML2 Web SSO Configuration.
- Click Download SAML2 metadata. A
metadata.xmlfile will be downloaded on to your machine. -
Import the
metadata.xmlfile to the relevant service provider to configure WSO2 Identity Server as a trusted identity provider for your application.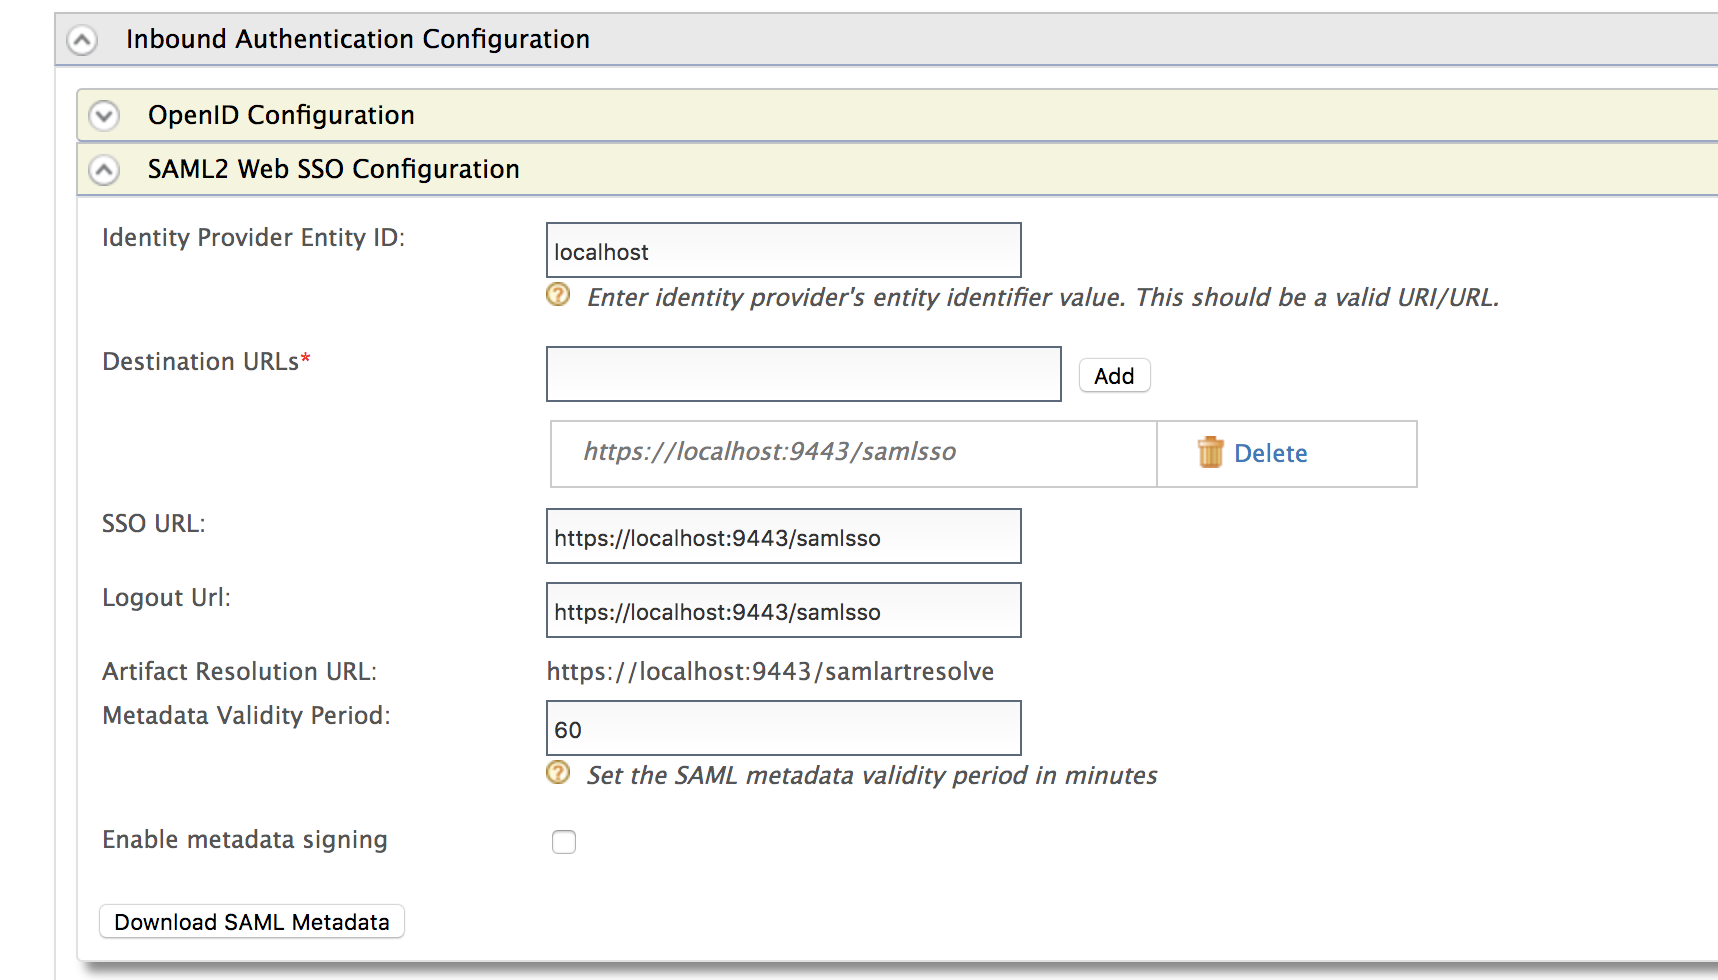
Managing identity providers
This section provides instructions on how to manage identity providers once they are created.
Viewing identity providers
Follow the instructions below to view the list of identity providers added in the WSO2 Identity Server.
- Sign in. Enter your username and password to log on to the Management Console.
- In the Main menu under the Identity section, click List
under Identity Providers. The list of identity providers you
added appears.

Editing identity providers
Follow the instructions below to edit an identity provider's details.
- Sign in. Enter your username and password to log on to the Management Console.
- In the Main menu under the Identity section, click List under Identity Providers. The list of identity providers you added appears.
- Locate the identity provider you want to edit and click on the
corresponding Edit link.

- You are directed to the edit screen where you can modify the details you configured for the identity provider.
Deleting identity providers
Follow the instructions below to delete an identity provider.
- Sign in. Enter your username and password to log on to the Management Console.
- In the Main menu under the Identity section, click List under Identity Providers. The list of identity providers you added appears.
- Locate the identity provider you want to delete and click on the
corresponding Delete link.

- Confirm your request in the WSO2 Carbon window. Click the Yes button.
Disabling/Enabling identity providers
Follow the instructions below to disable or enable an identity provider.
- Sign in. Enter your username and password to log on to the Management Console.
- In the Main menu under the Identity section, click List under Identity Providers. The list of identity providers you added appears.
- Locate the identity provider you want to delete and click on the
corresponding Disable link to disable the identity provider.
Clicking this link will change the link to Enable. To enable
the identity provider again, click the Enable link.

- Click Ok on the confirmation form that appears when clicking Disable / Enable.
Related Topics
See the following topics for information on configuring service providers using different specifications.
- See Identity Federation for information on configuring federated authenticators.
See the following topics to configure different applications as service providers in Identity Server.