Account Disabling
WSO2 Identity Server enables an administrative user to disable a user account by configuring this feature in the WSO2 Identity Server and editing the user profile of the account. You can also disable (switch-off) the account disabling feature so that administrative users do not have permission to disable users.
Configuring WSO2 IS for account disabling
But first, you need to configure WSO2 Identity Server for user account locking and disabling. Follow the below steps to do this configuration.
- Start the Identity Server and log into the management console using your tenant credentials.
- Click Resident under Identity Providers found in the Main tab.
- Expand the Account Management tab.
-
Expand the Account Disabling tab and select the Enable Account Disabling checkbox. Click Update to save changes.

Tip
Disable the account disabling feature
To disable the account disabling option, unselect the Enable Account Disabling in each of the tenants that you wish to disable this option for.
Alternatively, disable this feature for all tenants by adding the following configuration to the
<IS_HOME>/repository/conf/deployment.tomlfile. This will remove the account disabling option from all tenants.[identity_mgt.account_disabling] enable_account_disabling=false- Next, enable account locking. Expand the Login Attempts Security tab.
- Expand the Account Lock tab and select the Lock user accounts checkbox. Click Update to save changes.
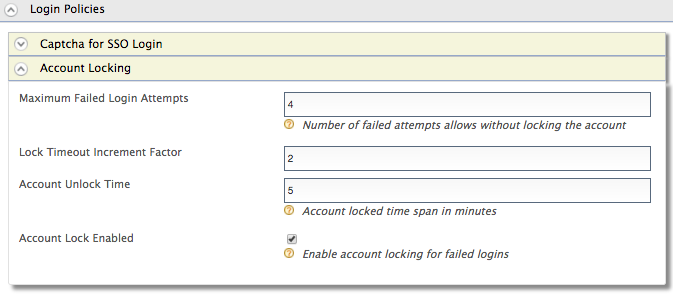
Tip
If a user is assigned the Internal/system role, the user can bypass account locking even if the user exceeds the specified number of Maximum Failed Login Attempts.
Click here to see more information
WSO2 Identity Server has the Internal/system role configured by default. But generally a new user is not assigned the Internal/system role by default. Required roles can be assigned to a user depending on the set of permission a user needs to have. For more information on roles and permission, see Configuring Roles and Permissions.
Although the Internal/system role is configured by default in WSO2 Identity Server, you can delete the role if necessary. To allow users with the Internal/system role to bypass account locking, you need to ensure that the role exists in WSO2 Identity Server.
-
To enable account locking and disabling for other tenants, log out and repeat the steps given above from step 2 onwards.
Disable an account
Follow the steps below to disable a user account through the WSO2 IS management console.
-
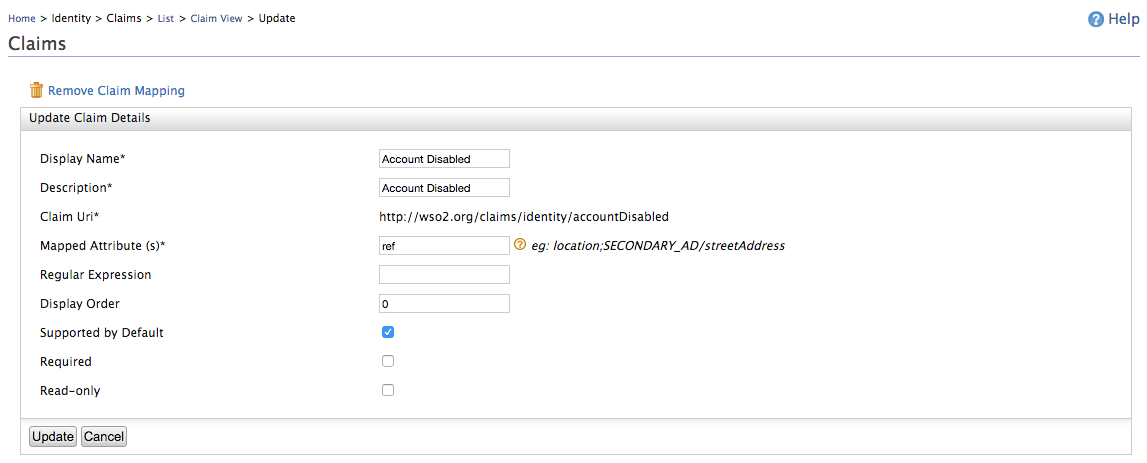
Navigate to Main>Claims>List and click on
http://wso2.org/claims. -
Edit the Account Disabled claim. See Editing Claim Mapping for more information on how to do this.
-
Tick the checkbox Supported by Default and click Update.
- Navigate to Main>Users and Roles>List>Users and click on User Profile of the user account that you want to disable.
- Tick the Account Disabled checkbox and click Update.
Tip
Alternatively, instead of using the management console, you can also
enable/disable the user account using the
setUserClaimValues method in the
RemoteUserStoreManagerService
after you have configured WSO2 IS for account disabling.
Sending email notifications for account disabling
Once you have configured WSO2 Identity Server for account disabling, you can also configure the WSO2 IS to send an email to the user's email address when the user account is disabled. To configure this, follow the steps below.
-
Enable the email sending configurations of the WSO2 Identity Server as explained here.
-
Restart the Server.
Info
The email template used to send the email notification for account locking is the AccountLock template and the template used for account disabling is the AccountDisable template. You can edit and customize the email template. For more information on how to do this, see Customizing Automated Emails
.