Configure OIDC Federated IdP-Initiated Logout
WSO2 Identity Server is able to handle logout requests from OIDC federated IdPs. When an OIDC back-channel logout request is received from the federated IdP to the back-channel logout endpoint of WSO2 Identity Server (https://localhost:9443/identity/oidc/slo), it processes the request, terminates the sessions of the particular user, and then responds to the external identity provider.
Sample scenario
Let's take a look at the following scenario to understand federated IdP-initiated logout.
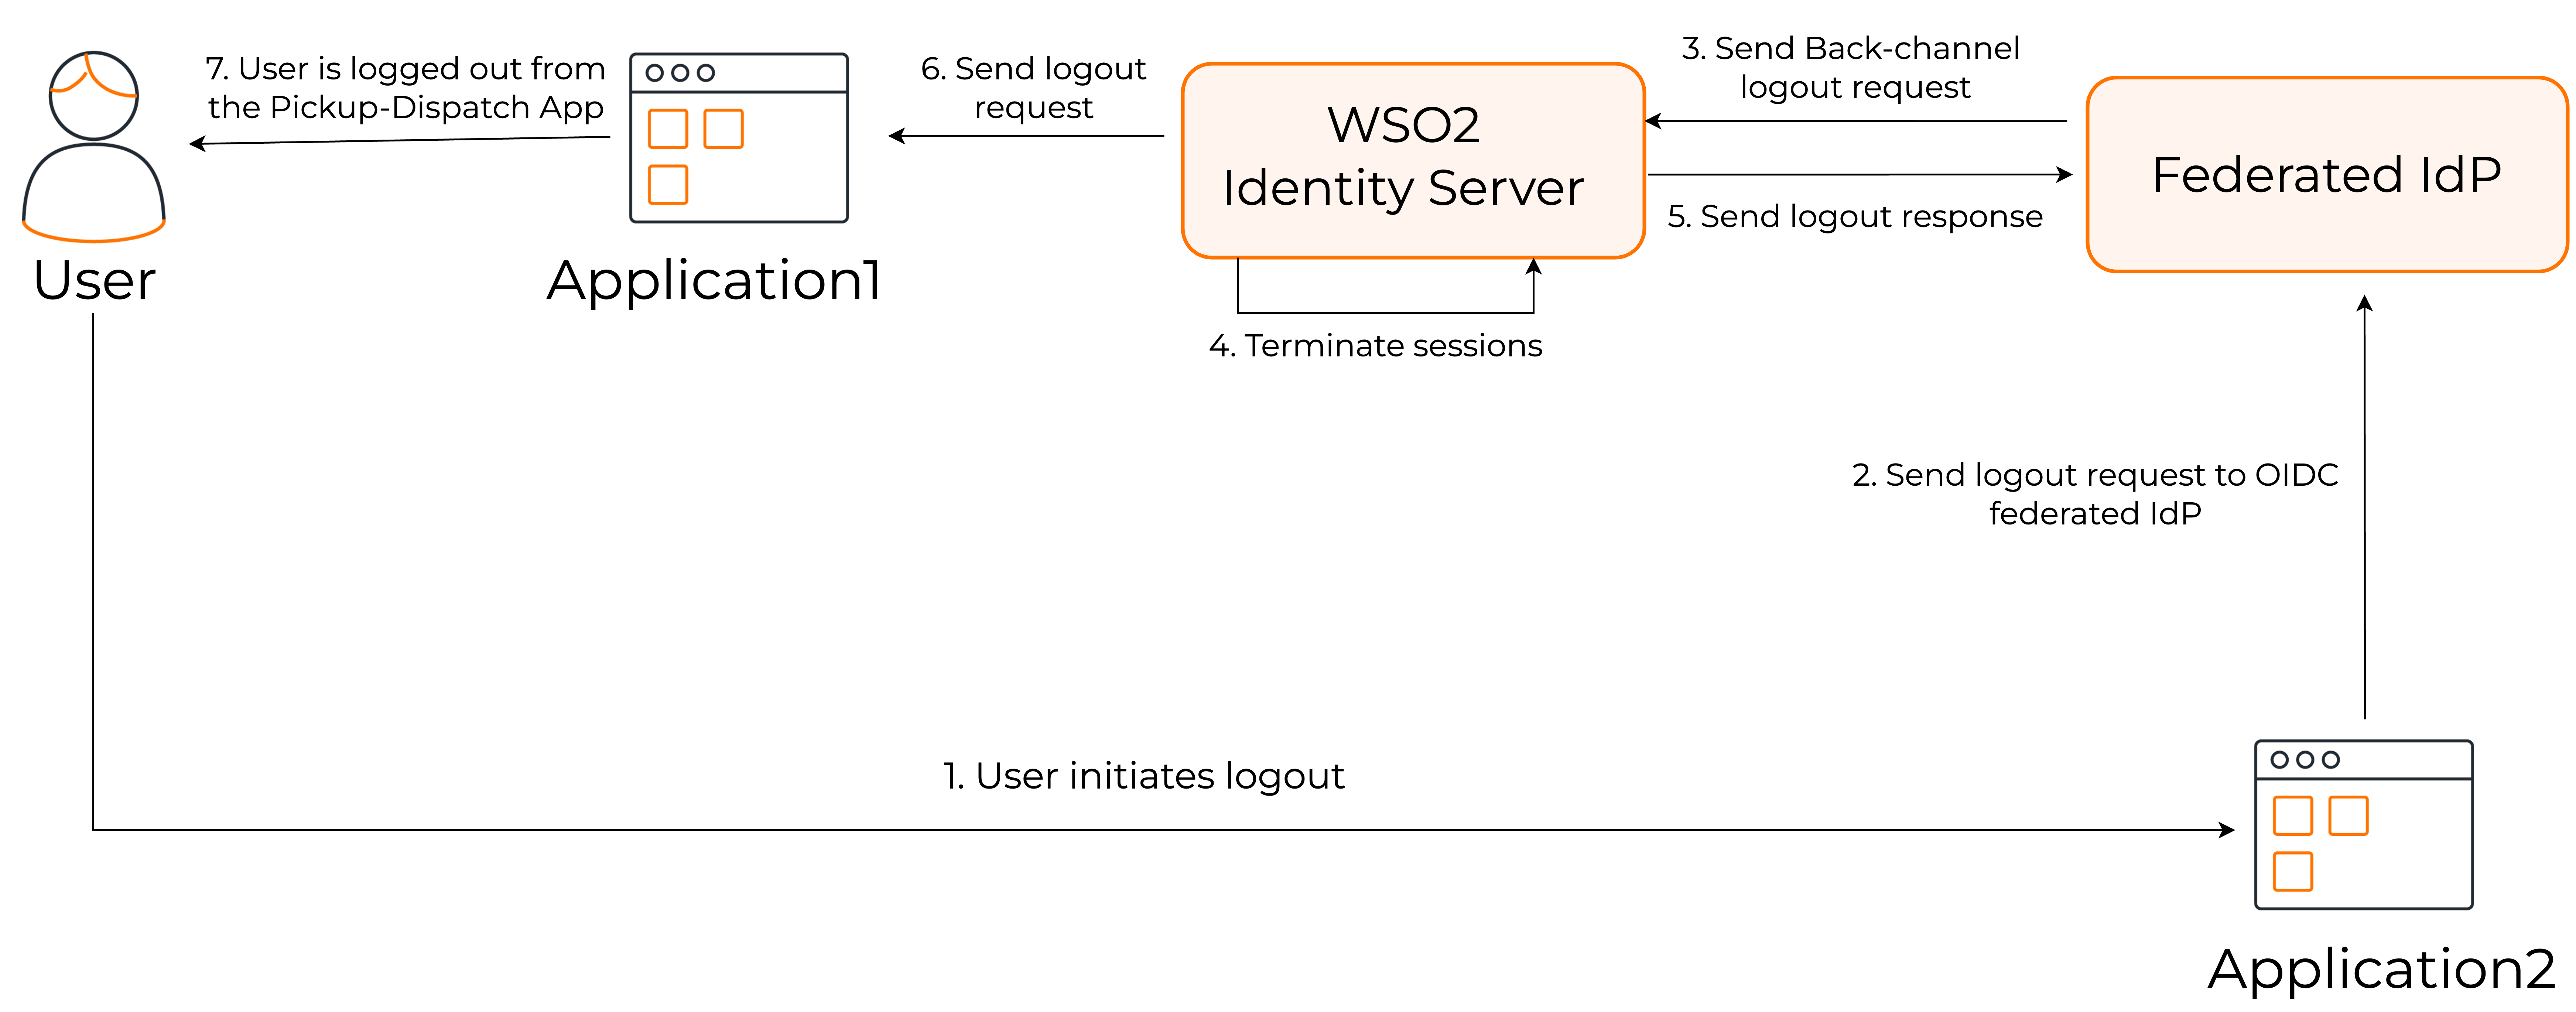
The steps are as follows:
- User initiates the logout from Application2.
- The logout request is sent to the federated OIDC provider.
- The federated OIDC provider handles the request and propagates the logout request to WSO2 Identity Server.
- After receiving the logout request from the federated IdP, WSO2 IS processes the request and terminates the session.
- WSO2 Identity Server then sends back a logout response to the external identity provider.
- Since the session is terminated, the logout request is propagated to all the connected applications.
- User is logged out from Application1.
Set up
To try this out, let's configure two WSO2 Identity Servers. One as the primary IdP (WSO2IS-1) and the other as the federated IdP (WSO2IS-2). Let's configure the applications, Pickup-Dispatch and Pickup-Manager in WSO2IS-1 and WSO2IS-2 respectively.
Prerequisites
- Set up two instances of WSO2 Identity Server.
-
Set a port offset for WSO2IS-2 so that the two servers can run on the same device. Learn how to do so here.
-
Since there can be issues with cookies when the same hostname is configured for both WSO2 identity servers, it is recommended to change the hostname of WSO2IS-2. In this guide, the hostname of WSO2IS-2 is configured as
localhost.com.
Register the primary IdP in the federated IdP
The primary identity provider (WSO2IS-1) should first be registered in the federated IdP (WSO2IS-2) as an application. To do so,
- Start WSO2IS-2.
- On the WSO2IS-2 Console, go to Applications, and click New Application.
-
Select Standard-Based Application and enter the following details:
Name WSO2IS-1 Protocol Select OpenID Connect -
Click Create to register the application.
-
In the Protocol tab of the created application, do the following:
- Take note of the Client ID and Client secret. You will need them later.
- Under Allowed grant types, enable Code.
- Enter the following as the Authorized redirect URLs:
- Enter the domain
https://localhost:9443as an allowed origin. - Under Logout URLs, enter the following as the Back channel logout URL:
-
Click Update to save the changes.
Configure the federated IdP in the primary IdP
Next, the federated IdP (WSO2IS-2) should now be registered in the primary IdP (WSO2IS-1) as a connection. To do so,
- Start WSO2IS-1.
- On the WSO2IS-1 Console, go to Connections and select New Connection.
-
Select Standard-Based IdP and enter the following details:
Identity provider name WSO2IS-2 Select protocol OpenID Connect -
Click Next and enter the following details:
Client ID WSO2IS-2 Client secret OpenID ConnectAuthorization endpoint URL https://localhost.com:9444/oauth2/authorizeToken endpoint URL https://localhost.com:9444/oauth2/token -
Click Next and do one of the following:
-
Select JWKS endpoint and add
https://localhost.com:9444/oauth2/jwksas the federated IdP's JWKS endpoint URL. -
Select Use PEM certification and upload the certificate of the federated IdP.
-
-
Click Finish to create the connection.
-
In the General tab of the created connection, add
https://localhost:9444/oauth2/tokenas the Issuer and click Update to save the changes.
Register an application in the primary IdP
Let's register an application in the primary IdP (WSO2IS-1).
- On the WSO2IS-1 Console, go to Applications and click New Application.
-
Select Standard-Based Application* and enter the following details:
Name Pickup-Dispatch Protocol Select OpenID Connect -
Click Create to register the application.
-
In the Protocol tab of the created application, do the following:
- Take note of the Client ID and Client secret. You will need them later.
- Under Allowed grant types, select Code.
- Enter the following in Authorized redirect URLs:
- Enter the domain
https://localhost:8080as an allowed origin.
-
Click Update to save the changes.
-
In the Login Flow tab of the created application, add
WSO2IS-2as a login method. -
Click Update to save the changes.
Register an application in the federated IdP
Finally, let's register an application in the federated IdP (WSO2 IS 2).
- On the WSO2IS-1 Console, go to Applications and click New Application.
-
Select Standard-Based Application* and enter the following details:
Name Pickup-Manager Protocol Select OpenID Connect -
Click Create to register the application.
-
In the Protocol tab of the created application, do the following:
- Take note of the Client ID and Client secret. You will need them later.
- Under Allowed grant types, select Code.
- Enter the following in Authorized redirect URLs:
- Enter the domain
https://localhost:8080as an allowed origin.
-
Click Update to save the changes.
Try it out
Let's set up the sample applications and try out back-channel logout initiated by the federated IdP.
Set up Pickup Dispatch
Follow the steps given below to set up the Pickup-Dispatch application that is registered as an application in the primary IdP (WSO2IS-1).
-
Download the pickup-dispatch.war sample.
-
Extract the
pickup-dispatch.warfile and open thedispatch.propertiesfile located in the<EXTRACT>/WEB-INF/classesfolder. -
Replace the
consumerKeyandconsumerSecretvalues with the OAuth Client Key and Client Secret values that were generated when you registered the service provider.
Set up Pickup Manager
Follow the steps given below to set up the Pickup-Manager application that is registered as a service provider for the federated IdP (WSO2 IS 2).
-
Download the pickup-manager.war sample.
-
Extract the
pickup-manager.warfile and open themanager.propertiesfile located in the<EXTRACT>/WEB-INF/classesfolder. -
Replace the
consumerKeyandconsumerSecretvalues with the OAuth Client Key and Client Secret values that were generated when you registered the service provider.
Deploy the samples
Next, deploy the sample web apps on a web container.
-
Download Apache Tomcat 8.x from here and install it.
Info
It is recommended that you use a hostname that is not
localhostto avoid browser errors. Modify the/etc/hostsentry in your machine to reflect this. Note thatwso2is.localis used in this documentation as an example, but you must modify this when configuring the authenticators or connectors with this sample application. -
Next, copy the extracted and modified
pickup-managerandpickup-dispatchfolders to the<TOMCAT_HOME>/webappsfolder.
You are now ready to try out back-channel logout initiated by the federated IdP.
Try logout
Once you have completed configuring WSO2 IS as instructed in the above sections, try out the flow by running the sample applications.
-
Start the Tomcat server and access the two applications (
Pickup-DispatchandPickup-Manager) on two browser pages.- Pickup-Dispatch: http://localhost.com:8080/pickup-dispatch/
- Pickup-Manager: http://localhost.com:8080/pickup-manager/
-
Log in to the
Pickup-Dispatchapplication.Info
You are redirected to the login page provided by the federated IdP (WSO2 IS 2).
-
Use your WSO2 Identity Server credentials to log in.
Info
You will be redirected to the Pickup Dispatch application's home page.
-
Log in to the
Pickup-Managerapplication.Info
You are automatically logged in and redirected to the Pickup Manager application's home page.
-
Log out of the Pickup Manager application.
Info
You are redirected to the login page of the application.
-
Now, attempt to access the Pickup Dispatch application.
Info
Note that you are already logged out of this application as well.
Validate the OIDC back-channel logout token
The following is an example OIDC back-channel logout token.
{
"iss": "https://localhost.com:9444/oauth2/token",
"sub": "admin",
"aud": "w_Hwp05dFRwcRs_WFHv9SNwpflAa",
"iat": 1609911868,
"exp": 1609911988,
"jti": "16159e3e-c5fc-42de-b93f-b0782ab33d58",
"sid": "15043ffc-877d-4205-af41-9b107f7da38c",
"events": {
   "http://schemas.openid.net/event/backchannel-logout": {}
   }
}
Logout token validation is done according to the OIDC back-channel logout specification for the token signature and the iss, aud, iat, sub, sid, events, and nonce claims.
-
Configure “iat” claim validation
By default,
iatclaim validation is enabled andiatValidityPeriodis set as 300 seconds. To update these configurations, follow the steps given below.- Open the
deployment.tomlfile (stored in the<PRIMARY_IS_HOME>/repository/conf/folder). -
Update the configurations given below.
- The
iatValidityPeriodconfiguration should be in seconds. - If
iatclaim validation is enabled in the primary IdP (WSO2 IS 1), the token shouldn’t be issued before the specified time.
- The
-
Restart the primary IdP (WSO2 IS 1).
- Open the
-
Identifying the session (using
suborsidclaims)- Logout token should contain a
subclaim, asidclaim, or both. - If the logout token contains a
sidclaim, the primary IdP (WSO2 IS 1) will terminate the particular session of the user with thesidclaim. Thesidclaim in the logout token should match thesidclaim in the ID token received for the current session. - If the logout token only contains a
subclaim, the primary IdP (WSO2 IS 1) will terminate all the sessions for thatsubclaim.
- Logout token should contain a