SCIM2 Custom User Schema Support
WSO2 Identity Server allows adding custom attributes into user objects through Custom schema.
Note
Reasons why we introduced custom schema to add custom attributes:
- According to the current model, Enterprise User Extension attributes are in a file, and those configurations apply at the server level.
- Enterprise User Extension is a defined schema and should not be modified.
How to add claims to support simple attributes
To add claims for simple attributes, follow these steps:
Add custom local claim
- Navigate to User Attributes & Stores > Attributes in console.
- Click Attributes under Manage Attributes.
-
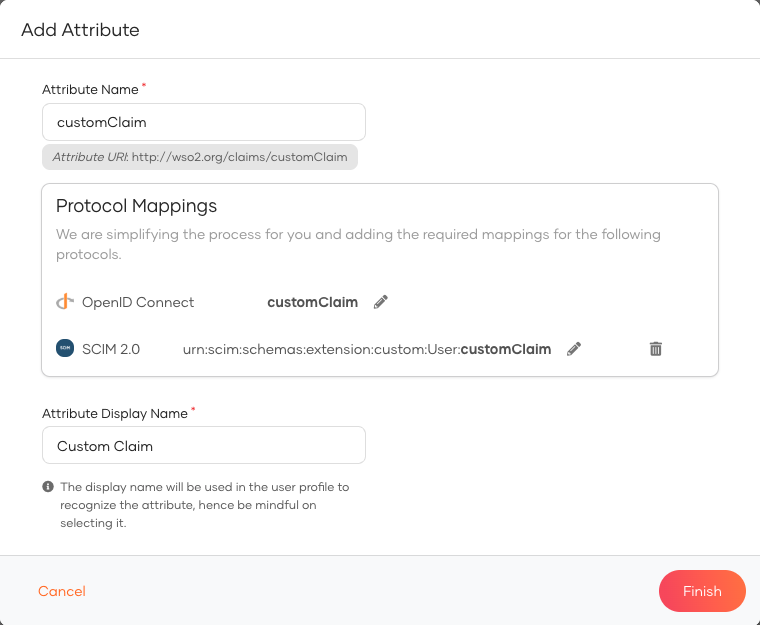
Click New Attribute and enter the following values.
- Attribute Name:
http://wso2.org/claims/customClaim - Attribute Display Name:
Custom Claim
- Attribute Name:
-
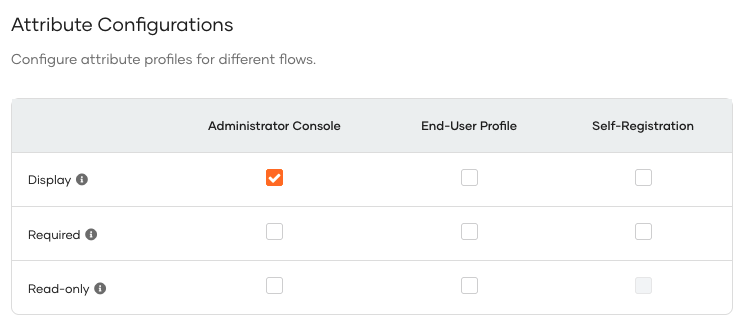
Go to the Edit Attribute of the custom attribute you just created.
- Select necessary options in Attribute Configurations to make the field visible in user profiles and click Update.
Note
If you want to add any additional properties for the scim attribute in Custom schema, you can add them using Additional Properties in the local claim configuration.
| Property Name | Allowed Values |
|---|---|
| caseExact | true, false |
| mutability | readWrite, readOnly, immutable |
| returned | always, default, never, request |
Note
-
You can use the word
customClaimor any other preferred word as the Mapped Attribute when using a JDBC user store because JDBC user stores will automatically create a new attribute if it does not already exist in the user store. However, if you are using LDAP or Active Directory, you will have to use an attribute that exists in the user store already. -
The configuration above is valid when using the PRIMARY user store. If you have a secondary user store configured, make sure to add another attribute mapping by clicking Add Attribute Mapping and selecting the secondary user store.
Map the custom claim
Note
SCIM 2.0 protocol mapping in Custom schema, will be created automatically with the Custom local claim creation as mentioned in the Protocol Mapping section in the wizard.
If it is not added, you can add it manually by,
- Navigate to User Attributes & Stores > Attributes in console.
- Click SCIM 2.0 under Manage Attribute Mappings.
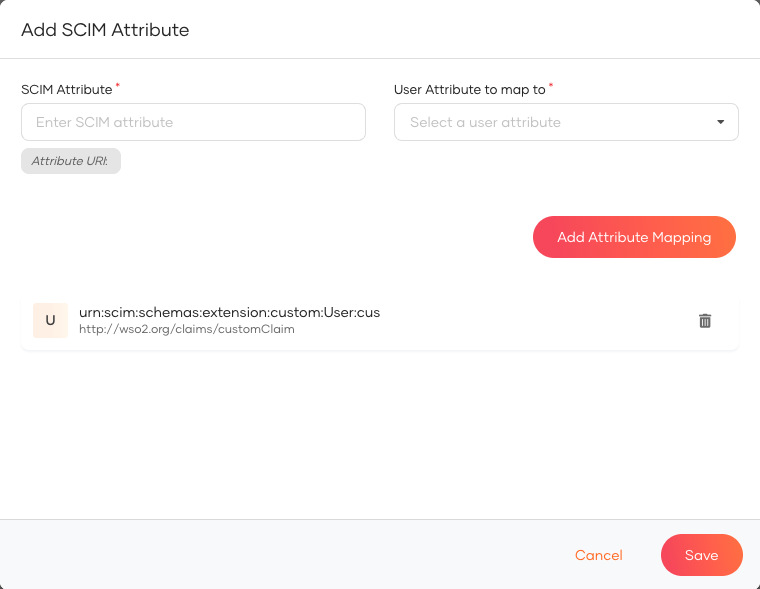
- Click New Attribute in Custom Schema tab and enter the following values.
- SCIM Attribute:
customClaim - User Attribute to map to: Select local claim from the dropdown
- SCIM Attribute:
- Click Add Attribute Mapping and click Finish.
Try it out
- Create a user from User Management > Users in console.
- Go to the User Profile of the user you just created.
-
Add a value for the Custom Claim field and click Update.
-
Retrieve the user using SCIM and ensure that the custom claim value is present.
SCIM Request
SCIM Response
{ "totalResults": 1, "startIndex": 1, "itemsPerPage": 1, "schemas": [ "urn:ietf:params:scim:api:messages:2.0:ListResponse" ], "Resources": [ { "emails": [ "[email protected]" ], "urn:scim:schemas:extension:custom:User": { "customClaim": "testValue" }, "meta": { "created": "2025-04-15T13:15:59.362739Z", "location": "https://localhost:9443/scim2/Users/65f09c38-23e0-4132-867f-451699e18022", "lastModified": "2025-04-15T13:17:06.638187Z", "resourceType": "User" }, "name": { "givenName": "Alex", "familyName": "Parker" }, "id": "65f09c38-23e0-4132-867f-451699e18022", "userName": "alex", "urn:scim:wso2:schema": { "emailAddresses": [ "[email protected]" ] } } ] } -
You can also try out updating the Custom Claim value using the following SCIM command and check if the value is updated by accessing the user profile on the console.
SCIM Patch Request
curl --location --request PATCH 'https://localhost:9443/scim2/Users/65f09c38-23e0-4132-867f-451699e18022' \
--header 'Authorization: Basic YWRtaW46YWRtaW4=' \
--header 'Content-Type: application/json' \
--data '{
        "schemas": [
            "urn:ietf:params:scim:api:messages:2.0:PatchOp"
        ],
        "Operations": [
            {
                "op": "replace",
                "value": {
                    "urn:scim:schemas:extension:custom:User": {
                        "customClaim": "New value"
                    }
                }
            }
        ]
    }'
How to add claims to support multi-valued simple attributes
Let's see when we've a deviceNames simple multi-valued attribute.
Add local claim for deviceNames
- Navigate to User Attributes & Stores > Attributes in console.
- Click Attributes under Manage Attributes.
- Click New Attribute and enter the following values.
- Attribute Name:
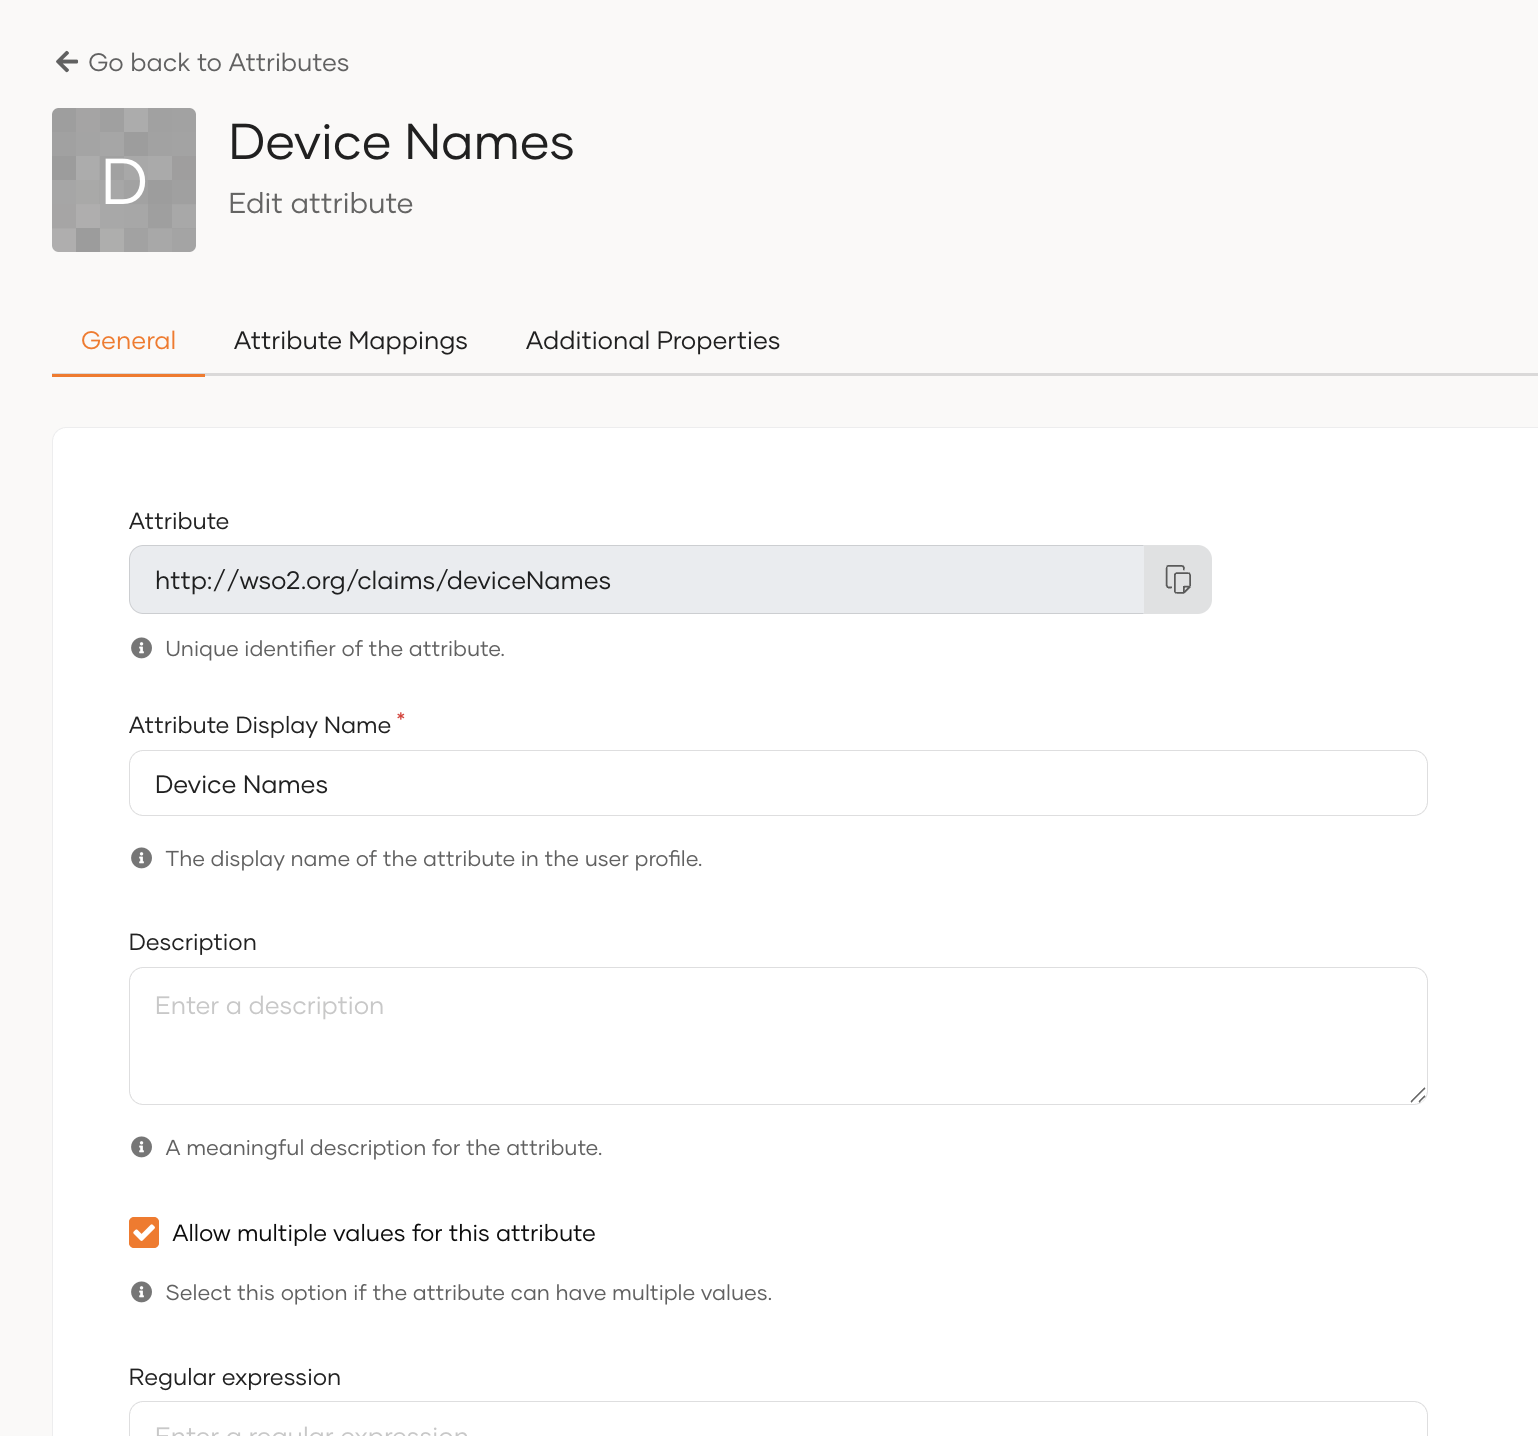
http://wso2.org/claims/deviceNames - Attribute Display Name:
Device Names
- Attribute Name:
- Click Finish.
- Go to the Edit Attribute of the custom attribute you just created.
-
Select necessary options in Attribute Configurations to make the field visible in user profiles and click Update.
-
Check the Allow multiple values for this attribute.
Map the custom claim
Note
SCIM 2.0 protocol mapping in Custom schema, will be created automatically with the Custom local claim creation as mentioned in the Protocol Mapping section in the wizard.
If it is not added, refer Map the custom claim to add it manually.
Try it out
- Create a user from User Management > Users in console.
- Go to the User Profile of the user you just created.
-
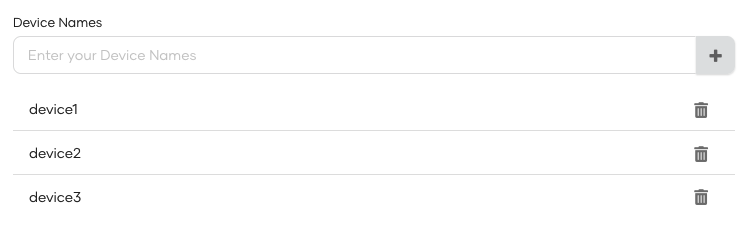
Add values for the Device Names field and click Update.
-
Retrieve the user using SCIM and ensure that the custom claim value is present.
SCIM Request
SCIM Response
{ "totalResults": 1, "startIndex": 1, "itemsPerPage": 1, "schemas": [ "urn:ietf:params:scim:api:messages:2.0:ListResponse" ], "Resources": [ { "emails": [ "[email protected]" ], "urn:scim:schemas:extension:custom:User": { "deviceNames": [ "device1", "device2", "device3" ] }, "meta": { "created": "2025-04-15T13:15:59.362739Z", "location": "https://localhost:9443/scim2/Users/65f09c38-23e0-4132-867f-451699e18022", "lastModified": "2025-04-15T18:01:55.805973Z", "resourceType": "User" }, "name": { "givenName": "Alex", "familyName": "Parker" }, "id": "65f09c38-23e0-4132-867f-451699e18022", "userName": "alex", "urn:scim:wso2:schema": { "emailAddresses": [ "[email protected]" ] } } ] } -
You can also try out updating the Device Names attribute values using the following SCIM command and check if the values are updated by accessing the user profile on the console.
SCIM Patch Request
curl --location --request PATCH 'https://localhost:9443/scim2/Users/65f09c38-23e0-4132-867f-451699e18022' \
--header 'Authorization: Basic YWRtaW46YWRtaW4=' \
--header 'Content-Type: application/json' \
--data '{
    "schemas": [
        "urn:ietf:params:scim:api:messages:2.0:PatchOp"
    ],
    "Operations": [
        {
            "op": "replace",
            "value": {
                "urn:scim:schemas:extension:custom:User": {
                    "deviceNames": [
                        "new_device1",
                        "new_device2"
                    ]
                }
            }
        }
    ]
}'
How to add claims to support Complex attributes
Let's see if we have a manager complex attribute that has address simple attribute and roles multi-valued attribute as the sub attributes.
Create claim mappings for Manager-Address claim
- Navigate to User Attributes & Stores > Attributes in console.
- Click Attributes under Manage Attributes.
- Click New Attribute and enter the following values.
- Attribute Name:
http://wso2.org/claims/manager.address - Attribute Display Name:
Manager Address
- Attribute Name:
- Go to the Edit Attribute of the custom attribute you just created.
- Select necessary options in Attribute Configurations to make the field visible in user profiles and click Update.
Note
SCIM 2.0 protocol mapping in Custom schema, will be created automatically with the Custom local claim creation as mentioned in the Protocol Mapping section in the wizard.
Create claim mappings for Manager-Roles claim
- Navigate to User Attributes & Stores > Attributes in console.
- Click Attributes under Manage Attributes.
- Click New Attribute and enter the following values.
- Attribute Name:
http://wso2.org/claims/manager.roles - Attribute Display Name:
Manager Roles
- Attribute Name:
- Click Finish.
- Go to the Edit Attribute of the custom attribute you just created.
-
Select necessary options in Attribute Configurations to make the field visible in user profiles and click Update.
-
Check the Allow multiple values for this attribute.
Note
SCIM 2.0 protocol mapping in Custom schema, will be created automatically with the Custom local claim creation as mentioned in the Protocol Mapping section in the wizard.
Create claim mappings for the Manager claim
- Navigate to User Attributes & Stores > Attributes in console.
- Click Attributes under Manage Attributes.
- Click New Attribute and enter the following values.
- Attribute Name:
http://wso2.org/claims/manager - Attribute Display Name:
Manager
- Attribute Name:
- Click Finish.
-
Go to the Edit Attribute of the custom attribute you just created.
-
Select the Object data type as the attribute data type.
-
Add the
http://wso2.org/claims/manager.addressandhttp://wso2.org/claims/manager.rolesas sub-attributes.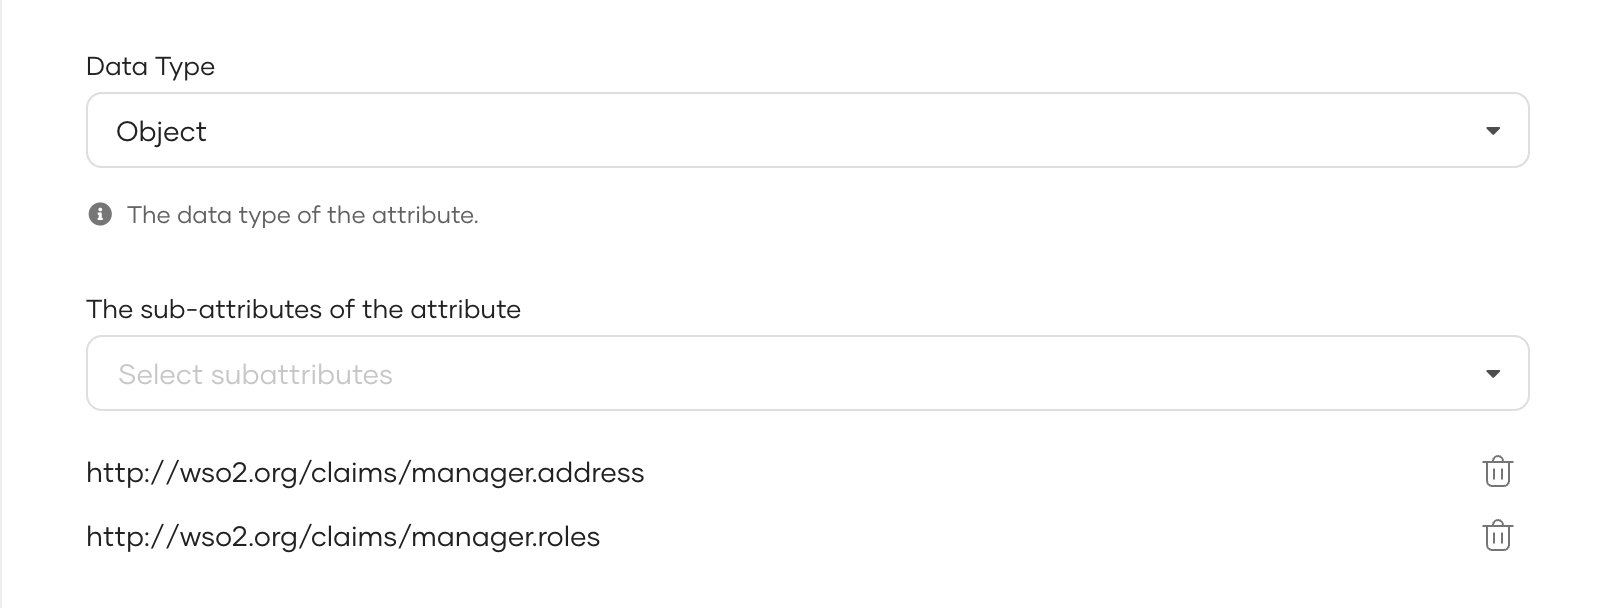
Try it out
- Create a user from User Management > Users in console.
- Go to the User Profile of the user you just created.
-
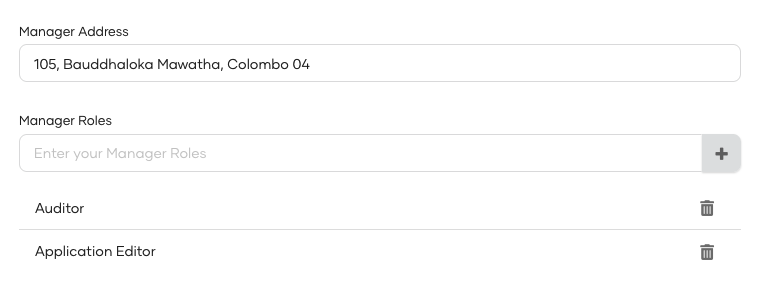
Add values for the Manager Address field, Manager Roles field and click Update.
-
Retrieve the user using SCIM and ensure that the custom claim value is present.
SCIM Request
SCIM Response
{ "totalResults": 1, "startIndex": 1, "itemsPerPage": 1, "schemas": [ "urn:ietf:params:scim:api:messages:2.0:ListResponse" ], "Resources": [ { "emails": [ "[email protected]" ], "urn:scim:schemas:extension:custom:User": { "manager": { "address": "105, Bauddhaloka Mawatha, Colombo 04", "roles": [ "Auditor", "Application Editor" ] } }, "meta": { "created": "2025-04-15T13:15:59.362739Z", "location": "https://localhost:9443/scim2/Users/65f09c38-23e0-4132-867f-451699e18022", "lastModified": "2025-04-15T18:58:23.825351Z", "resourceType": "User" }, "name": { "givenName": "Alex", "familyName": "Parker" }, "id": "65f09c38-23e0-4132-867f-451699e18022", "userName": "alex", "urn:scim:wso2:schema": { "emailAddresses": [ "[email protected]" ] } } ] } -
You can also try out updating the Manager Address and Manager Roles claim values using the following SCIM command and check if the values are updated by accessing the user profile on the console.
SCIM Patch Request
curl --location --request PATCH 'https://localhost:9443/scim2/Users/65f09c38-23e0-4132-867f-451699e18022' \
--header 'Authorization: Basic YWRtaW46YWRtaW4=' \
--header 'Content-Type: application/json' \
--data '{
    "schemas": [
        "urn:ietf:params:scim:api:messages:2.0:PatchOp"
    ],
    "Operations": [
        {
            "op": "replace",
            "value": {
                "urn:scim:schemas:extension:custom:User": {
                    "manager": {
                        "address": "WSO2, 105, Bauddhaloka Mawatha, Colombo 04",
                        "roles": [
                            "Connection Editor",
                            "Application Viewer"
                        ]
                    }
                }
            }
        }
    ]
}'