Integrate OAuth2 Proxy with WSO2 Identity Server
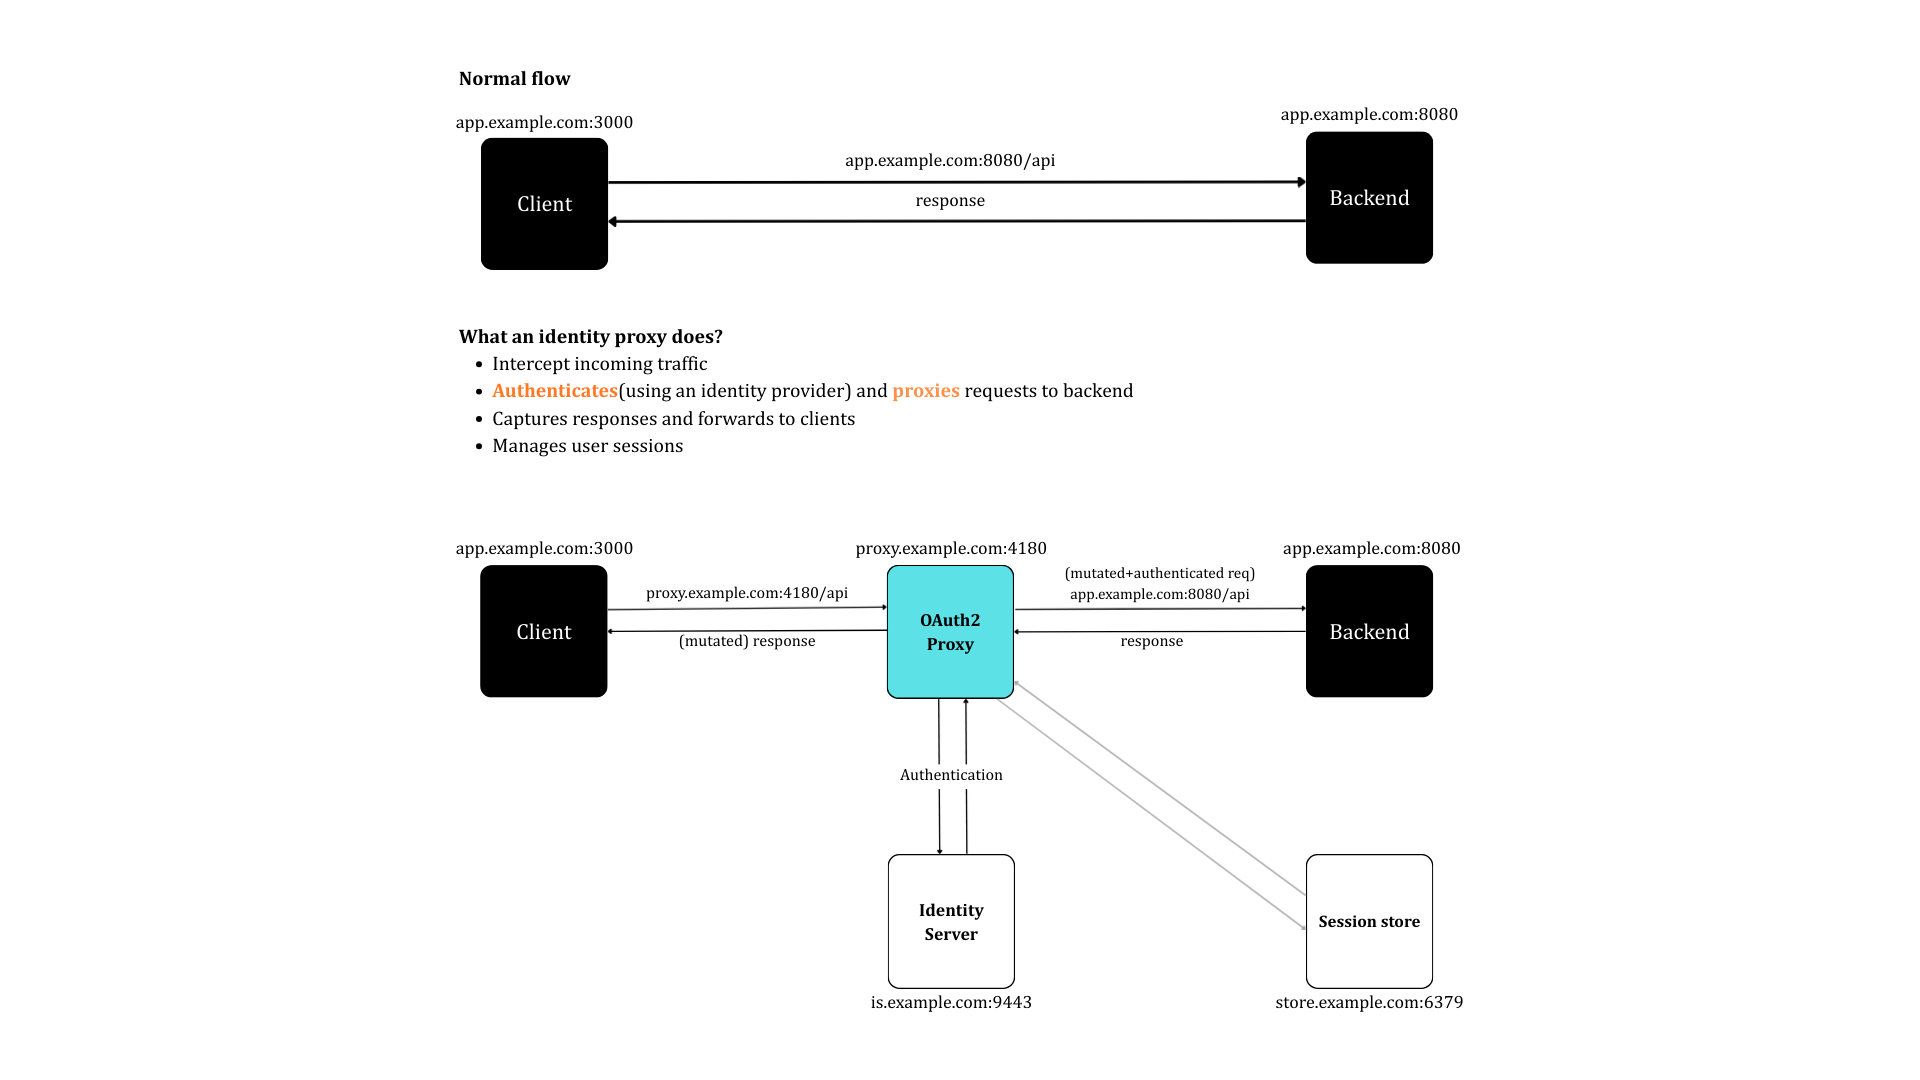
OAuth2 Proxy is an open-source reverse proxy that authenticates users through an external OAuth2 provider (such as WSO2 Identity Server) and forwards user identity information to your application via HTTP headers. This tutorial explains how you can connect WSO2 Identity Server with OAuth2 Proxy.
You can use OAuth2 Proxy if you want to,
- add OAuth2/OIDC authentication to legacy apps without code changes.
- centralize authentication logic.
- forward user identity details (for example, username or email) as HTTP headers.
Follow the steps below to connect WSO2 Identity Server with OAuth2 Proxy.
Prerequisites
-
Go 1.16 or later. To install Go, follow the steps in the Go documentation.
-
An application with a back-end. If you don't have one, you can use this sample application.
-
(Optional) Redis for advanced session storage.
Step 1: Install and run WSO2 Identity Server
Follow the following steps below to download and install WSO2 Identity Server. Refer to the quick setup to learn more.
-
Download the latest WSO2 Identity Server version from the website.
-
Unzip the archive using the following command:
-
Start the server:
-
You can access the WSO2 Identity Server Console by visiting the following URL and providing the default credentials of
admin,admin.
Step 2: Create an OIDC application
To connect your OAuth2 Proxy reverse proxy to WSO2 Identity Server, you need to register it as an application. To do so,
-
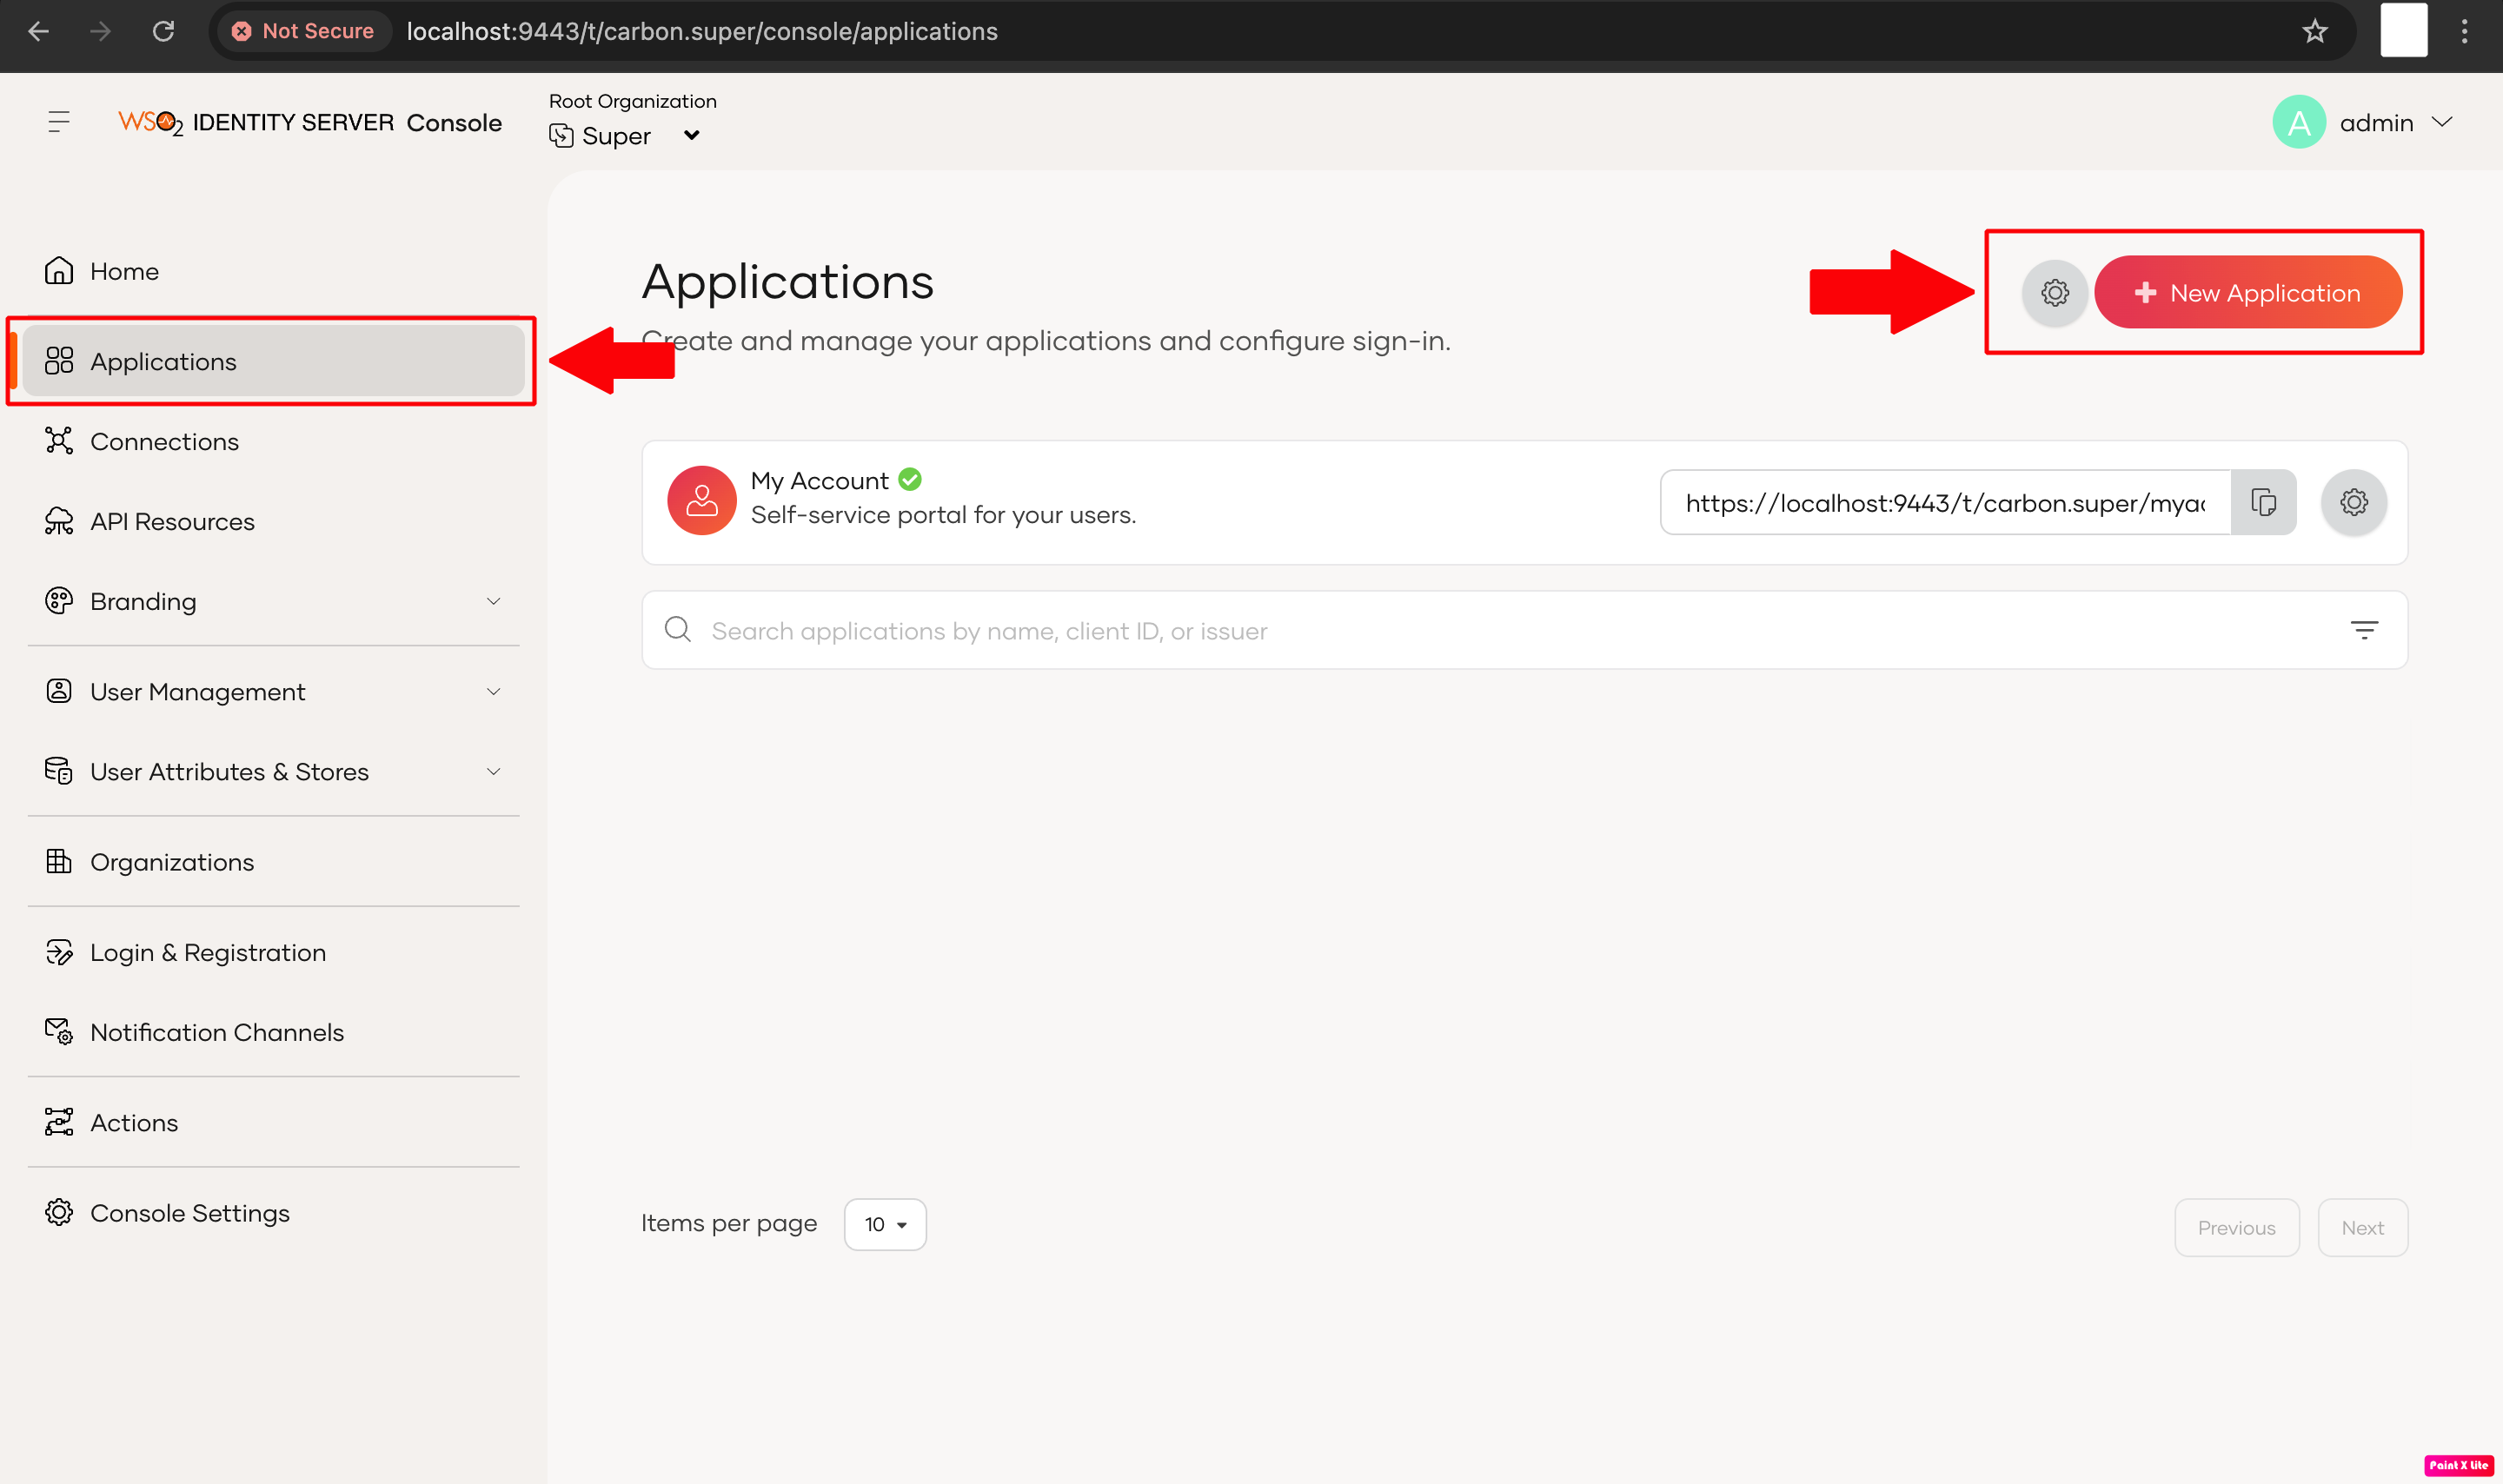
On the WSO2 Identity Server Console, go to Applications > New Application.
-
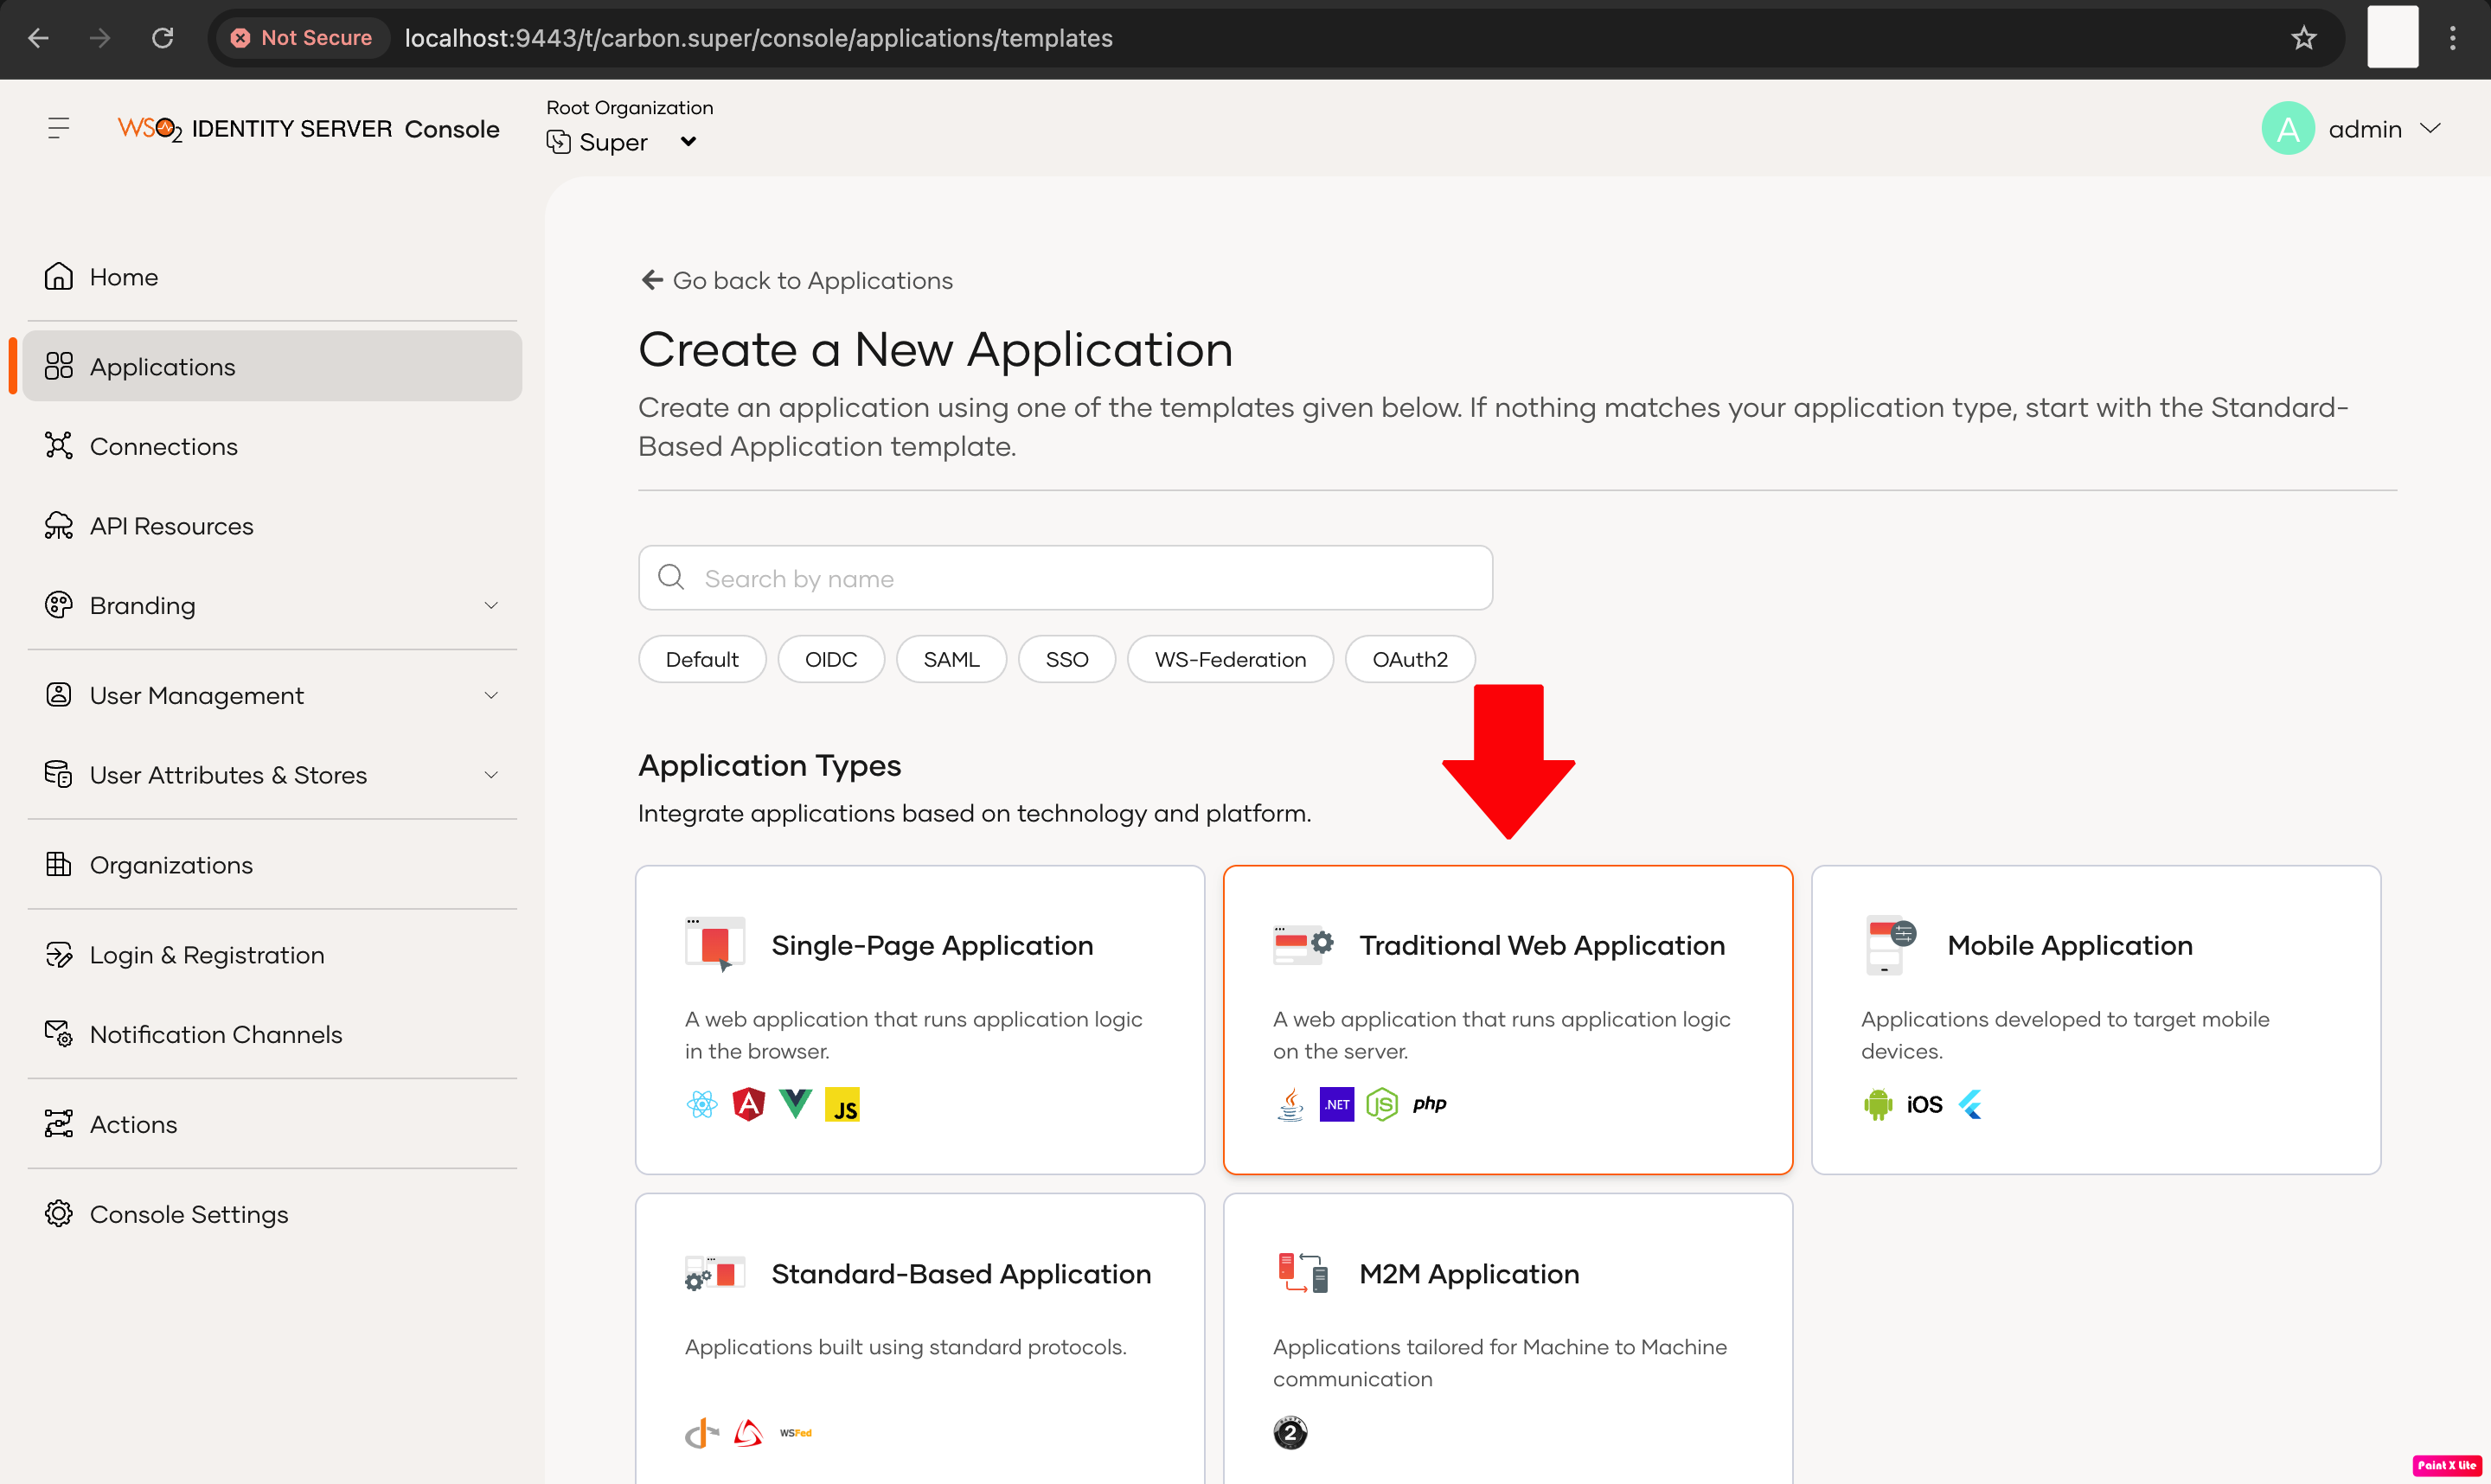
Select Traditional Web Application.
-
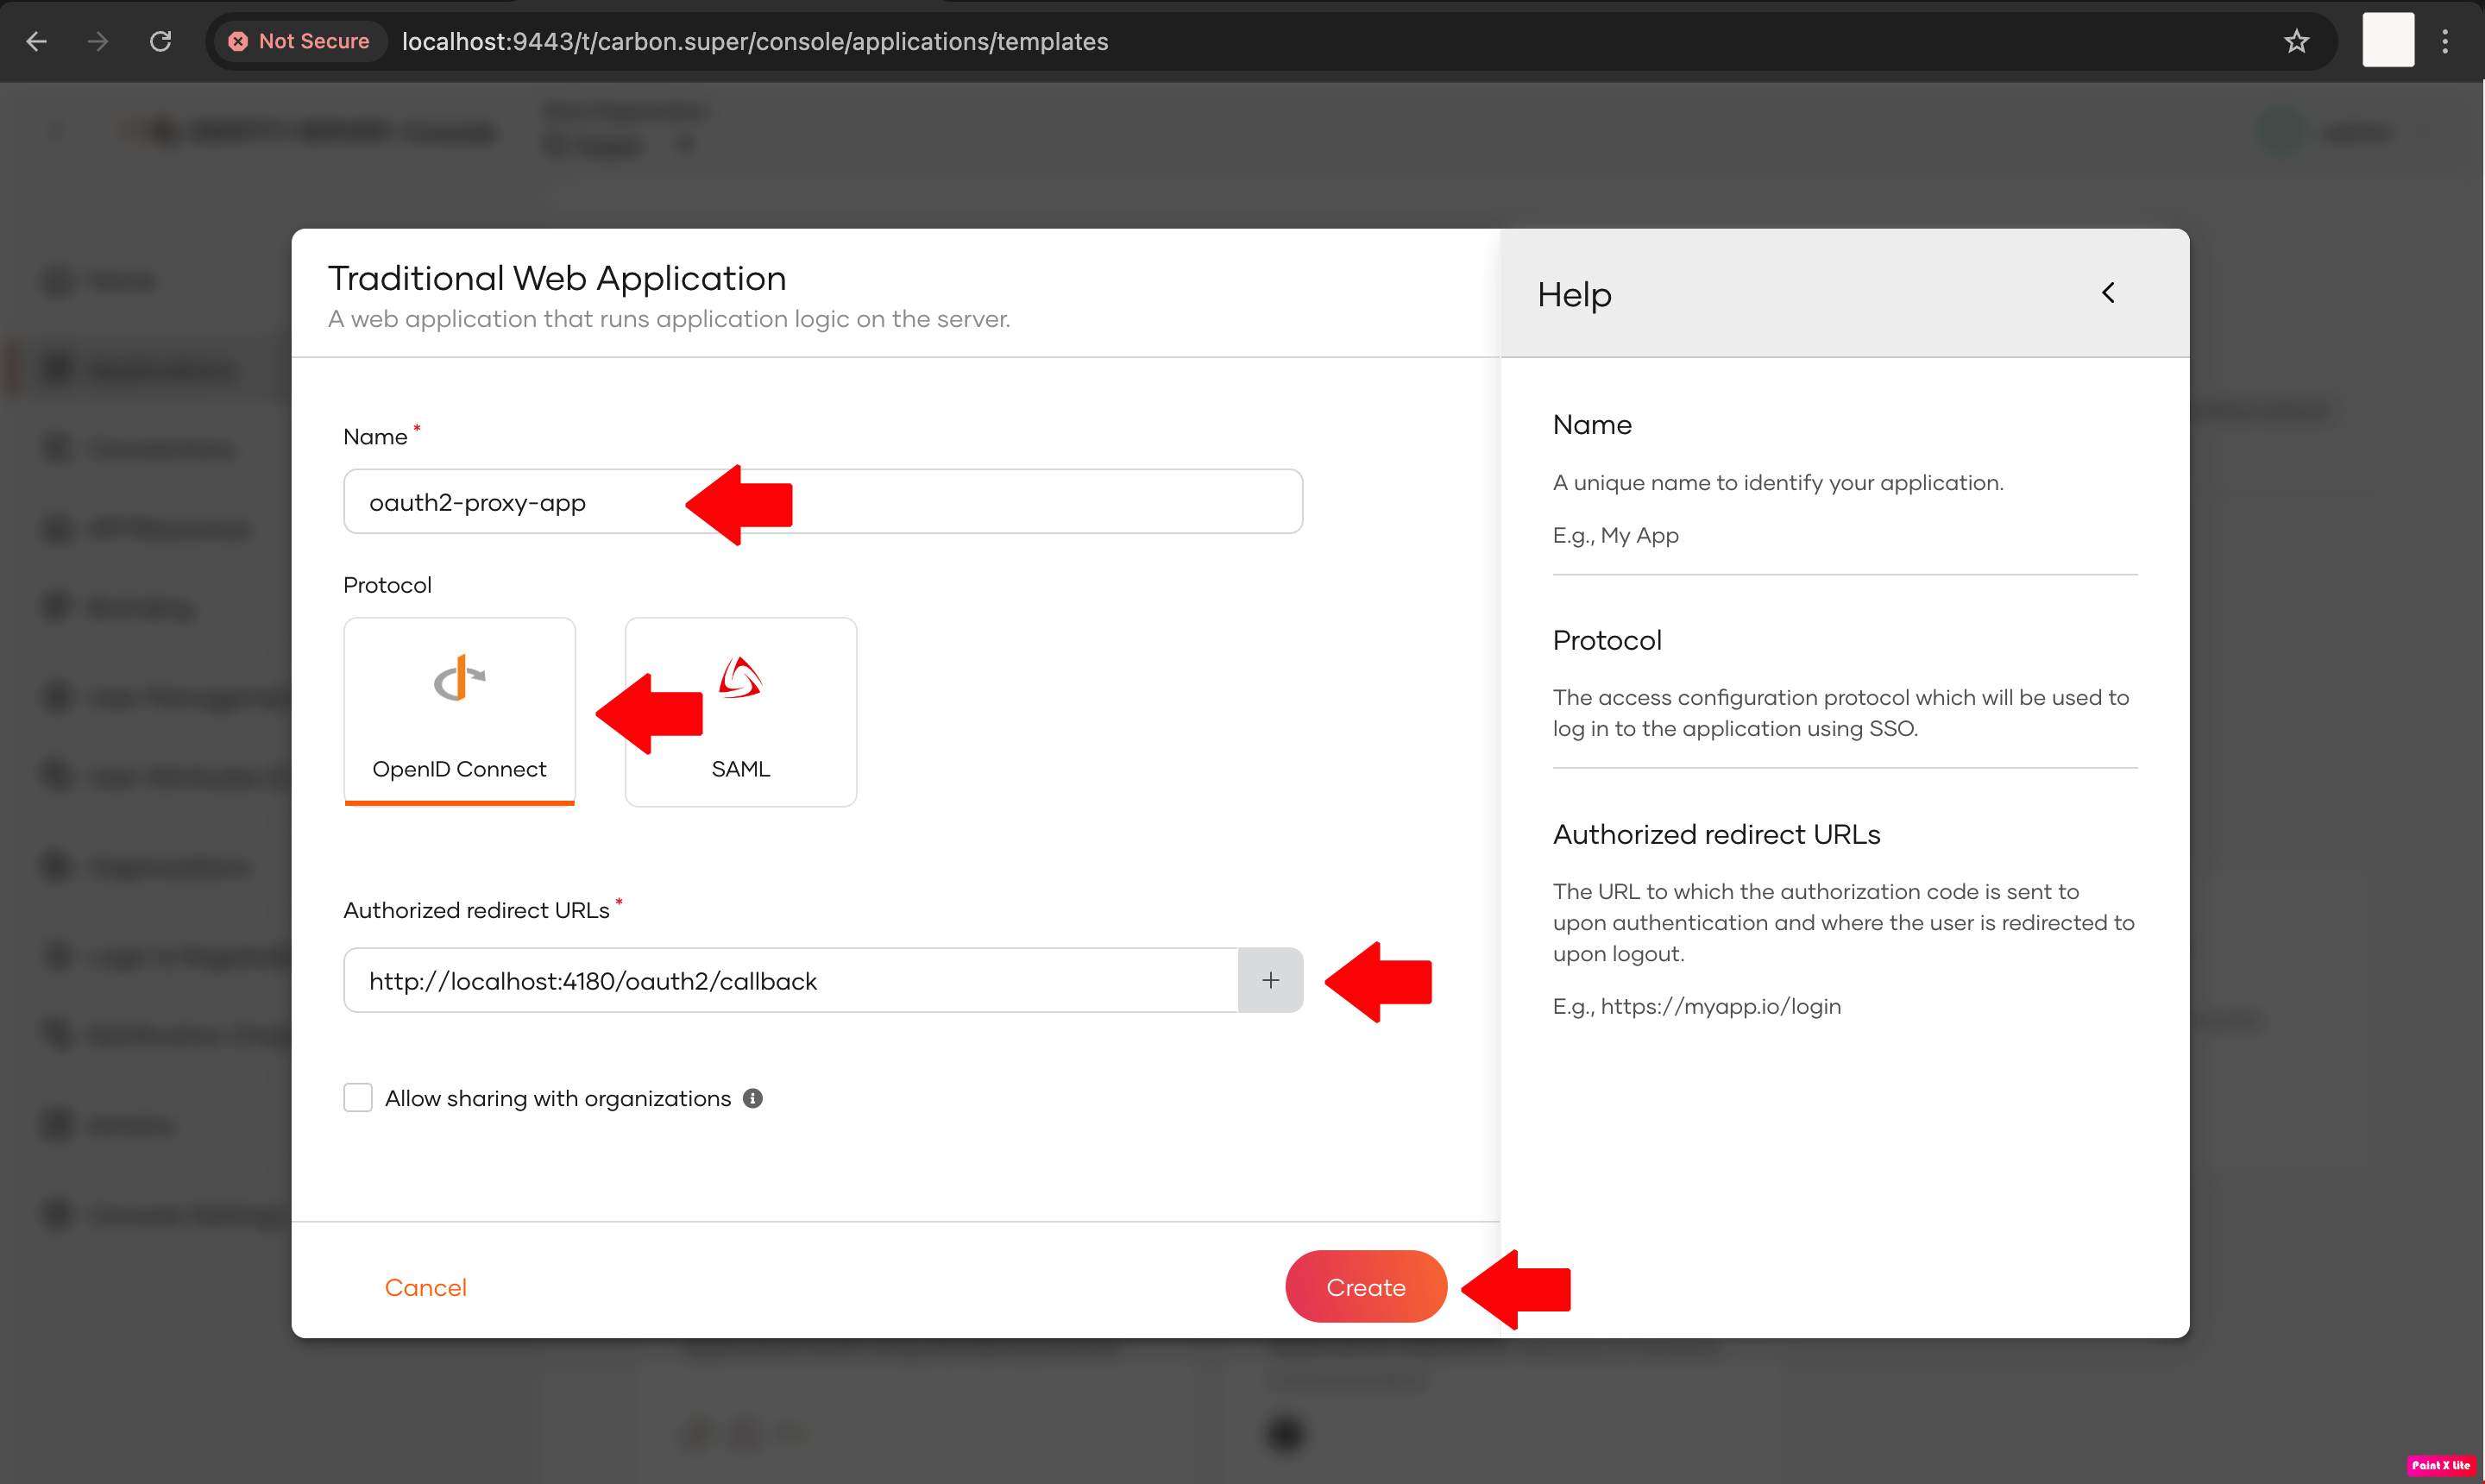
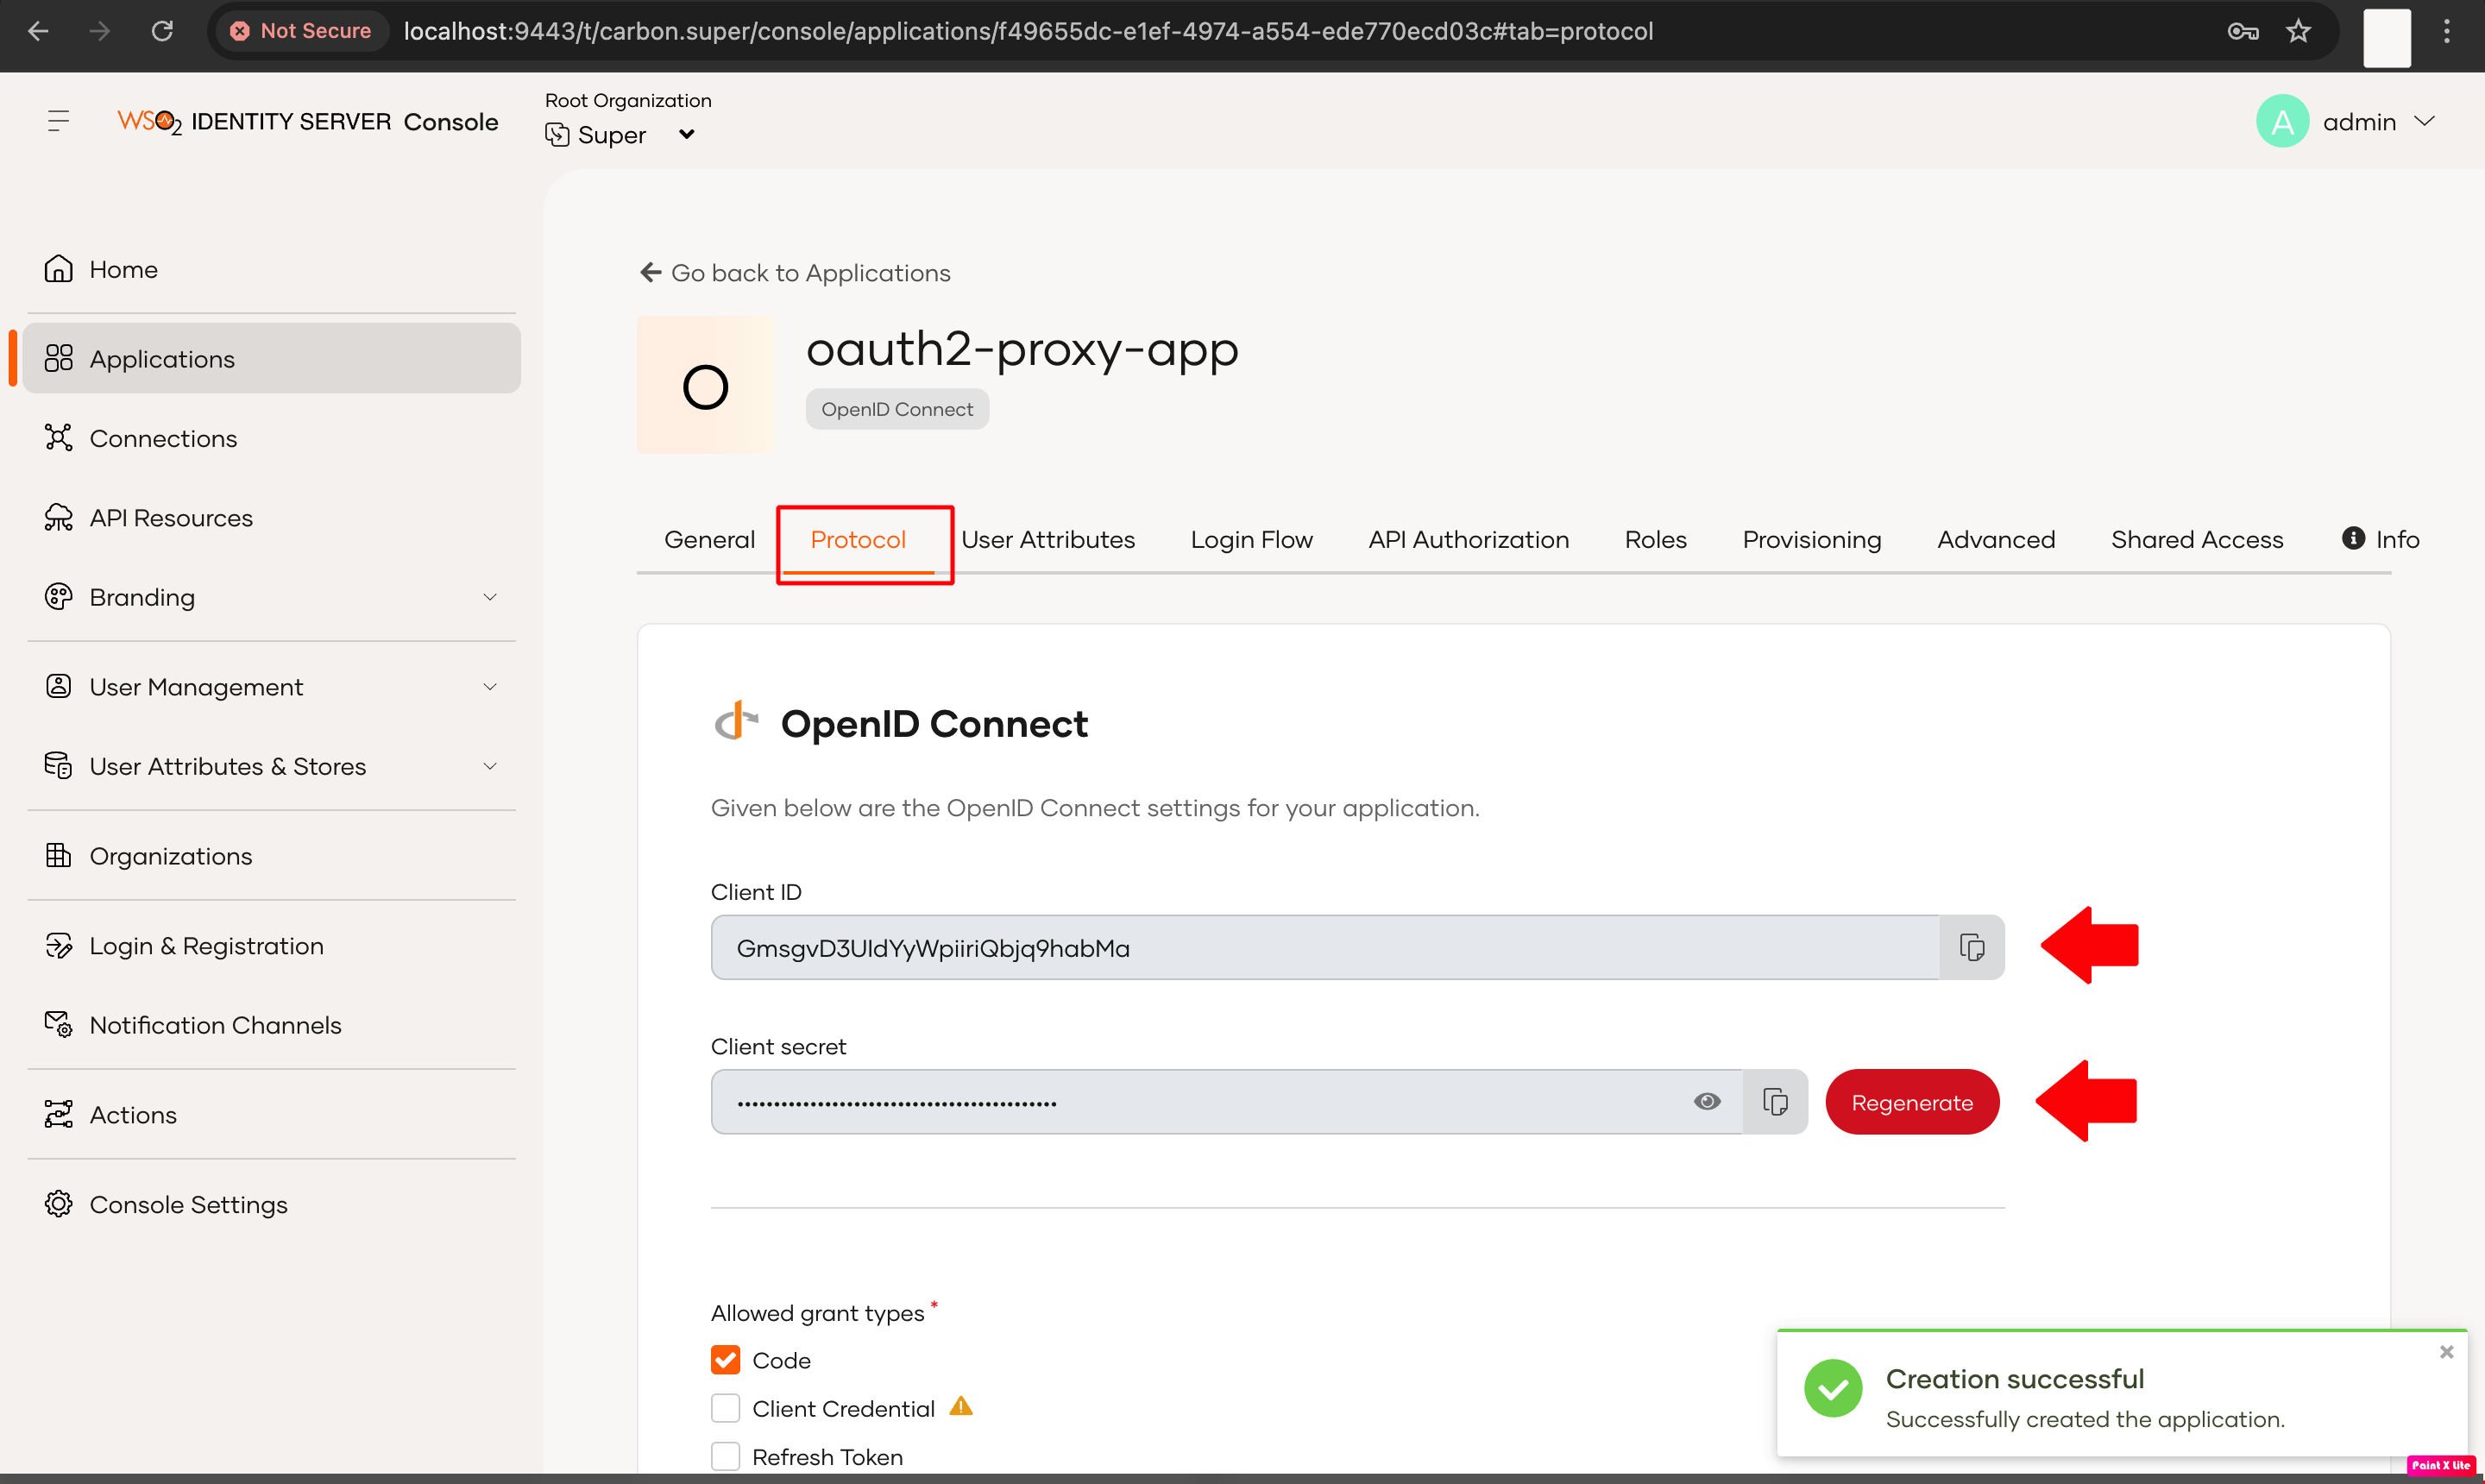
Enter the following details and click Create.
- Name - oauth2-proxy-app
- Protocol - Select OpenID Connect
- Callback URL -The URL where WSO2 Identity Server sends the authentication response after login. For example:
http://localhost:4180/oauth2/callback(or your proxy callback URL)
-
Take note of the Client ID and Client Secret generated for your application.
Step 3: (Optional) Set up sample application
If you have your own application, you can skip this step. If you want to use the sample Java application, follow the steps below to set it up.
-
Download the sample application.
-
Use the following command to run the application.
-
Go to
http://localhost:8080and verify that the application works.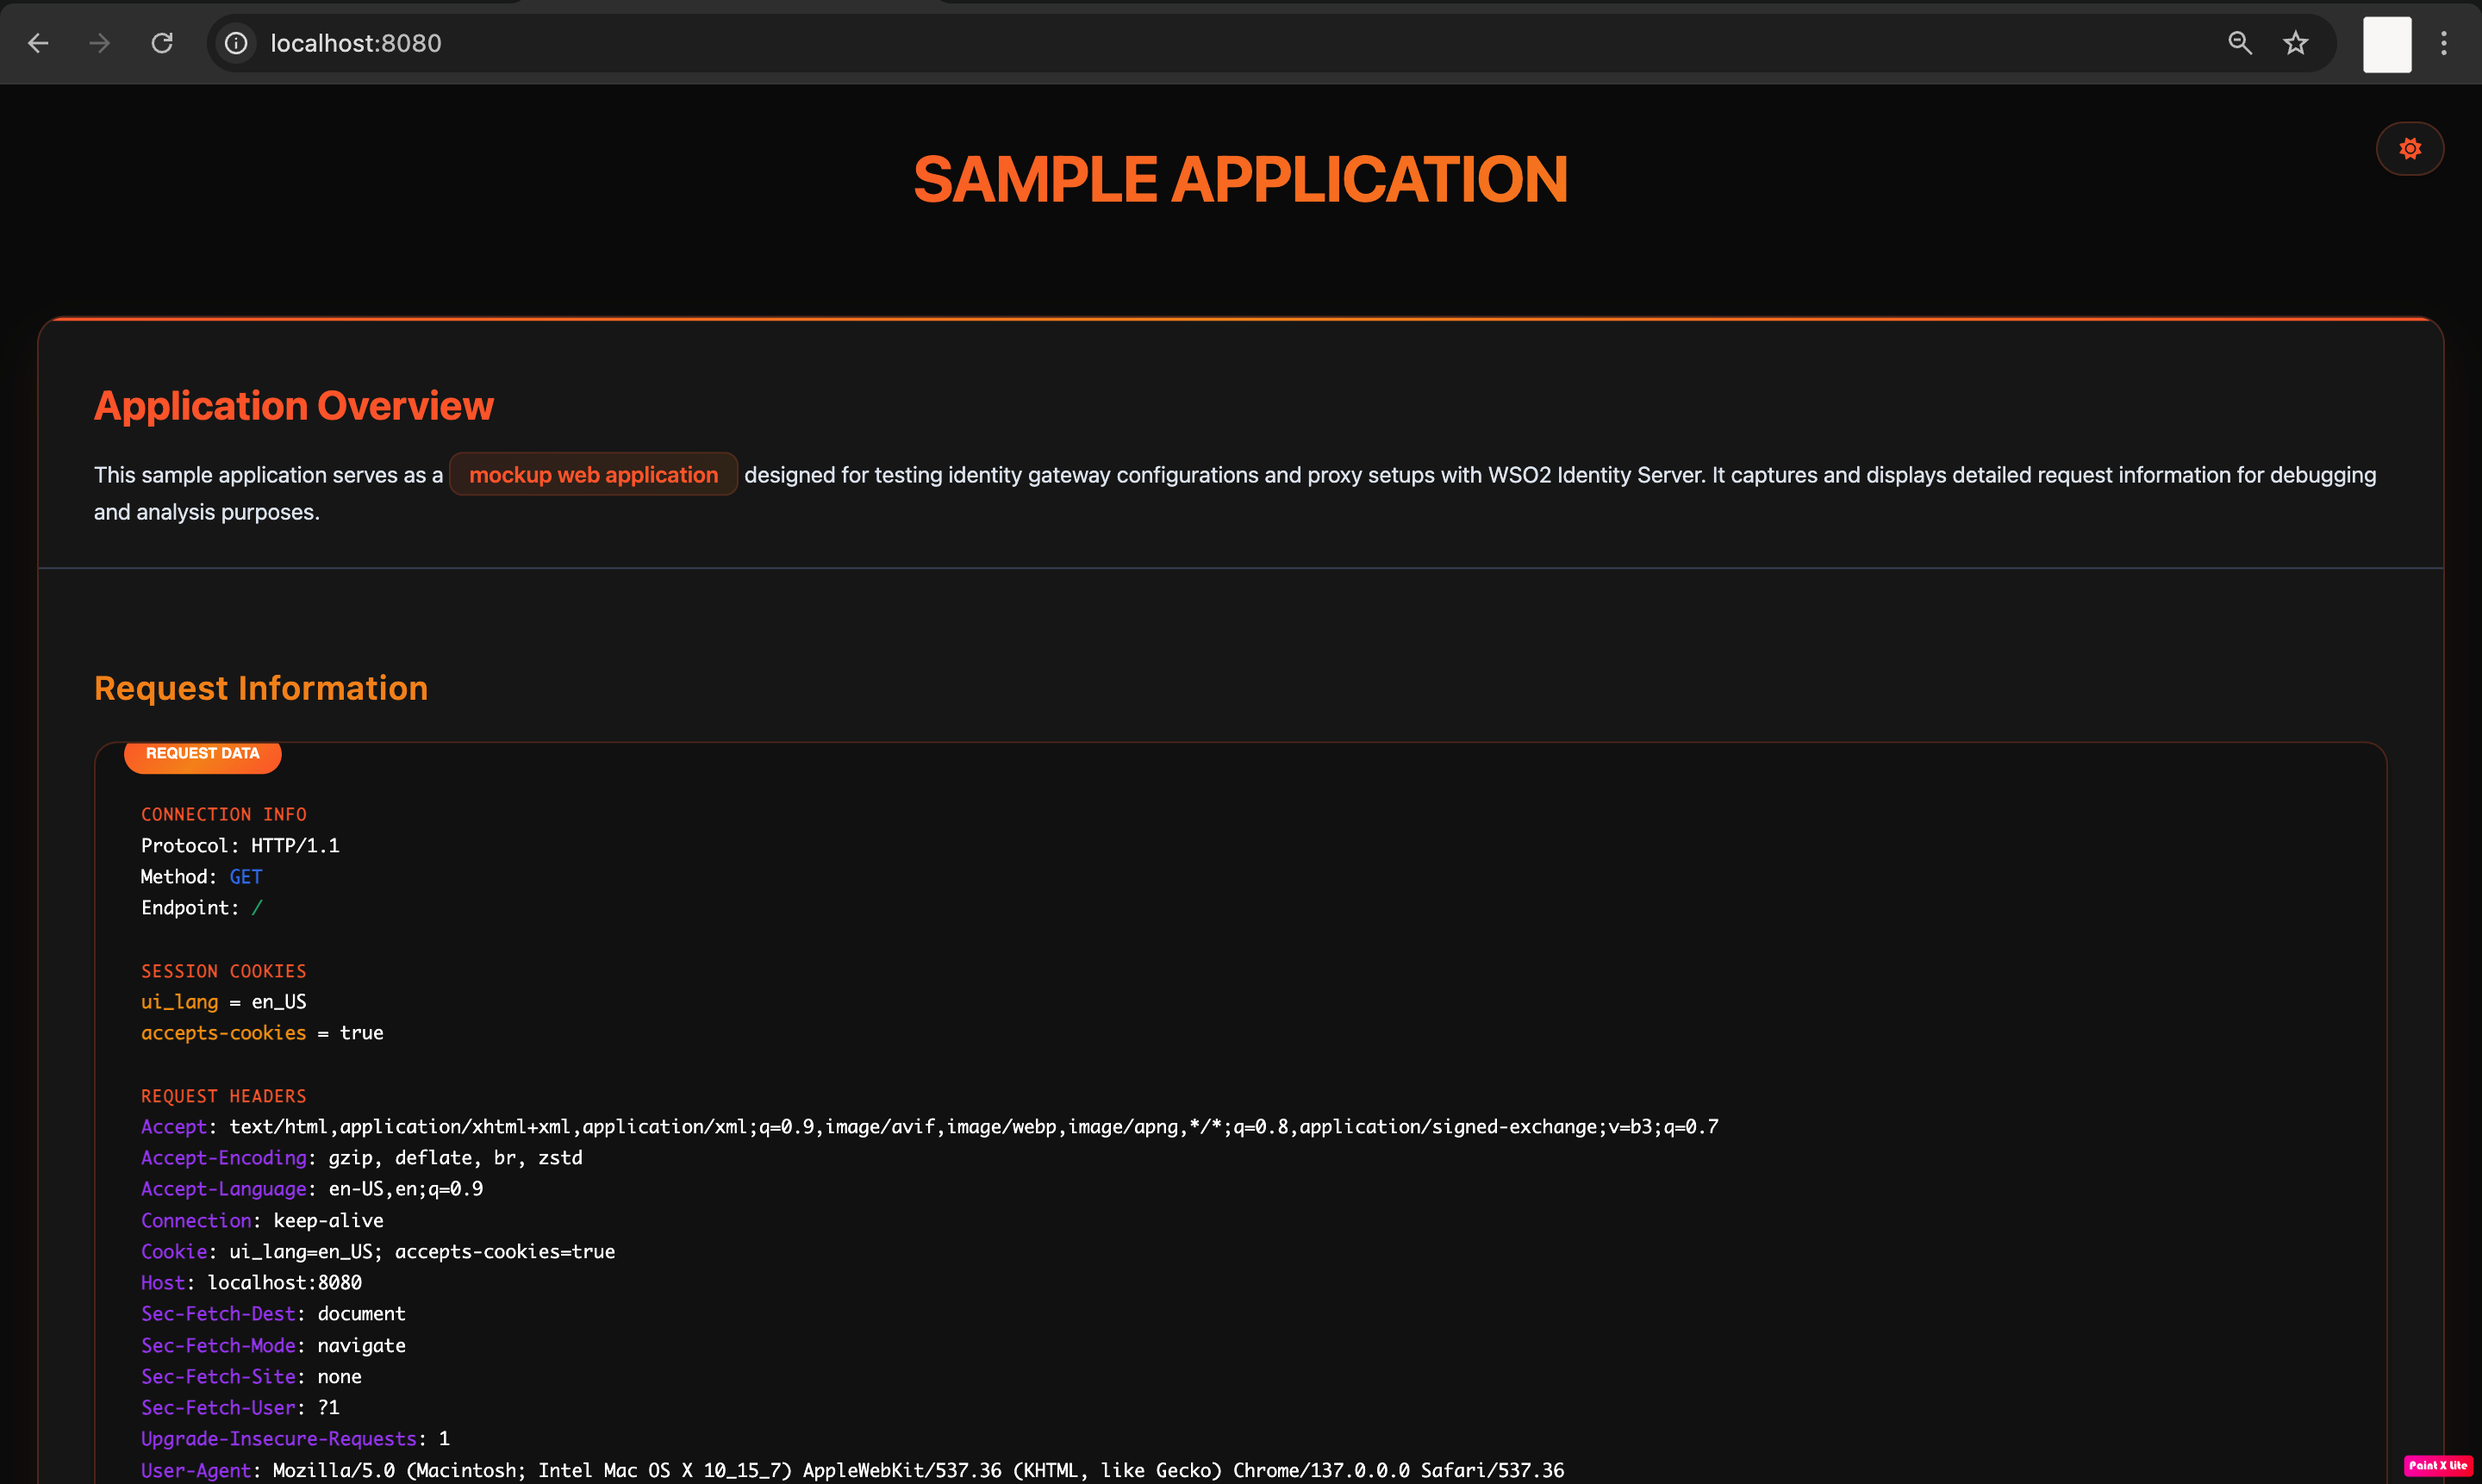
Step 4: Install and configure OAuth2 Proxy
Follow the steps below to set up OAuth2 Proxy with WSO2 Identity Server.
-
Install OAuth2 Proxy with Go by using the following command.
Tip
Refer to the OAuth2 Proxy installation guide for more information.
-
Create a configuration file named
oauth2-proxy.cfgand include the following properties.provider = "oidc" oidc_issuer_url = "https://localhost:9443/oauth2/token" oidc_jwks_url = "https://localhost:9443/oauth2/jwks" redirect_url = "http://localhost:4180/oauth2/callback" client_id = "<your_client_id>" client_secret = "<your_client_secret>" email_domains = ["*"] scope = "openid email profile" set_xauthrequest = true skip_auth_preflight = false http_address = "127.0.0.1:4180" upstreams = ["http://localhost:8080"] pass_access_token = true pass_user_headers = true set_authorization_header = true code_challenge_method = "S256" user_id_claim = "username" cookie_secure = false cookie_samesite = "lax" cookie_csrf_per_request = false cookie_secret = "<your_32_byte_base64_secret>"-
This sample configuration file assumes that the following services run on the specified ports. If your setup differs, adjust the configuration accordingly.
- WSO2 Identity Server:
https://localhost:9443 - OAuth2 Proxy:
http://localhost:4180 - Back-end Service (API or Web Application):
http://localhost:8080
- WSO2 Identity Server:
-
Replace
<your_client_id>,<your_client_secret>with the client ID and the client secret you received earlier when registering the application in WSO2 Identity Server. -
Generate a cookie secret and add it as
<your_32_byte_base64_secret>.
Tip
Learn more about generating cookie secrets and other configurations from the OAuth2 Proxy documentation.
-
-
Use one of the following methods to run OAuth2 Proxy.
Try it out
Now that you’ve set up WSO2 Identity Server, the sample application (or your own), and OAuth2 Proxy, follow the steps below to test them in action.
-
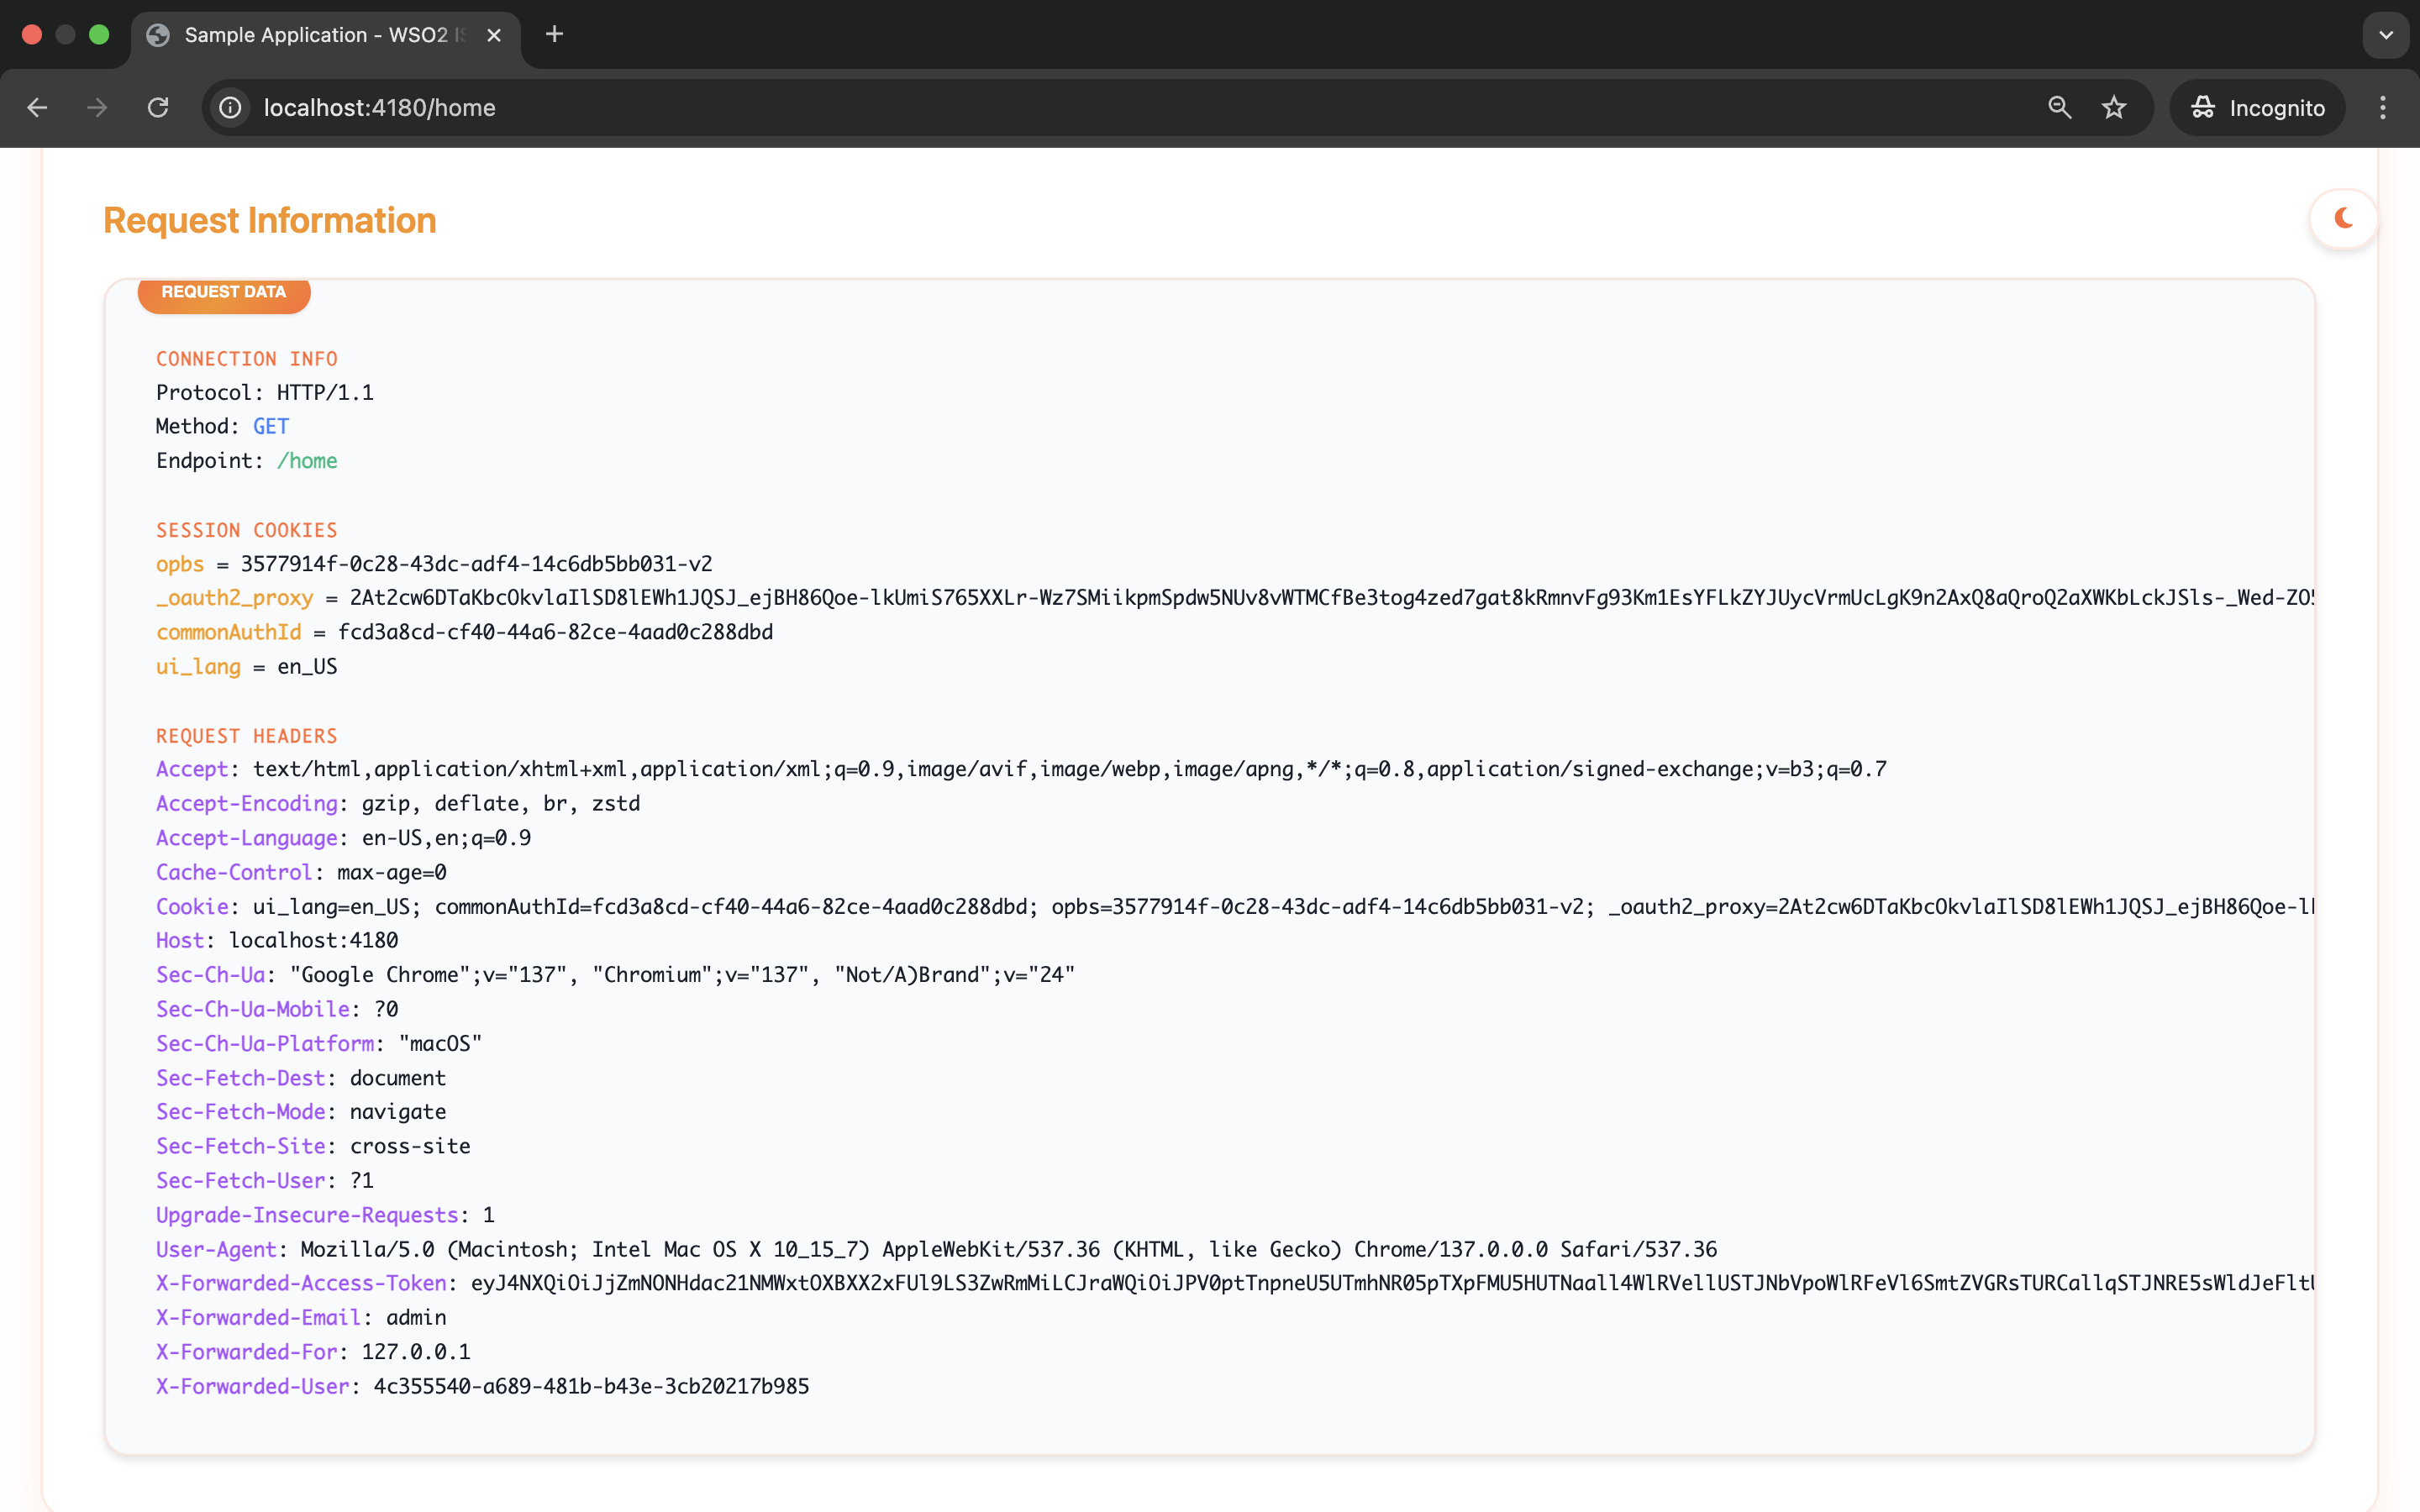
Log in to your app through OAuth2 Proxy by visiting
http://localhost:4180/home. You will be redirected to the login page of WSO2 Identity Server. -
Log in with an existing user.
-
After successfully logging in, OAuth2 Proxy forwards identity headers (for example X-Forwarded-User, X-Forwarded-Email) to your application.
Advanced configurations
You can enhance the integration between WSO2 Identity Server and OAuth2 Proxy with the following advanced options.
Integrate a Redis server for storing sessions
By default, OAuth2 Proxy keeps sessions in encrypted cookies. While this works for single-instance deployments, using Redis as a central session store offers better performance and consistency across multiple instances.
If you have a Redis server, add the following to your oauth2-proxy.cfg configuration file to connect it.
Encrypt connections with TLS
To encrypt communication between clients and OAuth2 Proxy, you can enable TLS. To do so, add the following to your oauth2-proxy.cfg configuration file:
http_address = "0.0.0.0:443"
cookie_secure = true
tls_cert_file = "/path/to/cert.pem"
tls_key_file = "/path/to/cert.key"
tls_min_version = "TLS1.3"  # Optional, for stronger security
Generate a self-signed TLS certificate
To create a self-signed TLS certificate for development purposes, run the following command. For production environments, always use a certificate issued by a trusted Certificate Authority (CA), such as Let’s Encrypt.
Learn more
Refer to the following documentation to learn more about these options.
Now that you’ve successfully connected WSO2 Identity Server with OAuth2 Proxy, you can leverage this integration to:
-
Add authentication to applications that lack native OIDC support.
-
Replace custom or insecure authentication methods.
-
Centralize and simplify authentication logic.
This setup secures dashboards, microservices, and legacy apps, improving stack security, scalability, and maintainability.