Custom authentication
Custom authentication allows you to extend the authentication functionality of WSO2 Identity Server by implementing a custom authentication service. This provides greater flexibility in handling diverse authentication requirements beyond the built-in authenticators.
Types of authenticators
In WSO2 Identity Server, authenticators identify and verify users. You can use different types for specific authentication needs:
-
Identification Authenticators:
These authenticators identify the user. Successful execution of this authenticator means the system manages the user either within WSO2 Identity Server as an internal user or by the external system as a federated user.
- Internal User Identification Authenticators: Authenticate users against the internal user stores (e.g., basic authentication with username and password).
- External (Federated) User Identification Authenticators: Delegate authentication to external systems like social login providers (e.g., Google, Facebook).
-
Verification Authenticators:
These authenticators provide extra security by verifying the authenticated identity. They often use multi-factor authentication (MFA) to confirm the user’s identity (for example 2FA with a one-time password).
WSO2 Identity Server includes built-in (system-defined) authenticators for both Identification and Verification types. Custom authenticators (user-defined) let you address specific requirements not met by system-defined authenticators. You can write custom authenticators for both Identification and Verification types.
How custom authentication service extension works
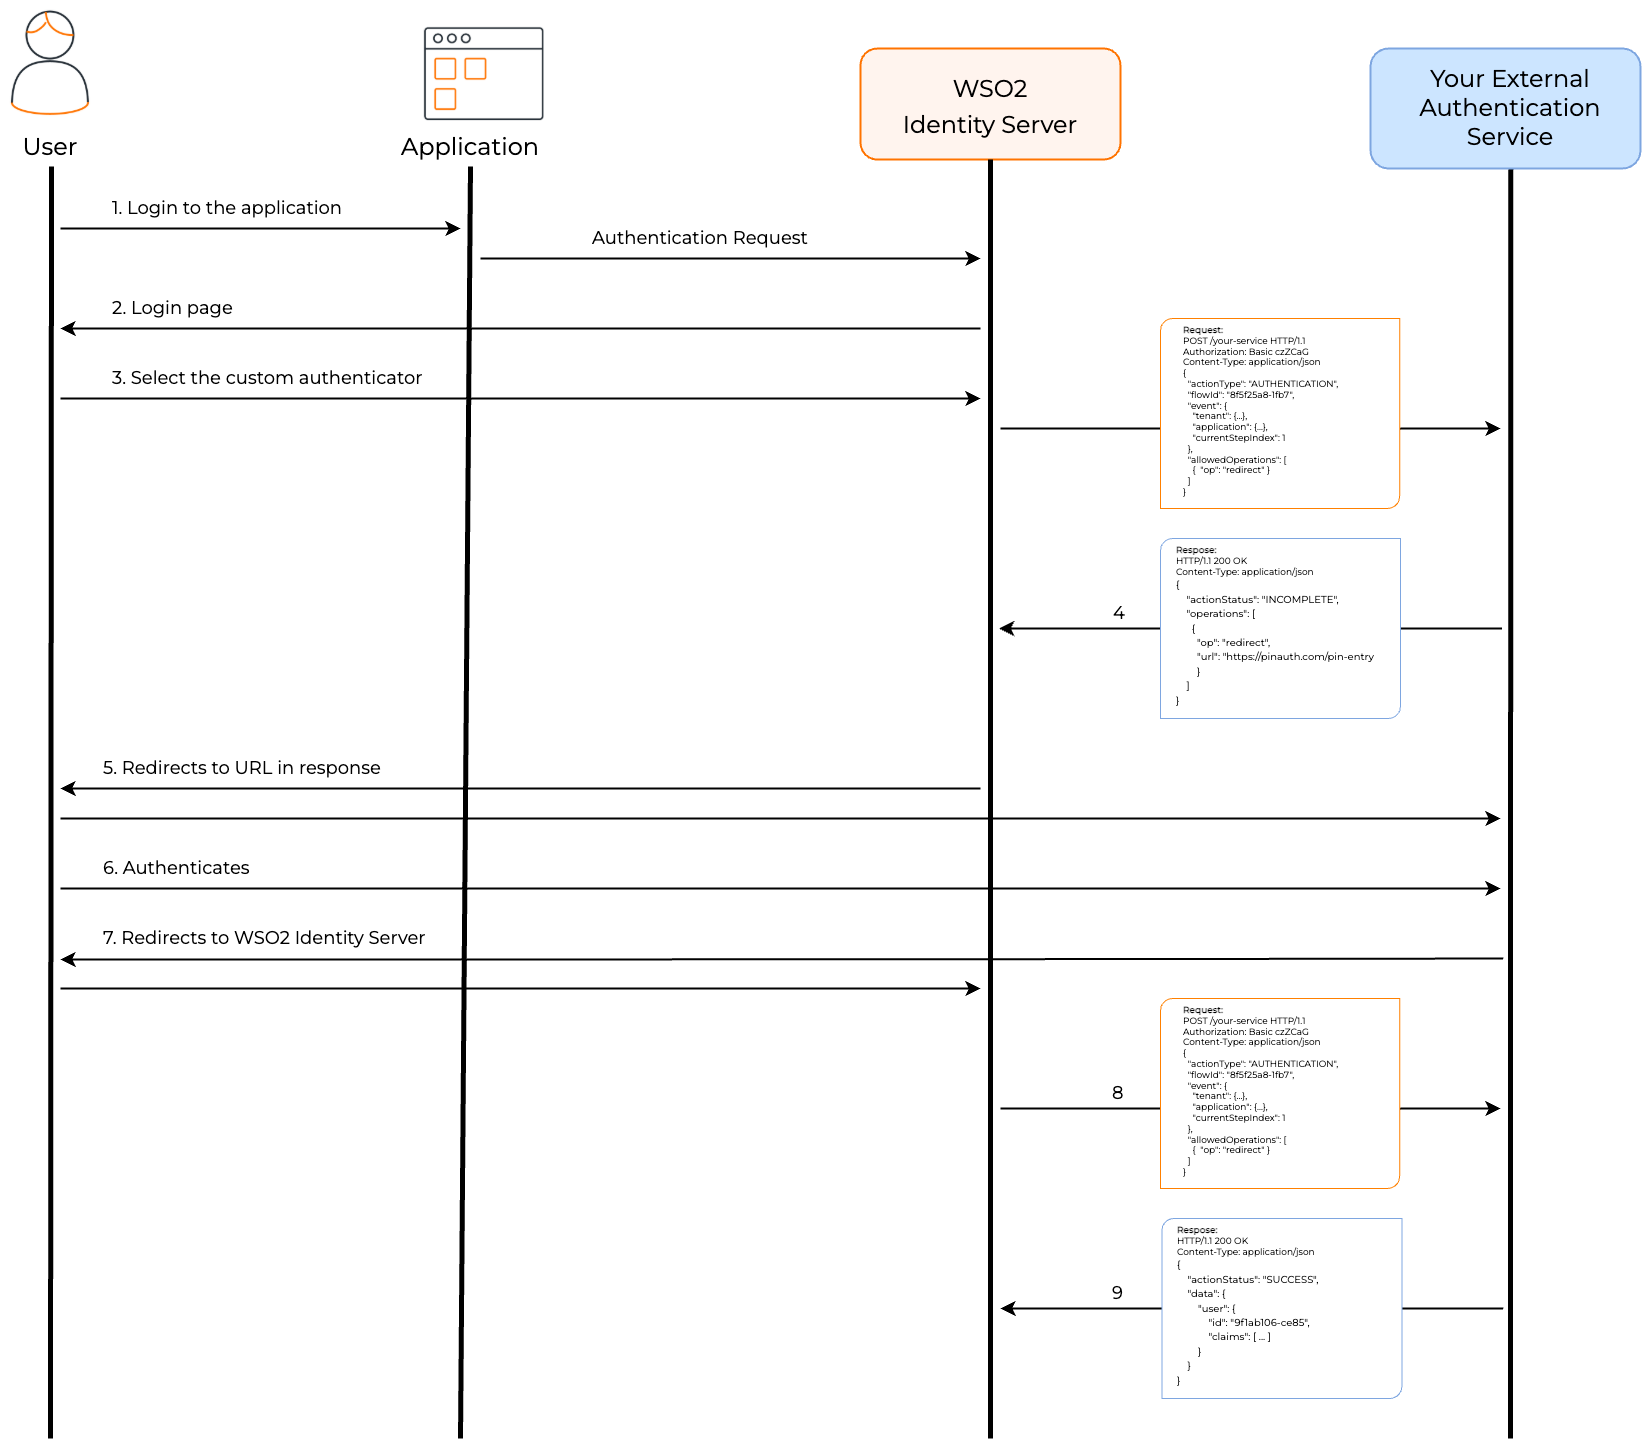
When you configure and add a custom authenticator to an application's login flow, the following execution sequence occurs:
- When a user attempts to log in to an application, the application sends a login request to WSO2 Identity Server.
- If the user isn't already authenticated, WSO2 Identity Server presents the login page with the available authentication options configured for that application.
At the relevant login step, if the user selects a custom authenticator, WSO2 Identity Server invokes the corresponding authentication service endpoint. This request includes the
flowId, a unique identifier used to track the authentication flow. - The custom authentication service processes the request and either:
- Authenticates the user directly and returns the response to WSO2 Identity Server.
- If required inputs (for example user identifier, PIN) are missing, redirect the user to a designated URL where they can provide the necessary information. This URL is part of your custom authenticator's implementation.
- When your service requests a redirect, WSO2 Identity Server forwards the user to the provided URL.
- The user directly interacts with the custom authentication service and authenticates.
- Once authenticated, the external service redirects the user back to WSO2 Identity Server, including the assigned
flowIdin the request. - WSO2 Identity Server calls the custom authentication service endpoint again, with the
flowId, to verify authentication completion. - The custom authentication service responds with the final authentication outcome, indicating whether authentication was successful or failed.
The following diagram illustrates the detailed authentication flow.
The custom authentication API contract defines the request and response structures that your service must follow.
The request and response structure between WSO2 Identity Server and the external service varies based on the authenticator's invocation step and authentication type (for example external, internal, 2FA).
Tip
Utilize the sample custom authentication service to experiment with custom authentication, understand its workflow, and familiarize yourself with the required request-response format for seamless implementation.
Configuring a custom authenticator
This guide provides a step-by-step approach to configure a custom authenticator in WSO2 Identity Server to integrate your use case with unique authentication logic.
Prerequisites
Ensure that you have:
- Access to the WSO2 Identity Server console.
- Ability to create a web service or endpoint accessible to WSO2 Identity Server.
Set up the external service
Your external web service should do the following to integrate as a custom authenticator.
Tip
Use the sample custom authentication service to experiment with custom authentication, understand its workflow, and familiarize yourself with the required request-response format for seamless implementation.
-
Expose an endpoint that accepts HTTP POST requests with JSON payloads. This endpoint should be deployed in a server accessible to WSO2 Identity Server.
-
To ensure successful integration, your external web service needs to adhere to the REST API contract, including correctly handling requests and responses. Refer to How custom authentication service extension works for an explanation of the invocation flow and Custom authentication API deep dive for detailed API contract information.
-
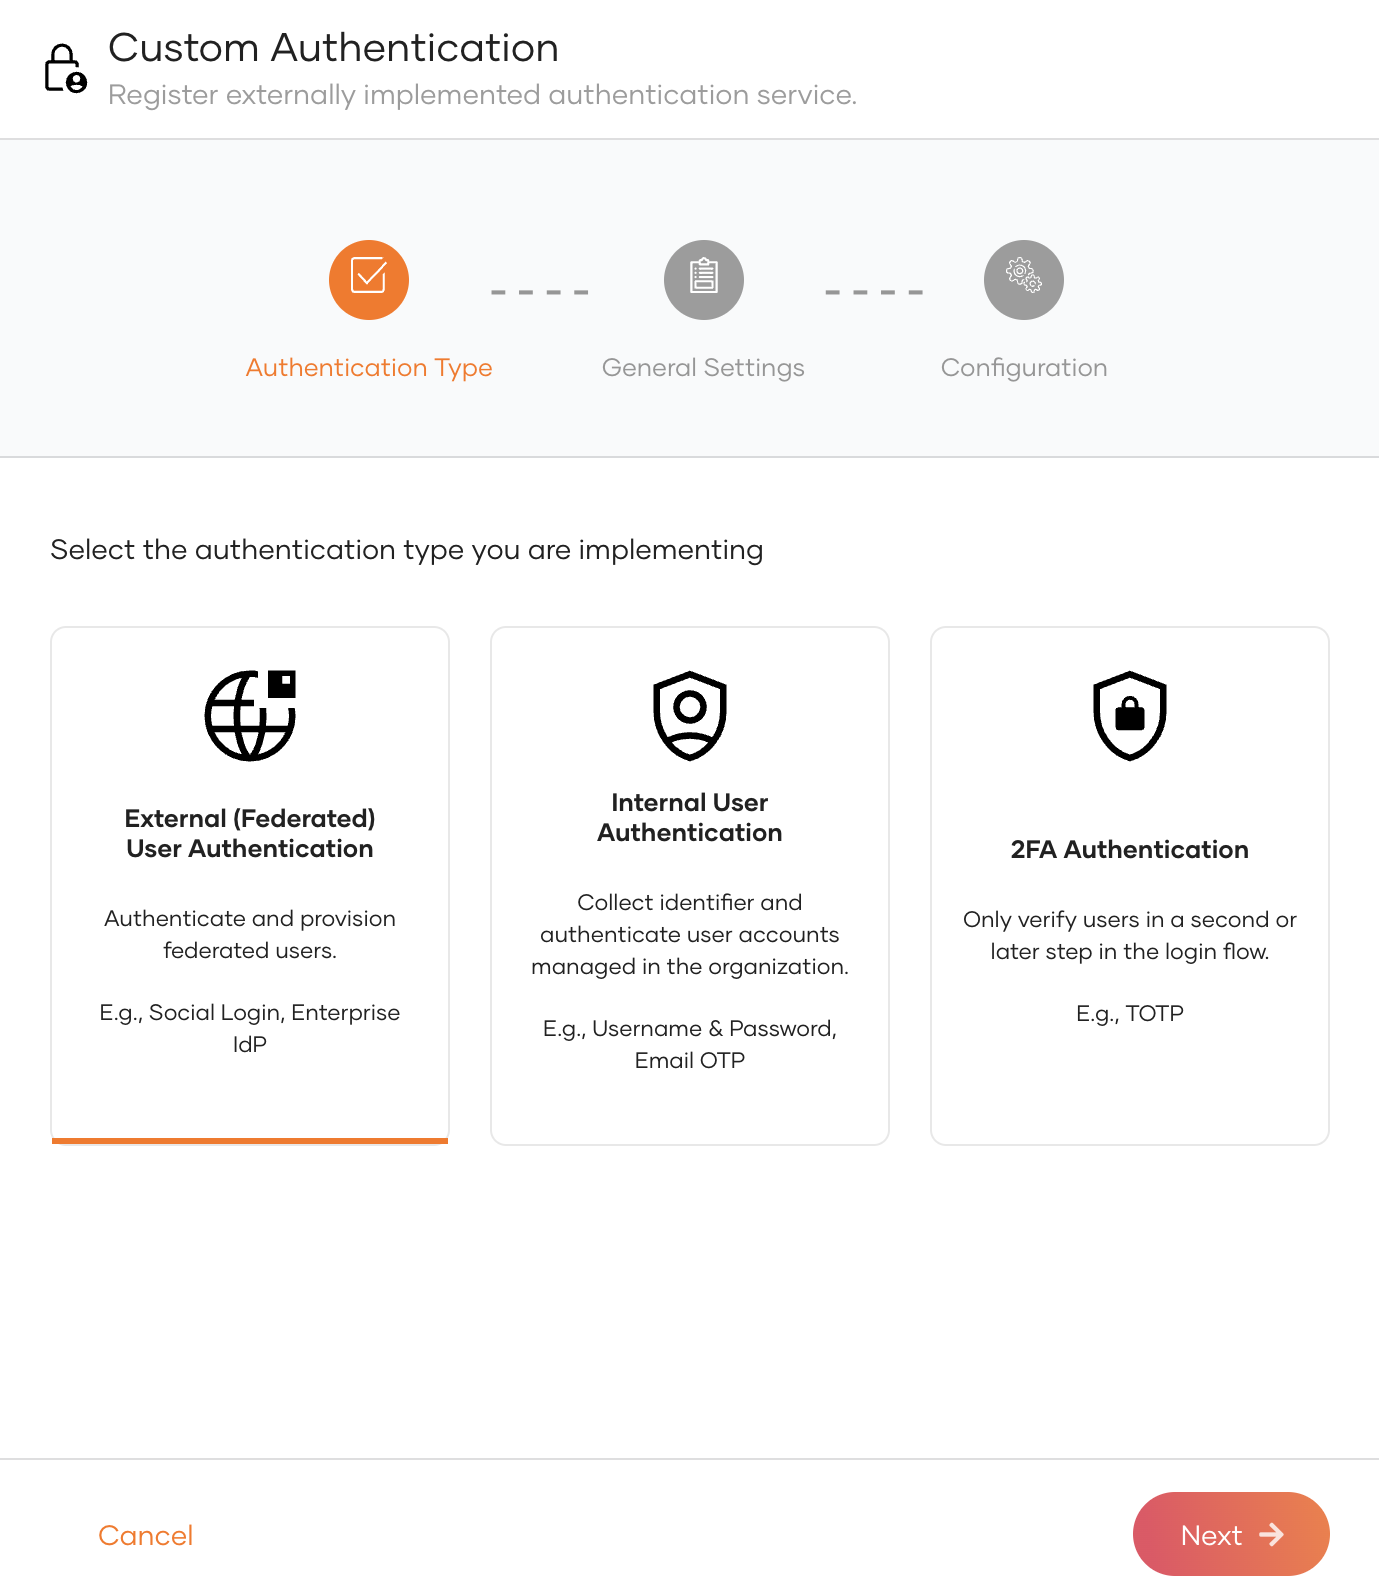
Choose an authenticator type for your service:
- External (Federated) User Authentication: Authenticate and provision federated users.
- Internal User Authentication: Authenticate user accounts stored within the organization’s connected user stores.
- 2FA Authentication: Provide an extra verification step during authentication flow.
For more details, refer to Types of authenticators.
-
Use one of the following methods to secure the communication between your external service and WSO2 Identity Server:
- Basic Authentication: Use HTTP Basic authentication to secure the endpoint.
- OAuth 2.0 Bearer Tokens: Use OAuth 2.0 for token-based authentication.
- API Key Header: Secure the endpoint using an API key sent in the request header.
Tip
During the development phase, you may choose to invoke your external service without security for testing purposes. Always secure your service before deploying it in a production environment.
Configure the custom authenticator in WSO2 Identity Server
Follow the steps below to configure a custom authenticator.
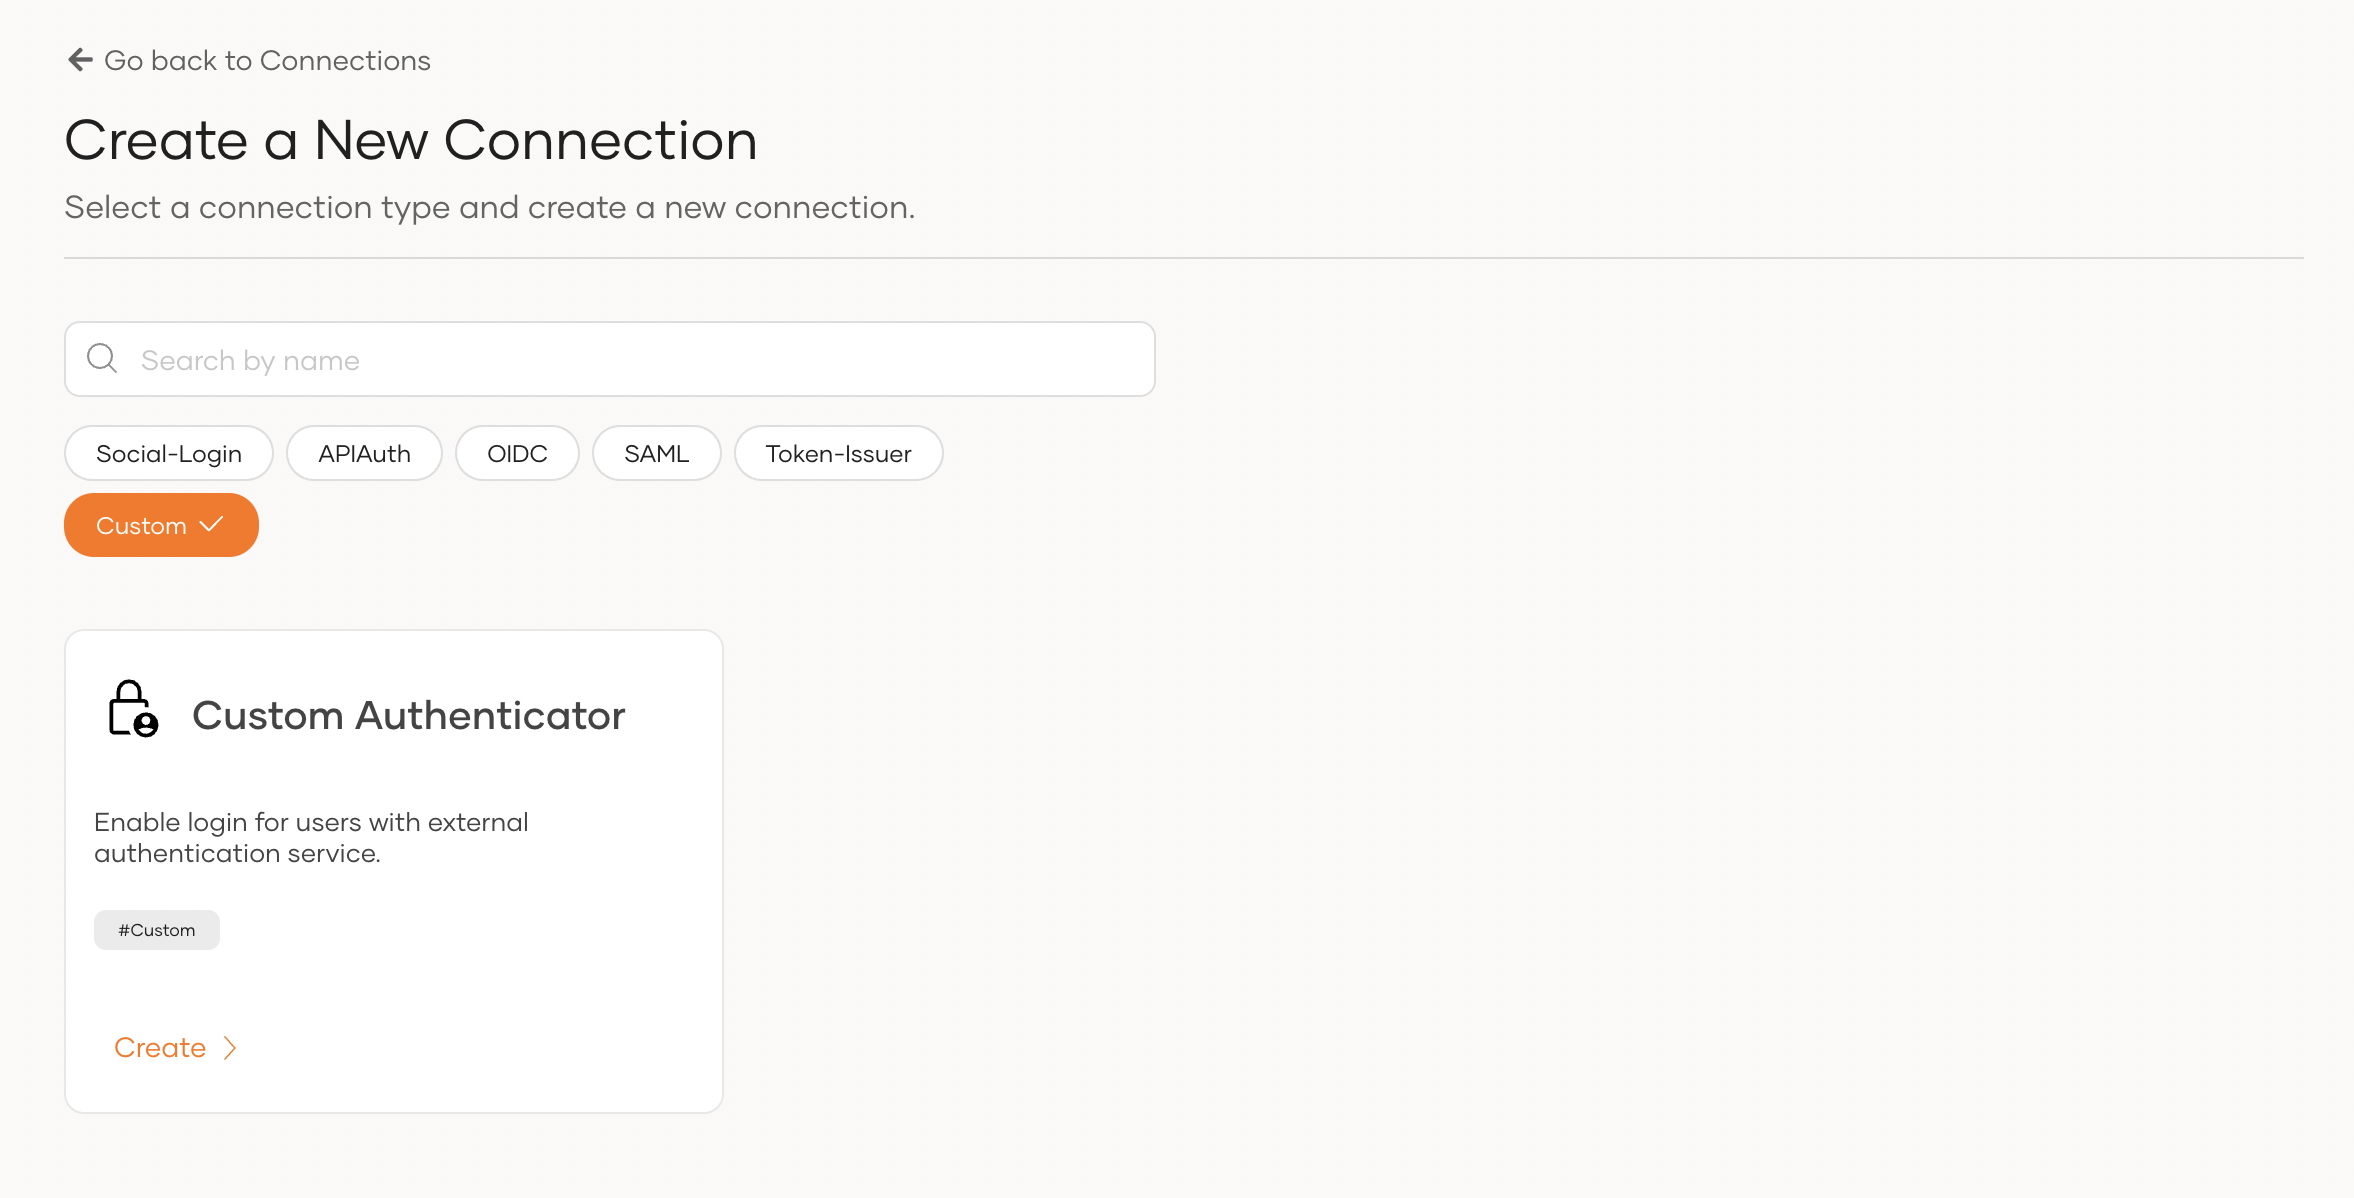
- On the WSO2 Identity Server Console, navigate to Connections.
-
Click on New Connection button, select Custom Authenticator and click Create.
-
In the setup wizard, choose the appropriate authentication type and click Next. Refer to Types of authenticators for further clarification.
-
Under General Settings, specify an identifier for your authenticator and a display name that appears on login pages.
-
In the Configuration section, fill in the following details and click Finish:
- Endpoint: Provide the URL of the web service endpoint you created.
-
Authentication: Choose the authentication method required to invoke your endpoint and configure its properties accordingly.
Note
Once added, these authentication secret values will not be displayed again. You will only be able to reset them.
- Basic - Provide a username and password.
- Bearer - Provide a bearer token.
-
API Key - Provide the header name and the value.
-
No Authentication - No authentication (recommended only for testing purposes).
-
If you select External (Federated) User Authentication, configure JIT-User Provisioning according to your requirements. Additionally, review and set up role assignments for user groups to ensure seamless integration.
Note
If you want to send extra HTTP request headers or extra parameters to your external service, you can add them in Allowed headers and Allowed parameters under the Settings tab in custom authenticator configuration.
Add the custom authenticator to an application login flow
Follow the steps below to integrate the custom authenticator into your application's login flow:
-
Open the WSO2 Identity Server Console and navigate to Applications.
-
Select the application you want to enable authentication using the custom authenticator.
-
Go to the Login Flow tab of the application.
-
Click Add Sign-In Option in the step where you want to add the authenticator.

-
Select the authenticator you configured and click Add to engage the authenticator in the flow.
Note
You can include External and Internal User Authentication type authenticators at any stage of the login flow. In contrast, 2FA Authentication type authenticators are only allowed from the second step onwards.
-
Click Update to save your changes.
Test your custom authenticator
Follow the steps below to try out the created custom authenticator.
-
Start an authentication request from the application where you've configured your custom authenticator. This will trigger the login flow in WSO2 Identity Server.
-
Observe the WSO2 Identity Server login page. Your custom authenticator should now appear as an available option for the user to select.
-
Select your custom authenticator. Check your external authentication service for the incoming request from WSO2 Identity Server. This request will be in JSON format.
-
Examine the captured JSON request payload. Verify that it matches the expected structure and includes necessary parameters like
actionType,flowId, and theeventobject. The specific payload format will vary depending on the step where WSO2 Identity Server invokes the authenticator. Refer to the Request from WSO2 Identity Server section for detailed information on request payload semantics and examples. -
For initial testing, consider having your external service return a simple, predefined response (for example a
SUCCESSresponse). This allows you to verify that WSO2 Identity Server receives and processes the response correctly. -
Once you've verified basic connectivity and response handling, test with a variety of responses:
INCOMPLETE: To ensure WSO2 Identity Server correctly redirects the user for further input.SUCCESS: With user data and claims to ensure proper user provisioning and session creation in WSO2 Identity Server.FAILED: With differentfailureReasonandfailureDescriptionvalues to see how WSO2 Identity Server handles and displays error messages.ERROR: To test WSO2 Identity Server's behavior when your service encounters server-side errors.
-
After your service responds, check how WSO2 Identity Server handles that response. Verify that:
- The authentication flow proceeds as expected based on the response.
- Users are correctly redirected, authenticated, or shown error messages.
- User data (claims, groups) is correctly processed in WSO2 Identity Server. Refer to Expected Response from External Service for detailed expected response semantics and examples for different response types.
Troubleshoot issues
The following are some troubleshooting steps that you may take to resolve issues.
- Ensure that your external service is up and running and that there are no connectivity issues.
- Confirm that the request and response payloads conform to the expected formats as defined by the REST API contract.
-
Use diagnostic logs to capture detailed information during the troubleshooting process. For more information refer to the troubleshooting guide here.
-
If your external service uses a self-signed certificate, ensure the certificate is imported into the WSO2 Carbon truststore. By default, WSO2 Identity Server uses the WSO2 Carbon truststore at
<IS_HOME>/repository/resources/security/client-truststore.jks.
Custom authentication API deep dive
This section delves into the specifics of the custom authentication API, providing a detailed look at the requests WSO2 Identity Server sends to your external authentication service and the responses it expects. Understanding these interactions is crucial for successfully implementing and integrating your custom authenticator.
Request from WSO2 Identity Server
The request from WSO2 Identity Server includes following in the JSON request payload:
| Property | Description |
|---|---|
| actionType | Specifies the action that WSO2 Identity Server triggers. In this case, the value is |
| flowId | A unique correlation identifier, used to track the login flow throughout all requests and responses. |
| requestId |
A unique correlation identifier that associates with the authentication request received by WSO2 Identity Server. The property appears in the request payload only when you enable product observability. |
| allowedOperations |
Allow redirection. for example |
event
| Property | Description | ||||||
|---|---|---|---|---|---|---|---|
| event.tenant | This property shows the tenant (root organization) that handles the authentication request. | ||||||
| event.user |
Contains details of the user currently authenticated in the flow. If the authenticator executes in the first step of login, this property is unavailable.
|
||||||
| event.userStore | This property indicates the user store that manages the currently authenticated user's identity or profile. |
||||||
| event.organization | This property refers to the organization to which the authenticating user is trying to log into. Organizations represent partners/enterprise customers in Business-to-Business (B2B) use cases. |
||||||
| currentStepIndex | Shows the current authentication step where the system calls the authenticator. |
||||||
| authenticatedSteps |
Lists the authenticators executed in each step up to the current step. for example |
Example requests from WSO2 Identity Server
The following examples show requests sent from WSO2 Identity Server to external services. Each example highlights a different authentication type.
Request for a custom authenticator engaged in the first step:
POST authservice/api/authenticate HTTP/1.1
Authorization: Basic czZCaGRSa3F0MzpnWDFmQmF0M2JW
Content-Type: application/json
{
"actionType": "AUTHENTICATION",
"flowId": "75919d4d-026b-4b7b-87e1-3f32986f6d97",
"requestId": "20250709T163958Z-159c6956d75ltm28hC1SINpsqs00000000p00000000009s4",
"event": {
"request": {},
"tenant": {
"id": "12",
"name": "example.com"
},
"application": {
"id": "634f9b10-5fb9-49e3-96cd-43ccaa92564c",
"name": "example.app"
},
"currentStepIndex": 1
},
"allowedOperations": [
    {
      "op": "redirect"
    }
  ]
}
Request for a custom authenticator in the second or later step:
POST authservice/api/authenticate HTTP/1.1
Authorization: Basic czZCaGRSa3F0MzpnWDFmQmF0M2JW
Content-Type: application/json

{
  "actionType": "AUTHENTICATION",
  "flowId": "8f5f25a8-1fb7-4c93-9e86-2c328beac833",
  "requestId": "20250709T163958Z-159c6956d75ltm28hC1SINpsqs00000000p00000000009s4",
  "event": {
    "request": {},
    "tenant": {
      "id": "12",
      "name": "example.com"
    },
    "user": {
      "id": "afb93858-18c8-4c65-9d08-86609d4eeee3",
      "userIdentitySource": "FEDERATED",
      "sub": "[email protected]"
    },
    "userStore": {},
    "application": {
      "id": "57c3a037-571f-4597-97e8-91a3bb1042d7",
      "name": "example.app"
    },
    "currentStepIndex": 1
  },
  "allowedOperations": [
    {
      "op": "redirect"
    }
  ]
}
Expected Response from external service
When WSO2 Identity Server invokes your external authentication service, it expects a response that adheres to the defined API contract.
This response determines the authentication status and the authenticated user from your custom authenticator.
Here’s a breakdown of the expected response:
The response can have four possible states: INCOMPLETE, SUCCESS, FAILED and ERROR.
INCOMPLETE: Insufficient input to complete authentication. The service needs more input and must redirect the user to a specified endpoint for further interaction.
SUCCESS: The authentication request was successfully processed, and your service authenticated the user.
FAILED: Authentication failed due to credential validation errors or other business rules defined by the external service. The application receives an error response formatted as per the authentication protocol, including the failure message from the external service.
ERROR: A processing failure occurred due to server-side issues. The application receives a server error response generated by WSO2 Identity Server, indicating an internal system failure.
Response for INCOMPLETE state
When the external authentication service returns a 200 status code with an INCOMPLETE state, authentication doesn't complete. WSO2 Identity Server redirects the user to the endpoint specified in the response to continue the authentication process.
Http Status Code: 200
| Property | Description |
|---|---|
| actionStatus | Represents the outcome of the request. For incomplete authentication, this should be |
| operations | This operation redirects the user. Use it to send the user to another endpoint. |
Below is an example of an incomplete response at custom authentication.
HTTP/1.1 200 OK
Content-Type: application/json

{
    "actionStatus": "INCOMPLETE",
    "operations": [
      {
        "op": "redirect",
        "url": "https://pinauth.com/pin-entry
        }
    ]
}
This response prompts WSO2 Identity Server to redirect the user to the specified url, allowing them to complete the authentication process with the external service.
Response for SUCCESS state
When the external service responds with a 200 status code and a SUCCESS state, it means the service successfully processed the request and authenticated the user.
The expected response format varies based on the authentication type implemented by the external service.
Http Status Code: 200
| Property | Description |
|---|---|
| actionStatus | Represents the outcome of the request. For successful authentication of any type, this property applies. The value should be |
| data.user | Required if the authentication type is External (Federated) User Authentication or Internal User Authentication, which function as identification authenticators. The validation process differs based on the type. For 2FA Authentication, the authentication process only verifies an already authenticated user and doesn't use this property. |
Response from an external service implementing External (Federated) User Authentication:
HTTP/1.1 200 OK
Content-Type: application/json

{
  "actionStatus": "SUCCESS",
  "data": {
    "user": {
      "id": "9f1ab106-ce85-46b1-8f41-6a071b54eb56",
      "claims": [
        {
          "uri": "http://wso2.org/claims/username",
          "value": "johnd"
        },
        {
          "uri": "http://wso2.org/claims/emailaddress",
          "value": "[email protected]"
        }
      ],
      "groups": [
        "gold-tier"
      ]
    }
  }
}
When an external identity provider (IdP) authenticates a user, it sends the user's profile information to WSO2 Identity Server as claims.
These claims can include any standard claim available in the WSO2 claim dialect: http://wso2.org/claims.
The groups attribute indicates the user groups to which the user belongs within the external IdP.
Since you handle this user as an external user, configure JIT-User Provisioning to automatically create a corresponding user account in WSO2 Identity Server. Additionally, set up role assignments for external user groups included in the response.
Response from an external service implementing Internal User Authentication:
HTTP/1.1 200 OK
Content-Type: application/json

{
  "actionStatus": "SUCCESS",
  "data": {
    "user": {
      "id": "9f1ab106-ce85-46b1-8f41-6a071b54eb56",
      "claims": [
        {
          "uri": "http://wso2.org/claims/username",
          "value": "emily"
        },
        {
          "uri": "http://wso2.org/claims/emailaddress",
          "value": "[email protected]"
        }
      ],
      "userStore": {
        "id": "UFJJTUFSWQ==",
        "name": "PRIMARY"
      }
    }
  }
}
Here, the claims represent the attributes the internal user uses to authenticate.
In this scenario, WSO2 Identity Server verifies the existence of a user with the provided id within its internal user stores. If your external service includes the http://wso2.org/claims/username claim in the response, the username value must match the username associated with the given id in the internal user store.
The claims payload can include any claim defined in the http://wso2.org/claims dialect.
Response from an external service implementing 2FA Authentication:
For 2FA authenticators, the system completes user identification in a preceding authentication step. These authenticators only verify the existing identity and report a SUCCESS or FAILED status.
Response for FAILED state
When the external service returns a 200 status code with a FAILED state, it means the authentication has failed.
The response body must be a JSON object containing the following properties:
Http Status Code: 200
| Property | Description |
|---|---|
| actionStatus | Indicates the outcome of the request. For a failed operation, set this to |
| failureReason | Provides the reason for failing to authenticate the user. The application receives this value in the error response. |
| failureDescription | Offers a detailed explanation of the failure. The application receives this value in the error response. |
Below is an example of a failed response due to invalid credentials.
Response from external service:
HTTP/1.1 200 OK
Content-Type: application/json

{
  "actionStatus": "FAILED",
  "failureReason": "auth-failed",
  "failureDescription": "Unable to find user for given credentials"
}
The application implementing OIDC receives the following error response after it initiates the login request.
Error response to the application:
HTTP/1.1 400
Content-Type: application/json

{
  "error": "auth-failed",
  "error_description": "Unable to find user for given credentials"
}
Response for ERROR state
When the external service responds with an ERROR state, it can return an HTTP status code of 400, 401, or 500, indicating either a validation failure or an issue processing the request.
Http Status Code: 400, 401 or 500
| Property | Description |
|---|---|
| actionStatus | Indicates the outcome of the request. Set this to |
| errorMessage | Describes the cause of the error.. |
| errorDescription | A detailed description of the error.. |
If the external service returns an error response (either defined or undefined) or fails to respond entirely, the system marks authentication as an error. In any of these cases, the application that initiated the login request receives an error state.
Below is an example of an error response returned by the service implementing the authenticator.
Response from external service:
HTTP/1.1 500
Content-Type: application/json

{
  "actionStatus": "ERROR",
  "errorMessage": "Server error",
  "errorDescription": "Error while processing request."
}
Note
Currently, the errorMessage or errorDescription from the external service’s ERROR response isn't directly included in the error response sent back to the application.
Custom authentication with app-native authentication
You can configure custom authentication services in app-native authentication flows, which authenticate users through API-based mechanisms instead of redirecting them to a web browser.
Note
Learn more about app-native authentication
Refer to the custom authentication-based app-native authentication flow for a detailed guidance on how to implement this.